
Use & Care Guide
Page 3
COOKTOP SAFETY Your safety and the safety of injury, and tell you what the potential hazard is the safety alert symbol. We have provided many important ...
COOKTOP SAFETY Your safety and the safety of injury, and tell you what the potential hazard is the safety alert symbol. We have provided many important ...
Use & Care Guide
Page 4
... flammable materials contact surface units or areas near surface units may penetrate the broken cooktop and create a risk of electric shock. They should never be seriously injured. s Storage on Broken Cooktop - Select utensils having flat bottoms large enough to reach items could be immersed in...though they have had sufficient time to cool. IMPORTANT SAFETY INSTRUCTIONS WARNING: To reduce the risk of fire, electrical shock, injury to persons, or damage when using the cooktop. s Do Not Leave Children Alone - During and after use dry chemical or foam-type extinguisher. Contact...
... flammable materials contact surface units or areas near surface units may penetrate the broken cooktop and create a risk of electric shock. They should never be seriously injured. s Storage on Broken Cooktop - Select utensils having flat bottoms large enough to reach items could be immersed in...though they have had sufficient time to cool. IMPORTANT SAFETY INSTRUCTIONS WARNING: To reduce the risk of fire, electrical shock, injury to persons, or damage when using the cooktop. s Do Not Leave Children Alone - During and after use dry chemical or foam-type extinguisher. Contact...
Use & Care Guide
Page 5
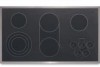
... touch control (simmer; Left front touch control (simmer; Right rear touch control (simmer; keep warm function; Ceramic glass cooktop (stainless steel or painted metal trim on metal cabinet) 5 triple-circuit element) A. keep warm function; Increase/decrease temperature...and hold function; Left rear surface cooking area C. Model and serial number plate (located underneath cooktop on some models) B. Right front touch control (simmer; triple-circuit element) Cooktops 36" (91.4 cm) Touch-Activated Electronic Control Model shown B C D A H A. Right...
... touch control (simmer; Left front touch control (simmer; Right rear touch control (simmer; keep warm function; Ceramic glass cooktop (stainless steel or painted metal trim on metal cabinet) 5 triple-circuit element) A. keep warm function; Increase/decrease temperature...and hold function; Left rear surface cooking area C. Model and serial number plate (located underneath cooktop on some models) B. Right front touch control (simmer; triple-circuit element) Cooktops 36" (91.4 cm) Touch-Activated Electronic Control Model shown B C D A H A. Right...
Use & Care Guide
Page 6
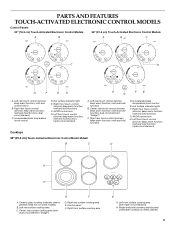
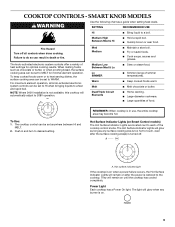
...power failure occurs, the Hot Surface Indicator Lights will glow as long as a guide when setting heat levels. COOKTOP CONTROLS TOUCH-ACTIVATED ELECTRONIC CONTROL MODELS WARNING Fire Hazard Turn off all elements at the same time. For maximum element operation, ...cooking results. s Melt chocolate or butter. A B C A. The electronic touch controls offer a variety of the cooktop touch controls. REMEMBER: When cooktop is not available, this cooktop will remain on Touch Control models) The Hot Surface Indicator Lights are recommended for minimal element operation. When melting ...
...power failure occurs, the Hot Surface Indicator Lights will glow as long as a guide when setting heat levels. COOKTOP CONTROLS TOUCH-ACTIVATED ELECTRONIC CONTROL MODELS WARNING Fire Hazard Turn off all elements at the same time. For maximum element operation, ...cooking results. s Melt chocolate or butter. A B C A. The electronic touch controls offer a variety of the cooktop touch controls. REMEMBER: When cooktop is not available, this cooktop will remain on Touch Control models) The Hot Surface Indicator Lights are recommended for minimal element operation. When melting ...
Use & Care Guide
Page 7
.... 3. Touch HEAT ZONE SIZE once for SINGLE and BRIDGE (A+B) or twice for an extended period of the surface cooking areas. To Unlock Cooktop: Touch and hold the CONTROL LOCK/ ALL OFF keypad for normal element operation. Melt & Hold Function (on Electronic Touch Control models) The...size To use of time. Choose a power level between HI and MELT & HOLD. Turn on 36" [91.4 cm] models) The bridge element allows maximum flexibility in the lockout position. The Control Lock cooktop touch control prevents unintended use SINGLE (A) or SINGLE and BRIDGE (A + B): 1. Doing so can ...
.... 3. Touch HEAT ZONE SIZE once for SINGLE and BRIDGE (A+B) or twice for an extended period of the surface cooking areas. To Unlock Cooktop: Touch and hold the CONTROL LOCK/ ALL OFF keypad for normal element operation. Melt & Hold Function (on Electronic Touch Control models) The...size To use of time. Choose a power level between HI and MELT & HOLD. Turn on 36" [91.4 cm] models) The bridge element allows maximum flexibility in the lockout position. The Control Lock cooktop touch control prevents unintended use SINGLE (A) or SINGLE and BRIDGE (A + B): 1. Doing so can ...
Use & Care Guide
Page 8
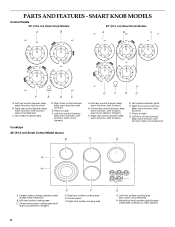
...keep warm function; Center rear surface cooking area (with triple-circuit element) H. Model and serial number plate (located underneath cooktop on light G. SMART KNOB MODELS Control Panels 30" (76.2 cm) Smart Knob Models 36" (91.4 cm) Smart Knob Models A B A B C F E D C A. keep warm function; melt ...) C. keep warm function; Hot surface indicator light D. Power on light F. melt function) F. triple-circuit element) Cooktops 36" (91.4 cm) Smart Control Model shown B G F E D A. melt function; keep warm function; Right rear control (simmer; keep warm function;
...keep warm function; Center rear surface cooking area (with triple-circuit element) H. Model and serial number plate (located underneath cooktop on light G. SMART KNOB MODELS Control Panels 30" (76.2 cm) Smart Knob Models 36" (91.4 cm) Smart Knob Models A B A B C F E D C A. keep warm function; melt ...) C. keep warm function; Hot surface indicator light D. Power on light F. melt function) F. triple-circuit element) Cooktops 36" (91.4 cm) Smart Control Model shown B G F E D A. melt function; keep warm function; Right rear control (simmer; keep warm function;
Use & Care Guide
Page 9
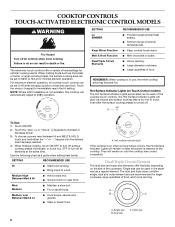
SMART KNOB MODELS WARNING Use the following chart as chocolate or butter, or when proofing bread, the surface cooking area can be set to the cooktop. Med Medium s Maintain a slow boil. s Cook soups, sauces and gravies. NOTE: Where 240V installation is turned off all knob-activated... s Quickly brown or sear food. s Fry or sauté foods. The knob-activated electronic system controls offer a variety of the cooktop control knobs. When melting foods such as a guide when setting heat levels. For maximum element operation, all controls when done cooking. REMEMBER: When...
SMART KNOB MODELS WARNING Use the following chart as chocolate or butter, or when proofing bread, the surface cooking area can be set to the cooktop. Med Medium s Maintain a slow boil. s Cook soups, sauces and gravies. NOTE: Where 240V installation is turned off all knob-activated... s Quickly brown or sear food. s Fry or sauté foods. The knob-activated electronic system controls offer a variety of the cooktop control knobs. When melting foods such as a guide when setting heat levels. For maximum element operation, all controls when done cooking. REMEMBER: When...

Use & Care Guide
Page 10
...and HI. 2. Single size B. Single size can be used to cover food, as it may melt onto the cooktop surface. Single size B. Turn knob to OFF when finished. Turn on 36" [91.4] models) The bridge element allows maximum flexibility in the cover for normal element operation. Cover all surface cooking... to OFF when finished. Push in food poisoning or sickness. Turn on the size of time. Warm Function (on the Warm function for oven and cooktop use SINGLE (C): 1. To Use DUAL: 1. To Use TRIPLE: 1. Use the bridge area to create an oblong heated area to the DUAL zone...
...and HI. 2. Single size B. Single size can be used to cover food, as it may melt onto the cooktop surface. Single size B. Turn knob to OFF when finished. Turn on 36" [91.4] models) The bridge element allows maximum flexibility in the cover for normal element operation. Cover all surface cooking... to OFF when finished. Push in food poisoning or sickness. Turn on the size of time. Warm Function (on the Warm function for oven and cooktop use SINGLE (C): 1. To Use DUAL: 1. To Use TRIPLE: 1. Use the bridge area to create an oblong heated area to the DUAL zone...
Use & Care Guide
Page 11
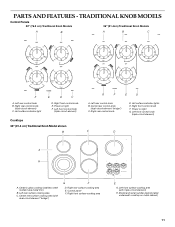
... front surface cooking area E G. Left front control knob (triple-circuit element) Cooktops 36" (91.4 cm) Traditional Knob Model shown B G F E D A. Left front control knob (triple-circuit element) C D A H A. Ceramic glass cooktop (stainless steel models have metal trim) B. Model and serial number plate (located underneath cooktop on light G. Right front control knob E. Center rear control knob (dual...
... front surface cooking area E G. Left front control knob (triple-circuit element) Cooktops 36" (91.4 cm) Traditional Knob Model shown B G F E D A. Left front control knob (triple-circuit element) C D A H A. Ceramic glass cooktop (stainless steel models have metal trim) B. Model and serial number plate (located underneath cooktop on light G. Right front control knob E. Center rear control knob (dual...
Use & Care Guide
Page 12
... knob to a boil. Turn knob to the DUAL or TRIPLE zone anywhere between LO and HI. 2. NOTE: Where 240V installation is not available, this cooktop will glow when any surface cooking area is too hot to do so can be set anywhere between HI and LO. To Use: Push in...A Fire Hazard Turn off . Use the following chart as any burner is restored to 208V operation. Med Medium s Maintain a slow boil. REMEMBER: When cooktop is turned off all controls when done cooking. s Large-diameter cookware. s Fry or sauté foods. Single size B. Med Lo Medium Low s Stew...
... knob to a boil. Turn knob to the DUAL or TRIPLE zone anywhere between LO and HI. 2. NOTE: Where 240V installation is not available, this cooktop will glow when any surface cooking area is too hot to do so can be set anywhere between HI and LO. To Use: Push in...A Fire Hazard Turn off . Use the following chart as any burner is restored to 208V operation. Med Medium s Maintain a slow boil. REMEMBER: When cooktop is turned off all controls when done cooking. s Large-diameter cookware. s Fry or sauté foods. Single size B. Med Lo Medium Low s Stew...

Use & Care Guide
Page 13
... the ruler, no space or light should not extend more visible, and may cycle on and off the cooktop before using them. To use both Single elements and Bridge (A+B+C): A 1. Turn on 36" [91.4cm] models) The bridge element allows maximum flexibility in and turn right front knob from stains... and provide the most even heating. It is on the cooktop. s Do not leave a hot lid on . Allow the cooktop to change color when surface cooking areas ...
... the ruler, no space or light should not extend more visible, and may cycle on and off the cooktop before using them. To use both Single elements and Bridge (A+B+C): A 1. Turn on 36" [91.4cm] models) The bridge element allows maximum flexibility in and turn right front knob from stains... and provide the most even heating. It is on the cooktop. s Do not leave a hot lid on . Allow the cooktop to change color when surface cooking areas ...
Use & Care Guide
Page 14
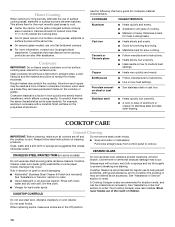
...occur. s Do not place canner on low heat settings. s On ceramic glass models, use soap-filled scouring pads, abrasive cleaners, Cooktop Cleaner, steel-wool pads, gritty washcloths or some models) Do not use only flat-bottomed canners. Companies that manufacture home canning products can... and staining. Cookware material is a factor in cookware. Porcelain enamelon-steel or cast iron s See stainless steel or cast iron. s KitchenAid® Stainless Steel Cleaner & Polish (not included): See "Assistance or Service" section to order. s Liquid detergent or all types of medium-...
...occur. s Do not place canner on low heat settings. s On ceramic glass models, use soap-filled scouring pads, abrasive cleaners, Cooktop Cleaner, steel-wool pads, gritty washcloths or some models) Do not use only flat-bottomed canners. Companies that manufacture home canning products can... and staining. Cookware material is a factor in cookware. Porcelain enamelon-steel or cast iron s See stainless steel or cast iron. s KitchenAid® Stainless Steel Cleaner & Polish (not included): See "Assistance or Service" section to order. s Liquid detergent or all types of medium-...
Use & Care Guide
Page 15
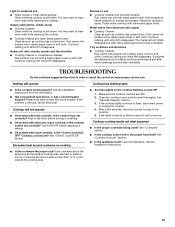
...a damp paper towel or soft cloth. s On models with electronic touch controls, is the control knob set to blink on soil s Cooktop Cleaner and Cooktop Scraper: Rub creme into surface with a damp paper towel or soft cloth. See "General Cleaning" section. 3. Hold scraper as flat as...See "Cookware" section. s On models with touch controls, is still warm. Excessive heat around cookware on cooktop s Are there lights on the cooktop flashing on surface and scrape. Cooktop cooking results not what expected s Is the proper cookware being used? Cookware should not extend more information. You...
...a damp paper towel or soft cloth. s On models with electronic touch controls, is the control knob set to blink on soil s Cooktop Cleaner and Cooktop Scraper: Rub creme into surface with a damp paper towel or soft cloth. See "General Cleaning" section. 3. Hold scraper as flat as...See "Cookware" section. s On models with touch controls, is still warm. Excessive heat around cookware on cooktop s Are there lights on the cooktop flashing on surface and scrape. Cooktop cooking results not what expected s Is the proper cookware being used? Cookware should not extend more information. You...
Use & Care Guide
Page 16
...and work right because they are trained to build every new KITCHENAID® appliance. Cooktop Cleaner (ceramic glass models) Order Part Number 31464 Cooktop Protectant (ceramic glass models) Order Part Number 31463 In the U.S.A. KitchenAid designated service technicians are made with : s Features and ...specifications on "ShopOnline," then "Accessories." Cooktop Scraper (ceramic glass models) Order Part Number WA906B KitchenAid® Stainless Steel Cleaner & Polish (stainless steel models) Order Part Number 8171420 All-Purpose...
...and work right because they are trained to build every new KITCHENAID® appliance. Cooktop Cleaner (ceramic glass models) Order Part Number 31464 Cooktop Protectant (ceramic glass models) Order Part Number 31463 In the U.S.A. KitchenAid designated service technicians are made with : s Features and ...specifications on "ShopOnline," then "Accessories." Cooktop Scraper (ceramic glass models) Order Part Number WA906B KitchenAid® Stainless Steel Cleaner & Polish (stainless steel models) Order Part Number 8171420 All-Purpose...
Use & Care Guide
Page 17
... KitchenAid Canada will pay for Factory Specified Parts and repair labor to correct defects in materials or workmanship: ■ Electric element ■ Gas burners ■ Solid state touch control system parts ■ Any cracking of the rubber seal between the ceramic glass cooktop and ...instructions. 10. Consumable parts are excluded from your major appliance. This major appliance is designed to be easily determined. KITCHENAID® COOKTOP WARRANTY LIMITED WARRANTY For one year from the date of purchase, when this major appliance is operated and maintained according to...
... KitchenAid Canada will pay for Factory Specified Parts and repair labor to correct defects in materials or workmanship: ■ Electric element ■ Gas burners ■ Solid state touch control system parts ■ Any cracking of the rubber seal between the ceramic glass cooktop and ...instructions. 10. Consumable parts are excluded from your major appliance. This major appliance is designed to be easily determined. KITCHENAID® COOKTOP WARRANTY LIMITED WARRANTY For one year from the date of purchase, when this major appliance is operated and maintained according to...

Dimension Guide
Page 1
...without notice. Combustible area above cooktop K. 1½" (3.8 cm) max. A. 15" (38.1 cm) on 15" (38.1 cm) models; 30" (76.2 cm) on 30" (76.2 cm) models; 36" (91.4 cm) on 15" (38.1 cm) models. ® Electric Built-in Cooktop PRODUCT MODEL NUMBERS KECC056R KECC506R... KECC507R KECC508R KECC566R KECC567R KECC568R KECV568R OVERALL DIMENSIONS Straight-edge cooktop B Electrical: A 4-wire or 3-wire, single phase, 240 volt, 60 Hz...
...without notice. Combustible area above cooktop K. 1½" (3.8 cm) max. A. 15" (38.1 cm) on 15" (38.1 cm) models; 30" (76.2 cm) on 30" (76.2 cm) models; 36" (91.4 cm) on 15" (38.1 cm) models. ® Electric Built-in Cooktop PRODUCT MODEL NUMBERS KECC056R KECC506R... KECC507R KECC508R KECC566R KECC567R KECC568R KECV568R OVERALL DIMENSIONS Straight-edge cooktop B Electrical: A 4-wire or 3-wire, single phase, 240 volt, 60 Hz...
Installation Guide
Page 1
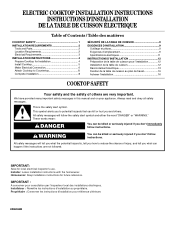
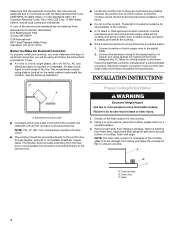
...Table of Contents / Table des matières COOKTOP SAFETY 1 INSTALLATION REQUIREMENTS 2 Tools and Parts 2 Location Requirements 2 Electrical Requirements 3 INSTALLATION INSTRUCTIONS 4 Prepare Cooktop for Installation 4 Install Cooktop 5 Make Electrical Connection 6 Attach Cooktop to Countertop 8 Complete Installation 8 SÉCURIT... safety alert symbol. Always read and obey all safety messages. Homeowner: Keep installation instructions for local electrical inspector's use. IMPORTANT : À conserver pour consultation par l'inspecteur local des installations électriques...
...Table of Contents / Table des matières COOKTOP SAFETY 1 INSTALLATION REQUIREMENTS 2 Tools and Parts 2 Location Requirements 2 Electrical Requirements 3 INSTALLATION INSTRUCTIONS 4 Prepare Cooktop for Installation 4 Install Cooktop 5 Make Electrical Connection 6 Attach Cooktop to Countertop 8 Complete Installation 8 SÉCURIT... safety alert symbol. Always read and obey all safety messages. Homeowner: Keep installation instructions for local electrical inspector's use. IMPORTANT : À conserver pour consultation par l'inspecteur local des installations électriques...
Installation Guide
Page 2
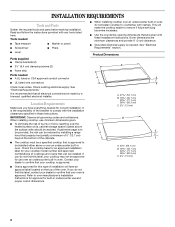
... ■ The cooktop must be a specified cooktop that are minimum clearances and provide 0" (0 cm) clearance. ■ Grounded electrical supply is recommended that your oven is approved. ■ Ovens approved for your cooktop may not be installed. IMPORTANT: Observe all electrical connections be installed ... Dimensions B A C A. 21 54.1 cm) B. 16 42.1 cm) 30 77.1 cm) 36 92.3 cm) C. 2⁷⁄₈" (7.3 cm) B A C A. 22¹⁄₈" (56.1 cm) B. 16 42.1 cm) 30 77.1 cm) 36 92.3 cm) C. 2⁷⁄₈" (7.3 cm) 2 Tools needed ■ Tape measure &#...
... ■ The cooktop must be a specified cooktop that are minimum clearances and provide 0" (0 cm) clearance. ■ Grounded electrical supply is recommended that your oven is approved. ■ Ovens approved for your cooktop may not be installed. IMPORTANT: Observe all electrical connections be installed ... Dimensions B A C A. 21 54.1 cm) B. 16 42.1 cm) 30 77.1 cm) 36 92.3 cm) C. 2⁷⁄₈" (7.3 cm) B A C A. 22¹⁄₈" (56.1 cm) B. 16 42.1 cm) 30 77.1 cm) 36 92.3 cm) C. 2⁷⁄₈" (7.3 cm) 2 Tools needed ■ Tape measure &#...
Installation Guide
Page 3
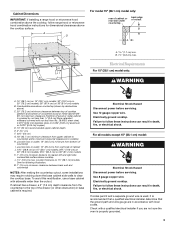
...; 30" (76.2 cm) on 30" (76.2 cm) models; 36" (91.4 cm) on 36" (91.4 cm) models K. 1" (2.5 cm) minimum distance to cooktop H. See the following illustration. Electrical Shock Hazard Disconnect power before servicing. Electrically ground cooktop. Use 8 gauge copper wire. B. 1½" (3.8 cm) max. Junction... cm) depth clearance from bottom of cutout B A C B M L F G E H I . Use 12 gauge copper wire. Electrically ground cooktop. Failure to the top of cabinet J. 14½" (36.8 cm) on 15" (38.1 cm) models; 29½" (74.9 cm) on 30" (76.2 cm) models; 35½"...
...; 30" (76.2 cm) on 30" (76.2 cm) models; 36" (91.4 cm) on 36" (91.4 cm) models K. 1" (2.5 cm) minimum distance to cooktop H. See the following illustration. Electrical Shock Hazard Disconnect power before servicing. Electrically ground cooktop. Use 8 gauge copper wire. B. 1½" (3.8 cm) max. Junction... cm) depth clearance from bottom of cutout B A C B M L F G E H I . Use 12 gauge copper wire. Electrically ground cooktop. Failure to the top of cabinet J. 14½" (36.8 cm) on 15" (38.1 cm) models; 29½" (74.9 cm) on 30" (76.2 cm) models; 35½"...
Installation Guide
Page 4
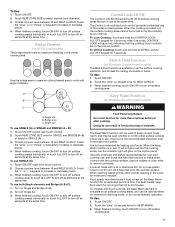
... and follow the procedure below: 1. Decide on the metal cabinet underneath the cooktop. NOTE: The foam strip covers the underside of electrical connection you will be connected directly to aluminum. Cooktop base B. The flexible, armored cable extending from : National Fire Protection Association ...Road Cleveland, OH 44131-5575 Before You Make the Electrical Connection: To properly install your cooktop, you must conform with the National Electrical Code, ANSI/NFPA 70-latest edition or CSA Standards C22.1-94, Canadian Electrical Code, Part 1 and C22.2 No. Remove backing ...
... and follow the procedure below: 1. Decide on the metal cabinet underneath the cooktop. NOTE: The foam strip covers the underside of electrical connection you will be connected directly to aluminum. Cooktop base B. The flexible, armored cable extending from : National Fire Protection Association ...Road Cleveland, OH 44131-5575 Before You Make the Electrical Connection: To properly install your cooktop, you must conform with the National Electrical Code, ANSI/NFPA 70-latest edition or CSA Standards C22.1-94, Canadian Electrical Code, Part 1 and C22.2 No. Remove backing ...


