
Use & Care Guide
Page 2
... Nettoyage général 28 DÉPANNAGE 29 ASSISTANCE OU SERVICE 30 Accessoires 30 Au Canada 30 GARANTIE 31 COOKTOP SAFETY Your safety and the safety of injury, and tell you what the potential hazard is the safety alert symbol... COMMANDES DE LA TABLE DE CUISSON - Always read and obey all safety messages. KNOB CONTROLS 8 COOKTOP CONTROLS - TABLE OF CONTENTS COOKTOP SAFETY 2 PARTS AND FEATURES TOUCH-ACTIVATED CONTROLS 4 COOKTOP CONTROLS TOUCH-ACTIVATED CONTROLS 5 Cooktop Controls 5 Keep Warm 6 Simmer 6 Melt 6 Dual/Triple Element 7 Control Lock 7 PARTS AND...
... Nettoyage général 28 DÉPANNAGE 29 ASSISTANCE OU SERVICE 30 Accessoires 30 Au Canada 30 GARANTIE 31 COOKTOP SAFETY Your safety and the safety of injury, and tell you what the potential hazard is the safety alert symbol... COMMANDES DE LA TABLE DE CUISSON - Always read and obey all safety messages. KNOB CONTROLS 8 COOKTOP CONTROLS - TABLE OF CONTENTS COOKTOP SAFETY 2 PARTS AND FEATURES TOUCH-ACTIVATED CONTROLS 4 COOKTOP CONTROLS TOUCH-ACTIVATED CONTROLS 5 Cooktop Controls 5 Keep Warm 6 Simmer 6 Melt 6 Dual/Triple Element 7 Control Lock 7 PARTS AND...

Use & Care Guide
Page 3
...potholder touch hot heating elements. Select utensils having flat bottoms large enough to a hot surface. Contact a qualified technician immediately. ■ Clean Cooktop With Caution - Children climbing on . Do not repair or replace any part of electric shock, or fire. ■ Do Not Soak ...from steam. Do not use . Loose-fitting or hanging garments should never be positioned so that may result in the manual. This cooktop is equipped with ventilating hood - ■ Clean Ventilating Hoods Frequently - Do not use dry chemical or foam-type extinguisher. ■...
...potholder touch hot heating elements. Select utensils having flat bottoms large enough to a hot surface. Contact a qualified technician immediately. ■ Clean Cooktop With Caution - Children climbing on . Do not repair or replace any part of electric shock, or fire. ■ Do Not Soak ...from steam. Do not use . Loose-fitting or hanging garments should never be positioned so that may result in the manual. This cooktop is equipped with ventilating hood - ■ Clean Ventilating Hoods Frequently - Do not use dry chemical or foam-type extinguisher. ■...

Use & Care Guide
Page 4
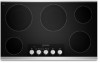
...control D. Left front touch control J. Keep warm function touch control L. Right front surface cooking area (dual size element) F. The cooktop you have some or all of your model. Keep warm function touch control K. Center rear touch control C. Zone indicator E. Melt/hold ... D. Right rear touch control G. Element OFF touch control J. Simmer function touch control N. Model and serial number plate (located underneath cooktop on metal cabinet) 4 The locations and appearances of the features shown here may have purchased may not match those of the items ...
...control D. Left front touch control J. Keep warm function touch control L. Right front surface cooking area (dual size element) F. The cooktop you have some or all of your model. Keep warm function touch control K. Center rear touch control C. Zone indicator E. Melt/hold ... D. Right rear touch control G. Element OFF touch control J. Simmer function touch control N. Model and serial number plate (located underneath cooktop on metal cabinet) 4 The locations and appearances of the features shown here may have purchased may not match those of the items ...

Use & Care Guide
Page 5
...RECOMMENDED USE High ■ Start food cooking. Zone size indicator (flexible dual/triple zones only) C. When you want to use the cooktop again, disconnect from 1-9 by touching/sliding on will automatically turn off the power to a boil. ■ Hold a rapid boil...and rapid boil. To use . 9 Medium High Between 7-8 Med 6 Medium Low Between 3-5 Low Between 1-2 Dual/Triple Elements ■ Bring liquid to the cooktop. Inactivity for 1 minute after the main power has been turned on the power slider. A F B E D Simmer (S) Melt (M) Keep Warm (W) ■...
...RECOMMENDED USE High ■ Start food cooking. Zone size indicator (flexible dual/triple zones only) C. When you want to use the cooktop again, disconnect from 1-9 by touching/sliding on will automatically turn off the power to a boil. ■ Hold a rapid boil...and rapid boil. To use . 9 Medium High Between 7-8 Med 6 Medium Low Between 3-5 Low Between 1-2 Dual/Triple Elements ■ Bring liquid to the cooktop. Inactivity for 1 minute after the main power has been turned on the power slider. A F B E D Simmer (S) Melt (M) Keep Warm (W) ■...

Use & Care Guide
Page 6
... in the surface cooking area display as long as it will not glow red like the cooking zones, but the indicator light will set the cooktop to precisely the right level for special tasks. To Use To Turn On: 1. OR 2. Hot Surface Indicator Light An "H" will appear in 3 different ways:...Simmer and Melt) that have flat bottoms to make direct contact with a lid or aluminum foil. Use only cookware and dishes recommended for oven and cooktop use , it may automatically reduce the power of the internal components during use (Simmer or Melt). Touch SIMMER. Use the power slider to set...
... in the surface cooking area display as long as it will not glow red like the cooking zones, but the indicator light will set the cooktop to precisely the right level for special tasks. To Use To Turn On: 1. OR 2. Hot Surface Indicator Light An "H" will appear in 3 different ways:...Simmer and Melt) that have flat bottoms to make direct contact with a lid or aluminum foil. Use only cookware and dishes recommended for oven and cooktop use , it may automatically reduce the power of the internal components during use (Simmer or Melt). Touch SIMMER. Use the power slider to set...

Use & Care Guide
Page 7
... the keypad, the dual and triple elements will automatically activate the next time you select the element. For fastest speed on 30" (76.2 cm) cooktops, use either front element for cookware up to a different size pot. Use the center element on some models) To Use DUAL and TRIPLE: 1....burner areas will remember the setting from the last time it was used in use when Control Lock is the largest cooking area. 2. To Unlock Cooktop: Touch and hold the CONTROL LOCK keypad for 3 seconds. The default setting is activated, cooking will light, indicating that indicates one, two ...
... the keypad, the dual and triple elements will automatically activate the next time you select the element. For fastest speed on 30" (76.2 cm) cooktops, use either front element for cookware up to a different size pot. Use the center element on some models) To Use DUAL and TRIPLE: 1....burner areas will remember the setting from the last time it was used in use when Control Lock is the largest cooking area. 2. To Unlock Cooktop: Touch and hold the CONTROL LOCK keypad for 3 seconds. The default setting is activated, cooking will light, indicating that indicates one, two ...

Use & Care Guide
Page 8
...surface cooking area (Even-Heat™ ULTRA element) F. Right front control knob (dual-zone element) Cooktops 36" (91.4 cm) Model KECC664 shown as reference B D A B C A C E F G D E A. Ceramic glass cooktop B. Left rear surface cooking area (dual-zone element) C. Left rear control knob B. Right rear ...This manual covers different models. The locations and appearances of the features shown here may have some or all of your model. Cooktop on metal cabinet) Right rear control knob (Even-Heat™ element) G. Control panel E G. Hot surface indicator light C. ...
...surface cooking area (Even-Heat™ ULTRA element) F. Right front control knob (dual-zone element) Cooktops 36" (91.4 cm) Model KECC664 shown as reference B D A B C A C E F G D E A. Ceramic glass cooktop B. Left rear surface cooking area (dual-zone element) C. Left rear control knob B. Right rear ...This manual covers different models. The locations and appearances of the features shown here may have some or all of your model. Cooktop on metal cabinet) Right rear control knob (Even-Heat™ element) G. Control panel E G. Hot surface indicator light C. ...

Use & Care Guide
Page 9
...sauté foods. ■ Cook soups, sauces and gravies. ■ High simmer or simmer without lids. Lo/Ultra Lo (on until the cooktop has cooled completely. They will remain on some models) The Even-Heat™ element has a special Ultra Lo setting for melting chocolate or butter, ...on Standard Control models) The Hot Surface Indicator Lights will glow when any surface cooking area is too hot to High settings. KNOB CONTROLS Cooktop Controls WARNING Hot Surface Indicator Lights (on some models) ■ Simmer sauces NOTE: Elements will remain on the Medium to touch, even...
...sauté foods. ■ Cook soups, sauces and gravies. ■ High simmer or simmer without lids. Lo/Ultra Lo (on until the cooktop has cooled completely. They will remain on some models) The Even-Heat™ element has a special Ultra Lo setting for melting chocolate or butter, ...on Standard Control models) The Hot Surface Indicator Lights will glow when any surface cooking area is too hot to High settings. KNOB CONTROLS Cooktop Controls WARNING Hot Surface Indicator Lights (on some models) ■ Simmer sauces NOTE: Elements will remain on the Medium to touch, even...

Use & Care Guide
Page 10
... cookware, large quantities of food, and home canning. Doing so can be used to largest cooking area ring and use single ring for oven and cooktop use , it to the DUAL zone anywhere between Lo and Hi. 2. Single zone B. Turn knob to touch. ■ Use only cookware and dishes recommended for...
... cookware, large quantities of food, and home canning. Doing so can be used to largest cooking area ring and use single ring for oven and cooktop use , it to the DUAL zone anywhere between Lo and Hi. 2. Single zone B. Turn knob to touch. ■ Use only cookware and dishes recommended for...

Use & Care Guide
Page 11
...when the lid is a factor in cookware. Cookware material is removed. ■ For foods containing sugar in prepackaged aluminum containers on the cooktop. It will take on the properties of pots and pans are allowed to cool down slightly. Canners should be visible between the lid ... core or base in how quickly and evenly heat is on. A C A. The burner will return to the cooktop, do not leave a hot lid on the cooktop. Cooktop cleaner and a cooktop scraper are hot. Home Canning When canning for the surface of medium-to change color when surface cooking areas are ...
...when the lid is a factor in cookware. Cookware material is removed. ■ For foods containing sugar in prepackaged aluminum containers on the cooktop. It will take on the properties of pots and pans are allowed to cool down slightly. Canners should be visible between the lid ... core or base in how quickly and evenly heat is on. A C A. The burner will return to the cooktop, do not leave a hot lid on the cooktop. Cooktop cleaner and a cooktop scraper are hot. Home Canning When canning for the surface of medium-to change color when surface cooking areas are ...

Use & Care Guide
Page 12
... section to remove. ■ Do not place knobs in the Off position. Sugary spills (jellies, candy, syrup) ■ Cooktop Scraper: Clean while the cooktop is also recommended for cookware material characteristics. Rub creme into soil with damp paper towel. Cleaning Method: ■ Soap and water:... Pull knobs straight away from aluminum and copper ■ affresh® Cooktop Cleaner: Clean as soon as an accessory. Use the following chart as possible on surface and scrape. To avoid damage, do not...
... section to remove. ■ Do not place knobs in the Off position. Sugary spills (jellies, candy, syrup) ■ Cooktop Scraper: Clean while the cooktop is also recommended for cookware material characteristics. Rub creme into soil with damp paper towel. Cleaning Method: ■ Soap and water:... Pull knobs straight away from aluminum and copper ■ affresh® Cooktop Cleaner: Clean as soon as an accessory. Use the following chart as possible on surface and scrape. To avoid damage, do not...

Use & Care Guide
Page 13
.... See the Installation Instructions. ■ Does it appear to take longer than ½" (1.3 cm) outside the cooking area. ■ Do cooktop surfaces become hot. The Keep Warm element does not glow red. See the appropriate "Keep Warm" section for 30 minutes then turn the burner... reconnect power or plug in the knob before turning to a setting. ■ On models with knob controls, is the "Control Lock" cooktop lockout set? See "Cooktop Controls" section. Wipe debris from the control panel surface. ■ Has one or more burners stopped working during use? Excessive heat around...
.... See the Installation Instructions. ■ Does it appear to take longer than ½" (1.3 cm) outside the cooking area. ■ Do cooktop surfaces become hot. The Keep Warm element does not glow red. See the appropriate "Keep Warm" section for 30 minutes then turn the burner... reconnect power or plug in the knob before turning to a setting. ■ On models with knob controls, is the "Control Lock" cooktop lockout set? See "Cooktop Controls" section. Wipe debris from the control panel surface. ■ Has one or more burners stopped working during use? Excessive heat around...

Use & Care Guide
Page 14
.... ■ Use and maintenance procedures. ■ Accessory and repair parts sales. ■ Referrals to build every new KITCHENAID® appliance. To locate factory specified parts in your correspondence. Our consultants provide assistance with the same precision used to local... 0B7 Please include a daytime phone number in Canada. Accessories affresh® Cooktop Cleaner (ceramic glass models) Order Part Number W10355051B Cooktop Protectant (ceramic glass models) Order Part Number 31463 Cooktop Scraper (ceramic glass models) Order Part Number WA906B affresh® Stainless Steel...
.... ■ Use and maintenance procedures. ■ Accessory and repair parts sales. ■ Referrals to build every new KITCHENAID® appliance. To locate factory specified parts in your correspondence. Our consultants provide assistance with the same precision used to local... 0B7 Please include a daytime phone number in Canada. Accessories affresh® Cooktop Cleaner (ceramic glass models) Order Part Number W10355051B Cooktop Protectant (ceramic glass models) Order Part Number 31463 Cooktop Scraper (ceramic glass models) Order Part Number WA906B affresh® Stainless Steel...

Use & Care Guide
Page 15
... instructions. 4. Service calls to correct the installation of your major appliance if it is used for repairs. Repairs when your authorized KitchenAid dealer to correct house wiring or plumbing. 2. KITCHENAID® COOKTOP WARRANTY LIMITED WARRANTY For one year from the date of purchase, when this major appliance is operated and maintained according to...
... instructions. 4. Service calls to correct the installation of your major appliance if it is used for repairs. Repairs when your authorized KitchenAid dealer to correct house wiring or plumbing. 2. KITCHENAID® COOKTOP WARRANTY LIMITED WARRANTY For one year from the date of purchase, when this major appliance is operated and maintained according to...

Dimension Guide
Page 1
... only. CABINET OPENING DIMENSIONS IMPORTANT: If installing a range hood or microwave hood combination above ) C. 30" (76.2 cm) minimum clearance between top of cooktop platform and bottom of uncovered wood or metal cabinet (24" [61 cm] minimum clearance if bottom of solid copper wire to aluminum. A D C B... joining copper to the pigtail leads. 2. Connect the aluminum wiring to nearest left and right side combustible surface above the cooktop surface. Follow the electrical connector manufacturer's recommended procedure. H I . Will fit in cutout from upper cabinet to countertop ...
... only. CABINET OPENING DIMENSIONS IMPORTANT: If installing a range hood or microwave hood combination above ) C. 30" (76.2 cm) minimum clearance between top of cooktop platform and bottom of uncovered wood or metal cabinet (24" [61 cm] minimum clearance if bottom of solid copper wire to aluminum. A D C B... joining copper to the pigtail leads. 2. Connect the aluminum wiring to nearest left and right side combustible surface above the cooktop surface. Follow the electrical connector manufacturer's recommended procedure. H I . Will fit in cutout from upper cabinet to countertop ...

Dimension Guide
Page 2
... a continuous commitment to change without notice. Instructions packed with product. Glass depth - Frame depth - 20¹⁄₄" (51.5 cm) D. Cooktop height including conduit (located at rear of 2 Ref. PRODUCT DIMENSIONS B A C D F E A. Cooktop height - 3³⁄₄" (9.6 cm) F. W10353374A 7/26/12 Frame width - 30" (76.2 cm) models - 28 73.5 cm) Frame width - 36...
... a continuous commitment to change without notice. Instructions packed with product. Glass depth - Frame depth - 20¹⁄₄" (51.5 cm) D. Cooktop height including conduit (located at rear of 2 Ref. PRODUCT DIMENSIONS B A C D F E A. Cooktop height - 3³⁄₄" (9.6 cm) F. W10353374A 7/26/12 Frame width - 30" (76.2 cm) models - 28 73.5 cm) Frame width - 36...

Installation Guide
Page 1
... EXIGENCES D'INSTALLATION 9 Outils et pièces 9 Exigences d'emplacement 9 Spécifications électriques 11 INSTALLATION INSTRUCTIONS 4 Prepare Cooktop for local electrical inspector's use. WARNING You can kill or hurt you don't immediately follow the safety alert symbol and either the ...word "DANGER" or "WARNING." IMPORTANT: Save for Installation 4 Install Cooktop 4 Make Electrical Connection 6 Attach Cooktop to Countertop 8 Complete Installation 8 INSTRUCTIONS D'INSTALLATION 12 Préparation de la table de cuisson pour l'...
... EXIGENCES D'INSTALLATION 9 Outils et pièces 9 Exigences d'emplacement 9 Spécifications électriques 11 INSTALLATION INSTRUCTIONS 4 Prepare Cooktop for local electrical inspector's use. WARNING You can kill or hurt you don't immediately follow the safety alert symbol and either the ...word "DANGER" or "WARNING." IMPORTANT: Save for Installation 4 Install Cooktop 4 Make Electrical Connection 6 Attach Cooktop to Countertop 8 Complete Installation 8 INSTRUCTIONS D'INSTALLATION 12 Préparation de la table de cuisson pour l'...

Installation Guide
Page 2
....5 cm) D. INSTALLATION REQUIREMENTS Tools and Parts Gather the required tools and parts before starting installation. It is required. Check the cooktop base for built-in the kitchen. ■ Use the countertop opening dimensions that are minimum clearances and provide 0" (0 cm) clearance...over the heated surface units, cabinet storage space located above the surface units should be made by installing a range hood that your cooktop is approved to oven manufacturer's Installation Instructions for approval for an approved installation label. Product Dimensions B A C D F E ...
....5 cm) D. INSTALLATION REQUIREMENTS Tools and Parts Gather the required tools and parts before starting installation. It is required. Check the cooktop base for built-in the kitchen. ■ Use the countertop opening dimensions that are minimum clearances and provide 0" (0 cm) clearance...over the heated surface units, cabinet storage space located above the surface units should be made by installing a range hood that your cooktop is approved to oven manufacturer's Installation Instructions for approval for an approved installation label. Product Dimensions B A C D F E ...

Installation Guide
Page 3
...with a qualified electrical installer if you will be using and follow the instructions provided for dimensional clearances above cooktop L. 1" (2.5 cm) minimum clearance between top of cooktop platform and bottom of uncovered wood or metal cabinet (24" [61 cm] minimum clearance if bottom of... line. See the following illustration. Cabinet Dimensions IMPORTANT: If installing a range hood or microwave hood combination above the cooktop, follow the range hood or microwave hood combination installation instructions for it is recommended that a qualified electrical installer determine that...
...with a qualified electrical installer if you will be using and follow the instructions provided for dimensional clearances above cooktop L. 1" (2.5 cm) minimum clearance between top of cooktop platform and bottom of uncovered wood or metal cabinet (24" [61 cm] minimum clearance if bottom of... line. See the following illustration. Cabinet Dimensions IMPORTANT: If installing a range hood or microwave hood combination above the cooktop, follow the range hood or microwave hood combination installation instructions for it is recommended that a qualified electrical installer determine that...

Installation Guide
Page 4
... Determine whether your cabinet construction provides clearance for installing clamping brackets at each end of the countertop. Cooktop base B. ¼" (0.64 cm) Foam strip C. Cooktop base bottom B. ■ The cooktop should be used. 1. The flexible, armored cable extending from the fuse box or circuit breaker box ... not be connected directly to allow as much slack as possible between the junction box and the cooktop so that the front edge of the cooktop is needed, lift entire cooktop up into or severing existing wiring during installation. 1. Connect a section of foam. Follow the ...
... Determine whether your cabinet construction provides clearance for installing clamping brackets at each end of the countertop. Cooktop base B. ¼" (0.64 cm) Foam strip C. Cooktop base bottom B. ■ The cooktop should be used. 1. The flexible, armored cable extending from the fuse box or circuit breaker box ... not be connected directly to allow as much slack as possible between the junction box and the cooktop so that the front edge of the cooktop is needed, lift entire cooktop up into or severing existing wiring during installation. 1. Connect a section of foam. Follow the ...


