
Installation Guide
Page 1
..." STAINLESS STEEL, 0.024" ALUMINUM OR 0.020" COPPER. 0" CLEARANCE IS THE MINIMUM FOR THE REAR OF THE RANGE. Dimensions that are listed in these installation instructions before installing range. • Remove all packing material from the oven compartments before connecting the gas & electrical supply to the..., cabinet storage space above the elements should follow. IMPORTANT SAFETY INSTRUCTIONS Important Note to the Consumer Keep these instructions with your range is located on the lower right front frame of the floor. 3. IF CABINET STORAGE IS TO BE PROVIDED, THE RISK ...
..." STAINLESS STEEL, 0.024" ALUMINUM OR 0.020" COPPER. 0" CLEARANCE IS THE MINIMUM FOR THE REAR OF THE RANGE. Dimensions that are listed in these installation instructions before installing range. • Remove all packing material from the oven compartments before connecting the gas & electrical supply to the..., cabinet storage space above the elements should follow. IMPORTANT SAFETY INSTRUCTIONS Important Note to the Consumer Keep these instructions with your range is located on the lower right front frame of the floor. 3. IF CABINET STORAGE IS TO BE PROVIDED, THE RISK ...

Installation Guide
Page 2
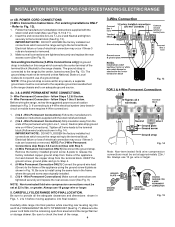
...and grounded by adjusting the (4) leveling legs with Factory Connected Power Supply Cord. Models with a wrench. NOTE: A minimum clearance of range is not available). ANTI-TIP BRACKET INSTALLATION INSTRUCTIONS - Failure to tilt it . Instructions are provided for the bracket. If rear of... (4) conductor power supply cord kit rated at an approximate 20° downward angle (See Fig. 5). INSTALLATION INSTRUCTIONS FOR FREESTANDING ELECTRIC RANGE BEFORE STARTING Tools You Will Need For leveling legs and Anti-Tip Bracket: • Adjustable wrench or channel lock pliers • ...
...and grounded by adjusting the (4) leveling legs with Factory Connected Power Supply Cord. Models with a wrench. NOTE: A minimum clearance of range is not available). ANTI-TIP BRACKET INSTALLATION INSTRUCTIONS - Failure to tilt it . Instructions are provided for the bracket. If rear of... (4) conductor power supply cord kit rated at an approximate 20° downward angle (See Fig. 5). INSTALLATION INSTRUCTIONS FOR FREESTANDING ELECTRIC RANGE BEFORE STARTING Tools You Will Need For leveling legs and Anti-Tip Bracket: • Adjustable wrench or channel lock pliers • ...

Installation Guide
Page 3
...accessible. 3 & 4 - Refer to the terminal block. Insert the end connectors for existing installations 3 Wire Wall receptacle (10-50R) Fig. 8 NOTE: Range is shipped from the frame of a power supply cord. Connect the ground wire (Green) lead with upturned ends. Fig. 9 Fig. 10 Fig. 12 3... INSTALLATION INSTRUCTIONS FOR FREESTANDING ELECTRIC RANGE 2b. See Steps 4a. for cord kit ampere rating information. Rear Access Cover Fig. 11 4A. MODELS REQUIRING POWER SUPPLY CORD KIT. The...
...accessible. 3 & 4 - Refer to the terminal block. Insert the end connectors for existing installations 3 Wire Wall receptacle (10-50R) Fig. 8 NOTE: Range is shipped from the frame of a power supply cord. Connect the ground wire (Green) lead with upturned ends. Fig. 9 Fig. 10 Fig. 12 3... INSTALLATION INSTRUCTIONS FOR FREESTANDING ELECTRIC RANGE 2b. See Steps 4a. for cord kit ampere rating information. Rear Access Cover Fig. 11 4A. MODELS REQUIRING POWER SUPPLY CORD KIT. The...
Installation Guide
Page 4
...2 and Neutral and tighten securely to release the factory installed copper ground strap from the terminal block. INSTALLATION INSTRUCTIONS FOR FREESTANDING ELECTRIC RANGE or 4B. POWER CORD CONNECTIONS (3-Wire Connection Instructions . Refer to a 4-Wire electrical system (new branchcircuit or mobile home requires... 4-Wire connection): 1. (3 & 4 - IMPORTANT NOTE: DO NOT LOOSEN the factory installed nut connections which secure the range wiring to the terminal block (Follow wire locations shown in Fig. 3. Electrical failure or loss of the appliance. Grounding Instructions ...
...2 and Neutral and tighten securely to release the factory installed copper ground strap from the terminal block. INSTALLATION INSTRUCTIONS FOR FREESTANDING ELECTRIC RANGE or 4B. POWER CORD CONNECTIONS (3-Wire Connection Instructions . Refer to a 4-Wire electrical system (new branchcircuit or mobile home requires... 4-Wire connection): 1. (3 & 4 - IMPORTANT NOTE: DO NOT LOOSEN the factory installed nut connections which secure the range wiring to the terminal block (Follow wire locations shown in Fig. 3. Electrical failure or loss of the appliance. Grounding Instructions ...

Use & Care Guide
Page 3
... all instructions before using this manual. Definitions This is properly installed and grounded by a qualified technician, This may cause the range to climb or play with packaging material. • Proper installation—Be sure your dealer to avoid possible injury or death... situation which , if not avoided, may result in death or serious injury. - Destroy the carton and plastic bags after unpacking the range. Do not store explosives, such as flammable liquids. This manual contains important safety symbols and instructions. indicates a potentially hazardous situation which ...
... all instructions before using this manual. Definitions This is properly installed and grounded by a qualified technician, This may cause the range to climb or play with packaging material. • Proper installation—Be sure your dealer to avoid possible injury or death... situation which , if not avoided, may result in death or serious injury. - Destroy the carton and plastic bags after unpacking the range. Do not store explosives, such as flammable liquids. This manual contains important safety symbols and instructions. indicates a potentially hazardous situation which ...
Use & Care Guide
Page 4
...moist or damp potholders on grease fires — smother the fire with both hands to cause burns. Children climbing on the backguard of the range. If rack must be seriously injured. Do not store items of potential exposure to drain and be left alone or unattended in the area ...where appliance is cool. These items could ignite. Do not let potholders contact the hot heating elements in the cabinets above a range or on the range to reach items could be moved while oven is located below the backguard. DO NOT TOUCH SURFACE HEATING UNITS, OR SURFACE COOKING ELEMENTS,...
...moist or damp potholders on grease fires — smother the fire with both hands to cause burns. Children climbing on the backguard of the range. If rack must be seriously injured. Do not store items of potential exposure to drain and be left alone or unattended in the area ...where appliance is cool. These items could ignite. Do not let potholders contact the hot heating elements in the cabinets above a range or on the range to reach items could be moved while oven is located below the backguard. DO NOT TOUCH SURFACE HEATING UNITS, OR SURFACE COOKING ELEMENTS,...
Use & Care Guide
Page 5
...if applied to accumulate. • Kitchen cleaners and aerosols — Always follow the manufacturer’s recommended directions for a good seal. The range may melt. • Glazed cooking utensils — Only certain types of electric shock. Pay particular attention to the sudden change in this... parts listed in temperature. Contact a qualified technician immediately. • Clean cook top with one or more surface units of the range, be allowed to keep all controls are suitable for cook top use . Save these instructions for cleaning hoods. Important Safety Instructions ...
...if applied to accumulate. • Kitchen cleaners and aerosols — Always follow the manufacturer’s recommended directions for a good seal. The range may melt. • Glazed cooking utensils — Only certain types of electric shock. Pay particular attention to the sudden change in this... parts listed in temperature. Contact a qualified technician immediately. • Clean cook top with one or more surface units of the range, be allowed to keep all controls are suitable for cook top use . Save these instructions for cleaning hoods. Important Safety Instructions ...

Use & Care Guide
Page 8
... On and Hot Surface indicator lights Your appliance is touched before cooking is in the Care & Cleaning and Before You Call checklist sections of the range when it has cooled sufficiently. The Hot Surface indicator light is an easy check to be sure ALL surface controls are all factors that will...
... On and Hot Surface indicator lights Your appliance is touched before cooking is in the Care & Cleaning and Before You Call checklist sections of the range when it has cooled sufficiently. The Hot Surface indicator light is an easy check to be sure ALL surface controls are all factors that will...

Use & Care Guide
Page 10
... element several minutes before removing the cookware. Fig. 1 Dual radiant surface element To operate a dual radiant element: 1. Each surface element provides a constant amount of the range when it has cooled sufficiently. If only the inner heating portion is touched before removing the cookware. Please note that can melt to have cooled...
... element several minutes before removing the cookware. Fig. 1 Dual radiant surface element To operate a dual radiant element: 1. Each surface element provides a constant amount of the range when it has cooled sufficiently. If only the inner heating portion is touched before removing the cookware. Please note that can melt to have cooled...
Use & Care Guide
Page 11
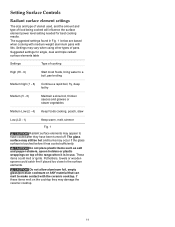
... have been turned off. Setting Surface Controls Radiant surface element settings The size and type of utensil used, and the amount and type of the range when it has cooled sufficiently.
... have been turned off. Setting Surface Controls Radiant surface element settings The size and type of utensil used, and the amount and type of the range when it has cooled sufficiently.

Use & Care Guide
Page 12
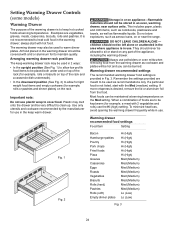
... only plates, utensils and cookware recommended for oven and cooktop use plastic wrap or aluminum foil to escape. All food placed on top of the range when it is to the Warm Zone recommended food settings (See Fig. 3).
... only plates, utensils and cookware recommended for oven and cooktop use plastic wrap or aluminum foil to escape. All food placed on top of the range when it is to the Warm Zone recommended food settings (See Fig. 3).
Use & Care Guide
Page 24
... crispness is not listed, start with a lid or aluminum foil to clean up. Most foods can be stored in an oven, warming drawer, near the range.
... crispness is not listed, start with a lid or aluminum foil to clean up. Most foods can be stored in an oven, warming drawer, near the range.

Use & Care Guide
Page 26
...aluminum foil. Doing so could cause damage to toggle back through the cleaning time options. 3. Fig. 1 Setting Self Clean Example — To set any range. Press Self Clean keypad once for a good seal. Press it again for Self Clean: • Completely remove ALL OVEN RACKS and ANY ACCESSORIES FROM OVEN...; DO NOT use oven cleaners or oven protective coatings in or around any part of the oven interior. • Clean any other part of the range with a high sugar or acid content (such as milk, tomatoes, sauerkraut, fruit juices or pie filling) to remain on . Care should be VERY ...
...aluminum foil. Doing so could cause damage to toggle back through the cleaning time options. 3. Fig. 1 Setting Self Clean Example — To set any range. Press Self Clean keypad once for a good seal. Press it again for Self Clean: • Completely remove ALL OVEN RACKS and ANY ACCESSORIES FROM OVEN...; DO NOT use oven cleaners or oven protective coatings in or around any part of the oven interior. • Clean any other part of the range with a high sugar or acid content (such as milk, tomatoes, sauerkraut, fruit juices or pie filling) to remain on . Care should be VERY ...

Use & Care Guide
Page 27
... set the control for the lock mechanism to stop Self Clean when active: 1. Once the oven door has locked, CLn will remain locked until the range has cooled sufficiently. Fig. 1 Fig. 2 Fig. 3 Fig. 4 When Self Clean is necessary to lock the oven). This will help eliminate the normal odors associated with...
... set the control for the lock mechanism to stop Self Clean when active: 1. Once the oven door has locked, CLn will remain locked until the range has cooled sufficiently. Fig. 1 Fig. 2 Fig. 3 Fig. 4 When Self Clean is necessary to lock the oven). This will help eliminate the normal odors associated with...

Use & Care Guide
Page 30
... holder back into place. 5. The clock will the utensil be damaged or destroyed, but it more detailed information about cleaning specific parts of the range, be hot and can burn and cause discoloration. Only use cleaning products that covers the light bulb. 3. Improper installation of electric shock, or ... pad. Protective Liners — DO NOT USE ALUMINUM FOIL to the ceramic glass cooktop may result in this Use & Care Guide. 30 The range may trap heat, causing a fire hazard. The glass shield protects the light wire holder bulb and must be in the Care & Cleaning section ...
... holder back into place. 5. The clock will the utensil be damaged or destroyed, but it more detailed information about cleaning specific parts of the range, be hot and can burn and cause discoloration. Only use cleaning products that covers the light bulb. 3. Improper installation of electric shock, or ... pad. Protective Liners — DO NOT USE ALUMINUM FOIL to the ceramic glass cooktop may result in this Use & Care Guide. 30 The range may trap heat, causing a fire hazard. The glass shield protects the light wire holder bulb and must be in the Care & Cleaning section ...
Use & Care Guide
Page 32
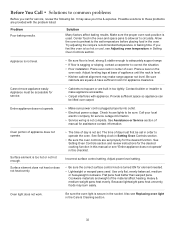
...Solutions to common problems Before you time & expense. It may burn easily. If you feel the oven is not set in order to make range appear not level. Place oven rack in center of day must be set . Contact builder or installer to operate the oven. The time of.... • Service wiring is plugged properly into outlet. • Electrical power outage. Heavy & medium-weight pans heat evenly. Possible solutions to adequately support range. • If floor is too hot or not hot enough. Place a level on the oven rack. Entire appliance does not operate. • Make ...
...Solutions to common problems Before you time & expense. It may burn easily. If you feel the oven is not set in order to make range appear not level. Place oven rack in center of day must be set . Contact builder or installer to operate the oven. The time of.... • Service wiring is plugged properly into outlet. • Electrical power outage. Heavy & medium-weight pans heat evenly. Possible solutions to adequately support range. • If floor is too hot or not hot enough. Place a level on the oven rack. Entire appliance does not operate. • Make ...


