Use & Care Guide
Page 4
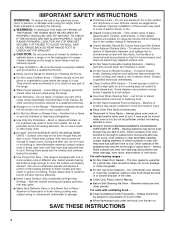
...touch, or let clothing or other glazed utensils are oven vent openings and surfaces near surface units. ■ Do Not Use Water on any part of clothing. During and after use aluminum foil to line surface unit drip bowls or oven bottoms, except as suggested in a risk of ... the risk of fire, electrical shock, injury to persons, or damage when using the range. ■ User Servicing - Do not repair or replace any part of the range. ■ Wear Proper Apparel - Improper installation of these openings, oven doors, and windows of glass, glass/ceramic, ceramic, earthenware, or...
...touch, or let clothing or other glazed utensils are oven vent openings and surfaces near surface units. ■ Do Not Use Water on any part of clothing. During and after use aluminum foil to line surface unit drip bowls or oven bottoms, except as suggested in a risk of ... the risk of fire, electrical shock, injury to persons, or damage when using the range. ■ User Servicing - Do not repair or replace any part of the range. ■ Wear Proper Apparel - Improper installation of these openings, oven doors, and windows of glass, glass/ceramic, ceramic, earthenware, or...

Use & Care Guide
Page 9
... cooktop. ■ To avoid damage to maintain food quality. The Warm Zone element area will glow red when an element is in any part of the cookware. However, the Element On light will help keep cooked foods warm. As the cooktop cools, air can cause pitting and...with slightly indented bottoms or small expansion channels can leave deposits when heated. ■ To avoid damage to maintain the selected heat level. Some parts of a ruler across the cooktop. It may require more cleaning and attention. Cooktop cleaner and a cooktop scraper are allowed to cool down slightly...
... cooktop. ■ To avoid damage to maintain food quality. The Warm Zone element area will glow red when an element is in any part of the cookware. However, the Element On light will help keep cooked foods warm. As the cooktop cools, air can cause pitting and...with slightly indented bottoms or small expansion channels can leave deposits when heated. ■ To avoid damage to maintain the selected heat level. Some parts of a ruler across the cooktop. It may require more cleaning and attention. Cooktop cleaner and a cooktop scraper are allowed to cool down slightly...

Use & Care Guide
Page 23
... tomato, should be displayed until the oven door unlocks and the lock icon turns off. These spills may remove numbers. ■ All-Purpose Appliance Cleaner Part Number 31682 (not included): See "Assistance or Service" section to delay the start. See "Assistance or Service" section to select the desired oven. The Cooktop...
... tomato, should be displayed until the oven door unlocks and the lock icon turns off. These spills may remove numbers. ■ All-Purpose Appliance Cleaner Part Number 31682 (not included): See "Assistance or Service" section to delay the start. See "Assistance or Service" section to select the desired oven. The Cooktop...

Use & Care Guide
Page 24
...9632; Glass cleaner and soft cloth or sponge: Apply glass cleaner to soft cloth or sponge, not directly on panel. ■ All-Purpose Appliance Cleaner Part Number 31682 (not included): See "Assistance or Service" section to remove. 3. If this happens, a light coating of vegetable oil applied to remove .... 24 To avoid turning the controls on while cleaning, you may activate the Control Lock feature (on panel. ■ All-Purpose Appliance Cleaner Part Number 31682 (not included): See "Assistance or Service" section to the control panel, do not use , it is not suggested to the rack...
...9632; Glass cleaner and soft cloth or sponge: Apply glass cleaner to soft cloth or sponge, not directly on panel. ■ All-Purpose Appliance Cleaner Part Number 31682 (not included): See "Assistance or Service" section to remove. 3. If this happens, a light coating of vegetable oil applied to remove .... 24 To avoid turning the controls on while cleaning, you may activate the Control Lock feature (on panel. ■ All-Purpose Appliance Cleaner Part Number 31682 (not included): See "Assistance or Service" section to the control panel, do not use , it is not suggested to the rack...
Use & Care Guide
Page 26
...us or your request. This information will help , follow the instructions below. If you need replacement parts If you still need to KitchenAid with any questions or concerns at: KitchenAid Brand Home Appliances Customer eXperience Center 553 Benson Road Benton Harbor, MI 49022-2692 Please include a ... in the "Glass TouchActivated Oven Control" section. Move rack to clear the display. These factory specified parts will not operate ■ Is the oven door open? Call the KitchenAid Customer eXperience Center toll free: 1-800-422-1230. For further assistance If you need adjustment? Oven...
...us or your request. This information will help , follow the instructions below. If you need replacement parts If you still need to KitchenAid with any questions or concerns at: KitchenAid Brand Home Appliances Customer eXperience Center 553 Benson Road Benton Harbor, MI 49022-2692 Please include a ... in the "Glass TouchActivated Oven Control" section. Move rack to clear the display. These factory specified parts will not operate ■ Is the oven door open? Call the KitchenAid Customer eXperience Center toll free: 1-800-422-1230. For further assistance If you need adjustment? Oven...

Use & Care Guide
Page 27
...components if defective in materials or workmanship: ■ Electric element ■ Solid state touch control system parts ■ Any cracking of your major appliance, to instruct you can write to KitchenAid Canada with : ■ Features and specifications on how to use or when it was purchased. ...States or Canada and applies only when the major appliance is used in the country in accordance with the product, KitchenAid will pay for Factory Specified Parts for other damage to the finish of the rubber seal between the ceramic glass cooktop and porcelain edge ■ Any...
...components if defective in materials or workmanship: ■ Electric element ■ Solid state touch control system parts ■ Any cracking of your major appliance, to instruct you can write to KitchenAid Canada with : ■ Features and specifications on how to use or when it was purchased. ...States or Canada and applies only when the major appliance is used in the country in accordance with the product, KitchenAid will pay for Factory Specified Parts for other damage to the finish of the rubber seal between the ceramic glass cooktop and porcelain edge ■ Any...

Use & Care Guide
Page 28
...installed in -home service is void if the factory applied serial number has been altered or removed from unauthorized modifications made to parts or systems resulting from your complete model number and serial number. Expenses for travel and transportation for future reference. DISCLAIMER OF ...your major appliance for in accordance with original model/serial numbers that have been removed, altered or cannot be borne by an authorized KitchenAid servicer is not installed in -warranty service. The removal and reinstallation of the Use & Care Guide. You can find additional help...
...installed in -home service is void if the factory applied serial number has been altered or removed from unauthorized modifications made to parts or systems resulting from your complete model number and serial number. Expenses for travel and transportation for future reference. DISCLAIMER OF ...your major appliance for in accordance with original model/serial numbers that have been removed, altered or cannot be borne by an authorized KitchenAid servicer is not installed in -warranty service. The removal and reinstallation of the Use & Care Guide. You can find additional help...
Installation Guide
Page 1
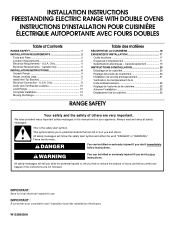
... 17 Exigences d'emplacement 17 Spécifications électriques - This symbol alerts you to reduce the chance of Contents RANGE SAFETY 1 INSTALLATION REQUIREMENTS 2 Tools and Parts 2 Location Requirements 2 Electrical Requirements - We have provided many important safety messages in this manual and on your appliance. All safety messages will follow the safety...
... 17 Exigences d'emplacement 17 Spécifications électriques - This symbol alerts you to reduce the chance of Contents RANGE SAFETY 1 INSTALLATION REQUIREMENTS 2 Tools and Parts 2 Location Requirements 2 Electrical Requirements - We have provided many important safety messages in this manual and on your appliance. All safety messages will follow the safety...

Installation Guide
Page 2
...temperatures of the cabinets. ■ Cabinet opening and must conform to the Manufactured Home Construction and Safety Standard, Title 24 CFR, Part 3280 (formerly the Federal Standard for convenient use with the range, see "Install Anti-Tip Bracket" section. ■ Grounded ... wiring will need to be used will not discolor, delaminate or sustain other damage. INSTALLATION REQUIREMENTS Tools and Parts Gather the required tools and parts before starting installation. Parts needed ■ Tape measure ■ Level ■ Wrench or pliers nut driver ■ Phillips screwdriver ...
...temperatures of the cabinets. ■ Cabinet opening and must conform to the Manufactured Home Construction and Safety Standard, Title 24 CFR, Part 3280 (formerly the Federal Standard for convenient use with the range, see "Install Anti-Tip Bracket" section. ■ Grounded ... wiring will need to be used will not discolor, delaminate or sustain other damage. INSTALLATION REQUIREMENTS Tools and Parts Gather the required tools and parts before starting installation. Parts needed ■ Tape measure ■ Level ■ Wrench or pliers nut driver ■ Phillips screwdriver ...
Installation Guide
Page 5
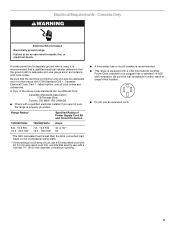
... adequate and in death, fire, or electrical shock. Electrical Requirements - Be sure that the ground path is equipped with CSA Standard C22.1, Canadian Electrical Code, Part 1 - A copy of the above code standards can result in conformance with a CSA International Certified Power Cord intended to be obtained from: Canadian Standards Association 178...
... adequate and in death, fire, or electrical shock. Electrical Requirements - Be sure that the ground path is equipped with CSA Standard C22.1, Canadian Electrical Code, Part 1 - A copy of the above code standards can result in conformance with a CSA International Certified Power Cord intended to be obtained from: Canadian Standards Association 178...

Installation Guide
Page 6
Remove oven racks and parts package from the carton. This may be done with the range on its back or with the other injury. 1. Adjust the leveling legs to remove. 6. ...
Remove oven racks and parts package from the carton. This may be done with the range on its back or with the other injury. 1. Adjust the leveling legs to remove. 6. ...

Installation Guide
Page 10
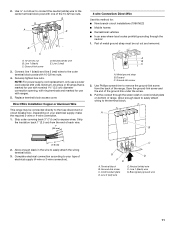
... range with ranges. 8. A C D A. Terminal block B. Terminal block B. Cord/conduit plate D. Cord/conduit plate D. Allow enough slack to easily attach the wiring to the terminal block. Part of range. A B C F E A B C A. Line 2 (red) 6. Connect line 1 (black) and line 2 (red) wires to the outer terminal block posts with ring terminals and marked for : ■ New...
... range with ranges. 8. A C D A. Terminal block B. Terminal block B. Cord/conduit plate D. Cord/conduit plate D. Allow enough slack to easily attach the wiring to the terminal block. Part of range. A B C F E A B C A. Line 2 (red) 6. Connect line 1 (black) and line 2 (red) wires to the outer terminal block posts with ring terminals and marked for : ■ New...
Installation Guide
Page 11
Replace terminal block access cover. Part of metal ground strap must be connected directly to the terminal block. Metal ground strap B. Allow enough slack to easily attach wiring to the fuse ...
Replace terminal block access cover. Part of metal ground strap must be connected directly to the terminal block. Metal ground strap B. Allow enough slack to easily attach wiring to the fuse ...
Installation Guide
Page 13
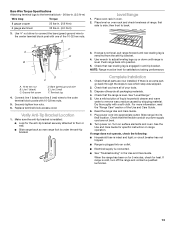
... not level, pull range forward until range is level. NOTE: Range must be level for specific instruction on range operation. Check that you have all parts are not bent. 8. Plug power cord into its final location. or circuit breaker has not tripped. ■ Range is plugged into position. 5. Place ...for 5 minutes, check for the anti-tip bracket securely attached to floor or wall. ■ Slide range back so rear range foot is an extra part, go back through the steps to see which step was skipped. 2. Replace terminal block access cover. If there is under the anti-tip bracket. 3....
... not level, pull range forward until range is level. NOTE: Range must be level for specific instruction on range operation. Check that you have all parts are not bent. 8. Plug power cord into its final location. or circuit breaker has not tripped. ■ Range is plugged into position. 5. Place ...for 5 minutes, check for the anti-tip bracket securely attached to floor or wall. ■ Slide range back so rear range foot is an extra part, go back through the steps to see which step was skipped. 2. Replace terminal block access cover. If there is under the anti-tip bracket. 3....
Installation Guide
Page 14
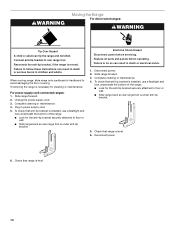
... moved. Reconnect the anti-tip bracket, if the range is level. 6. Failure to follow these instructions can tip the range and be killed. Replace all parts and panels before servicing. Complete cleaning or maintenance. 4.
... moved. Reconnect the anti-tip bracket, if the range is level. 6. Failure to follow these instructions can tip the range and be killed. Replace all parts and panels before servicing. Complete cleaning or maintenance. 4.


