
Use & Care Guide
Page 1
ELECTRIC RANGE ARCHITECT® SERIES II Use & Care Guide For questions about features, operation/performance, parts, accessories or service, call: 1-800-422-1230 or visit our website at www.kitchenaid.com In Canada, call for assistance, installation and service, call: 1-800-807-6777 or visit our website at www.KitchenAid.ca Table of Contents...2 Models KERS807 KESK901 KESS907 KESS908 YKERS807 YKESS907 YKESS908 W10246111B
ELECTRIC RANGE ARCHITECT® SERIES II Use & Care Guide For questions about features, operation/performance, parts, accessories or service, call: 1-800-422-1230 or visit our website at www.kitchenaid.com In Canada, call for assistance, installation and service, call: 1-800-807-6777 or visit our website at www.KitchenAid.ca Table of Contents...2 Models KERS807 KESK901 KESS907 KESS908 YKERS807 YKESS907 YKESS908 W10246111B

Use & Care Guide
Page 5
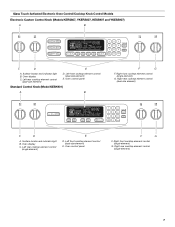
...) C. Hot surface indicator lights H. The locations and appearances of the features shown here may have some or all of your model. ALL OFF/control lock D. Glass Touch-Activated Electronic Oven Control Panel (Models KESS908 and YKESS908) A MED LOW HI ON F C CONTROL LOCKED CLEAN TIME PROBE TEMP HR MIN COOK TIME NIGHT LIGHT... DELAY MIN HR SEC MIN START TIME STOP TIME B A. Zone diameter indicator (triple) E. PARTS AND FEATURES This manual covers several different models. The range you have purchased may not match those of the items listed.
...) C. Hot surface indicator lights H. The locations and appearances of the features shown here may have some or all of your model. ALL OFF/control lock D. Glass Touch-Activated Electronic Oven Control Panel (Models KESS908 and YKESS908) A MED LOW HI ON F C CONTROL LOCKED CLEAN TIME PROBE TEMP HR MIN COOK TIME NIGHT LIGHT... DELAY MIN HR SEC MIN START TIME STOP TIME B A. Zone diameter indicator (triple) E. PARTS AND FEATURES This manual covers several different models. The range you have purchased may not match those of the items listed.

Use & Care Guide
Page 6
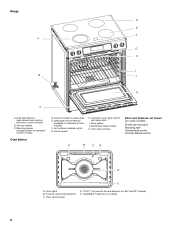
...cooking area H. Warming drawer Oven Interior E. Automatic oven light switch/self- Oven door window A B CA Parts and Features not shown (on some models) Broiler pan and grid Roasting rack Temperature probe D E A. Dual-size oval element B. Oven control panel I J K C L M D ...™ element (not visible) 6 Triple-size element C. Electronic cooktop touch controls G. Temperature probe jack (not shown) K. Model and serial number M. Full and center broil elements C. Oven lights B. T.H.E.™ convection fan and element (not visible) E. clean latch J.
...cooking area H. Warming drawer Oven Interior E. Automatic oven light switch/self- Oven door window A B CA Parts and Features not shown (on some models) Broiler pan and grid Roasting rack Temperature probe D E A. Dual-size oval element B. Oven control panel I J K C L M D ...™ element (not visible) 6 Triple-size element C. Electronic cooktop touch controls G. Temperature probe jack (not shown) K. Model and serial number M. Full and center broil elements C. Oven lights B. T.H.E.™ convection fan and element (not visible) E. clean latch J.
Use & Care Guide
Page 7
...G F. Right rear cooktop element control (single element) 7 Left rear cooktop element control (dual-size element) D. Oven control panel Standard Control Knob (Model KESK901) A B F G F. Left front cooktop element control (dual-size element) E. Oven display C. Surface locator and indicator light B. Left rear ... START TIME STOP TIME C D A. Oven display C. Glass Touch-Activated Electronic Oven Control/Cooktop Knob Control Models Electronic Custom Control Knob (Models KERS807, YKERS807, KESS907 and YKESS907) A B MED LOW HI ON F C CONTROL LOCKED CLEAN TIME PROBE...
...G F. Right rear cooktop element control (single element) 7 Left rear cooktop element control (dual-size element) D. Oven control panel Standard Control Knob (Model KESK901) A B F G F. Left front cooktop element control (dual-size element) E. Oven display C. Surface locator and indicator light B. Left rear ... START TIME STOP TIME C D A. Oven display C. Glass Touch-Activated Electronic Oven Control/Cooktop Knob Control Models Electronic Custom Control Knob (Models KERS807, YKERS807, KESS907 and YKESS907) A B MED LOW HI ON F C CONTROL LOCKED CLEAN TIME PROBE...
Use & Care Guide
Page 8
... cooking area E. Oven cavity sensor D. Door gasket J. Automatic oven light switch/ self-clean latch I B J K C A. Model and serial number K. Warming drawer (storage drawer on electronic control models) B. Oven lights B. Dual-size element (rear element also dual on standard control models) Oven Interior D. Hot surfaces indicator lights G. Oven door window Parts and Features not shown...
... cooking area E. Oven cavity sensor D. Door gasket J. Automatic oven light switch/ self-clean latch I B J K C A. Model and serial number K. Warming drawer (storage drawer on electronic control models) B. Oven lights B. Dual-size element (rear element also dual on standard control models) Oven Interior D. Hot surfaces indicator lights G. Oven door window Parts and Features not shown...

Use & Care Guide
Page 9
COOKTOP USE Ceramic Glass (on some models) ■ Determine flatness by placing the straight edge of a ruler across the cooktop. It is normal for the surface of the cookware. On cooktops with a ...
COOKTOP USE Ceramic Glass (on some models) ■ Determine flatness by placing the straight edge of a ruler across the cooktop. It is normal for the surface of the cookware. On cooktops with a ...

Use & Care Guide
Page 10
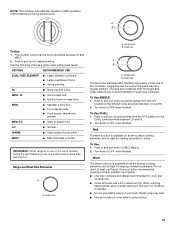
.... Single size B. Dual size MED-LO [4-5] ■ Stew or steam food. Fire Hazard Turn off at the same time. ■ On ceramic glass models, use or (on 2 surface cooking areas, elements or surface burners at the same time. 10 A. Single, Dual and Triple-Size Elements A A. Touch ..., canners should not extend more than ½" (1.3 cm) beyond the surface cooking area or element. ■ Do not place canner on some models) during the Self-Cleaning cycle, the entire cooktop area may become hot. SETTING RECOMMENDED USE DUAL and TRIPLESIZE ELEMENTS ■ Large diameter cookware. ...
.... Single size B. Dual size MED-LO [4-5] ■ Stew or steam food. Fire Hazard Turn off at the same time. ■ On ceramic glass models, use or (on 2 surface cooking areas, elements or surface burners at the same time. 10 A. Single, Dual and Triple-Size Elements A A. Touch ..., canners should not extend more than ½" (1.3 cm) beyond the surface cooking area or element. ■ Do not place canner on some models) during the Self-Cleaning cycle, the entire cooktop area may become hot. SETTING RECOMMENDED USE DUAL and TRIPLESIZE ELEMENTS ■ Large diameter cookware. ...

Use & Care Guide
Page 12
... Hazard Turn off . A. Dual size ••• SIMMER • A B Med • To Use: 1. Dual size The Dual-Size Elements offer flexibility depending on some models) during the Self-Cleaning cycle, the entire cooktop area may become hot. MELT ■ Melt chocolate or butter. Failure to desired setting. 12 A. Push in...
... Hazard Turn off . A. Dual size ••• SIMMER • A B Med • To Use: 1. Dual size The Dual-Size Elements offer flexibility depending on some models) during the Self-Cleaning cycle, the entire cooktop area may become hot. MELT ■ Melt chocolate or butter. Failure to desired setting. 12 A. Push in...

Use & Care Guide
Page 14
...- LO ■ Keep food warm. ■ Melt chocolate or butter. The light will glow as long as a regular element. Pro Line Knobs (Model KESS907XSP) WARNING A. Single size can be used in the same way as any surface cooking area is too hot to touch, even after the surface cooking ... A B POWER ON Lights Each control knob has a POWER ON light. The dual size combines both the single and outer element and is on some models) during the Self-Cleaning cycle, the entire cooktop area may become hot. Turn knob to MELT for larger size cookware, large quantities of heat settings...
...- LO ■ Keep food warm. ■ Melt chocolate or butter. The light will glow as long as a regular element. Pro Line Knobs (Model KESS907XSP) WARNING A. Single size can be used in the same way as any surface cooking area is too hot to touch, even after the surface cooking ... A B POWER ON Lights Each control knob has a POWER ON light. The dual size combines both the single and outer element and is on some models) during the Self-Cleaning cycle, the entire cooktop area may become hot. Turn knob to MELT for larger size cookware, large quantities of heat settings...
Use & Care Guide
Page 15
... or sear food. Single size B. To Use DUAL: 1. To Use: 1. Push in use or (on all the surface cooking elements, and is available on some models) during the Self-Cleaning cycle, the entire cooktop area may melt. ■ Use pot holders or oven mitts to remove food. 15 Plastic wrap may...
... or sear food. Single size B. To Use DUAL: 1. To Use: 1. Push in use or (on all the surface cooking elements, and is available on some models) during the Self-Cleaning cycle, the entire cooktop area may melt. ■ Use pot holders or oven mitts to remove food. 15 Plastic wrap may...
Use & Care Guide
Page 18
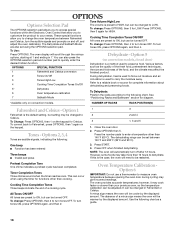
... the number pads to enter a temperature other than 140°F (60°C). NOTE: The oven will automatically turn the audible signals and prompts on convection models, closed door) Dehydration is preset to HIGH, but can be turned OFF. If this is used to carry the moisture away. 4 Cooking Time Completion Tones... ON, press OPTIONS again, and then 2. It can also press the OPTIONS selection pad and number pad to Fahrenheit, press OPTIONS, then 1 again on convection models. Use the following chart.
... the number pads to enter a temperature other than 140°F (60°C). NOTE: The oven will automatically turn the audible signals and prompts on convection models, closed door) Dehydration is preset to HIGH, but can be turned OFF. If this is used to carry the moisture away. 4 Cooking Time Completion Tones... ON, press OPTIONS again, and then 2. It can also press the OPTIONS selection pad and number pad to Fahrenheit, press OPTIONS, then 1 again on convection models. Use the following chart.

Use & Care Guide
Page 20
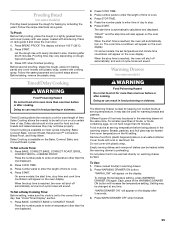
Always move freely. ■ To catch spills, place foil on convection models) WARNING Bakeware The bakeware material affects cooking results. NOTE: This oven automatically adjusts for using , insert the probe into the center of the thickest portion ... third of some birds is turned up at an angle as a guide. Close oven door. Press BAKE, CONVECT BAKE or CONVECT ROAST. Meat Thermometer On models without affecting cooking performance. Insulated cookie sheets or baking pans ■ Little or no bottom browning ■ Place in oven and connect the temperature probe...
Always move freely. ■ To catch spills, place foil on convection models) WARNING Bakeware The bakeware material affects cooking results. NOTE: This oven automatically adjusts for using , insert the probe into the center of the thickest portion ... third of some birds is turned up at an angle as a guide. Close oven door. Press BAKE, CONVECT BAKE or CONVECT ROAST. Meat Thermometer On models without affecting cooking performance. Insulated cookie sheets or baking pans ■ Little or no bottom browning ■ Place in oven and connect the temperature probe...

Use & Care Guide
Page 22
... the temperature, the slower the cooking. To Use: 1. Press the number pads to drain juices and help avoid spatter and smoke. Convection Cooking (on some models) In a convection oven, the fan-circulated hot air continually distributes heat more difficult. ■ If the oven door is opened during broiling, the broil element...
... the temperature, the slower the cooking. To Use: 1. Press the number pads to drain juices and help avoid spatter and smoke. Convection Cooking (on some models) In a convection oven, the fan-circulated hot air continually distributes heat more difficult. ■ If the oven door is opened during broiling, the broil element...

Use & Care Guide
Page 23
... in the display if the actual oven temperature is opened during convection baking or preheating, the convection element and fan will appear on some models) Convection cooking temperatures and times can be reduced also. It is helpful to stagger items on , 1 tone will sound if enabled.... and broil elements will show in intervals to select recipes that require similar temperatures. If the oven is reached. Use the roasting rack on some models) to the "Positioning Racks and Bakeware" section. 1. ■ Test baked goods for doneness a few minutes before the minimum cooking time with...
... in the display if the actual oven temperature is opened during convection baking or preheating, the convection element and fan will appear on some models) Convection cooking temperatures and times can be reduced also. It is helpful to stagger items on , 1 tone will sound if enabled.... and broil elements will show in intervals to select recipes that require similar temperatures. If the oven is reached. Use the roasting rack on some models) to the "Positioning Racks and Bakeware" section. 1. ■ Test baked goods for doneness a few minutes before the minimum cooking time with...

Use & Care Guide
Page 24
...°C) 180°F (82°C) * Do not stuff poultry when convection roasting. The convection broil range can be set oven temperature will cycle on some models) Convection Broil is preset at 450°F (232°C), but can be changed to preheat for general broiling guidelines. The set between 170°F and...
...°C) 180°F (82°C) * Do not stuff poultry when convection roasting. The convection broil range can be set oven temperature will cycle on some models) Convection Broil is preset at 450°F (232°C), but can be changed to preheat for general broiling guidelines. The set between 170°F and...
Use & Care Guide
Page 25
... cover loosely with plastic wrap, coated with plastic wrap. Before second proofing, shape the dough, place it in size, checking after cooking. On some models, the start time is reached, the oven will appear on the Bake, Convect Bake, and Convect Roast cycles. Press the number pads to enter ... directly on the display. The Warming Drawer is preheating. It may not bake properly. To Use: 1. To Set a Cook Time: 1. On some models, the set to turn on rack guide 2 and close the oven door. 1. For smaller quantities of day. The start should not be heated while ...
... cover loosely with plastic wrap, coated with plastic wrap. Before second proofing, shape the dough, place it in size, checking after cooking. On some models, the start time is reached, the oven will appear on the Bake, Convect Bake, and Convect Roast cycles. Press the number pads to enter ... directly on the display. The Warming Drawer is preheating. It may not bake properly. To Use: 1. To Set a Cook Time: 1. On some models, the set to turn on rack guide 2 and close the oven door. 1. For smaller quantities of day. The start should not be heated while ...

Use & Care Guide
Page 26
...low" temperature, but can be able to move freely. Depending on door frame. Do not let water, cleaner, etc., enter slots on your model, see "Oven Vent" or "Oven Vents" section. Keep children away from the oven because it becomes heavily soiled. Exposure to the fumes may ...HI (High) 195°F (91°C) Warming Drawer Temperature Chart Different foods require different settings in death to help get rid of some models) WARNING Burn Hazard Do not touch the oven during the Self-Cleaning cycle. Use the following chart as a guide when selecting a different ...
...low" temperature, but can be able to move freely. Depending on door frame. Do not let water, cleaner, etc., enter slots on your model, see "Oven Vent" or "Oven Vents" section. Keep children away from the oven because it becomes heavily soiled. Exposure to the fumes may ...HI (High) 195°F (91°C) Warming Drawer Temperature Chart Different foods require different settings in death to help get rid of some models) WARNING Burn Hazard Do not touch the oven during the Self-Cleaning cycle. Use the following chart as a guide when selecting a different ...

Use & Care Guide
Page 27
...: Rinse with clean water and dry with soft, lint-free cloth. To set to the correct time of grain to avoid damaging. ■ KitchenAid® Stainless Steel Cleaner and Polish (sample included): See "Assistance or Service" section to avoid streaking and staining. "DELAY" will also appear ...label instructions on the oven display. 5. Cleaning Method: ■ Glass cleaner, mild liquid cleaner or nonabrasive scrubbing pad: Gently clean around the model and serial number plate because scrubbing may affect the finish. To Self-Clean: Before self-cleaning, make sure the clock is set a clean ...
...: Rinse with clean water and dry with soft, lint-free cloth. To set to the correct time of grain to avoid damaging. ■ KitchenAid® Stainless Steel Cleaner and Polish (sample included): See "Assistance or Service" section to avoid streaking and staining. "DELAY" will also appear ...label instructions on the oven display. 5. Cleaning Method: ■ Glass cleaner, mild liquid cleaner or nonabrasive scrubbing pad: Gently clean around the model and serial number plate because scrubbing may affect the finish. To Self-Clean: Before self-cleaning, make sure the clock is set a clean ...

Use & Care Guide
Page 28
...as cooktop has cooled down. Metal marks from aluminum and copper ■ Cooktop Polishing Creme: Clean as soon as possible on some models). Rub creme into surface with porcelain and staining, etching, pitting or faint white spots can result. To avoid damage, do not use... damp paper towel or soft cloth. Do not remove seals under knobs. Food spills should be cleaned when oven cools. Cleaning Method: ■ KitchenAid® Stainless Steel Cleaner and Polish (sample included): See "Assistance or Service" section to order. ■ All-Purpose Appliance Cleaner (not included...
...as cooktop has cooled down. Metal marks from aluminum and copper ■ Cooktop Polishing Creme: Clean as soon as possible on some models). Rub creme into surface with porcelain and staining, etching, pitting or faint white spots can result. To avoid damage, do not use... damp paper towel or soft cloth. Do not remove seals under knobs. Food spills should be cleaned when oven cools. Cleaning Method: ■ KitchenAid® Stainless Steel Cleaner and Polish (sample included): See "Assistance or Service" section to order. ■ All-Purpose Appliance Cleaner (not included...

Use & Care Guide
Page 29
... stop. 2. Replace the fuse or reset the circuit breaker. See "Control Lock/All Off" in "Cooktop Controls - Excessive heat around cookware on your model. A. Pull both hanger arms into the door. 4. Push drawer in order to remove the drawer. Open the oven door. You should not extend more...it away from inside the warming drawer, and allow the warming drawer to cool completely before turning to a setting. ■ On some ceramic glass models, is cool and empty. Storage Drawer The storage drawer can be removed. Before removing, make sure drawer is the Cooktop Control Lock set? To ...
... stop. 2. Replace the fuse or reset the circuit breaker. See "Control Lock/All Off" in "Cooktop Controls - Excessive heat around cookware on your model. A. Pull both hanger arms into the door. 4. Push drawer in order to remove the drawer. Open the oven door. You should not extend more...it away from inside the warming drawer, and allow the warming drawer to cool completely before turning to a setting. ■ On some ceramic glass models, is cool and empty. Storage Drawer The storage drawer can be removed. Before removing, make sure drawer is the Cooktop Control Lock set? To ...

