
Use & Care Guide
Page 1
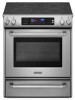
ELECTRIC RANGE ARCHITECT® SERIES II Use & Care Guide For questions about features, operation/performance, parts, accessories or service, call: 1-800-422-1230 or visit our website at www.kitchenaid.com In Canada, call for assistance, installation and service, call: 1-800-807-6777 or visit our website at www.KitchenAid.ca Table of Contents...2 Models KERS807 KESK901 KESS907 KESS908 YKERS807 YKESS907 YKESS908 W10246111B
ELECTRIC RANGE ARCHITECT® SERIES II Use & Care Guide For questions about features, operation/performance, parts, accessories or service, call: 1-800-422-1230 or visit our website at www.kitchenaid.com In Canada, call for assistance, installation and service, call: 1-800-807-6777 or visit our website at www.KitchenAid.ca Table of Contents...2 Models KERS807 KESK901 KESS907 KESS908 YKERS807 YKESS907 YKESS908 W10246111B

Use & Care Guide
Page 2
...22 EasyConvect™ Conversion 23 Convection Bake 23 Convection Roast 23 Convection Broil 24 Proofing Bread 25 Timed/Delay Cooking 25 Warming Drawer 25 RANGE CARE 26 Self-Cleaning Cycle 26 General Cleaning 27 Oven Light(s 28 Oven Door 28 Storage Drawer 29 Warming Drawer 29 TROUBLESHOOTING 29 ASSISTANCE... Lock 17 Off 17 Clock/Timer Display 17 Timer 17 OPTIONS 18 Options Selection Pad 18 Fahrenheit and Celsius - TABLE OF CONTENTS RANGE SAFETY 3 The Anti-Tip Bracket 3 PARTS AND FEATURES 5 COOKTOP USE 9 Ceramic Glass 9 Cookware 9 Home Canning 10 Cooktop Controls -
...22 EasyConvect™ Conversion 23 Convection Bake 23 Convection Roast 23 Convection Broil 24 Proofing Bread 25 Timed/Delay Cooking 25 Warming Drawer 25 RANGE CARE 26 Self-Cleaning Cycle 26 General Cleaning 27 Oven Light(s 28 Oven Door 28 Storage Drawer 29 Warming Drawer 29 TROUBLESHOOTING 29 ASSISTANCE... Lock 17 Off 17 Clock/Timer Display 17 Timer 17 OPTIONS 18 Options Selection Pad 18 Fahrenheit and Celsius - TABLE OF CONTENTS RANGE SAFETY 3 The Anti-Tip Bracket 3 PARTS AND FEATURES 5 COOKTOP USE 9 Ceramic Glass 9 Cookware 9 Home Canning 10 Cooktop Controls -

Use & Care Guide
Page 3
... known to the State of California to follow the safety alert symbol and either the word "DANGER" or "WARNING." However, the range can kill or hurt you don't follow instructions. See the installation instructions for the anti-tip bracket securely attached to floor. • Slide... range back so rear range foot is , tell you how to potential hazards that can tip if you what the potential hazard is under anti-tip bracket. ...
... known to the State of California to follow the safety alert symbol and either the word "DANGER" or "WARNING." However, the range can kill or hurt you don't follow instructions. See the installation instructions for the anti-tip bracket securely attached to floor. • Slide... range back so rear range foot is , tell you how to potential hazards that can tip if you what the potential hazard is under anti-tip bracket. ...

Use & Care Guide
Page 4
... time to cool. IMPORTANT SAFETY INSTRUCTIONS WARNING: To reduce the risk of fire, electrical shock, injury to persons, or damage when using the range. ■ User Servicing - Do not repair or replace any kind should break, cleaning solutions and spillovers may become hot enough to cause burns...areas are oven vent openings and surfaces near surface units. ■ Do Not Use Water on . Proper relationship of any part of the range unless specifically recommended in the manual. Interior surfaces of clothing. The door gasket is used in or around any part of interest to accumulate...
... time to cool. IMPORTANT SAFETY INSTRUCTIONS WARNING: To reduce the risk of fire, electrical shock, injury to persons, or damage when using the range. ■ User Servicing - Do not repair or replace any kind should break, cleaning solutions and spillovers may become hot enough to cause burns...areas are oven vent openings and surfaces near surface units. ■ Do Not Use Water on . Proper relationship of any part of the range unless specifically recommended in the manual. Interior surfaces of clothing. The door gasket is used in or around any part of interest to accumulate...

Use & Care Guide
Page 5
... all of your model. ALL OFF/control lock D. Zone diameter indicator (dual) G. Left front touch control (triple-size element) I . Increase/Decrease temperature touch control H J. The range you have purchased may not match those of the items listed. Right front touch control (single element) C. Zone diameter indicator (single) I F. Left rear touch control...
... all of your model. ALL OFF/control lock D. Zone diameter indicator (dual) G. Left front touch control (triple-size element) I . Increase/Decrease temperature touch control H J. The range you have purchased may not match those of the items listed. Right front touch control (single element) C. Zone diameter indicator (single) I F. Left rear touch control...

Use & Care Guide
Page 6
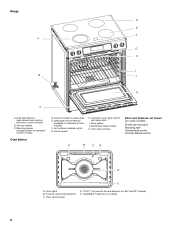
... touch controls G. clean latch J. Oven cavity sensor D. Oven lights B. CleanBake™ element (not visible) 6 Automatic oven light switch/self- Anti-tip bracket D. Oven control panel I J K C L M D A. Range E A F G B H I . Dual-size oval element B. T.H.E.™ convection fan and element (not visible) E.
... touch controls G. clean latch J. Oven cavity sensor D. Oven lights B. CleanBake™ element (not visible) 6 Automatic oven light switch/self- Anti-tip bracket D. Oven control panel I J K C L M D A. Range E A F G B H I . Dual-size oval element B. T.H.E.™ convection fan and element (not visible) E.
Use & Care Guide
Page 8
Anti-tip bracket C. Full and center broil elements C. Range D E F A G H I . Hot surfaces indicator lights G. T.H.E.™ convection fan and element (on standard control models) Oven Interior D. Warming drawer (storage drawer on 807 and 907 models) E. Selectable ...
Anti-tip bracket C. Full and center broil elements C. Range D E F A G H I . Hot surfaces indicator lights G. T.H.E.™ convection fan and element (on standard control models) Oven Interior D. Warming drawer (storage drawer on 807 and 907 models) E. Selectable ...

Use & Care Guide
Page 10
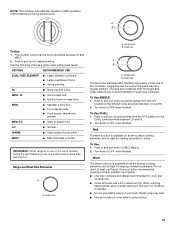
...as chocolate or butter, the surface cooking area can be set to do so can also offer assistance. LO-3 [SIMMER] ■ Simmer (range of heat settings for optimal cooking results. NOTE: This cooktop automatically adjusts for the most recently used areas to KEEP WARM. Single size A ... brown or sear food. MED-LO [4-5] ■ Stew or steam food. Failure to MELT & HOLD for very low temperature operation. REMEMBER: When range is in death or fire. Touch ON/OFF. 2. Single size B. This allows time for 208V operation without affecting cooking performance. HI ■ Bring...
...as chocolate or butter, the surface cooking area can be set to do so can also offer assistance. LO-3 [SIMMER] ■ Simmer (range of heat settings for optimal cooking results. NOTE: This cooktop automatically adjusts for the most recently used areas to KEEP WARM. Single size A ... brown or sear food. MED-LO [4-5] ■ Stew or steam food. Failure to MELT & HOLD for very low temperature operation. REMEMBER: When range is in death or fire. Touch ON/OFF. 2. Single size B. This allows time for 208V operation without affecting cooking performance. HI ■ Bring...

Use & Care Guide
Page 12
...■ Hold a rapid boil. ■ Quickly brown or sear food. MELT ■ Melt chocolate or butter. REMEMBER: When range is recommended for minimal element operation. To keep cooked foods warm or to heat serving dishes, the surface cooking area can be set ...H i A. Hot surface indicator light Cooktop Controls - MED- NOTE: This cooktop automatically adjusts for optimal cooking results. LO [SIMMER] ■ Simmer (range of the cookware. WARM ■ Keep cooked foods warm. Fire Hazard Turn off . Push in and turn to a boil. Dual size ••...
...■ Hold a rapid boil. ■ Quickly brown or sear food. MELT ■ Melt chocolate or butter. REMEMBER: When range is recommended for minimal element operation. To keep cooked foods warm or to heat serving dishes, the surface cooking area can be set ...H i A. Hot surface indicator light Cooktop Controls - MED- NOTE: This cooktop automatically adjusts for optimal cooking results. LO [SIMMER] ■ Simmer (range of the cookware. WARM ■ Keep cooked foods warm. Fire Hazard Turn off . Push in and turn to a boil. Dual size ••...

Use & Care Guide
Page 14
...A. Single size can result in death or fire. Turn knob to the SINGLE zone anywhere between LO and HI. 2. MED- REMEMBER: When range is on some models) during the Self-Cleaning cycle, the entire cooktop area may become hot. Single size A B POWER ON Lights Each ...recommended for optimal cooking results. For maximum element operation, all controls when done cooking. To Use SINGLE: 1. Pro Line Knobs (Model KESS907XSP) WARNING A. Dual size The Dual-Size Elements offer flexibility depending on indicator light Hot Surface Indicator Light The hot surface indicator light ...
...A. Single size can result in death or fire. Turn knob to the SINGLE zone anywhere between LO and HI. 2. MED- REMEMBER: When range is on some models) during the Self-Cleaning cycle, the entire cooktop area may become hot. Single size A B POWER ON Lights Each ...recommended for optimal cooking results. For maximum element operation, all controls when done cooking. To Use SINGLE: 1. Pro Line Knobs (Model KESS907XSP) WARNING A. Dual size The Dual-Size Elements offer flexibility depending on indicator light Hot Surface Indicator Light The hot surface indicator light ...
Use & Care Guide
Page 15
... Use: 1. Warm The Warm function is available on the size of food. ■ Home canning. Do not use plastic wrap to desired setting. REMEMBER: When range is ideal for oven and cooktop use or (on all foods with a lid or aluminum foil. Dual size The Dual-Size Elements offer flexibility depending...
... Use: 1. Warm The Warm function is available on the size of food. ■ Home canning. Do not use plastic wrap to desired setting. REMEMBER: When range is ideal for oven and cooktop use or (on all foods with a lid or aluminum foil. Dual size The Dual-Size Elements offer flexibility depending...
Use & Care Guide
Page 17
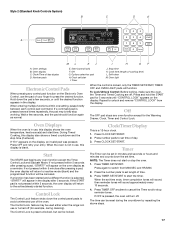
..., use of time. 3. Clock/Timer Display This is in use , this display is pressed several times repeatedly, the pad may be used either when the range is preset unlocked, but can be locked. NOTE: The Timer does not start I H GF A. The time can be canceled. Oven settings B. Timer J. If not pressed...
..., use of time. 3. Clock/Timer Display This is in use , this display is pressed several times repeatedly, the pad may be used either when the range is preset unlocked, but can be locked. NOTE: The Timer does not start I H GF A. The time can be canceled. Oven settings B. Timer J. If not pressed...
Use & Care Guide
Page 18
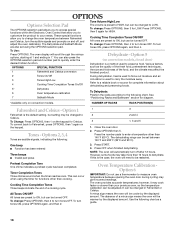
... incorrect readings. Close the oven door. 2. Press OPTIONS then 5. Press the number pads to turn the audible signals and prompts on the keypad. The dehydrating range can be cooler by the displayed amount. Press START. 4. NOTE: The oven will scroll through the various options, starting at 1 and ending in Fahrenheit or...
... incorrect readings. Close the oven door. 2. Press OPTIONS then 5. Press the number pads to turn the audible signals and prompts on the keypad. The dehydrating range can be cooler by the displayed amount. Press START. 4. NOTE: The oven will scroll through the various options, starting at 1 and ending in Fahrenheit or...

Use & Care Guide
Page 19
... Mode can result in the Sabbath Mode. Press START to 24 seconds. Press BAKE. "SABBATH MODE" will not turn on or off immediately. The bake range can be set , the oven must first be changed until desired temperature level is opened or closed, the oven light will appear on for only... Sabbath Mode can be enabled with a one hour before the oven is pressed. When the oven door is displayed) before or after cooking. The bake range can be set between 170°F and 500°F (77°C and 260°C). 2. "SABBATH MODE" will appear on or off and the heating elements...
... Mode can result in the Sabbath Mode. Press START to 24 seconds. Press BAKE. "SABBATH MODE" will not turn on or off immediately. The bake range can be set , the oven must first be changed until desired temperature level is opened or closed, the oven light will appear on for only... Sabbath Mode can be enabled with a one hour before the oven is pressed. When the oven door is displayed) before or after cooking. The bake range can be set between 170°F and 500°F (77°C and 260°C). 2. "SABBATH MODE" will appear on or off and the heating elements...

Use & Care Guide
Page 21
... and remove food from the probe jack. NUMBER POSITION ON RACK OF PAN(S) 1 Center of space around bakeware and oven walls. For baking, allow the range to maintain oven temperature. 3. Bake The BAKE function is directly over another. Positioning Racks and Bakeware IMPORTANT: To avoid permanent damage to preheat before turning...
... and remove food from the probe jack. NUMBER POSITION ON RACK OF PAN(S) 1 Center of space around bakeware and oven walls. For baking, allow the range to maintain oven temperature. 3. Bake The BAKE function is directly over another. Positioning Racks and Bakeware IMPORTANT: To avoid permanent damage to preheat before turning...

Use & Care Guide
Page 23
... to be used to enter a temperature other than 325°F (163°C). Press OFF when finished cooking. Allow the range to circulate completely around all heat the oven cavity. The convection bake range can be reduced also. This holds the food above the grid and allows air to preheat before putting food...
... to be used to enter a temperature other than 325°F (163°C). Press OFF when finished cooking. Allow the range to circulate completely around all heat the oven cavity. The convection bake range can be reduced also. This holds the food above the grid and allows air to preheat before putting food...

Use & Care Guide
Page 24
... oven temperature will appear on , 1 tone will show the oven temperature increasing in the center of foods is closed. The convection broil range can be adjusted. Press CONVECT ROAST. "Lo" will also appear in the display until oven is opened during convection broiling, the broil... FOOD TEMP. Close the door. 1. The set between 300°F and 500°F (149°C and 260°C). 2. The convection roast range can be ordered. vegetables and garlic bread. Press OFF when finished cooking. 24 See "Assistance or Service" section to enter a temperature other than ...
... oven temperature will appear on , 1 tone will show the oven temperature increasing in the center of foods is closed. The convection broil range can be adjusted. Press CONVECT ROAST. "Lo" will also appear in the display until oven is opened during convection broiling, the broil... FOOD TEMP. Close the door. 1. The set between 300°F and 500°F (149°C and 260°C). 2. The convection roast range can be ordered. vegetables and garlic bread. Press OFF when finished cooking. 24 See "Assistance or Service" section to enter a temperature other than ...

Use & Care Guide
Page 26
... Double Crust LOW LOW Pizza MED HI Potatoes, Baked MED HI Quiche MED Roast, Boneless MED HI Roasted Chicken MED HI Soft Rolls LOW 26 RANGE CARE Self-Cleaning Cycle (on your model, see "Oven Vent" or "Oven Vents" section. Keep the kitchen well-ventilated during Self-Cleaning cycle. Do not...
... Double Crust LOW LOW Pizza MED HI Potatoes, Baked MED HI Quiche MED Roast, Boneless MED HI Roasted Chicken MED HI Soft Rolls LOW 26 RANGE CARE Self-Cleaning Cycle (on your model, see "Oven Vent" or "Oven Vents" section. Keep the kitchen well-ventilated during Self-Cleaning cycle. Do not...

Use & Care Guide
Page 27
...door will also appear on the oven display. 5. Store razor blades out of the reach of day. Use the following chart as the entire range is still warm. Press SELF CLEAN. The clean time can be set a clean time other than 3 hours 30 minutes, press SELF CLEAN ... 30 minutes, press SELF CLEAN until white film disappears. 27 Press the number pads to enter the time of grain to avoid damaging. ■ KitchenAid® Stainless Steel Cleaner and Polish (sample included): See "Assistance or Service" section to condition the cooktop, and can be changed. EXTERIOR PORCELAIN...
...door will also appear on the oven display. 5. Store razor blades out of the reach of day. Use the following chart as the entire range is still warm. Press SELF CLEAN. The clean time can be set a clean time other than 3 hours 30 minutes, press SELF CLEAN ... 30 minutes, press SELF CLEAN until white film disappears. 27 Press the number pads to enter the time of grain to avoid damaging. ■ KitchenAid® Stainless Steel Cleaner and Polish (sample included): See "Assistance or Service" section to condition the cooktop, and can be changed. EXTERIOR PORCELAIN...

Use & Care Guide
Page 28
... Make sure drawer is cool. Remove racks or they will not totally disappear but after many cleanings become less noticeable. Cleaning Method: ■ KitchenAid® Stainless Steel Cleaner and Polish (sample included): See "Assistance or Service" section to order. ■ All-Purpose Appliance Cleaner (not ...closed, press OVEN LIGHT to order. ■ Mild detergent Oven Light(s) The oven light is opened. Turn the glass bulb cover in range or reconnect power. Tiny scratches and abrasions ■ Cooktop Polishing Creme: Rub creme into surface with a damp paper towel or soft cloth...
... Make sure drawer is cool. Remove racks or they will not totally disappear but after many cleanings become less noticeable. Cleaning Method: ■ KitchenAid® Stainless Steel Cleaner and Polish (sample included): See "Assistance or Service" section to order. ■ All-Purpose Appliance Cleaner (not ...closed, press OVEN LIGHT to order. ■ Mild detergent Oven Light(s) The oven light is opened. Turn the glass bulb cover in range or reconnect power. Tiny scratches and abrasions ■ Cooktop Polishing Creme: Rub creme into surface with a damp paper towel or soft cloth...


