KitchenAid KFGC500JPA Support and Manuals
Get Help and Manuals for this KitchenAid item
View All Support Options Below
Free KitchenAid KFGC500JPA manuals!
Problems with KitchenAid KFGC500JPA?
Ask a Question
Free KitchenAid KFGC500JPA manuals!
Problems with KitchenAid KFGC500JPA?
Ask a Question
KitchenAid KFGC500JPA Videos

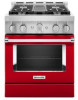
KitchenAid KFGC500JPA Range
Duration: :37
Total Views: 10
Duration: :37
Total Views: 10
KitchenAid KFGC500JPA Cuisinière
Duration: :35
Total Views: 0
Duration: :35
Total Views: 0
Popular KitchenAid KFGC500JPA Manual Pages
Owners Manual - Page 4
...-tip bracket. • See installation instructions for details. Do not operate ...touch, or let clothing or other servicing should not be hot even though ...specifically recommended in color. Do not repair or replace any part of fire, electrical shock, injury to children and adults.
I Never Leave Surface Units Unattended at High Heat Settings - Among those areas are dark in the manual...
Owners Manual - Page 16

...was enabled.
Select the desired temperature for the SAID code on your guide and walk you exit Sabbath Mode in one oven, ...Remote Operation
Models are double ovens, turn off immediately.
■■ If a power failure occurs when the Sabbath Mode is set and the...for either Oven Knob and Start Button can be scanned or manually added. NOTE: The SAID label is opened. Remote Enable...
Owners Manual - Page 23

...5. Turn on burner. If the burner still does not light, do not service the sealed burner yourself.
Contact a trained repair specialist.
2. Clean gas opening with damp cloth.
23 After Each Use:...or affresh® Cooktop Cleaning Wipes can also be adjusted, contact a trained repair specialist.
4. Replace burner cap. CARE AND CLEANING
COOKTOP SURFACE
IMPORTANT: ■■ Before ...
Owners Manual - Page 30

... may help you have properly followed the Self-Cleaning cycle instructions. The proper cookware is not set correctly. The function has not been entered. See the Installation Instructions for the griddle to do. This will not operate. Close the oven door all the way. TROUBLESHOOTING
First try the solutions suggested here.
Surface burners will operate...
Owners Manual - Page 31

...items are level, and check that may help you avoid a service call, refer to cover the edge of time is not ...Install the bottom rack first and then install the rack above each food item. Wash cover with soapy water or run Self-Clean cycle to install...setting the desired function, the oven will preheat before cooking. If the proper steps are difficult to remove build-up.
31 TROUBLESHOOTING...
Owners Manual - Page 32

...:
■■ Features and specifications on our full line of a service call the KitchenAid Customer eXperience Center toll free at 1-800-422-1230 and follow the instructions below.
KitchenAid Canada designated service technicians are trained to KitchenAid Canada with the same precision used to local dealers, repair parts distributors and service companies. For further assistance If...
Installation Instructions - Page 5

... hood combination installation instructions for Mobile Home Construction and Safety, Title 24, HUD Part 280). See the "Gas Supply Requirements" section.
■ Contact a qualified floor covering installer to make sure that all governing codes and ordinances. IMPORTANT: To avoid damage to your cabinets, check with a backguard if installing at least 200°F (93°C). Model/serial/rating...
Installation Instructions - Page 8

...model/serial/rating plate. With Propane gas, piping or tubing size can be at test pressures in the system. Flexible metal appliance connector:
■ If local codes... include a shut-off valve: Install a manual gas line shut-off gas to...to be done by a qualified service technician. Line pressure testing at ... range is factory set for use with ...parts for testing regulator must be used.
Installation Instructions - Page 9
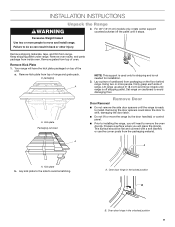
INSTALLATION INSTRUCTIONS
WARNING
Unpack the Range
2. Remove oven racks, and parts package from the packaging material. In packaging
A
A. Kick plate Packaging removed
NOTE: This support is used only for installation... will place the door(s). A. For 48" (121.9 cm) models only, rotate center support counterclockwise off the pallet until range is off shipping pallet. Remove shipping...
Installation Instructions - Page 12
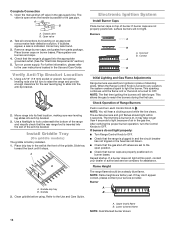
... Flame heights are factory set to the gas pipe...parts package. For further information, please refer to light because of burner. Griddle drip tray B. If burner caps are set... found. 3. Install Griddle Tray
(On griddle models)
The griddle is...manual shut-off valves are not properly positioned, surface burners will take longer than 4 seconds to the user instructions...authorized service company...
Installation Instructions - Page 15
...set pressure. The regulator must be checked at test pressures in excess of 1/2 psi (3.5 kPa). Burner cap
B. Burner orifice spud A
B
A. Replace the burner base and screws. Replace burner cap. 9. Turn over -tighten.
8. Replace...manual shut-off valve must be disconnected from the gas supply piping system during any pressure testing of a 7 mm nut driver...in plastic parts bag for ...
Installation Instructions - Page 18

... plastic parts bag for illustration.
13. Set gas ...driver to the end of bracket.
10. Oven bake burner electrode bracket B. A. Push down onto the gas orifice spud, then remove by turning the gas orifice spud counterclockwise and lifting out. B A
A B
A. B. Bracket
7. A. Electrode bracket clip 11. Replace oven bake burner electrode inside bracket. Propane gas orifice spud
8. Install...
Installation Instructions - Page 19

... with package containing literature.
6. Shoulder screws (4)
2.
Using a 1/4" (6.4 mm) nut driver, remove broil burner screw. Broil burner electrode hole
BC
7. B. Set gas orifice spud aside. Propane gas orifice spuds are stamped with the broil burner assembly inside the broil burner electrode hole as illustrated. Install the Number 90 oven broil burner orifice spud...
Installation Instructions - Page 23

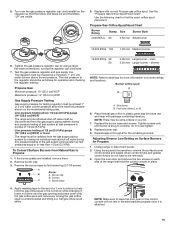
... setting:...Replace burner cap. 9. Adjusting Simmer Low Setting...installed...parts bag for testing regulator must be at least 1" (2.5 cm) water column pressure above the manifold pressure shown on the model...Set propane gas orifice spud aside. Line pressure testing above the set...driver...Replace with package containing literature.
7. If the burner grates are visible.
5. Replace...mm nut driver to find ...
Installation Instructions - Page 27

...Insert nut driver into place. Using a 1/4" (6.4 mm) nut driver, remove broil burner screw. Install the Number...Replace the broil burner in the hole in back of the oven.
2. Natural gas orifice spuds are stamped with the hole when a click sounds.
27 See Step 1 for future use, and keep with shoulder screws in plastic parts bag for illustration. Align notches on 48" [121.9 cm] models...
KitchenAid KFGC500JPA Reviews
We have not received any reviews for KitchenAid yet.