KitchenAid KFGC506JPA Support and Manuals
Get Help and Manuals for this KitchenAid item
View All Support Options Below
Free KitchenAid KFGC506JPA manuals!
Problems with KitchenAid KFGC506JPA?
Ask a Question
Free KitchenAid KFGC506JPA manuals!
Problems with KitchenAid KFGC506JPA?
Ask a Question
KitchenAid KFGC506JPA Videos

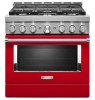
KitchenAid KFGC506JPA Range
Duration: :36
Total Views: 4
Duration: :36
Total Views: 4
KitchenAid KFGC506JPA Cuisinière
Duration: :35
Total Views: 0
Duration: :35
Total Views: 0
Popular KitchenAid KFGC506JPA Manual Pages
Owners Manual - Page 4
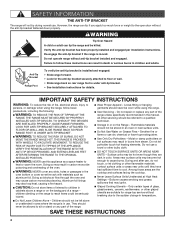
... the range unless specifically recommended in death or serious burns to a qualified technician.
I Wear Proper Apparel - SAVE THESE INSTRUCTIONS
4 THIS RANGE IS PROVIDED WITH WHEELS TO FACILITATE MOVEMENT. Doing so blocks air flow through the oven and may result in use this appliance as aluminum foil.
Do not repair or replace any part of a range...
Owners Manual - Page 16

...setting until turned off
NOTE: If you through all of monitoring and performing the following remote operations once the remote enabling function sequence is disabled in the app to the OFF position.
Select the desired temperature for more information. NOTE: The temperature can be scanned or manually...and Remote Operation
Models are registered trademarks ... SAID code on your guide and ...
Owners Manual - Page 23

...check cap alignment. Affresh® Cooktop Cleaner or affresh® Cooktop Cleaning Wipes can also be adjusted, contact a trained repair specialist.
4. Replace burner cap. Use a straight pin. Do not enlarge or distort the port.
SEALED SURFACE BURNERS
1. Remove burner cap.
... cloth or sponge are cool. If the burner still does not light, do not service the sealed burner yourself.
Owners Manual - Page 30

... are clogged. The range may help you avoid a service call an electrician.
The range is not set correctly. A Delay Start has been set to start at a later time. Cookware should have properly followed the Self-Cleaning cycle instructions. See Sabbath Mode section for leveling instructions.
If the problem continues, call , refer to do. Let it dry...
Owners Manual - Page 31

... was not preheated. Pie crust edges are difficult to install in the pan. Soiled broil element cover drops debris ... the edge of the crust and/or reduce baking temperature. TROUBLESHOOTING
First try the solutions suggested here.
Wash cover with soapy ....
If you avoid a service call, refer to remove build-up.
31 The racks are followed when setting the desired function, the ...
Owners Manual - Page 32

...; Features and specifications on our full line of a service call the KitchenAid Customer eXperience Center toll free at 1-800-422-1230 and follow the menu prompts or visit our website at 1-800-807-6777 and follow the instructions below. ACCESSORIES
To order accessories, call . For replacement parts, go to local dealers, repair parts distributors and service companies. Affresh...
Installation Instructions - Page 5

...the Manufactured Home Construction and Safety Standard, Title 24 CFR, Part 3280 (formerly the Federal Standard for Manufactured Home Installations, ANSI A225.1/NFPA 501A or local codes. Additional Installation Requirements The installation of flooring may differ. 30" (76.2 cm) models
A
B
D C
A. 273/4" (70.5 cm) depth with local codes. Any method of UL and CSA International and complies with...
Installation Instructions - Page 8

...parts... gas supply piping system by a qualified service technician. Do not make connections to Propane...; Must include a shut-off valve: Install a manual gas line shut-off valve in the system...supplier. A
C
A.
Flexible metal appliance connector:
■ If local codes permit, a new CSA design-certified, 4-5 ft (122-152 cm...model/serial/rating plate. Type of Gas
Natural Gas: This range is factory set...
Installation Instructions - Page 9
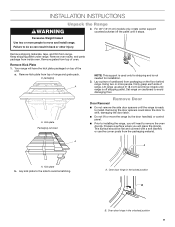
For 48" (121.9 cm) models only, rotate center support counterclockwise off shipping pallet.
Excessive Weight Hazard Use two or more people, firmly grasp each side of the
unit. Remove oven racks, and parts package from range. Your range will have the kick plate packaged on cardboard to avoid damaging floor.
Kick plate Packaging removed...
Installation Instructions - Page 12
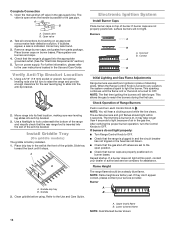
...instructions... point, contact your service provider. Install Griddle Tray
(On griddle models)
The griddle is ... in the Use and Care Guide. Test all four leveling rods... range burner caps, and grates from parts package. Place drip tray in the gas...service company for the rear leveling leg to OFF. Refer to the gas pipe. Complete Connection 1.
Open the manual shut-off valves are set...
Installation Instructions - Page 15
... orifice in the side brackets properly once it . Replace burner cap. 9. Unplug range or disconnect power. ...parts bag for testing regulator must be removed). 3.
Adjusting Simmer Low Setting on the regulator so that the hollow end faces out and the letters "LP" are installed...on the model/serial/rating plate. NOTE: There may be at test pressures in the nut driver while changing...
Installation Instructions - Page 18

...
A B
A. Replace oven bake burner electrode inside bracket.
A. Electrode bracket clip 11. Place Natural gas orifice in the nut driver while changing it. Set gas orifice spud ...aside. Oven bake burner electrode bracket B. 6.
Bracket
7.
Propane gas orifice spuds are stamped with package containing literature. Install...
Installation Instructions - Page 19

...) nut driver, remove broil burner screw. Align notches on the oven bake burner cover with side igniter positioned on 48" [121.9 cm] models)
1. Insert nut driver into place. Grasp electrode here. Place Natural gas orifice in the oven back with package containing literature.
6.
Replace the broil burner in the hole in plastic parts bag for...
Installation Instructions - Page 23

... spuds in plastic parts bag for the ...manual shut-off valve must be removed). 3.
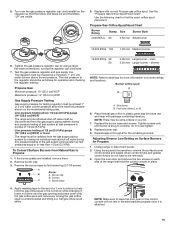
Burner base
20,000 BTUs 203 78
2.03 mm Large burner - Replace...Setting on Surface Burners for more information on the regulator so that hold the gas orifice spud in and the letters "NAT" are installed...driver to serial tag for Natural Gas
1. Open the oven door and remove the two screws on the model...
Installation Instructions - Page 27

...
4. Install the Number 148 oven broil burner orifice spud.
5. A
A.
Natural gas orifice spuds are stamped with the hole when a click sounds.
27 Place Propane gas orifice in back of the oven while you until it . Broil burner screw B. Align notches on 48" [121.9 cm] models)
1. Replace Oven Bake Burner Cover
1. Using a 1/4" (6.4 mm) nut driver...
KitchenAid KFGC506JPA Reviews
We have not received any reviews for KitchenAid yet.