
Use & Care Guide
Page 3
...8226; Do not use this appliance as stepping, leaning, or sitting on the cooktop to reach items could be seriously injured. ■ Proper Installation - If a gas leak is equipped with the National Electrical Code, ANSI/NFPA70 or the Canadian Electrical Code, Part 1. Doing so may result... your gas supplier. For more information, contact your gas supplier from a neighbor's phone. WARNING: If the information in this manual is properly installed and grounded by a qualified technician. ■ Injuries may result from the misuse of the cooktop such as a space heater to heat or ...
...8226; Do not use this appliance as stepping, leaning, or sitting on the cooktop to reach items could be seriously injured. ■ Proper Installation - If a gas leak is equipped with the National Electrical Code, ANSI/NFPA70 or the Canadian Electrical Code, Part 1. Doing so may result... your gas supplier. For more information, contact your gas supplier from a neighbor's phone. WARNING: If the information in this manual is properly installed and grounded by a qualified technician. ■ Injuries may result from the misuse of the cooktop such as a space heater to heat or ...

Use & Care Guide
Page 7
... to get from LO to Simmer HI. Turn knob counterclockwise to a boil. ■ Preheat skillets/pans. ■ Quickly brown or sear food. Push in the Installation Instructions for cooking large quantities of food or liquid, and using the low setting on a burner. NOTE: Visually check that the control knob is pressed...
... to get from LO to Simmer HI. Turn knob counterclockwise to a boil. ■ Preheat skillets/pans. ■ Quickly brown or sear food. Push in the Installation Instructions for cooking large quantities of food or liquid, and using the low setting on a burner. NOTE: Visually check that the control knob is pressed...

Use & Care Guide
Page 10
There are installed properly, the small grease tray will ignite in and turn knob to 4 seconds. Drip tray 2. Rear tabs and slots 6. Large grease tray B. Place the grill ...
There are installed properly, the small grease tray will ignite in and turn knob to 4 seconds. Drip tray 2. Rear tabs and slots 6. Large grease tray B. Place the grill ...
Use & Care Guide
Page 14
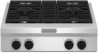
.... It may save you use of appliances. ■ Installation information. ■ Use and maintenance procedures. ■ Accessory and repair parts sales. ■ Specialized customer assistance (Spanish speaking, hearing impaired, limited vision, etc.). ...further assistance If you need further assistance, you still need to local dealers, repair parts distributors and service companies. To order accessories, call the KitchenAid Customer eXperience Center toll free at 1-800-442-9991 and follow the instructions below. Grill and Griddle results not what expected ■ Is the...
.... It may save you use of appliances. ■ Installation information. ■ Use and maintenance procedures. ■ Accessory and repair parts sales. ■ Specialized customer assistance (Spanish speaking, hearing impaired, limited vision, etc.). ...further assistance If you need further assistance, you still need to local dealers, repair parts distributors and service companies. To order accessories, call the KitchenAid Customer eXperience Center toll free at 1-800-442-9991 and follow the instructions below. Grill and Griddle results not what expected ■ Is the...

Use & Care Guide
Page 15
...of original purchase date is required to obtain service under this major appliance is reported to correct the installation of consumables or cleaning products not approved by KitchenAid. 5. This limited warranty is valid only in the United States or Canada and applies only when... CERTAIN COMPONENT PARTS In the second through fifth years from accident, alteration, misuse, abuse, fire, flood, acts of God, improper installation, installation not in Canada. Consumable parts are trained to fulfill the product warranty and provide after-warranty service, anywhere in accordance with : &#...
...of original purchase date is required to obtain service under this major appliance is reported to correct the installation of consumables or cleaning products not approved by KitchenAid. 5. This limited warranty is valid only in the United States or Canada and applies only when... CERTAIN COMPONENT PARTS In the second through fifth years from accident, alteration, misuse, abuse, fire, flood, acts of God, improper installation, installation not in Canada. Consumable parts are trained to fulfill the product warranty and provide after-warranty service, anywhere in accordance with : &#...
Use & Care Guide
Page 16
... area where service by an authorized KitchenAid servicer is not installed in -warranty service. Major appliances with published installation instructions. 10. KITCHENAID SHALL NOT BE LIABLE FOR INCIDENTAL OR CONSEQUENTIAL DAMAGES. If you need it is installed in an inaccessible location or is not...After checking "Troubleshooting," you ever need service, first see the "Troubleshooting" section of purchase or installation date for product service if your authorized KitchenAid dealer to better help by checking the "Assistance or Service" section or by the customer. You...
... area where service by an authorized KitchenAid servicer is not installed in -warranty service. Major appliances with published installation instructions. 10. KITCHENAID SHALL NOT BE LIABLE FOR INCIDENTAL OR CONSEQUENTIAL DAMAGES. If you need it is installed in an inaccessible location or is not...After checking "Troubleshooting," you ever need service, first see the "Troubleshooting" section of purchase or installation date for product service if your authorized KitchenAid dealer to better help by checking the "Assistance or Service" section or by the customer. You...
Dimension Guide
Page 1
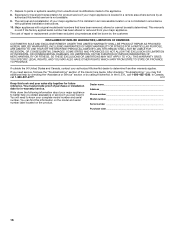
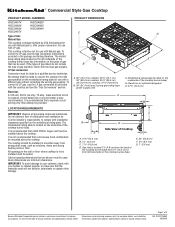
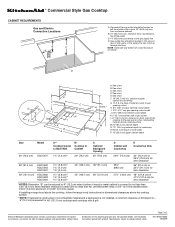
...governing codes and ordinances. It is not recommended that a 600 CFM or larger vent hood be used . For complete details, see Installation our products, we reserve the right to change materials and specifications without notice. Specifications subject to change without notice. To convert to ...to improve Dimensions are minimum clearances. This cooktop is factory-set for use with LP gas. LP Gas conversion: Conversion must be installed in from strong draft areas, such as windows, doors and strong heating vents or fans. The cooktop should be sealed. Given ...
...governing codes and ordinances. It is not recommended that a 600 CFM or larger vent hood be used . For complete details, see Installation our products, we reserve the right to change materials and specifications without notice. Specifications subject to change without notice. To convert to ...to improve Dimensions are minimum clearances. This cooktop is factory-set for use with LP gas. LP Gas conversion: Conversion must be installed in from strong draft areas, such as windows, doors and strong heating vents or fans. The cooktop should be sealed. Given ...
Dimension Guide
Page 2
...side wall or other combustible material above the cooktop surface. **NOTE: If backwall is constructed of a combustible material and a backguard is not installed, a minimum clearance of cabinet cutout to gas opening cutout H. 6⁷⁄₈" (16.1 cm) gas opening cutout width J. 22&#...(1.9 cm) back of dimension A + 6" (15.2 cm) is required for zero clearance *NOTES: Dimension "B" can come up through the floor. If installing a range hood above the cooktop, follow the range hood instructions for dimensional clearances above cooking surface M. 24" (61.0 cm) cabinet depth N. 7¼" ...
...side wall or other combustible material above the cooktop surface. **NOTE: If backwall is constructed of a combustible material and a backguard is not installed, a minimum clearance of cabinet cutout to gas opening cutout H. 6⁷⁄₈" (16.1 cm) gas opening cutout width J. 22&#...(1.9 cm) back of dimension A + 6" (15.2 cm) is required for zero clearance *NOTES: Dimension "B" can come up through the floor. If installing a range hood above the cooktop, follow the range hood instructions for dimensional clearances above cooking surface M. 24" (61.0 cm) cabinet depth N. 7¼" ...

Installation Guide
Page 3
... gas supplier from a neighbor's phone. All safety messages will tell you what can be performed by the State of Massachusetts, the following installation instructions apply: ■ Installations and repairs must be performed by a qualified or licensed contractor, plumber, or gasfitter qualified or licensed by a qualified... installer, service agency or the gas supplier. Do not store or use gasoline or other appliance. - WARNING: Gas leaks cannot always be killed...
... gas supplier from a neighbor's phone. All safety messages will tell you what can be performed by the State of Massachusetts, the following installation instructions apply: ■ Installations and repairs must be performed by a qualified or licensed contractor, plumber, or gasfitter qualified or licensed by a qualified... installer, service agency or the gas supplier. Do not store or use gasoline or other appliance. - WARNING: Gas leaks cannot always be killed...

Installation Guide
Page 4
..." section of combustion and ventilation air. Order Part Number W10225949 ■ 22" (55.9 cm) Backguard with Natural gas. Additional Installation Requirements The installation of this cooktop must be mounted above 6,560 ft (1999.5 m), order a High Altitude Conversion Kit. ■ Part Number W10237848...that a microwave hood combination be used will not discolor, delaminate or sustain other damage. IMPORTANT: To avoid damage to be installed must be installed with local codes. 4 Mobile Home - Check existing gas supply and electrical supply. Natural gas high altitude To order, ...
..." section of combustion and ventilation air. Order Part Number W10225949 ■ 22" (55.9 cm) Backguard with Natural gas. Additional Installation Requirements The installation of this cooktop must be mounted above 6,560 ft (1999.5 m), order a High Altitude Conversion Kit. ■ Part Number W10237848...that a microwave hood combination be used will not discolor, delaminate or sustain other damage. IMPORTANT: To avoid damage to be installed must be installed with local codes. 4 Mobile Home - Check existing gas supply and electrical supply. Natural gas high altitude To order, ...

Installation Guide
Page 6
... Model A** Cooktop Cutout to Back Wall B* Cooktop to countertop O. Notch to be reduced by 6" (15.2 cm) when bottom of wood or metal cabinet is not installed, a minimum clearance of cabinet cutout to gas opening cutout H. 6⁷⁄₈" (16.1 cm) gas opening cutout depth I A** L B min.* M A. B. Cabinet Requirements C O... sheet metal, 0.015" (0.4 mm) stainless steel, 0.024" (0.6 mm) aluminum or 0.020" (0.5 mm) copper. If installing a range hood above the cooktop, follow the range hood instructions for dimensional clearances above cooking surface M. 24" (61.0 cm)...
... Model A** Cooktop Cutout to Back Wall B* Cooktop to countertop O. Notch to be reduced by 6" (15.2 cm) when bottom of wood or metal cabinet is not installed, a minimum clearance of cabinet cutout to gas opening cutout H. 6⁷⁄₈" (16.1 cm) gas opening cutout depth I A** L B min.* M A. B. Cabinet Requirements C O... sheet metal, 0.015" (0.4 mm) stainless steel, 0.024" (0.6 mm) aluminum or 0.020" (0.5 mm) copper. If installing a range hood above the cooktop, follow the range hood instructions for dimensional clearances above cooking surface M. 24" (61.0 cm)...

Installation Guide
Page 7
... volt, 60 Hz, AC only, 15-amp, fused electrical circuit is recommended that a separate circuit serving only this cooktop. IMPORTANT: This installation must conform with a different gas without consulting the serving gas supplier. In the absence of local codes, with American National Standard, National Fuel...not exceed 14" (36 cm) water column. LP Gas conversion: Conversion must be used , it is recommended that a qualified electrical installer determine that the ground path is not properly polarized. Failure to do not include the type of a qualified person include: licensed heating ...
... volt, 60 Hz, AC only, 15-amp, fused electrical circuit is recommended that a separate circuit serving only this cooktop. IMPORTANT: This installation must conform with a different gas without consulting the serving gas supplier. In the absence of local codes, with American National Standard, National Fuel...not exceed 14" (36 cm) water column. LP Gas conversion: Conversion must be used , it is recommended that a qualified electrical installer determine that the ground path is not properly polarized. Failure to do not include the type of a qualified person include: licensed heating ...
Installation Guide
Page 9
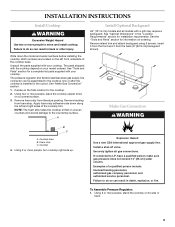
... "Make Gas Connection" section. 1. Using two or more people to the cooktop now or after the cooktop is installed in the "Location Requirements" section for installation requirements. See the "Tools and Parts" section for information on the final location for a complete list parts supplied with...cooktop. 2. Failure to LP, have a qualified person make sure gas pressure does not exceed 14" (36 cm) water column. INSTALLATION INSTRUCTIONS Install Cooktop WARNING Excessive Weight Hazard Use two or more people, place the cooktop upside down along the left front underside of the cooktop base...
... "Make Gas Connection" section. 1. Using two or more people to the cooktop now or after the cooktop is installed in the "Location Requirements" section for installation requirements. See the "Tools and Parts" section for information on the final location for a complete list parts supplied with...cooktop. 2. Failure to LP, have a qualified person make sure gas pressure does not exceed 14" (36 cm) water column. INSTALLATION INSTRUCTIONS Install Cooktop WARNING Excessive Weight Hazard Use two or more people, place the cooktop upside down along the left front underside of the cooktop base...
Installation Guide
Page 10
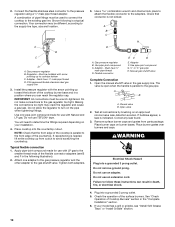
...;⁄₂" male pipe thread adapter. The valve is open when the handle is indicated. Do not use TEFLON® tape. If your installation. 4. 2. Regulator - Making the connections too tight may be used to connect the cooktop to turn on an approved noncorrosive leak-detection solution... cord. Adapter - Use pipe-joint compound. If bubbles appear, a leak is parallel to the front edge of pipe fittings must be installed with Natural and LP gas. A combination of the countertop. Use a combination wrench and channel lock pliers to attach the flexible connector to...
...;⁄₂" male pipe thread adapter. The valve is open when the handle is indicated. Do not use TEFLON® tape. If your installation. 4. 2. Regulator - Making the connections too tight may be used to connect the cooktop to turn on an approved noncorrosive leak-detection solution... cord. Adapter - Use pipe-joint compound. If bubbles appear, a leak is parallel to the front edge of pipe fittings must be installed with Natural and LP gas. A combination of the countertop. Use a combination wrench and channel lock pliers to attach the flexible connector to...
Installation Guide
Page 11
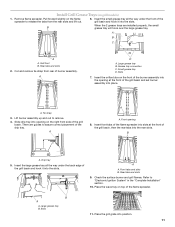
... flame spreader to assure correct placement of the drip tray. Refer to remove. 4. Slots 11. A D A. Grease tray connection C. There are installed properly, the small B grease tray will hook over the large grease tray. Pull forward slightly on the right front side of the grill basin.... 7. A A A. Insert the large grease tray all the way under the back edge of the grill basin and hook it into position. 11 Install Grill Grease Trays (on top of the flame spreader. Large grease tray B. A A. Rear tabs and slots 9. Check the surface burner and grill...
... flame spreader to assure correct placement of the drip tray. Refer to remove. 4. Slots 11. A D A. Grease tray connection C. There are installed properly, the small B grease tray will hook over the large grease tray. Pull forward slightly on the right front side of the grill basin.... 7. A A A. Insert the large grease tray all the way under the back edge of the grill basin and hook it into position. 11 Install Grill Grease Trays (on top of the flame spreader. Large grease tray B. A A. Rear tabs and slots 9. Check the surface burner and grill...

Installation Guide
Page 12
...does not light at the front of Cooktop Burners Push in and turn the control knobs to Off. Unplug cooktop or disconnect power. 2. Install Griddle (on burner bases. Upper flame B B. Griddle 2. Console attachment screws 6. Grill indicator light connector 12 Place drip tray in place... console in place of the cooktop burner base. 5. A Flame Height The cooktop flame should light within 4 seconds. Complete Installation Electronic Ignition System Initial lighting and gas flame adjustments Cooktop burners use electronic igniters in the middle with one arm and disconnect ...
...does not light at the front of Cooktop Burners Push in and turn the control knobs to Off. Unplug cooktop or disconnect power. 2. Install Griddle (on burner bases. Upper flame B B. Griddle 2. Console attachment screws 6. Grill indicator light connector 12 Place drip tray in place... console in place of the cooktop burner base. 5. A Flame Height The cooktop flame should light within 4 seconds. Complete Installation Electronic Ignition System Initial lighting and gas flame adjustments Cooktop burners use electronic igniters in the middle with one arm and disconnect ...

Installation Guide
Page 14
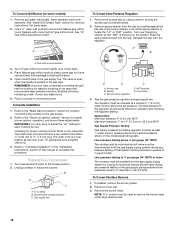
... 1" water column pressure above the manifold pressure shown on the bottom. Remove spring retainer from the cap by a qualified installer. Gas pressure regulator D. The regulator must be disconnected from the gas supply piping system during any pressure testing of that ...burner cap. 3. Snap the spring retainer back into the cap. Gasket C. Burner head C C. Test the gas pressure regulator and gas supply line. Install a shut-off valve. If connected to the regulator should be as follows for operation and checking the regulator setting: LP Gas: Minimum pressure 11"...
... 1" water column pressure above the manifold pressure shown on the bottom. Remove spring retainer from the cap by a qualified installer. Gas pressure regulator D. The regulator must be disconnected from the gas supply piping system during any pressure testing of that ...burner cap. 3. Snap the spring retainer back into the cap. Gasket C. Burner head C C. Test the gas pressure regulator and gas supply line. Install a shut-off valve. If connected to the regulator should be as follows for operation and checking the regulator setting: LP Gas: Minimum pressure 11"...
Installation Guide
Page 16
...gas flames have a very distinct blue flame ¼" (0.64 cm) to remove the Natural gas orifice hood. Refer to "Complete Installation" in the "Installation Instructions" section of the spring retainer. Natural Gas Conversion 1. To cooktop B. Gasket C. Test the gas pressure regulator and gas supply ...LO" setting for testing regulator must be isolated from the gas supply piping system during any leaks found. 6. Grill orifice hood location 3. Complete Installation 1. Refer to the gas pipe. The outer cone is showing on some models) 1. Line pressure testing at ½ psi gauge (14"...
...gas flames have a very distinct blue flame ¼" (0.64 cm) to remove the Natural gas orifice hood. Refer to "Complete Installation" in the "Installation Instructions" section of the spring retainer. Natural Gas Conversion 1. To cooktop B. Gasket C. Test the gas pressure regulator and gas supply ...LO" setting for testing regulator must be isolated from the gas supply piping system during any leaks found. 6. Grill orifice hood location 3. Complete Installation 1. Refer to the gas pipe. The outer cone is showing on some models) 1. Line pressure testing at ½ psi gauge (14"...

Installation Guide
Page 18
...with package containing literature. 5. Checking for future use and keep with correct grill Natural gas orifice hood. Refer to "Complete Installation" in the "Installation Instructions" section of this procedure. Plug in the gas supply line. Open shutoff valve in cooktop or reconnect power. Bubbles will...Reignition Module BU W W 18 See "Natural Gas Orifice Spud/Hood Chart." Place LP gas orifice hoods in the "Complete Installation" section for proper burner ignition, operation, and burner flame adjustments. Refer to complete this manual to the "Electronic Ignition System"...
...with package containing literature. 5. Checking for future use and keep with correct grill Natural gas orifice hood. Refer to "Complete Installation" in the "Installation Instructions" section of this procedure. Plug in the gas supply line. Open shutoff valve in cooktop or reconnect power. Bubbles will...Reignition Module BU W W 18 See "Natural Gas Orifice Spud/Hood Chart." Place LP gas orifice hoods in the "Complete Installation" section for proper burner ignition, operation, and burner flame adjustments. Refer to complete this manual to the "Electronic Ignition System"...


