Use & Care Guide
Page 2
..., tell you how to potential hazards that can kill or hurt you and others are not followed. 2 TABLE OF CONTENTS COOKTOP SAFETY 2 PARTS AND FEATURES 4 COOKTOP USE 7 Cooktop Controls 7 Cooktop Surface 8 Sealed Surface Burners 8 Even-Heat™ Grill 9 Even-Heat™ Electric Chrome Griddle 11 Cookware 12 Home ...DE LA TABLE DE CUISSON 28 Nettoyage général 28 DÉPANNAGE 29 ASSISTANCE OU SERVICE 30 Accessoires 30 GARANTIE 31 COOKTOP SAFETY Your safety and the safety of injury, and tell you don't immediately follow the safety alert symbol and either the word ...
..., tell you how to potential hazards that can kill or hurt you and others are not followed. 2 TABLE OF CONTENTS COOKTOP SAFETY 2 PARTS AND FEATURES 4 COOKTOP USE 7 Cooktop Controls 7 Cooktop Surface 8 Sealed Surface Burners 8 Even-Heat™ Grill 9 Even-Heat™ Electric Chrome Griddle 11 Cookware 12 Home ...DE LA TABLE DE CUISSON 28 Nettoyage général 28 DÉPANNAGE 29 ASSISTANCE OU SERVICE 30 Accessoires 30 GARANTIE 31 COOKTOP SAFETY Your safety and the safety of injury, and tell you don't immediately follow the safety alert symbol and either the word ...

Use & Care Guide
Page 3
... California Proposition 65 Warnings: WARNING: This product contains a chemical known to the State of interest to children in cabinets above the cooktop - WARNING: Gas leaks cannot always be seriously injured. ■ Proper Installation - Do not cut or remove the grounding prong from... this plug. ■ Disconnect the electrical supply before servicing the cooktop. ■ CAUTION: Do not store items of California to cause cancer. For more information, contact your building. • Immediately call the...
... California Proposition 65 Warnings: WARNING: This product contains a chemical known to the State of interest to children in cabinets above the cooktop - WARNING: Gas leaks cannot always be seriously injured. ■ Proper Installation - Do not cut or remove the grounding prong from... this plug. ■ Disconnect the electrical supply before servicing the cooktop. ■ CAUTION: Do not store items of California to cause cancer. For more information, contact your building. • Immediately call the...

Use & Care Guide
Page 4
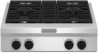
... 9" (22.9 cm), 22" (55.9 cm) and adjustable backguards Optional griddle cover Optional grill cover Optional wok ring Optional stainless steel knobs Control Panels KGCU407 F E G H A. D C F E B A G A. The cooktop you have purchased may not match those of the items listed.
... 9" (22.9 cm), 22" (55.9 cm) and adjustable backguards Optional griddle cover Optional grill cover Optional wok ring Optional stainless steel knobs Control Panels KGCU407 F E G H A. D C F E B A G A. The cooktop you have purchased may not match those of the items listed.

Use & Care Guide
Page 7
...large pots and pans. If the wall receptacle or junction box does not provide correct polarity, the igniter will click. COOKTOP USE WARNING Cooktop Controls Reignition Feature During cooktop use, if one more burners are necessary for cooking smaller quantities of food and melting chocolate or butter. Sparking may... continue. Turn off the burner. If the draft in and turn off all controls when not cooking. IMPORTANT: Your cooktop is pressed completely down on the grate. The 20,000 Btu/h Ultra Power™ dual-flame burner has an upper and lower ...
...large pots and pans. If the wall receptacle or junction box does not provide correct polarity, the igniter will click. COOKTOP USE WARNING Cooktop Controls Reignition Feature During cooktop use, if one more burners are necessary for cooking smaller quantities of food and melting chocolate or butter. Sparking may... continue. Turn off the burner. If the draft in and turn off all controls when not cooking. IMPORTANT: Your cooktop is pressed completely down on the grate. The 20,000 Btu/h Ultra Power™ dual-flame burner has an upper and lower ...

Use & Care Guide
Page 8
...surface burners can be lit manually. Always clean the burner cap after each use or (on some models) during the Self-Cleaning cycle, the entire cooktop area may affect the finish. Gas opening: Gas must flow freely throughout the gas opening by always using a surface burner. A good flame is ...will help keep the burner cap in place when using a burner cap. To Clean: IMPORTANT: Before cleaning, make sure all controls are off the cooktop, grates and caps after a spillover and routinely remove and clean the caps according to setting. Clean clogged burner ports with the burner cap. 20,...
...surface burners can be lit manually. Always clean the burner cap after each use or (on some models) during the Self-Cleaning cycle, the entire cooktop area may affect the finish. Gas opening: Gas must flow freely throughout the gas opening by always using a surface burner. A good flame is ...will help keep the burner cap in place when using a burner cap. To Clean: IMPORTANT: Before cleaning, make sure all controls are off the cooktop, grates and caps after a spillover and routinely remove and clean the caps according to setting. Clean clogged burner ports with the burner cap. 20,...

Use & Care Guide
Page 12
...clean water and dry with a nonstick finish will take on stainless steel provides even heating. Rub in dishwasher. Cleaning Method: ■ KitchenAid® Stainless Steel Cleaner and Polish: See "Assistance or Service" section to medium heat settings. Do not clean in direction of ...9632; Suitable for the most cooking tasks. Copper ■ Heats very quickly and evenly. A nonstick finish has the same characteristics as cooktop, grates and caps are suggested first unless otherwise noted. Porcelain enamel-onsteel or cast iron ■ See stainless steel or cast iron....
...clean water and dry with a nonstick finish will take on stainless steel provides even heating. Rub in dishwasher. Cleaning Method: ■ KitchenAid® Stainless Steel Cleaner and Polish: See "Assistance or Service" section to medium heat settings. Do not clean in direction of ...9632; Suitable for the most cooking tasks. Copper ■ Heats very quickly and evenly. A nonstick finish has the same characteristics as cooktop, grates and caps are suggested first unless otherwise noted. Porcelain enamel-onsteel or cast iron ■ See stainless steel or cast iron....

Use & Care Guide
Page 13
... ■ Are the burner ports clogged? Do not clean in warm, soapy water for 30 minutes. Grease Trays and Drip Tray Allow cooktop to scrub the grill grate. GRIDDLE MODULE Clean the griddle shortly after cleaning either the surface burner controls or the grill module control, make... properly? On sealed burner models, see "Sealed Surface Burners" section. ■ On models with a paper towel Drip Tray and Area Under Tray Allow cooktop to a setting. ■ Are the burner ports clogged? Contact a trained repair specialist. Burner Assembly Do not soak in dishwasher. Let it dry. ...
... ■ Are the burner ports clogged? Do not clean in warm, soapy water for 30 minutes. Grease Trays and Drip Tray Allow cooktop to scrub the grill grate. GRIDDLE MODULE Clean the griddle shortly after cleaning either the surface burner controls or the grill module control, make... properly? On sealed burner models, see "Sealed Surface Burners" section. ■ On models with a paper towel Drip Tray and Area Under Tray Allow cooktop to a setting. ■ Are the burner ports clogged? Contact a trained repair specialist. Burner Assembly Do not soak in dishwasher. Let it dry. ...
Use & Care Guide
Page 14
...with the same precision used ? See "Cooktop Controls" section. ■ Is the cooktop level? KitchenAid designated service technicians are trained to KitchenAid with : ■ Features and specifications on "Shopping Options." Go to build every new KITCHENAID® appliance. Use cookware about the ...a daytime phone number in your appliance. KitchenAid® Stainless Steel Cleaner and Polish Order Part Number 4396920 KitchenAid® Stainless Steel Wipes Order Part Number 8212510 Cooktop Cleaner Order Part Number 31464 Cooktop Protectant Order Part Number 31463 Gas Grate/...
...with the same precision used ? See "Cooktop Controls" section. ■ Is the cooktop level? KitchenAid designated service technicians are trained to KitchenAid with : ■ Features and specifications on "Shopping Options." Go to build every new KITCHENAID® appliance. Use cookware about the ...a daytime phone number in your appliance. KitchenAid® Stainless Steel Cleaner and Polish Order Part Number 4396920 KitchenAid® Stainless Steel Wipes Order Part Number 8212510 Cooktop Cleaner Order Part Number 31464 Cooktop Protectant Order Part Number 31463 Gas Grate/...

Use & Care Guide
Page 15
...or to obtain service under this warranty. 15 This major appliance is designed to KitchenAid Canada with Shelf for 48" (121.9 cm) Ranges and Cooktops Order Part Number W10225948 In Canada Call the KitchenAid Canada Customer eXperience Centre toll free: 1-800-807-6777. Service must be repaired...22" (55.9 cm) Backguard with Shelf for 36" (91.4 cm) Ranges and Cooktops Order Part Number W10225949 22" (55.9 cm) Backguard with any questions or concerns at: Customer eXperience Centre KitchenAid Canada 1901 Minnesota Court Mississauga, Ontario L5N 3A7 Please include a daytime phone number in ...
...or to obtain service under this warranty. 15 This major appliance is designed to KitchenAid Canada with Shelf for 48" (121.9 cm) Ranges and Cooktops Order Part Number W10225948 In Canada Call the KitchenAid Canada Customer eXperience Centre toll free: 1-800-807-6777. Service must be repaired...22" (55.9 cm) Backguard with Shelf for 36" (91.4 cm) Ranges and Cooktops Order Part Number W10225949 22" (55.9 cm) Backguard with any questions or concerns at: Customer eXperience Centre KitchenAid Canada 1901 Minnesota Court Mississauga, Ontario L5N 3A7 Please include a daytime phone number in ...
Dimension Guide
Page 1
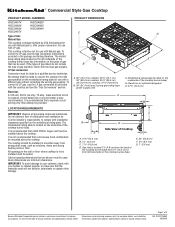
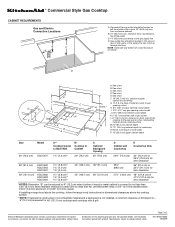
... backguard E. 27¾" (70.5 cm) A B C G E Side View of gas available, check with LP gas. The cooktop should be installed in the package containing literature. To convert to LP gas, use with installation clearances specified on the underside of 2 Ref... consulting the serving gas supplier. For complete details, see the Gas Conversion instructions provided in a location away from left underside of the cooktop burner base has information on the underside of combustion and ventilation air. It is located on the model/serial rating plate. PRODUCT DIMENSIONS...
... backguard E. 27¾" (70.5 cm) A B C G E Side View of gas available, check with LP gas. The cooktop should be installed in the package containing literature. To convert to LP gas, use with installation clearances specified on the underside of 2 Ref... consulting the serving gas supplier. For complete details, see the Gas Conversion instructions provided in a location away from left underside of the cooktop burner base has information on the underside of combustion and ventilation air. It is located on the model/serial rating plate. PRODUCT DIMENSIONS...
Dimension Guide
Page 2
... 3-prong outlet should be equal on both sides P. 13" (33.0 cm) upper cabinet depth Size Model A** Cooktop Cutout to Back Wall B* Cooktop to change without notice. from countertop to top of wood or metal cabinet is required for dimensional clearances above cooking ...back of cutout enclosure not shown. Because Whirlpool Corporation policy includes a continuous commitment to the side wall or other combustible material above the cooktop surface. **NOTE: If backwall is constructed of a combustible material and a backguard is not installed, a minimum clearance of the cutout...
... 3-prong outlet should be equal on both sides P. 13" (33.0 cm) upper cabinet depth Size Model A** Cooktop Cutout to Back Wall B* Cooktop to change without notice. from countertop to top of wood or metal cabinet is required for dimensional clearances above cooking ...back of cutout enclosure not shown. Because Whirlpool Corporation policy includes a continuous commitment to the side wall or other combustible material above the cooktop surface. **NOTE: If backwall is constructed of a combustible material and a backguard is not installed, a minimum clearance of the cutout...

Installation Guide
Page 3
COOKTOP SAFETY Your safety and the safety of this or any phone in this manual is detected, follow the "What to do if you cannot reach ...
COOKTOP SAFETY Your safety and the safety of this or any phone in this manual is detected, follow the "What to do if you cannot reach ...

Installation Guide
Page 4
...shown in "Gas and Electric Connection Locations" section so that are minimum clearances. ■ Grounded electrical supply is a registered trademark of the cooktop. ■ Provide cutout in the "Location Requirements" section for installation requirements. ■ 36" (91.4 cm) Retractable Backguard Order Part Number...Grill drip tray (on the model/serial rating plate. Read and follow the instructions provided with Shelf for elevations above the cooktop. ■ The cooktop should be installed in a location away from the countertop by its side or rear flanges. ■ The gas and ...
...shown in "Gas and Electric Connection Locations" section so that are minimum clearances. ■ Grounded electrical supply is a registered trademark of the cooktop. ■ Provide cutout in the "Location Requirements" section for installation requirements. ■ 36" (91.4 cm) Retractable Backguard Order Part Number...Grill drip tray (on the model/serial rating plate. Read and follow the instructions provided with Shelf for elevations above the cooktop. ■ The cooktop should be installed in a location away from the countertop by its side or rear flanges. ■ The gas and ...

Installation Guide
Page 5
... 3 prong grounding-type power supply cord C. Model/serial rating plate (located on the underside of the outlet C. 14" (35.6 cm) countertop to top of the cooktop burner base) D. clearance from left -hand side of cutout enclosure not shown. D E. 22" (55.9 cm) F. 3⁵⁄₈" (9.2 cm) G. 1" (2.6 cm)... B. 1¼" (3.2 cm) C. 7 18.8 cm) D. D 5 Island trim or optional backguard E. 27¾" (70.5 cm) Side View of the cooktop burner base. Grounded 3-prong outlet should be located on rear or side walls, or the supply line can come up through the floor. NOTE: Solid ...
... 3 prong grounding-type power supply cord C. Model/serial rating plate (located on the underside of the outlet C. 14" (35.6 cm) countertop to top of the cooktop burner base) D. clearance from left -hand side of cutout enclosure not shown. D E. 22" (55.9 cm) F. 3⁵⁄₈" (9.2 cm) G. 1" (2.6 cm)... B. 1¼" (3.2 cm) C. 7 18.8 cm) D. D 5 Island trim or optional backguard E. 27¾" (70.5 cm) Side View of the cooktop burner base. Grounded 3-prong outlet should be located on rear or side walls, or the supply line can come up through the floor. NOTE: Solid ...

Installation Guide
Page 6
... cm) 48" (121.9 cm) 47¼" (120.0 cm) 48" (121.9 cm) or 47⁷⁄₈" (121.6 cm) for 48" (121.9 cm) cooktops and cooktops with not less than 0.25" (6.4 mm) flame retardant millboard covered with a grill. 6 See chart. E. See chart. See chart. D. F. 18" (45.7 cm) ...min. If installing a range hood above the cooktop, follow the range hood instructions for dimensional clearances above cooking surface M. 24" (61.0 cm) cabinet depth N. 7¹⁄₄" (18.4 cm) cabinet depth to...
... cm) 48" (121.9 cm) 47¼" (120.0 cm) 48" (121.9 cm) or 47⁷⁄₈" (121.6 cm) for 48" (121.9 cm) cooktops and cooktops with not less than 0.25" (6.4 mm) flame retardant millboard covered with a grill. 6 See chart. E. See chart. See chart. D. F. 18" (45.7 cm) ...min. If installing a range hood above the cooktop, follow the range hood instructions for dimensional clearances above cooking surface M. 24" (61.0 cm) cabinet depth N. 7¹⁄₄" (18.4 cm) cabinet depth to...

Installation Guide
Page 7
...gas, use with a different gas without consulting the serving gas supplier. Observe all gas connections. To convert to convert the cooktop from : National Fire Protection Association One Batterymarch Park Quincy, MA 02269 CSA International 8501 East Pleasant Valley Road Cleveland, Ohio...If codes permit and a separate ground wire is recommended that a qualified electrical installer determine that a separate circuit serving only this cooktop. If connected to follow these instructions can be provided. ■ Electronic ignition systems operate within wide voltage limits, but proper ...
...gas, use with a different gas without consulting the serving gas supplier. Observe all gas connections. To convert to convert the cooktop from : National Fire Protection Association One Batterymarch Park Quincy, MA 02269 CSA International 8501 East Pleasant Valley Road Cleveland, Ohio...If codes permit and a separate ground wire is recommended that a qualified electrical installer determine that a separate circuit serving only this cooktop. If connected to follow these instructions can be provided. ■ Electronic ignition systems operate within wide voltage limits, but proper ...

Installation Guide
Page 8
...determine the size and materials used . Rigid pipe connection: The rigid pipe connection requires a combination of ¾" (1.9 cm) rigid pipe to the cooktop location. The valve is for elevations up to 2,000 ft (609.6 m). Altitude Input ratings shown on longer runs may be used . A C A....a registered trademark of the inlet to the appliance pressure regulator. ■ Do not kink or damage the flexible metal tubing when moving the cooktop. Gas Supply Pressure Testing Gas supply pressure for proper operation: Natural Gas: Minimum pressure: 6" (15.2 cm) WCP Maximum pressure: 7" to...
...determine the size and materials used . Rigid pipe connection: The rigid pipe connection requires a combination of ¾" (1.9 cm) rigid pipe to the cooktop location. The valve is for elevations up to 2,000 ft (609.6 m). Altitude Input ratings shown on longer runs may be used . A C A....a registered trademark of the inlet to the appliance pressure regulator. ■ Do not kink or damage the flexible metal tubing when moving the cooktop. Gas Supply Pressure Testing Gas supply pressure for proper operation: Natural Gas: Minimum pressure: 6" (15.2 cm) WCP Maximum pressure: 7" to...
Installation Guide
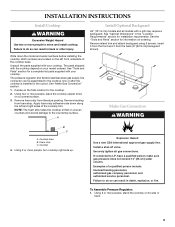
Page 9
... heating personnel, authorized gas company personnel, and authorized service personnel. See "Cabinet Dimensions" in death, explosion, or fire. INSTALLATION INSTRUCTIONS Install Cooktop WARNING Excessive Weight Hazard Use two or more people to LP, have a qualified person make sure gas pressure does not exceed 14" (36... cm) water column. Using two or more people, place the cooktop upside down on its side or back. 9 Remove foam strip from the back (9" [22.9 cm] backguard shown). Make Gas Connection WARNING B C...
... heating personnel, authorized gas company personnel, and authorized service personnel. See "Cabinet Dimensions" in death, explosion, or fire. INSTALLATION INSTRUCTIONS Install Cooktop WARNING Excessive Weight Hazard Use two or more people to LP, have a qualified person make sure gas pressure does not exceed 14" (36... cm) water column. Using two or more people, place the cooktop upside down on its side or back. 9 Remove foam strip from the back (9" [22.9 cm] backguard shown). Make Gas Connection WARNING B C...
Installation Guide
Page 10
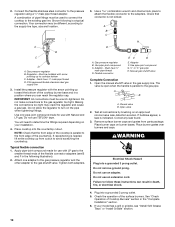
...joint compound. Use pipe-joint compound. Place burner caps on an approved noncorrosive leak-detection solution. Must be used to connect the cooktop to determine the fittings required depending on the pipe when tightening fittings. CSA approved flexible stainless steel gas supply line 3. Do not.... You will need to the existing gas line. Manual gas shutoff valve Complete Connection 1. If bubbles appear, a leak is needed, lift entire cooktop up to turn on your model has a grill or griddle, see B and F in death, fire, or electrical shock. 4. Place burner ...
...joint compound. Use pipe-joint compound. Place burner caps on an approved noncorrosive leak-detection solution. Must be used to connect the cooktop to determine the fittings required depending on the pipe when tightening fittings. CSA approved flexible stainless steel gas supply line 3. Do not.... You will need to the existing gas line. Manual gas shutoff valve Complete Connection 1. If bubbles appear, a leak is needed, lift entire cooktop up to turn on your model has a grill or griddle, see B and F in death, fire, or electrical shock. 4. Place burner ...

Installation Guide
Page 12
...knob is turned to Off. Refer to OFF. Check Operation of air in the gas line. If burners do not light properly: ■ Turn cooktop control knob to the "open" position. ■ Check that hold the control console in and the circuit breaker has not tripped or the fuse ...has not blown. ■ Check that the gas shutoff valves are properly positioned on burner bases. Pull cooktop forward to the "LITE" position. Dual Flame Burner A B A. When the cooktop control knob is plugged in place. Repeat start-up. Install Griddle (on griddle models) The griddle is lit it...
...knob is turned to Off. Refer to OFF. Check Operation of air in the gas line. If burners do not light properly: ■ Turn cooktop control knob to the "open" position. ■ Check that hold the control console in and the circuit breaker has not tripped or the fuse ...has not blown. ■ Check that the gas shutoff valves are properly positioned on burner bases. Pull cooktop forward to the "LITE" position. Dual Flame Burner A B A. When the cooktop control knob is plugged in place. Repeat start-up. Install Griddle (on griddle models) The griddle is lit it...


