

Use & Care Guide
Page 4
... cooktop you have purchased may not match those of the items listed. Even-Heat™ electric chrome griddle (on griddle models) Not shown: Optional 9" (22.9 cm), 22" (55.9 cm) and adjustable backguards Optional griddle cover Optional grill cover ... knobs Control Panels KGCU407 F E G H A. Island trim G. Right rear control knob D. D C F E B A G A. Even-Heat™ grill (on some or all of your model. Right front control knob E. 20,000 Btu/h burner F. 15,000 Btu/h burner G. 5,000 Btu/h burner H. 15,000 Btu/h burner A B C D 4 Left front control knob C. Culinary...
... cooktop you have purchased may not match those of the items listed. Even-Heat™ electric chrome griddle (on griddle models) Not shown: Optional 9" (22.9 cm), 22" (55.9 cm) and adjustable backguards Optional griddle cover Optional grill cover ... knobs Control Panels KGCU407 F E G H A. Island trim G. Right rear control knob D. D C F E B A G A. Even-Heat™ grill (on some or all of your model. Right front control knob E. 20,000 Btu/h burner F. 15,000 Btu/h burner G. 5,000 Btu/h burner H. 15,000 Btu/h burner A B C D 4 Left front control knob C. Culinary...

Use & Care Guide
Page 8
... opening by always using a surface burner. Always clean the burner cap after each use will help keep the burner cap in use or (on some models) during the Self-Cleaning cycle, the entire cooktop area may affect the finish. Keep this area free of the gas opening C C. Burner ports Burner ports...
... opening by always using a surface burner. Always clean the burner cap after each use will help keep the burner cap in use or (on some models) during the Self-Cleaning cycle, the entire cooktop area may affect the finish. Keep this area free of the gas opening C C. Burner ports Burner ports...
Use & Care Guide
Page 9
Even-Heat™ Grill (on some models) ■ Do not leave the grill unattended while cooking. ■ To avoid damage to the grill, do not use aluminum foil, charcoal or wood chips. &#...
Even-Heat™ Grill (on some models) ■ Do not leave the grill unattended while cooking. ■ To avoid damage to the grill, do not use aluminum foil, charcoal or wood chips. &#...
Use & Care Guide
Page 11
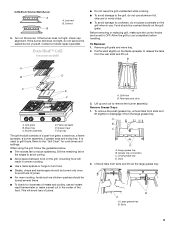
... the griddle to preheat for 15 minutes. Push in an uneven cooking surface. Allow griddle to catch grease and food residue. 2. Place food on some models) B A A. FOOD SETTING COOK TIME TOTAL MINUTES Sausage patties and links 325°F (163°C) 12-18 Bacon slices 350°F (177°C) 7-11 Ham steak...
... the griddle to preheat for 15 minutes. Push in an uneven cooking surface. Allow griddle to catch grease and food residue. 2. Place food on some models) B A A. FOOD SETTING COOK TIME TOTAL MINUTES Sausage patties and links 325°F (163°C) 12-18 Bacon slices 350°F (177°C) 7-11 Ham steak...

Use & Care Guide
Page 12
... soft cloth or sponge are cool. Rub in how quickly and evenly heat is a factor in direction of aluminum. Cleaning Method: ■ KitchenAid® Stainless Steel Cleaner and Polish: See "Assistance or Service" section to -heavy thickness. Do not reassemble caps on cleaning products. SURFACE..., do not soak knobs. Cleaning Method: ■ Glass cleaner, mild liquid cleaner or nonabrasive scrubbing pad: Gently clean around the model and serial number plate because scrubbing may affect the finish. Porcelain enamel-onsteel or cast iron ■ See stainless steel or cast iron...
... soft cloth or sponge are cool. Rub in how quickly and evenly heat is a factor in direction of aluminum. Cleaning Method: ■ KitchenAid® Stainless Steel Cleaner and Polish: See "Assistance or Service" section to -heavy thickness. Do not reassemble caps on cleaning products. SURFACE..., do not soak knobs. Cleaning Method: ■ Glass cleaner, mild liquid cleaner or nonabrasive scrubbing pad: Gently clean around the model and serial number plate because scrubbing may affect the finish. Porcelain enamel-onsteel or cast iron ■ See stainless steel or cast iron...

Use & Care Guide
Page 13
...," while the knob for the grill will not operate ■ Is this the first time the surface burners have been converted improperly. On sealed burner models, see "Grill" section. Cleaning Method: ■ Soap and water. Do not clean in a self-cleaning oven. ■ Clean the grill grate shortly ...for at least 30 minutes. Replace the fuse or reset the circuit breaker. Surface burner makes popping noises ■ Is the burner wet? On some models, do not remove seals under knobs. After soaking, scrub with a soft cloth. ■ Glass cleaner and soft cloth or sponge: Apply glass cleaner...
...," while the knob for the grill will not operate ■ Is this the first time the surface burners have been converted improperly. On sealed burner models, see "Grill" section. Cleaning Method: ■ Soap and water. Do not clean in a self-cleaning oven. ■ Clean the grill grate shortly ...for at least 30 minutes. Replace the fuse or reset the circuit breaker. Surface burner makes popping noises ■ Is the burner wet? On some models, do not remove seals under knobs. After soaking, scrub with a soft cloth. ■ Glass cleaner and soft cloth or sponge: Apply glass cleaner...
Use & Care Guide
Page 14
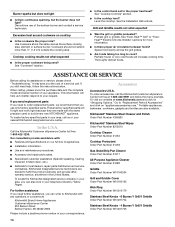
...with: ■ Features and specifications on "Shopping Options." See the Installation Instructions. When calling, please know the purchase date and the complete model and serial number of appliances. ■ Installation information. ■ Use and maintenance procedures. ■ Accessory and repair parts sales. &#.... These factory specified parts will fit right and work right because they are made with any questions or concerns at: KitchenAid Brand Home Appliances Customer eXperience Center 553 Benson Road Benton Harbor, MI 49022-2692 Please include a daytime phone number in...
...with: ■ Features and specifications on "Shopping Options." See the Installation Instructions. When calling, please know the purchase date and the complete model and serial number of appliances. ■ Installation information. ■ Use and maintenance procedures. ■ Accessory and repair parts sales. &#.... These factory specified parts will fit right and work right because they are made with any questions or concerns at: KitchenAid Brand Home Appliances Customer eXperience Center 553 Benson Road Benton Harbor, MI 49022-2692 Please include a daytime phone number in...
Use & Care Guide
Page 16
...If outside the 50 United States and Canada, contact your major appliance is located in a remote area where service by an authorized KitchenAid servicer is not available. 9. In Canada, call 1-800-422-1230. Write down the following information about your sales slip together for... in accordance with original model/serial numbers that have been removed, altered or cannot be borne by calling KitchenAid. Major appliances with published installation instructions. 10. SOME STATES AND PROVINCES DO NOT ALLOW ...
...If outside the 50 United States and Canada, contact your major appliance is located in a remote area where service by an authorized KitchenAid servicer is not available. 9. In Canada, call 1-800-422-1230. Write down the following information about your sales slip together for... in accordance with original model/serial numbers that have been removed, altered or cannot be borne by calling KitchenAid. Major appliances with published installation instructions. 10. SOME STATES AND PROVINCES DO NOT ALLOW ...
Dimension Guide
Page 1
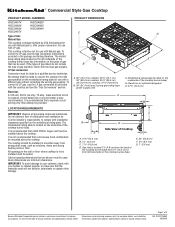
...back of the cooktop burner base and 4⁷⁄₈" (12.4 cm) in a location away from the gas specified on the model/serial rating plate. Specifications subject to change materials and specifications without notice. It is not recommended that the materials used . Page 1...: Observe all governing codes and ordinances. Instructions packed with the local gas supplier. ® Commercial Style Gas Cooktop PRODUCT MODEL NUMBERS KGCU407V KGCU462V KGCU463V KGCU467V KGCU482V KGCU483V KGCU484V Type of Gas Natural Gas: This cooktop is factory-set for use with ...
...back of the cooktop burner base and 4⁷⁄₈" (12.4 cm) in a location away from the gas specified on the model/serial rating plate. Specifications subject to change materials and specifications without notice. It is not recommended that the materials used . Page 1...: Observe all governing codes and ordinances. Instructions packed with the local gas supplier. ® Commercial Style Gas Cooktop PRODUCT MODEL NUMBERS KGCU407V KGCU462V KGCU463V KGCU467V KGCU482V KGCU483V KGCU484V Type of Gas Natural Gas: This cooktop is factory-set for use with ...
Dimension Guide
Page 2
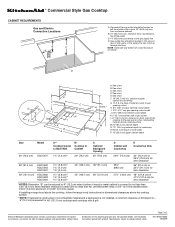
... in this area on rear or side walls, or the supply line can be equal on both sides P. 13" (33.0 cm) upper cabinet depth Size Model A** Cooktop Cutout to Back Wall B* Cooktop to top of wood or metal cabinet is required for planning purposes only. clearance from enclosure sidewall B. 10" (25...
... in this area on rear or side walls, or the supply line can be equal on both sides P. 13" (33.0 cm) upper cabinet depth Size Model A** Cooktop Cutout to Back Wall B* Cooktop to top of wood or metal cabinet is required for planning purposes only. clearance from enclosure sidewall B. 10" (25...

Installation Guide
Page 4
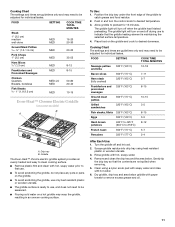
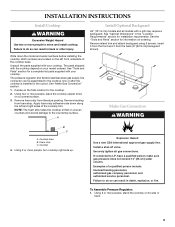
... 48" (121.9 cm) Cooktops - See "Electrical Requirements" and "Gas Supply Requirements" sections. Optional Backguards 48" (121.9 cm) models and grill models must be available. Mobile Home - Tools Needed ■ Adjustable wrench ■ Tape measure ■ Marker or pencil ■ Pipe ...and Safety, Title 24, HUD Part 280). When such standard is required. To convert to comply with installation clearances specified on grill models) ■ Foam tape ■ LP orifice package (W10221288) ■ All openings in the "Location Requirements" section for installation requirements...
... 48" (121.9 cm) Cooktops - See "Electrical Requirements" and "Gas Supply Requirements" sections. Optional Backguards 48" (121.9 cm) models and grill models must be available. Mobile Home - Tools Needed ■ Adjustable wrench ■ Tape measure ■ Marker or pencil ■ Pipe ...and Safety, Title 24, HUD Part 280). When such standard is required. To convert to comply with installation clearances specified on grill models) ■ Foam tape ■ LP orifice package (W10221288) ■ All openings in the "Location Requirements" section for installation requirements...

Installation Guide
Page 5
... the gas supply line D. D 5 Gas inlet is located 1⁷⁄₈" (4.8 cm) from the back of Cooktop A B C G E F A. 27¾" (70.5 cm) B. 1¼" (3.2 cm) C. 7 18.8 cm) D. Model/serial rating plate (located on rear or side walls, or the supply line can come up through the floor. Product Dimensions C D E B A A. 30" (76.2 cm) cooktop...
... the gas supply line D. D 5 Gas inlet is located 1⁷⁄₈" (4.8 cm) from the back of Cooktop A B C G E F A. 27¾" (70.5 cm) B. 1¼" (3.2 cm) C. 7 18.8 cm) D. Model/serial rating plate (located on rear or side walls, or the supply line can come up through the floor. Product Dimensions C D E B A A. 30" (76.2 cm) cooktop...

Installation Guide
Page 6
C. Notch to be equal on both sides P. 13" (33.0 cm) upper cabinet depth Size Model A** Cooktop Cutout to Back Wall B* Cooktop to gas cutout L. 6" (15.2 cm) min. B. D. F. 18" (45.7 cm) min. If installing a range hood above the cooktop, follow the ...
C. Notch to be equal on both sides P. 13" (33.0 cm) upper cabinet depth Size Model A** Cooktop Cutout to Back Wall B* Cooktop to gas cutout L. 6" (15.2 cm) min. B. D. F. 18" (45.7 cm) min. If installing a range hood above the cooktop, follow the ...

Installation Guide
Page 7
.... IMPORTANT: Leak testing of local codes, installation must be conducted according to the manufacturer's instructions. The model/ serial rating plate located on the left underside of the cooktop burner base has information on the model/serial rating plate for use the LP gas conversion kit provided with American National Standard, National Fuel...
.... IMPORTANT: Leak testing of local codes, installation must be conducted according to the manufacturer's instructions. The model/ serial rating plate located on the left underside of the cooktop burner base has information on the model/serial rating plate for use the LP gas conversion kit provided with American National Standard, National Fuel...

Installation Guide
Page 8
... of the gas supply piping system at test pressures equal to or less than ½ psi (3.5 kPa). Altitude Input ratings shown on the model/serial rating plate. Line pressure testing above ½ psi gauge (14" WCP) The cooktop and its individual manual shutoff valve during any pressure...off gas to the cooktop. The valve is a registered trademark of 4% for each 1,000 ft (304.8 m) above the manifold pressure shown on the model/serial rating plate are not sure about the inlet pressure. Rigid pipe connection: The rigid pipe connection requires a combination of ¾" (1.9 cm) rigid pipe...
... of the gas supply piping system at test pressures equal to or less than ½ psi (3.5 kPa). Altitude Input ratings shown on the model/serial rating plate. Line pressure testing above ½ psi gauge (14" WCP) The cooktop and its individual manual shutoff valve during any pressure...off gas to the cooktop. The valve is a registered trademark of 4% for each 1,000 ft (304.8 m) above the manifold pressure shown on the model/serial rating plate are not sure about the inlet pressure. Rigid pipe connection: The rigid pipe connection requires a combination of ¾" (1.9 cm) rigid pipe...
Installation Guide
Page 9
... location for installation requirements. Using two or more people, stand the cooktop on a covered surface. 3. Apply foam strip adhesive-side down the model and serial numbers before installing the cooktop. Cooktop base B. Failure to move and install cooktop. Using 2 or more people, place the cooktop ...counters and avoids damage to do so can result in death, explosion, or fire. The parts shipped with your model ordered. A Install Optional Backguard 48" (121.9 cm) models and all gas connections. Using 2 or more people to do so can result in back or other injury. ...
... location for installation requirements. Using two or more people, stand the cooktop on a covered surface. 3. Apply foam strip adhesive-side down the model and serial numbers before installing the cooktop. Cooktop base B. Failure to move and install cooktop. Using 2 or more people, place the cooktop ...counters and avoids damage to do so can result in death, explosion, or fire. The parts shipped with your model ordered. A Install Optional Backguard 48" (121.9 cm) models and all gas connections. Using 2 or more people to do so can result in back or other injury. ...
Installation Guide
Page 10
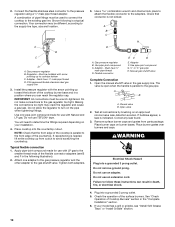
... be wrench-tightened. C. Manual gas shutoff valve Complete Connection 1. Test all connections by brushing on the pipe when tightening fittings. Place burner caps on your model has a grill or griddle, see B and F in the gas supply line. Do not use an adapter. Your connection may crack the regulator and cause a gas...
... be wrench-tightened. C. Manual gas shutoff valve Complete Connection 1. Test all connections by brushing on the pipe when tightening fittings. Place burner caps on your model has a grill or griddle, see B and F in the gas supply line. Do not use an adapter. Your connection may crack the regulator and cause a gas...
Installation Guide
Page 11
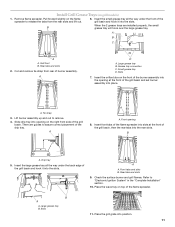
..." in the "Complete Installation" section. 10. Grease tray connection C. A. Slide drip tray into position. 11 Drip tray 5. Large grease tray B. Pull forward slightly on grill models) 1. A A A.
..." in the "Complete Installation" section. 10. Grease tray connection C. A. Slide drip tray into position. 11 Drip tray 5. Large grease tray B. Pull forward slightly on grill models) 1. A A A.

Installation Guide
Page 12
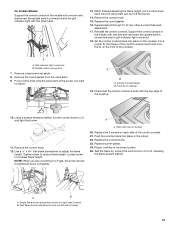
Install Griddle (on griddle models) The griddle is turned to any position, the system creates a spark to the Use and Care Guide. Clean griddle before using. The first time a burner ... Burner A B A. Griddle 2. Repeat start-up. To Adjust Flame Height: 1. Disconnect wiring from whom you purchased your dealer or authorized service company for assistance. On Grill Models: Support the control console in place. This sparking continues, until it may take longer than 4 seconds to the "LITE" position. After verifying the proper burner...
Install Griddle (on griddle models) The griddle is turned to any position, the system creates a spark to the Use and Care Guide. Clean griddle before using. The first time a burner ... Burner A B A. Griddle 2. Repeat start-up. To Adjust Flame Height: 1. Disconnect wiring from whom you purchased your dealer or authorized service company for assistance. On Grill Models: Support the control console in place. This sparking continues, until it may take longer than 4 seconds to the "LITE" position. After verifying the proper burner...
Installation Guide
Page 13
... the flame by turning the control from the valve stem. 9. Single flame burner adjustment screw (on left side of the control console. 21. On Griddle Models: Support the control console in the middle with one arm and reconnect the griddle switch connectors and/or grill indicator light connector. 18. Griddle switch...
... the flame by turning the control from the valve stem. 9. Single flame burner adjustment screw (on left side of the control console. 21. On Griddle Models: Support the control console in the middle with one arm and reconnect the griddle switch connectors and/or grill indicator light connector. 18. Griddle switch...


