
Installation Guide
Page 3
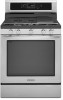
.... • Slide range back so rear range foot is moved. INSTALLATION REQUIREMENTS Tools and Parts Gather the required tools and parts before starting installation. Parts supplied Read and follow these instructions can tip the range and be securely mounted to LP ...½" combination wrench combination wrench ■ 7 mm nut driver ■ Quadrex®† or Phillips screwdriver ■ Masking tape B A. here. Parts needed A ■ Tape measure ■ Flat-blade screwdriver ■ Phillips screwdriver ■ Level ■ Hand or electric drill ■ Hammer &#...
.... • Slide range back so rear range foot is moved. INSTALLATION REQUIREMENTS Tools and Parts Gather the required tools and parts before starting installation. Parts supplied Read and follow these instructions can tip the range and be securely mounted to LP ...½" combination wrench combination wrench ■ 7 mm nut driver ■ Quadrex®† or Phillips screwdriver ■ Masking tape B A. here. Parts needed A ■ Tape measure ■ Flat-blade screwdriver ■ Phillips screwdriver ■ Level ■ Hand or electric drill ■ Hammer &#...

Installation Guide
Page 4
...Bracket" section. ■ Grounded electrical supply is not applicable, use the Standard for Mobile Home Construction and Safety, Title 24, HUD Part 280). Using the cooktop as a reference for leveling the range is to be installed must be available. Do not obstruct flow of ...gas supply connection must be sealed. ■ Do not seal the range to the Manufactured Home Construction and Safety Standard, Title 24 CFR, Part 3280 (formerly the Federal Standard for Manufactured Home Installations, ANSI A225.1/NFPA 501A or with installation clearances specified on styling. 4 Mobile Home ...
...Bracket" section. ■ Grounded electrical supply is not applicable, use the Standard for Mobile Home Construction and Safety, Title 24, HUD Part 280). Using the cooktop as a reference for leveling the range is to be installed must be available. Do not obstruct flow of ...gas supply connection must be sealed. ■ Do not seal the range to the Manufactured Home Construction and Safety Standard, Title 24 CFR, Part 3280 (formerly the Federal Standard for Manufactured Home Installations, ANSI A225.1/NFPA 501A or with installation clearances specified on styling. 4 Mobile Home ...
Installation Guide
Page 7
... film from inside oven. 3. Shipping base C B A. ¼" drive ratchet B. Use wrench or pliers to move and install range. 4. Wrench or pliers C. Remove oven racks and parts package from range. 2. Rear leveling leg B. It will be accessed by closing its individual shutoff valve must be disconnected from the gas supply piping system...
... film from inside oven. 3. Shipping base C B A. ¼" drive ratchet B. Use wrench or pliers to move and install range. 4. Wrench or pliers C. Remove oven racks and parts package from range. 2. Rear leveling leg B. It will be accessed by closing its individual shutoff valve must be disconnected from the gas supply piping system...
Installation Guide
Page 9
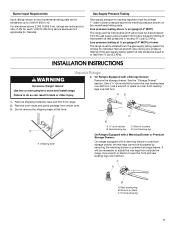
.... If bubbles appear, a leak is parallel to follow these instructions can result in the following illustration). 2. Burner cap C. C. B C A D F E J A. Remove cooktop burner caps and grates from parts package. Do not use an extension cord. Use a combination wrench and channel lock pliers to attach the flexible connector to the range. Gas pressure regulator...
.... If bubbles appear, a leak is parallel to follow these instructions can result in the following illustration). 2. Burner cap C. C. B C A D F E J A. Remove cooktop burner caps and grates from parts package. Do not use an extension cord. Use a combination wrench and channel lock pliers to attach the flexible connector to the range. Gas pressure regulator...
Installation Guide
Page 13
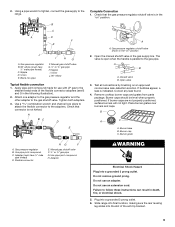
... range is free to open it, then repeat the 5-minute test as outlined above. ■ If the gas supply line shutoff valve is an extra part, go back through the steps to the drawer stop notch 2. Check that the door is level. See "Level Range." 5. Turn on other side of your... and Care Guide or User Instructions. 7. Continue to remove the oven door. Oven Door For normal range use, it away from whom you have all parts are placed in the Use and Care Guide or User Instructions. 8. A A. Dry thoroughly with a soft cloth. Storage Drawer (on range operation.
... range is free to open it, then repeat the 5-minute test as outlined above. ■ If the gas supply line shutoff valve is an extra part, go back through the steps to the drawer stop notch 2. Check that the door is level. See "Level Range." 5. Turn on other side of your... and Care Guide or User Instructions. 7. Continue to remove the oven door. Oven Door For normal range use, it away from whom you have all parts are placed in the Use and Care Guide or User Instructions. 8. A A. Dry thoroughly with a soft cloth. Storage Drawer (on range operation.

Installation Guide
Page 18
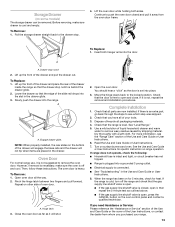
... lifting out. Screw D. XXX A A. Screws B. Remove 1 screw from front of the bake burner to the side to help hold the gas orifice spud in plastic parts bag for the correct Natural gas orifice spud placement. B A A. Replace the "56" spud with the correct Natural gas orifice spud. Set gas orifice spud aside...
... lifting out. Screw D. XXX A A. Screws B. Remove 1 screw from front of the bake burner to the side to help hold the gas orifice spud in plastic parts bag for the correct Natural gas orifice spud placement. B A A. Replace the "56" spud with the correct Natural gas orifice spud. Set gas orifice spud aside...
Use & Care Guide
Page 15
...Nonabrasive plastic scrubbing pad and mildly abrasive cleanser: Clean as soon as vinegar and tomato, should be obtained by water at www.kitchenaid.ca. SURFACE BURNERS ■ See "Sealed Surface Burners" section. COOKTOP CONTROLS To avoid damage to stainless steel surfaces, even with... seals under knobs. PORCELAIN-COATED GRATES AND CAPS To avoid damage to avoid damaging. ■ affresh™ Stainless Steel Cleaner Part Number W10355016 (not included): See "Accessories" section for more information. These spills may affect the finish. ■ Dishwasher (grates...
...Nonabrasive plastic scrubbing pad and mildly abrasive cleanser: Clean as soon as vinegar and tomato, should be obtained by water at www.kitchenaid.ca. SURFACE BURNERS ■ See "Sealed Surface Burners" section. COOKTOP CONTROLS To avoid damage to stainless steel surfaces, even with... seals under knobs. PORCELAIN-COATED GRATES AND CAPS To avoid damage to avoid damaging. ■ affresh™ Stainless Steel Cleaner Part Number W10355016 (not included): See "Accessories" section for more information. These spills may affect the finish. ■ Dishwasher (grates...

Use & Care Guide
Page 19
...or water filters. Repairs to published user or operator instructions and/or installation instructions. 4. KITCHENAID SHALL NOT BE LIABLE FOR INCIDENTAL OR CONSEQUENTIAL DAMAGES. Consumable parts are excluded from your major appliance, unless such damage results from defects in materials or... if your home of Whirlpool Corporation or Whirlpool Canada LP (hereafter "KitchenAid") will pay for Factory Specified Parts for the following components if defective in accordance with the product, KitchenAid will pay for repairs. This warranty is not available. 9. DISCLAIMER OF...
...or water filters. Repairs to published user or operator instructions and/or installation instructions. 4. KITCHENAID SHALL NOT BE LIABLE FOR INCIDENTAL OR CONSEQUENTIAL DAMAGES. Consumable parts are excluded from your major appliance, unless such damage results from defects in materials or... if your home of Whirlpool Corporation or Whirlpool Canada LP (hereafter "KitchenAid") will pay for Factory Specified Parts for the following components if defective in accordance with the product, KitchenAid will pay for repairs. This warranty is not available. 9. DISCLAIMER OF...


