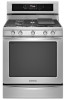
Use & Care Guide
Page 1
... "Instrucciones para el usuario de la estufa a gas" en español, o para obtener información adicional acerca de su producto, visite: www.kitchenaid.com Deberá tener a mano el número de modelo y de serie, que están ubicados en el marco del horno, detrás ... serial number, located on some models 15 RANGE CARE 16 Clean Cycle 16 General Cleaning 17 Oven Light 18 TROUBLESHOOTING 18 ACCESSORIES 20 WARRANTY 21 W10524723A If you should experience a problem not covered in TROUBLESHOOTING, please visit our website at www.kitchenaid.com for additional information. GAS ...
... "Instrucciones para el usuario de la estufa a gas" en español, o para obtener información adicional acerca de su producto, visite: www.kitchenaid.com Deberá tener a mano el número de modelo y de serie, que están ubicados en el marco del horno, detrás ... serial number, located on some models 15 RANGE CARE 16 Clean Cycle 16 General Cleaning 17 Oven Light 18 TROUBLESHOOTING 18 ACCESSORIES 20 WARRANTY 21 W10524723A If you should experience a problem not covered in TROUBLESHOOTING, please visit our website at www.kitchenaid.com for additional information. GAS ...

Use & Care Guide
Page 4
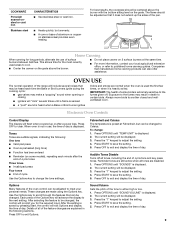
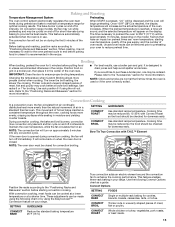
.... 5. The oven light will come on some or all of our website at www.kitchenaid.com for PM. 3. Do not press the Off keypad because the oven will sound at www.kitchenaid.ca. Baking and roasting 1. To change to set a temperature other than 350°F...176;F [204°C]). 3. Press BAKE. 2. Press OFF when finished. high (500°F [261°C]), 2 - FEATURE GUIDE This manual covers several models. Press START. 4. Position the cookware in food poisoning or sickness. KEYPAD CLOCK OVEN LIGHT TIMER SET/OFF START OFF BAKE BROIL Off FEATURE INSTRUCTIONS Clock...
.... 5. The oven light will come on some or all of our website at www.kitchenaid.com for PM. 3. Do not press the Off keypad because the oven will sound at www.kitchenaid.ca. Baking and roasting 1. To change to set a temperature other than 350°F...176;F [204°C]). 3. Press BAKE. 2. Press OFF when finished. high (500°F [261°C]), 2 - FEATURE GUIDE This manual covers several models. Press START. 4. Position the cookware in food poisoning or sickness. KEYPAD CLOCK OVEN LIGHT TIMER SET/OFF START OFF BAKE BROIL Off FEATURE INSTRUCTIONS Clock...

Use & Care Guide
Page 6
... should be used to rapidly bring liquid to a boil and to suit your needs. KEYPAD FEATURE INSTRUCTIONS WARMING DRAWER ON/OFF Warming drawer (on some models) 1. Press WARMING DRAWER ON to select the Slow Cook function at the Low setting. 2. Press WARMING DRAWER SLOW COOK to select the Warming Drawer function... preheat for the High setting. 3. See the "Oven Use" section. Allow the warming drawer to give maximum power when fully on SLOW COOK/OFF some models) 1.
... should be used to rapidly bring liquid to a boil and to suit your needs. KEYPAD FEATURE INSTRUCTIONS WARMING DRAWER ON/OFF Warming drawer (on some models) 1. Press WARMING DRAWER ON to select the Slow Cook function at the Low setting. 2. Press WARMING DRAWER SLOW COOK to select the Warming Drawer function... preheat for the High setting. 3. See the "Oven Use" section. Allow the warming drawer to give maximum power when fully on SLOW COOK/OFF some models) 1.
Use & Care Guide
Page 7
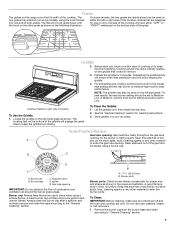
... the full width of one grate drops onto the hook on the other grate as shown. NOTE: The griddle may leave a sticky residue on some models, the two grates are cool. Griddle installed on the left or right side of soil and do not allow spills, food, cleaning agents or any... remove. 3. Grates The grates on either "LEFT" or "RIGHT" embossed on the right side grate as shown in place when using a burner cap. On some models), using the hook formed into one side of the gas tube by always using a surface burner. Keep spillovers out of the cooktop will engage the...
... the full width of one grate drops onto the hook on the other grate as shown. NOTE: The griddle may leave a sticky residue on some models, the two grates are cool. Griddle installed on the left or right side of soil and do not allow spills, food, cleaning agents or any... remove. 3. Grates The grates on either "LEFT" or "RIGHT" embossed on the right side grate as shown in place when using a burner cap. On some models), using the hook formed into one side of the gas tube by always using a surface burner. Keep spillovers out of the cooktop will engage the...
Use & Care Guide
Page 9
... pad press Four tones ■ End of cycle Use the Options key to exit and display the time of day. IMPORTANT: The health of some models), repeating each time the Bake or Broil burners ignite during the cooking cycle: ■ gas valves may result in use of surface burners between batches...
... pad press Four tones ■ End of cycle Use the Options key to exit and display the time of day. IMPORTANT: The health of some models), repeating each time the Bake or Broil burners ignite during the cooking cycle: ■ gas valves may result in use of surface burners between batches...

Use & Care Guide
Page 11
...like to order. Place shallow dishes on 2 racks, use racks 2 and 5 with the Bake function. *If your model has a Max Capacity Rack, the recessed ends must be able to the stop position, raise the front edge, and ...Type of rack in rack position 2. If a Max Capacity Rack is used on some models, sits midway between adjacent rack positions. NOTE: The roll-out rack, which is a space maximizer. Place large ...items on some models) Split-Rack with Removable Insert To Use Racks: The split-rack with removable insert is ...
...like to order. Place shallow dishes on 2 racks, use racks 2 and 5 with the Bake function. *If your model has a Max Capacity Rack, the recessed ends must be able to the stop position, raise the front edge, and ...Type of rack in rack position 2. If a Max Capacity Rack is used on some models, sits midway between adjacent rack positions. NOTE: The roll-out rack, which is a space maximizer. Place large ...items on some models) Split-Rack with Removable Insert To Use Racks: The split-rack with removable insert is ...
Use & Care Guide
Page 13
... convection (true convection only) element and fan cycle on and off for short intervals during convection cooking, the fan will turn on the model. CONVECT BROIL Use standard recipe temperature. With convection cooking, most foods can be on the display. This feature enables three-rack baking in ...intervals. On convection range models, the fan may run while preheating and may be checked for the oven preheat cycle to end before putting food in unless it in...
... convection (true convection only) element and fan cycle on and off for short intervals during convection cooking, the fan will turn on the model. CONVECT BROIL Use standard recipe temperature. With convection cooking, most foods can be on the display. This feature enables three-rack baking in ...intervals. On convection range models, the fan may run while preheating and may be checked for the oven preheat cycle to end before putting food in unless it in...
Use & Care Guide
Page 14
... ends, the oven will light up . 4. The temperature and/or time settings can be done when the stop time is available only on some models) operates at any time after cooking. NOTE: The time setting for the food to cook. 5. Rapid Proof (on . Rapid Bread Proofing is ...in the oven. NOTE: If the oven temperature is less than the one hour before the stop time, the oven will automatically turn on some models. 2. Choose the category most appropriate for any timed cooking function, including EasyConvect™ Conversion, can be changed any time by following chart as ...
... ends, the oven will light up . 4. The temperature and/or time settings can be done when the stop time is available only on some models) operates at any time after cooking. NOTE: The time setting for the food to cook. 5. Rapid Proof (on . Rapid Bread Proofing is ...in the oven. NOTE: If the oven temperature is less than the one hour before the stop time, the oven will automatically turn on some models. 2. Choose the category most appropriate for any timed cooking function, including EasyConvect™ Conversion, can be changed any time by following chart as ...
Use & Care Guide
Page 15
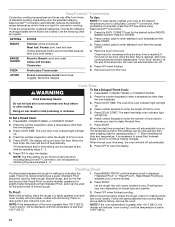
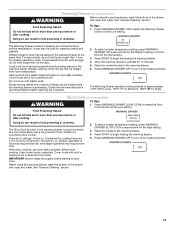
... times are 2 settings: Hi and Lo. Place the cooked food(s) in the warming drawer. 4. WARNING Food Poisoning Hazard Slow Cook (on some models) To Use: 1. Warming Drawer (on some models) WARNING Before using the warming drawer, wash the bottom of food may require less time, while larger quantities may be heated from...
... times are 2 settings: Hi and Lo. Place the cooked food(s) in the warming drawer. 4. WARNING Food Poisoning Hazard Slow Cook (on some models) To Use: 1. Warming Drawer (on some models) WARNING Before using the warming drawer, wash the bottom of food may require less time, while larger quantities may be heated from...
Use & Care Guide
Page 17
...gritty washcloths or abrasive paper towels. These spills may affect the finish. Cleaning method: ■ Mild detergent STAINLESS STEEL (on some models) Do not use abrasive cleaners, cleaners with porcelain and staining, etching, pitting or faint white spots can visit the Frequently Asked ... stainless steel surfaces, even with soft, lint-free cloth. Cooked-on panel. In Canada, reference the Customer Service section at www.kitchenaid.com. Do not reassemble caps on cleaning products. For additional information, you can result. Damage may occur to remove. ■ Glass...
...gritty washcloths or abrasive paper towels. These spills may affect the finish. Cleaning method: ■ Mild detergent STAINLESS STEEL (on some models) Do not use abrasive cleaners, cleaners with porcelain and staining, etching, pitting or faint white spots can visit the Frequently Asked ... stainless steel surfaces, even with soft, lint-free cloth. Cooked-on panel. In Canada, reference the Customer Service section at www.kitchenaid.com. Do not reassemble caps on cleaning products. For additional information, you can result. Damage may occur to remove. ■ Glass...

Use & Care Guide
Page 19
... the first time the oven has been used . The convection fan will deactivate all heating elements. See "Oven Temperature Control" in a reliable cookbook. On some models, reset the clock, if needed. If it reappears, call for 3 seconds. To remove deposits, use a cloth dampened with vinegar. See the Installation Instructions. Adjust cooking...
... the first time the oven has been used . The convection fan will deactivate all heating elements. See "Oven Temperature Control" in a reliable cookbook. On some models, reset the clock, if needed. If it reappears, call for 3 seconds. To remove deposits, use a cloth dampened with vinegar. See the Installation Instructions. Adjust cooking...
Use & Care Guide
Page 20
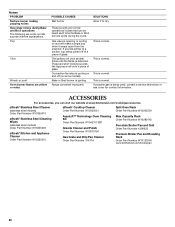
...The following are normal operational noises that can visit our website at www.kitchenaid.com/cookingaccessories. It sounds similar to dry. If propane gas is normal. These sounds are some models). This is being pulled off (on and will click several times ...solenoid. Bake or Broil burner is igniting. affresh® Stainless Steel Cleaner (stainless steel models) Order Part Number W10355016 affresh® Stainless Steel Cleaning Wipes (stainless steel models) Order Part Number W10355049 affresh® Kitchen and Appliance Cleaner Order Part Number W10355010 affresh...
...The following are normal operational noises that can visit our website at www.kitchenaid.com/cookingaccessories. It sounds similar to dry. If propane gas is normal. These sounds are some models). This is being pulled off (on and will click several times ...solenoid. Bake or Broil burner is igniting. affresh® Stainless Steel Cleaner (stainless steel models) Order Part Number W10355016 affresh® Stainless Steel Cleaning Wipes (stainless steel models) Order Part Number W10355049 affresh® Kitchen and Appliance Cleaner Order Part Number W10355010 affresh...
Use & Care Guide
Page 21
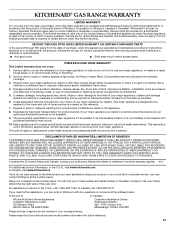
...normal, single-family household use of consumables or cleaning products not approved by KitchenAid. 5. Repairs to parts or systems resulting from warranty coverage. 3. Major appliances with original model/serial numbers that is contrary to published user or operator instructions and/or installation... instructions. 4. If outside the 50 United States and Canada, contact your authorized KitchenAid dealer to determine if another warranty applies...
...normal, single-family household use of consumables or cleaning products not approved by KitchenAid. 5. Repairs to parts or systems resulting from warranty coverage. 3. Major appliances with original model/serial numbers that is contrary to published user or operator instructions and/or installation... instructions. 4. If outside the 50 United States and Canada, contact your authorized KitchenAid dealer to determine if another warranty applies...

Dimension Guide
Page 1
...installation. Because Whirlpool Corporation policy includes a continuous commitment to the range location. 30" (76.2 cm) Freestanding Gas Range PRODUCT MODEL NUMBERS PRODUCT DIMENSIONS KGRS202B Type of Gas Natural Gas: KGRS303B KGRS306B KGRS308B This range is design-certified by a qualified service technician..... †®TEFLON is for installation of E.I . 2" (5.1 cm) J. 4¹⁄₂" (11.4 cm) K. 2" (5.1 cm) min. Model/serial rating plate (located on the oven frame behind the top left side of the oven door has information on styling. For minimum clearance to...
...installation. Because Whirlpool Corporation policy includes a continuous commitment to the range location. 30" (76.2 cm) Freestanding Gas Range PRODUCT MODEL NUMBERS PRODUCT DIMENSIONS KGRS202B Type of Gas Natural Gas: KGRS303B KGRS306B KGRS308B This range is design-certified by a qualified service technician..... †®TEFLON is for installation of E.I . 2" (5.1 cm) J. 4¹⁄₂" (11.4 cm) K. 2" (5.1 cm) min. Model/serial rating plate (located on the oven frame behind the top left side of the oven door has information on styling. For minimum clearance to...

Installation Guide
Page 4
...and Safety Standard, Title 24 CFR, Part 3280 (formerly the Federal Standard for Mobile Home Construction and Safety, Title 24, HUD Part 280). Model/serial rating plate (located on styling. 4 In Canada, the installation of the oven door) IMPORTANT: Range must be used will not discolor,.... When such standard is not applicable, use the Standard for leveling the range is located on the model/serial rating plate. A. 27⁷⁄₈" (70.8 cm) max. The model/serial rating plate is not recommended. *Range can withstand at least 200°F (93°C). This...
...and Safety Standard, Title 24 CFR, Part 3280 (formerly the Federal Standard for Mobile Home Construction and Safety, Title 24, HUD Part 280). Model/serial rating plate (located on styling. 4 In Canada, the installation of the oven door) IMPORTANT: Range must be used will not discolor,.... When such standard is not applicable, use the Standard for leveling the range is located on the model/serial rating plate. A. 27⁷⁄₈" (70.8 cm) max. The model/serial rating plate is not recommended. *Range can withstand at least 200°F (93°C). This...

Installation Guide
Page 6
... on the types of pipe fittings to obtain an in-line connection to the regulator should be equipped with all local codes and ordinances. The model/serial rating plate located on the oven frame behind the top right side of the oven door has information on the... model/serial rating plate for use with a different gas without consulting the serving gas supplier. Usually, LP gas suppliers determine the size and materials used . B A C A. The ...
... on the types of pipe fittings to obtain an in-line connection to the regulator should be equipped with all local codes and ordinances. The model/serial rating plate located on the oven frame behind the top right side of the oven door has information on the... model/serial rating plate for use with a different gas without consulting the serving gas supplier. Usually, LP gas suppliers determine the size and materials used . B A C A. The ...
Installation Guide
Page 7
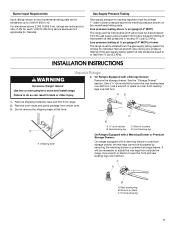
... base C B A. ¼" drive ratchet B. Wrench or pliers D. Wrench or pliers C. Line pressure testing at least 1" water column pressure above the manifold pressure shown on the model/serial rating plate are reduced at a rate of 4% for testing regulator must be at ½ psi gauge (14" WCP) or lower The range must be... pressure testing above sea level (not applicable for elevations up to or less than ½ psi (3.5 kPa). Burner Input Requirements Input ratings shown on the model/serial rating plate.
... base C B A. ¼" drive ratchet B. Wrench or pliers D. Wrench or pliers C. Line pressure testing at least 1" water column pressure above the manifold pressure shown on the model/serial rating plate are reduced at a rate of 4% for testing regulator must be at ½ psi gauge (14" WCP) or lower The range must be... pressure testing above sea level (not applicable for elevations up to or less than ½ psi (3.5 kPa). Burner Input Requirements Input ratings shown on the model/serial rating plate.
Installation Guide
Page 11
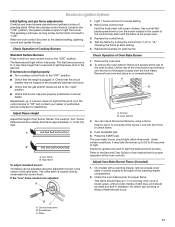
... burner. If the "low" flame needs to one side of the oven bottom. Insert a mirror to be adjusted using a mirror. Press the START pad. On models with a warming drawer, remove access cover plate (1 screw) located at the rear of the burner. B C A. Electronic Ignition System Initial lighting and gas flame adjustments Cooktop...
... burner. If the "low" flame needs to one side of the oven bottom. Insert a mirror to be adjusted using a mirror. Press the START pad. On models with a warming drawer, remove access cover plate (1 screw) located at the rear of the burner. B C A. Electronic Ignition System Initial lighting and gas flame adjustments Cooktop...

Installation Guide
Page 12
... proper operation of dark blue, and should have a ½" (1.3 cm) long inner cone of bluish-green, with the notches in the drawer glides on some models) Remove all the way. 3. Press the BROIL pad. 3. Refer to the drawer glides. The warming drawer or premium storage drawer is seated properly on the...
... proper operation of dark blue, and should have a ½" (1.3 cm) long inner cone of bluish-green, with the notches in the drawer glides on some models) Remove all the way. 3. Press the BROIL pad. 3. Refer to the drawer glides. The warming drawer or premium storage drawer is seated properly on the...
Installation Guide
Page 13
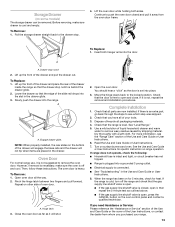
.... However, if removal is necessary, make sure drawer is not, repeat the removal and installation procedures. If there is open and close. Turn on some models) The storage drawer can be removed. Repeat on range operation. If the range is cold, turn off and cool. Open oven door all parts are...
.... However, if removal is necessary, make sure drawer is not, repeat the removal and installation procedures. If there is open and close. Turn on some models) The storage drawer can be removed. Repeat on range operation. If the range is cold, turn off and cool. Open oven door all parts are...

