
Use & Care Guide
Page 2
...lower right oven frame. ®Registered trademark/™Trademark of your product. Date of Purchase Save sales receipt for aluminum use 30 Replacing oven light 30 Removing and replacing the lift-off oven door 31 Before You Call - Serial Plate Location To locate the serial plate open ...153; Feature Meats & Baked Goods (some models). See bottom of this space below, record the date of purchase, model and serial number of KitchenAid, U.S.A., KitchenAid Canada Licensee in Canada. © 2010 All rights reserved. 2 Serial No. The serial plate is attached to common problems .... 32-34 ...
...lower right oven frame. ®Registered trademark/™Trademark of your product. Date of Purchase Save sales receipt for aluminum use 30 Replacing oven light 30 Removing and replacing the lift-off oven door 31 Before You Call - Serial Plate Location To locate the serial plate open ...153; Feature Meats & Baked Goods (some models). See bottom of this space below, record the date of purchase, model and serial number of KitchenAid, U.S.A., KitchenAid Canada Licensee in Canada. © 2010 All rights reserved. 2 Serial No. The serial plate is attached to common problems .... 32-34 ...
Use & Care Guide
Page 13
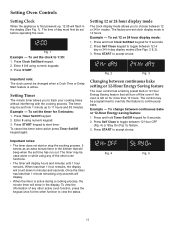
... oven. Press and hold Clock Set/Start keypad for the other oven functions. • The timer will flash in the display. Press Self Clean to 1:30: 1. Important note: The clock cannot be programmed to override this feature to accept choice. Press Timer Set/Off keypad. 2. The time of the other function...
... oven. Press and hold Clock Set/Start keypad for the other oven functions. • The timer will flash in the display. Press Self Clean to 1:30: 1. Important note: The clock cannot be programmed to override this feature to accept choice. Press Timer Set/Off keypad. 2. The time of the other function...
Use & Care Guide
Page 16
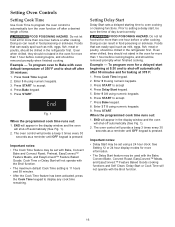
...off automatically (See Fig. 1). 2. Press START to accept. 7. Enter 5 0 using numeric keypads. 3. Delay Start or Cook Time will provide a beep 3 times every 30 seconds as a reminder until OFF keypad is 11 hours and 59 minutes. • After the Cook Time feature has been activated, press the Cook Time.... Do not let food sit for more than 1 hour before or after cooking. Cook Time or Delay Start will provide a beep 3 times every 30 seconds as a reminder until OFF keypad is set using a 24 hour clock. Foods that can easily spoil such as milk, eggs, fish, meat...
...off automatically (See Fig. 1). 2. Press START to accept. 7. Enter 5 0 using numeric keypads. 3. Delay Start or Cook Time will provide a beep 3 times every 30 seconds as a reminder until OFF keypad is 11 hours and 59 minutes. • After the Cook Time feature has been activated, press the Cook Time.... Do not let food sit for more than 1 hour before or after cooking. Cook Time or Delay Start will provide a beep 3 times every 30 seconds as a reminder until OFF keypad is set using a 24 hour clock. Foods that can easily spoil such as milk, eggs, fish, meat...
Use & Care Guide
Page 18
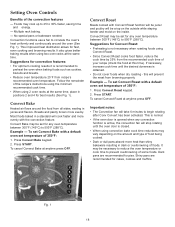
... after Conv Convert has been activated. Most foods baked in juices and flavors. If necessary, increase cook time until the oven door is recommended to 30% faster, saving time and energy. — Multiple rack baking. — No special pans or bakeware needed. Dark pans are recommended for pies. Example — To...
... after Conv Convert has been activated. Most foods baked in juices and flavors. If necessary, increase cook time until the oven door is recommended to 30% faster, saving time and energy. — Multiple rack baking. — No special pans or bakeware needed. Dark pans are recommended for pies. Example — To...

Use & Care Guide
Page 19
..., fat, gristle or cookware. • For bone-in ham or lamb, insert meat probe into the center of lowest large muscle or joint. Enter 3 0 (for 30 minutes). 3. Press Easy Convect. When using either EasyConvect™ Feature Meats or Baked Goods bake time reductions may be entered using default oven set temperature...
..., fat, gristle or cookware. • For bone-in ham or lamb, insert meat probe into the center of lowest large muscle or joint. Enter 3 0 (for 30 minutes). 3. Press Easy Convect. When using either EasyConvect™ Feature Meats or Baked Goods bake time reductions may be entered using default oven set temperature...
Use & Care Guide
Page 28
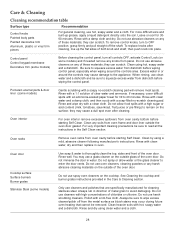
... from panel. Rinse and wipe dry with a high sugar or acid content (milk, tomatoes, sauerkraut, fruit juices or pie filling) to remain on soil for 30 to wipe excess cleaner/polish off the shaft. For more difficult soils and built-up the flat sides of the oven door. Leave on the...
... from panel. Rinse and wipe dry with a high sugar or acid content (milk, tomatoes, sauerkraut, fruit juices or pie filling) to remain on soil for 30 to wipe excess cleaner/polish off the shaft. For more difficult soils and built-up the flat sides of the oven door. Leave on the...

Use & Care Guide
Page 30
... such as aluminum foil. Before manually cleaning any slots, holes or passages in this Use & Care Guide. Care must be reset. glass shield wire holder 30
... such as aluminum foil. Before manually cleaning any slots, holes or passages in this Use & Care Guide. Care must be reset. glass shield wire holder 30
Installation Guide
Page 4
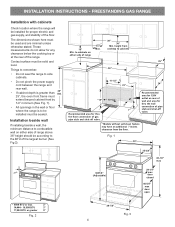
...must extend beyond cabinet front by 1/2" minimum (See Fig. 1). • All openings in the wall or floor where the range is to cabinets 25" 30" 11-1/2" 24" 23" *15" 10-1/2" Recommended area for thru the floor connection of gas pipe stub and shut-off valve. * Models without self-...clean feature may have an additional 7 inches clearance from cooktop to be installed must be sealed. Fig. 1 30" 25-3/4" 48-1/2" max * 29-1/4" 36±1/8" max (Adjustable) door closed 46-5/8" max door open * 9500 BTU or less 2" 10,000 - 16,999 BTU...
...must extend beyond cabinet front by 1/2" minimum (See Fig. 1). • All openings in the wall or floor where the range is to cabinets 25" 30" 11-1/2" 24" 23" *15" 10-1/2" Recommended area for thru the floor connection of gas pipe stub and shut-off valve. * Models without self-...clean feature may have an additional 7 inches clearance from cooktop to be installed must be sealed. Fig. 1 30" 25-3/4" 48-1/2" max * 29-1/4" 36±1/8" max (Adjustable) door closed 46-5/8" max door open * 9500 BTU or less 2" 10,000 - 16,999 BTU...
Installation Guide
Page 9
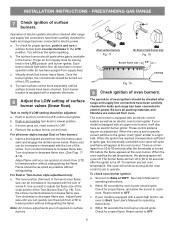
...Check for operating instructions. a. Each burner should be as small as an electric oven burner igniter. Each burner location is set oven to 30 seconds after range and supply line connectors have an electric burner igniter. Turn clockwise to a light bulb. Adjust flame until burner ignites. ...verify if LOW setting should ignite when gas is equipped with the turn control to electric power. Note: Air mixture adjustments are removed from 30 to 60 seconds after the thermostat is equipped with an upper oven burner, it will "glow" similar to decrease flame size. (See ...
...Check for operating instructions. a. Each burner should be as small as an electric oven burner igniter. Each burner location is set oven to 30 seconds after range and supply line connectors have an electric burner igniter. Turn clockwise to a light bulb. Adjust flame until burner ignites. ...verify if LOW setting should ignite when gas is equipped with the turn control to electric power. Note: Air mixture adjustments are removed from 30 to 60 seconds after the thermostat is equipped with an upper oven burner, it will "glow" similar to decrease flame size. (See ...


