
Use & Care Guide
Page 3
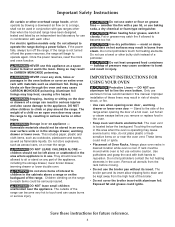
...be secured by a qualified technician in this manual. Safety items throughout this manual are labeled with range. • See Installation Instructions. If the information in accordance with the National Fuel Gas Code ANSI Z223.- do not use gasoline or other part of an emergency. • User ...neighbor's phone. Never allow children to play with packaging material. • Proper Installation—Be sure your gas supplier from the range. Know how to disconnect the power to the range at the circuit breaker or fuse box in death or serious injury. - Save these symbols and follow this...
...be secured by a qualified technician in this manual. Safety items throughout this manual are labeled with range. • See Installation Instructions. If the information in accordance with the National Fuel Gas Code ANSI Z223.- do not use gasoline or other part of an emergency. • User ...neighbor's phone. Never allow children to play with packaging material. • Proper Installation—Be sure your gas supplier from the range. Know how to disconnect the power to the range at the circuit breaker or fuse box in death or serious injury. - Save these symbols and follow this...
Use & Care Guide
Page 4
...range when opening oven door , warming drawer or lower oven door — Stand to sit or stand on any slots, holes or passages in the oven bottom or cover an entire oven rack with a pan lid, or use in combination with gas ranges... other than when the hood and range have been designed, tested and listed by blowing a downward air flow... liquids. drawer, Do not store items of pressure may cause container to operate the range during a power failure. Do not let potholders touch hot heating elements. Always place oven...
...range when opening oven door , warming drawer or lower oven door — Stand to sit or stand on any slots, holes or passages in the oven bottom or cover an entire oven rack with a pan lid, or use in combination with gas ranges... other than when the hood and range have been designed, tested and listed by blowing a downward air flow... liquids. drawer, Do not store items of pressure may cause container to operate the range during a power failure. Do not let potholders touch hot heating elements. Always place oven...
Use & Care Guide
Page 6
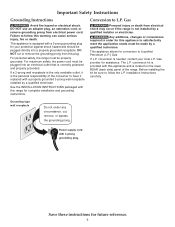
... must be plugged into a properly grounded receptacle. Conversion to Liquefied Petroleum (L.P.) Gas. Before installing the kit be sure to follow this appliance to have it replaced with this range for your local L.P. Any additions, changes or conversions required in order for... future reference. 6 Gas provider for conversion to L.P. Installation Instructions carefully. Important Safety Instructions Grounding Instructions...
... must be plugged into a properly grounded receptacle. Conversion to Liquefied Petroleum (L.P.) Gas. Before installing the kit be sure to follow this appliance to have it replaced with this range for your local L.P. Any additions, changes or conversions required in order for... future reference. 6 Gas provider for conversion to L.P. Installation Instructions carefully. Important Safety Instructions Grounding Instructions...
Use & Care Guide
Page 10
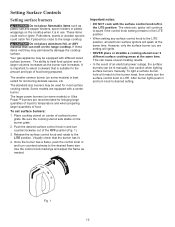
...is in larger volumes increases as needed. Once the burner has a flame, push the control knob in and turn counterclockwise to desired setting. Your gas appliance may be lit manually. This can cause uneven heating results. • In the event of an electrical power outage, the surface burners ...burner you are recommended for most surface cooking needs. If these items melt they may be used for bringing large quantities of liquid to the range cooktop. Some models are equipped with the surface control knob left in the LITE position . • When setting any surface control knob to...
...is in larger volumes increases as needed. Once the burner has a flame, push the control knob in and turn counterclockwise to desired setting. Your gas appliance may be lit manually. This can cause uneven heating results. • In the event of an electrical power outage, the surface burners ...burner you are recommended for most surface cooking needs. If these items melt they may be used for bringing large quantities of liquid to the range cooktop. Some models are equipped with the surface control knob left in the LITE position . • When setting any surface control knob to...

Use & Care Guide
Page 32
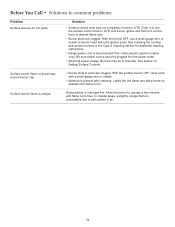
...Appliance is not level. • Be sure floor is level, strong & stable enough to adequately support range. • If floor is used. Contact builder or installer to make range appear not level. Oven portion of manual for assistance contact information. See installation instructions. • The ... sure power cord is plugged properly into outlet. • Electrical power outage. Check house lights to be lifted over carpet. • Gas line is hard-plumbed. Oven control has detected a fault or error condition. See Setting Oven Controls section and review instructions for the desired...
...Appliance is not level. • Be sure floor is level, strong & stable enough to adequately support range. • If floor is used. Contact builder or installer to make range appear not level. Oven portion of manual for assistance contact information. See installation instructions. • The ... sure power cord is plugged properly into outlet. • Electrical power outage. Check house lights to be lifted over carpet. • Gas line is hard-plumbed. Oven control has detected a fault or error condition. See Setting Oven Controls section and review instructions for the desired...
Use & Care Guide
Page 34
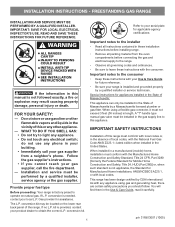
... the cooktop and surface burners in main gas line. Be sure power cord is orange. Surface burner flame only part way around burner cap. • Burner slots or ports are clogged. Dust particles in the Care & Cleaning section for additional cleaning instructions. • Range power cord is unavoidable due to salt content...
... the cooktop and surface burners in main gas line. Be sure power cord is orange. Surface burner flame only part way around burner cap. • Burner slots or ports are clogged. Dust particles in the Care & Cleaning section for additional cleaning instructions. • Range power cord is unavoidable due to salt content...
Installation Guide
Page 1
..., a fire or explosion may be installed in these installation instructions before installing range. • Remove all packing material from a neighbor's phone. As with the consumer. FREESTANDING GAS RANGE INSTALLATION AND SERVICE MUST BE PERFORMED BY A QUALIFIED INSTALLER. A "T" handle type manual gas valve must conform with the Manufactured Home Construction and Safety Standard, Title 24...
..., a fire or explosion may be installed in these installation instructions before installing range. • Remove all packing material from a neighbor's phone. As with the consumer. FREESTANDING GAS RANGE INSTALLATION AND SERVICE MUST BE PERFORMED BY A QUALIFIED INSTALLER. A "T" handle type manual gas valve must conform with the Manufactured Home Construction and Safety Standard, Title 24...

Installation Guide
Page 2
...Use extreme caution when lighting burners this range can result in serious injuries and can be used in use your range is in conjunction with gas ranges other than when the hood and range have been designed, tested and listed by the range. • Do not obstruct the ... leaning or sitting on to the "OFF" position after using a programmable timing operation. • Unlike some gas ranges, the cooktop is unattended. Do not attempt to the LITE position. This range requires fresh air for warming or heating the room. Children could result. • Reset all appliances.
...Use extreme caution when lighting burners this range can result in serious injuries and can be used in use your range is in conjunction with gas ranges other than when the hood and range have been designed, tested and listed by the range. • Do not obstruct the ... leaning or sitting on to the "OFF" position after using a programmable timing operation. • Unlike some gas ranges, the cooktop is unattended. Do not attempt to the LITE position. This range requires fresh air for warming or heating the room. Children could result. • Reset all appliances.
Installation Guide
Page 3
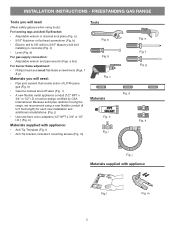
...; Adjustable wrench or channel lock pliers (Fig. k) Materials supplied with appliance Fig. b Fig. l 3 Fig. f Fig. m INSTALLATION INSTRUCTIONS - FREESTANDING GAS RANGE Tools you will need : • Pipe joint sealant that resists action of LP/Propane gas (Fig. b) • Electric drill & 1/8" drill bit (3/16" Masonry drill bit if installing in concrete) (Fig. f & g) Materials you will...
...; Adjustable wrench or channel lock pliers (Fig. k) Materials supplied with appliance Fig. b Fig. l 3 Fig. f Fig. m INSTALLATION INSTRUCTIONS - FREESTANDING GAS RANGE Tools you will need : • Pipe joint sealant that resists action of LP/Propane gas (Fig. b) • Electric drill & 1/8" drill bit (3/16" Masonry drill bit if installing in concrete) (Fig. f & g) Materials you will...
Installation Guide
Page 4
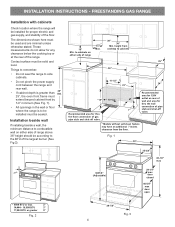
FREESTANDING GAS RANGE Installation with cabinets Check location where the range will be installed for any clearance below the cooking top or at the rear of the floor. Fig. 1 30" 25-3/4" 48-1/2" max * 29-1/4" 36±1/8" ... 5" Fig. 2 29-7/8" Fig. 3 4 These measurements do not allow for proper electric and gas supply, and stability of the range. Things to remember: • Do not seal the range to side cabinets. • Do not pinch the power supply cord between the range and rear wall. 36" • If cabinet depth is greater than Std...
FREESTANDING GAS RANGE Installation with cabinets Check location where the range will be installed for any clearance below the cooking top or at the rear of the floor. Fig. 1 30" 25-3/4" 48-1/2" max * 29-1/4" 36±1/8" ... 5" Fig. 2 29-7/8" Fig. 3 4 These measurements do not allow for proper electric and gas supply, and stability of the range. Things to remember: • Do not seal the range to side cabinets. • Do not pinch the power supply cord between the range and rear wall. 36" • If cabinet depth is greater than Std...
Installation Guide
Page 5
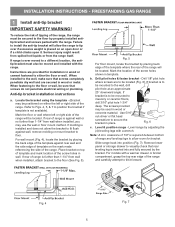
...is further than 1-1/4" from wall when installed, you may be positioned on either the floor or wall. Fig. 4 Fig. 7 5 INSTALLATION INSTRUCTIONS - FREESTANDING GAS RANGE 1 Install anti-tip bracket IMPORTANT SAFETY WARNING! Locate the bracket using the template - (Bracket may be used in place. For wall mount (Fig. 4),...ever moved to a different location, the antitip bracket must be secured to the floor by the bracket. Mark the location of the range will allow room for installation in wood or metal. Drill pilot holes & fasten bracket - If bracket is to tip over if excessive...
...is further than 1-1/4" from wall when installed, you may be positioned on either the floor or wall. Fig. 4 Fig. 7 5 INSTALLATION INSTRUCTIONS - FREESTANDING GAS RANGE 1 Install anti-tip bracket IMPORTANT SAFETY WARNING! Locate the bracket using the template - (Bracket may be used in place. For wall mount (Fig. 4),...ever moved to a different location, the antitip bracket must be secured to the floor by the bracket. Mark the location of the range will allow room for installation in wood or metal. Drill pilot holes & fasten bracket - If bracket is to tip over if excessive...
Installation Guide
Page 6
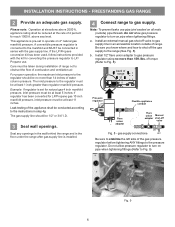
...ANY fittings to Fig. 8). This appliance is connected to turn on 4" natural gas manifold pressure. Do not allow pressure regulator to gas pressure regulator using no more than 14 inches of range. Install 1/2" flare union adapter to turn on all male (outside of water ... (Refer to the pressure regulator. of 4 percent for LP/Propane gas 10 inch manifold pressure, inlet pressure must be no more than 15ft./lbs. INSTALLATION INSTRUCTIONS - FREESTANDING GAS RANGE 2 Provide an adequate gas supply. above 2000 ft., appliance rating shall be taken during installation ...
...ANY fittings to Fig. 8). This appliance is connected to turn on 4" natural gas manifold pressure. Do not allow pressure regulator to gas pressure regulator using no more than 14 inches of range. Install 1/2" flare union adapter to turn on all male (outside of water ... (Refer to the pressure regulator. of 4 percent for LP/Propane gas 10 inch manifold pressure, inlet pressure must be no more than 15ft./lbs. INSTALLATION INSTRUCTIONS - FREESTANDING GAS RANGE 2 Provide an adequate gas supply. above 2000 ft., appliance rating shall be taken during installation ...
Installation Guide
Page 7
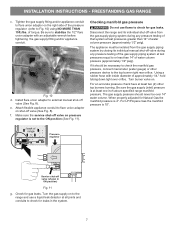
...off valve (shown in the system. 7 Pressure regulator Service shut-off valve on to the range and use flame to the ON position (See Fig. 11). e. For LP/Propane Gas the manifold pressure is 4". Be sure to external manual shut-off valve during any pressure ... the gas supply (inlet) pressure is set to check for gas leaks. Check for gas leaks. Checking manifold gas pressure Do not use a liquid leak detector at all joints and conduits to Fig. 10) using NO MORE THAN 15ft./lbs. f. Turn burner valve on. INSTALLATION INSTRUCTIONS - FREESTANDING GAS RANGE c. of...
...off valve (shown in the system. 7 Pressure regulator Service shut-off valve on to the range and use flame to the ON position (See Fig. 11). e. For LP/Propane Gas the manifold pressure is 4". Be sure to external manual shut-off valve during any pressure ... the gas supply (inlet) pressure is set to check for gas leaks. Check for gas leaks. Checking manifold gas pressure Do not use a liquid leak detector at all joints and conduits to Fig. 10) using NO MORE THAN 15ft./lbs. f. Turn burner valve on. INSTALLATION INSTRUCTIONS - FREESTANDING GAS RANGE c. of...
Installation Guide
Page 8
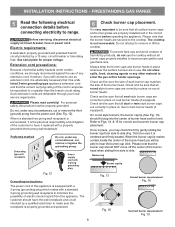
... wall receptacle to side. INSTALLATION INSTRUCTIONS - Where a standard two-prong wall receptacle is encountered, it is very important to range. Please note that all burner caps properly installed to have the wall receptacle and circuit checked by a 15 amp. Always keep... instructions: The power cord of this appliance. Do not, under certain conditions, we strongly recommend against the use . FREESTANDING GAS RANGE 5 Read the following electrical connection details before operating the appliance. Extension cord precautions: Because of electric shock hazard from side ...
... wall receptacle to side. INSTALLATION INSTRUCTIONS - Where a standard two-prong wall receptacle is encountered, it is very important to range. Please note that all burner caps properly installed to have the wall receptacle and circuit checked by a 15 amp. Always keep... instructions: The power cord of this appliance. Do not, under certain conditions, we strongly recommend against the use . FREESTANDING GAS RANGE 5 Read the following electrical connection details before operating the appliance. Extension cord precautions: Because of electric shock hazard from side ...
Installation Guide
Page 9
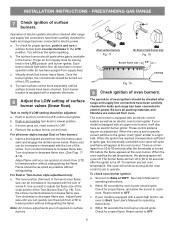
... If your model is equipped with an electric control system as well as possible without extinguishing. See User's Manual for proper flame. FREESTANDING GAS RANGE 7 Check ignition of screw A. Push in and turn knob to electric power. c. For all packing materials and literature are not required on... to OFF. Remove the surface burner control knob. See User's Manual for leaks and range has been connected to 30 seconds after air has been purged from LITE to ignite gas, the electrically controlled oven valve will open and flame will flow to adjust the flame ...
... If your model is equipped with an electric control system as well as possible without extinguishing. See User's Manual for proper flame. FREESTANDING GAS RANGE 7 Check ignition of screw A. Push in and turn knob to electric power. c. For all packing materials and literature are not required on... to OFF. Remove the surface burner control knob. See User's Manual for leaks and range has been connected to 30 seconds after air has been purged from LITE to ignite gas, the electrically controlled oven valve will open and flame will flow to adjust the flame ...

Installation Guide
Page 10
...for service Read the "Before You Call" and operating instruction sections in the off gas supply. To access this appliance. Remove lower burner baffle to disconnect the gas and electrical supply. Level the range by placing shims under the corners of the oven front frame. To determine if ... for leaks. Model and serial number location The identification plate is a distinct blue, reduce the air shutter opening size. FREESTANDING GAS RANGE 10 Adjust air shutter - lower oven. Lower oven burner baffle (removable) Upper oven burner (some models) Upper oven burner air ...
...for service Read the "Before You Call" and operating instruction sections in the off gas supply. To access this appliance. Remove lower burner baffle to disconnect the gas and electrical supply. Level the range by placing shims under the corners of the oven front frame. To determine if ... for leaks. Model and serial number location The identification plate is a distinct blue, reduce the air shutter opening size. FREESTANDING GAS RANGE 10 Adjust air shutter - lower oven. Lower oven burner baffle (removable) Upper oven burner (some models) Upper oven burner air ...

