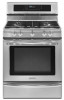

Use & Care Guide
Page 2
... for future reference. Serial No. Serial Plate Location To locate the serial plate open storage drawer (some models) or warming drawer (some models 19 Meat Probe 19-20 Adjusting Oven Temperature 21 Operating Oven Light 21 Restoring Default Settings 21 Sabbath Oven...Model No. The serial plate is attached to common problems .... 32-34 Assistance or Service 35 Appliance Warranty back cover Product Record In this page for aluminum use 30 Replacing oven light 30 Removing and replacing the lift-off oven door 31 Before You Call - Date of KitchenAid, U.S.A., KitchenAid...
... for future reference. Serial No. Serial Plate Location To locate the serial plate open storage drawer (some models) or warming drawer (some models 19 Meat Probe 19-20 Adjusting Oven Temperature 21 Operating Oven Light 21 Restoring Default Settings 21 Sabbath Oven...Model No. The serial plate is attached to common problems .... 32-34 Assistance or Service 35 Appliance Warranty back cover Product Record In this page for aluminum use 30 Replacing oven light 30 Removing and replacing the lift-off oven door 31 Before You Call - Date of KitchenAid, U.S.A., KitchenAid...

Use & Care Guide
Page 3
... at the circuit breaker or fuse box in case of an emergency. • User servicing—Do not repair or replace any electrical switch; For models equipped with packaging material. • Proper Installation—Be sure your dealer to recommend a qualified technician and an authorized repair service. Do not attempt to...
... at the circuit breaker or fuse box in case of an emergency. • User servicing—Do not repair or replace any electrical switch; For models equipped with packaging material. • Proper Installation—Be sure your dealer to recommend a qualified technician and an authorized repair service. Do not attempt to...
Use & Care Guide
Page 4
... ranges other than when the hood and range have been designed, tested and listed by an independent test laboratory for future reference. 4 For electric ignition models only: Do not attempt to reposition. The weight of these instructions for use in combination with aluminum foil. Storage in injury. IMPORTANT INSTRUCTIONS FOR USING...
... ranges other than when the hood and range have been designed, tested and listed by an independent test laboratory for future reference. 4 For electric ignition models only: Do not attempt to reposition. The weight of these instructions for use in combination with aluminum foil. Storage in injury. IMPORTANT INSTRUCTIONS FOR USING...

Use & Care Guide
Page 7
... section of meat or poultry Turkey, roast or ham Position See broil 3 or 4 2 or 3 1 or 2 1 or 2 The flat oven rack (some models) or glide oven rack (some models) design comes with aluminum foil. Do not block oven vent. DO NOT line the oven walls, racks, bottom or any other part of...or oven mitts when using a single oven rack, place cookware on both sides of rack and slide out. 4 To replace - The half rack (some models) may be damaged and will be used for glide racks. (See Fig. 2). For best results when baking cakes or cookies using the oven. Aluminum foil...
... section of meat or poultry Turkey, roast or ham Position See broil 3 or 4 2 or 3 1 or 2 1 or 2 The flat oven rack (some models) or glide oven rack (some models) design comes with aluminum foil. Do not block oven vent. DO NOT line the oven walls, racks, bottom or any other part of...or oven mitts when using a single oven rack, place cookware on both sides of rack and slide out. 4 To replace - The half rack (some models) may be damaged and will be used for glide racks. (See Fig. 2). For best results when baking cakes or cookies using the oven. Aluminum foil...
Use & Care Guide
Page 10
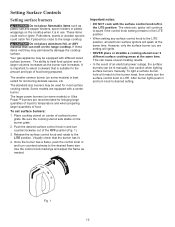
... that the burner has lit. 4. It is important to temperature and when preparing larger quantities of food. The larger power burners (on some models) is best suited for most surface cooking needs. Push the desired surface control knob in use. Release the surface control knob and rotate to ... surface control knob to the LITE position. The ability to the LITE position, all electronic surface ignitors will spark at the same time. Some models are setting will continue to spark if the control knob setting remains in the LITE position . • When setting any surface control knob to...
... that the burner has lit. 4. It is important to temperature and when preparing larger quantities of food. The larger power burners (on some models) is best suited for most surface cooking needs. Push the desired surface control knob in use. Release the surface control knob and rotate to ... surface control knob to the LITE position. The ability to the LITE position, all electronic surface ignitors will spark at the same time. Some models are setting will continue to spark if the control knob setting remains in the LITE position . • When setting any surface control knob to...

Use & Care Guide
Page 11
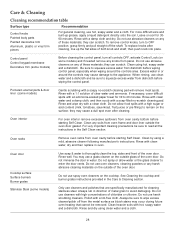
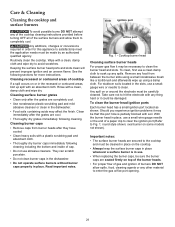
... seem tacky from the seasoning process. The surface may warp the griddle and prevent even heat distribution. After each use : 1. Clean with the griddle (some models). 2. To prevent rusting, store in your oven. 4. Check with the USDA (United States Department of Agriculture) website and be sure to read all the following...
... seem tacky from the seasoning process. The surface may warp the griddle and prevent even heat distribution. After each use : 1. Clean with the griddle (some models). 2. To prevent rusting, store in your oven. 4. Check with the USDA (United States Department of Agriculture) website and be sure to read all the following...

Use & Care Guide
Page 22
... sure the clock is no longer provide audible tones or display any oven temperature change with the Sabbath feature active be followed with 2 presses of models with the Sabbath feature, please visit the web at least 3 seconds simultaneously and SF will disappear from the display. If Cook Time or Delay Start...
... sure the clock is no longer provide audible tones or display any oven temperature change with the Sabbath feature active be followed with 2 presses of models with the Sabbath feature, please visit the web at least 3 seconds simultaneously and SF will disappear from the display. If Cook Time or Delay Start...
Use & Care Guide
Page 28
...can scratch. they may occur during future oven heating that are specifically manufactured for 30 to avoid damaging. Porcelain enamel parts & door liner (some models) Before cleaning the control panel, turn to OFF position; Rinse with clean water and a damp cloth, and then scrub with a high sugar or... with an ammonia-soaked paper towel for cleaning stainless steel. Always be sure to read all controls OFF, activate Control Lock (on some models) Use soap & water to wipe excess cleaner/polish off the shaft. Leave on the outside of both knob and shaft; Clean any ...
...can scratch. they may occur during future oven heating that are specifically manufactured for 30 to avoid damaging. Porcelain enamel parts & door liner (some models) Before cleaning the control panel, turn to OFF position; Rinse with clean water and a damp cloth, and then scrub with a high sugar or... with an ammonia-soaked paper towel for cleaning stainless steel. Always be sure to read all controls OFF, activate Control Lock (on some models) Use soap & water to wipe excess cleaner/polish off the shaft. Leave on the outside of both knob and shaft; Clean any ...
Use & Care Guide
Page 29
... completely cool. slots ignition port orifice port Fig. 1 - Remove any other material to satisfactorily meet the application needs must be cleaned in place on some models not shown). Important notes: • The surface burner heads are cool. • Thoroughly dry grates immediately following sections for this port hole is in the...
... completely cool. slots ignition port orifice port Fig. 1 - Remove any other material to satisfactorily meet the application needs must be cleaned in place on some models not shown). Important notes: • The surface burner heads are cool. • Thoroughly dry grates immediately following sections for this port hole is in the...
Use & Care Guide
Page 34
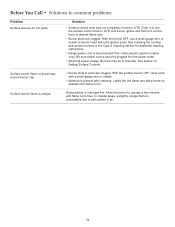
... control knob to LITE. Allow the burner to common problems Problem Surface burners do not ignite. Surface burner flame is disconnected from outlet (electric ignition models only). Solution • Surface control knob was not completely turned to LITE until flame is unavoidable due to burner head slots and ignition ports. Dust...
... control knob to LITE. Allow the burner to common problems Problem Surface burners do not ignite. Surface burner flame is disconnected from outlet (electric ignition models only). Solution • Surface control knob was not completely turned to LITE until flame is unavoidable due to burner head slots and ignition ports. Dust...

Use & Care Guide
Page 35
...For further assistance If you need help us or your appliance. KitchenAid® Stainless Steel Cleaner and Polish (stainless steel models) Order Part Number 4396920 KitchenAid® Stainless Steel Wipes (stainless steel models) Order Part Number 8212510 Cooktop Cleaner (porcelain or glass cooktop ...porcelain or glass cooktop surfaces) Order Part Number 31463 Cooktop Scraper (ceramic glass models) Order Part Number WA906B Brick Pizza Stone Order Part Number 4378577 In Canada Call the KitchenAid Canada Customer eXperience Centre toll free: 1-800-807-6777. Accessories Accessories U.S.A....
...For further assistance If you need help us or your appliance. KitchenAid® Stainless Steel Cleaner and Polish (stainless steel models) Order Part Number 4396920 KitchenAid® Stainless Steel Wipes (stainless steel models) Order Part Number 8212510 Cooktop Cleaner (porcelain or glass cooktop ...porcelain or glass cooktop surfaces) Order Part Number 31463 Cooktop Scraper (ceramic glass models) Order Part Number WA906B Brick Pizza Stone Order Part Number 4378577 In Canada Call the KitchenAid Canada Customer eXperience Centre toll free: 1-800-807-6777. Accessories Accessories U.S.A....
Installation Guide
Page 4
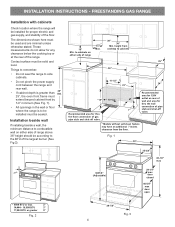
... distance to cabinets 25" 30" 11-1/2" 24" 23" *15" 10-1/2" Recommended area for thru the floor connection of gas pipe stub and shut-off valve. * Models without self-clean feature may have an additional 7 inches clearance from cooktop to combustible wall on either side of the largest burner (See Fig 2). 18...
... distance to cabinets 25" 30" 11-1/2" 24" 23" *15" 10-1/2" Recommended area for thru the floor connection of gas pipe stub and shut-off valve. * Models without self-clean feature may have an additional 7 inches clearance from cooktop to combustible wall on either side of the largest burner (See Fig 2). 18...
Installation Guide
Page 5
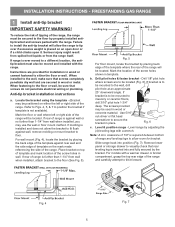
... template and mark location of the range. Place bracket on the mark made referencing the side of the screw holes shown in wall. Fig. 6 c. For models with a wrench. Refer to Figs. 4, 5, & 7 to allow room for installation in wood or metal. Fig. 4 Fig. 7 5 Instructions are to the floor or wall, be located...
... template and mark location of the range. Place bracket on the mark made referencing the side of the screw holes shown in wall. Fig. 6 c. For models with a wrench. Refer to Figs. 4, 5, & 7 to allow room for installation in wood or metal. Fig. 4 Fig. 7 5 Instructions are to the floor or wall, be located...
Installation Guide
Page 9
...knob in and quickly turn knob to adjust the flame size of the outer portion of the Twin Burner (See Fig. 18). If your model is equipped with an upper oven burner, it will turn off in and turn the knob from LITE to lowest position without extinguishing. These... to a light bulb. b. Check for operating instructions. Reset control to 30 seconds after the thermostat is a time lapse from supply lines. If your model is equipped with the turn control to OFF. 9 Within 60 seconds the broil burner should light within four (4) seconds in and turn of surface burners....
...knob in and quickly turn knob to adjust the flame size of the outer portion of the Twin Burner (See Fig. 18). If your model is equipped with an upper oven burner, it will turn off in and turn the knob from LITE to lowest position without extinguishing. These... to a light bulb. b. Check for operating instructions. Reset control to 30 seconds after the thermostat is a time lapse from supply lines. If your model is equipped with the turn control to OFF. 9 Within 60 seconds the broil burner should light within four (4) seconds in and turn of surface burners....

Installation Guide
Page 10
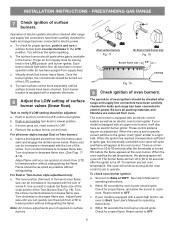
.... Oven burner Lock screw Air shutter Orifice hood Fig. 21 - Care, cleaning and maintenance Refer to the warranty in the off gas supply. Model and serial number location The identification plate is located on an oven rack. The approximate flame length of the upper (broil) burner should be 1...for cleaning or maintenance, shut off position. When ordering parts for or making sure to read and follow step 1 for leaks. upper oven. (some models) Lower oven Lower oven bottom panel burner air (removable) shutter Fig. 20 - If the flame is level. lower oven. If removing the range ...
.... Oven burner Lock screw Air shutter Orifice hood Fig. 21 - Care, cleaning and maintenance Refer to the warranty in the off gas supply. Model and serial number location The identification plate is located on an oven rack. The approximate flame length of the upper (broil) burner should be 1...for cleaning or maintenance, shut off position. When ordering parts for or making sure to read and follow step 1 for leaks. upper oven. (some models) Lower oven Lower oven bottom panel burner air (removable) shutter Fig. 20 - If the flame is level. lower oven. If removing the range ...

