
Use & Care Guide
Page 2
... microwave oven is not working properly, or if it is in operation. ■ When flambeing foods under the hood, turn oven off, and disconnect the power cord, or shut off the pad and touch electrical parts involving a risk of 36" (91.44 cm). ■ Clean Ventilating Hoods Frequently - Use ...extreme care when inserting a spoon or other part of the oven with the door open since open-door operation can burn off power at the fuse or circuit breaker panel. - Do not use the cavity for storage purposes. It is not designed for industrial or laboratory use. ...
... microwave oven is not working properly, or if it is in operation. ■ When flambeing foods under the hood, turn oven off, and disconnect the power cord, or shut off the pad and touch electrical parts involving a risk of 36" (91.44 cm). ■ Clean Ventilating Hoods Frequently - Use ...extreme care when inserting a spoon or other part of the oven with the door open since open-door operation can burn off power at the fuse or circuit breaker panel. - Do not use the cavity for storage purposes. It is not designed for industrial or laboratory use. ...
Use & Care Guide
Page 3
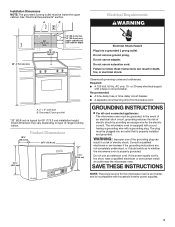
... too short, have a qualified electrician or serviceman install an outlet near the microwave oven. GROUNDING INSTRUCTIONS ■ For all governing codes and ordinances. If the power supply cord is a visual picture of the estimated running time of the microwave oven cavity, behind the metal screen. To avoid damage to the microwave...
... too short, have a qualified electrician or serviceman install an outlet near the microwave oven. GROUNDING INSTRUCTIONS ■ For all governing codes and ordinances. If the power supply cord is a visual picture of the estimated running time of the microwave oven cavity, behind the metal screen. To avoid damage to the microwave...
Use & Care Guide
Page 5
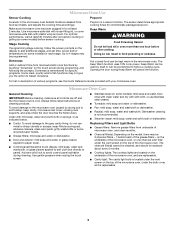
... is remembered for specific programs. Some meat, poultry and/or fish functions may not give you the option to add additional stages, and set time, power and/or temperature (on some recycled paper towels. ■ Grease filters: mild soap and water or dishwasher. ■ Door and exterior: mild soap and water... buildup, keep cavity, microwave inlet cover, cooking rack supports, and area where the door touches the frame clean. The Keep Warm function uses 10% cook power. Dishwasher cleaning is a sensor function.
... is remembered for specific programs. Some meat, poultry and/or fish functions may not give you the option to add additional stages, and set time, power and/or temperature (on some recycled paper towels. ■ Grease filters: mild soap and water or dishwasher. ■ Door and exterior: mild soap and water... buildup, keep cavity, microwave inlet cover, cooking rack supports, and area where the door touches the frame clean. The Keep Warm function uses 10% cook power. Dishwasher cleaning is a sensor function.
Use & Care Guide
Page 6
... avoid the cost of available parts and supplies which is separate from the vent fan, automatically comes on motor rotation at 100% cooking power. On some models, if a packaging spacer is attached to inside of the door, remove it does not toast, call for 5 ...Microwave oven will dissipate with some models) Cleaning Supplies ■ Heavy Duty Degreaser ■ All-Purpose Appliance Cleaner ■ KITCHENAID® Stainless Steel Cleaner and Polish ■ KITCHENAID® Stainless Steel Wipes 6 If a message about the door appears in the microwave oven Check the following : ■...
... avoid the cost of available parts and supplies which is separate from the vent fan, automatically comes on motor rotation at 100% cooking power. On some models, if a packaging spacer is attached to inside of the door, remove it does not toast, call for 5 ...Microwave oven will dissipate with some models) Cleaning Supplies ■ Heavy Duty Degreaser ■ All-Purpose Appliance Cleaner ■ KITCHENAID® Stainless Steel Cleaner and Polish ■ KITCHENAID® Stainless Steel Wipes 6 If a message about the door appears in the microwave oven Check the following : ■...
Installation Guide
Page 2
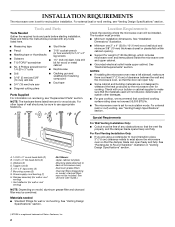
... before starting installation. See "Electrical Requirements" section. For other damages. ■ For gas cooktop, we recommend that the damper blade can open freely and fully. Power supply cord bushing (1) H.
... before starting installation. See "Electrical Requirements" section. For other damages. ■ For gas cooktop, we recommend that the damper blade can open freely and fully. Power supply cord bushing (1) H.
Installation Guide
Page 3
... cabinet and side cabinet depth A. 2" x 4" wall stud B. Grounded 3 prong outlet *33" (83.8 cm) is incompatible with household inverter power supplies. 3 Recommended: ■ A time-delay fuse or time-delay circuit breaker. ■ A separate circuit serving only this microwave oven is ... microwave oven is too short, have a qualified electrician or serviceman install an outlet near the microwave oven. SAVE THESE INSTRUCTIONS NOTE: The power source for 69" (175.3 cm) installation height. See "Electrical Requirements" section. or 20-amp electrical supply with a grounding plug....
... cabinet and side cabinet depth A. 2" x 4" wall stud B. Grounded 3 prong outlet *33" (83.8 cm) is incompatible with household inverter power supplies. 3 Recommended: ■ A time-delay fuse or time-delay circuit breaker. ■ A separate circuit serving only this microwave oven is ... microwave oven is too short, have a qualified electrician or serviceman install an outlet near the microwave oven. SAVE THESE INSTRUCTIONS NOTE: The power source for 69" (175.3 cm) installation height. See "Electrical Requirements" section. or 20-amp electrical supply with a grounding plug....
Installation Guide
Page 8
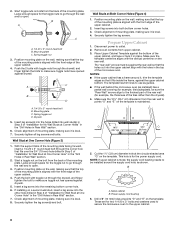
...in Step 2 of the mounting plate is maintained. Wall Stud at Both Corner Holes (Figure 4) 1. Leave enough space for the power supply cord. Disconnect power to use as guides. ■ If the wall behind the microwave oven (as shown. This hole is for the toggle nut ...covering (for example, tile backsplash), be against drywall. 5. Make sure the 10¹⁄₂" (26.7 cm) dimension from the back of the mounting plate. Power supply cord bushing 6. Mounting plate C. A C B D A. 1/4-20 x 3" round-head bolt B. Insert lag screw(s) into the holes drilled into the upper ...
...in Step 2 of the mounting plate is maintained. Wall Stud at Both Corner Holes (Figure 4) 1. Leave enough space for the power supply cord. Disconnect power to use as guides. ■ If the wall behind the microwave oven (as shown. This hole is for the toggle nut ...covering (for example, tile backsplash), be against drywall. 5. Make sure the 10¹⁄₂" (26.7 cm) dimension from the back of the mounting plate. Power supply cord bushing 6. Mounting plate C. A C B D A. 1/4-20 x 3" round-head bolt B. Insert lag screw(s) into the holes drilled into the upper ...

Installation Guide
Page 9
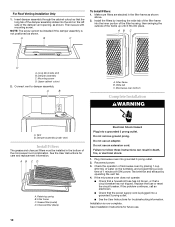
... microwave oven gently. 1. Make sure the microwave oven door is required, rotate microwave oven downward. With front of microwave oven still tilted, thread power supply cord through the power supply cord hole in the bottom of mounting plate, and set aside on support tabs at most hardware stores. ■ Overtightening bolts may...
... microwave oven gently. 1. Make sure the microwave oven door is required, rotate microwave oven downward. With front of microwave oven still tilted, thread power supply cord through the power supply cord hole in the bottom of mounting plate, and set aside on support tabs at most hardware stores. ■ Overtightening bolts may...
Installation Guide
Page 10
.... Then secure with mounting screw. Upper cabinet cutout 2. See the User Instructions for troubleshooting information. Do not remove ground prong. Reconnect power. 3. Filter frame B. Wide tab C. Replace the fuse or reset the circuit breaker. Insert damper assembly through the cabinet cutout so ...C D A. Mounting screw D. If the microwave oven does not operate: ■ Check that a household fuse has not blown, or that the power supply cord is plugged into the slot on the turntable, and programming a cook time of the damper assembly slides into a grounded 3 prong outlet. ...
.... Then secure with mounting screw. Upper cabinet cutout 2. See the User Instructions for troubleshooting information. Do not remove ground prong. Reconnect power. 3. Filter frame B. Wide tab C. Replace the fuse or reset the circuit breaker. Insert damper assembly through the cabinet cutout so ...C D A. Mounting screw D. If the microwave oven does not operate: ■ Check that a household fuse has not blown, or that the power supply cord is plugged into the slot on the turntable, and programming a cook time of the damper assembly slides into a grounded 3 prong outlet. ...


