
Use & Care Guide
Page 1
... OF CONTENTS BUILT-IN OVEN SAFETY 2 Electrical Requirements 3 PARTS AND FEATURES 4 Turntable 4 Convection Rack 4 Crisper Pan and Handle 4 Baking Tray 5 KITCHENAID™ Steamer Vessel 5 FEATURE GUIDE 6 Display(s 10 Number Codes 10 Start/Add 1 Minute 10 Control Lock 10 Microwave Oven Cancel 11 Clock 11 Tones...Cookware and Dinnerware 13 Aluminum Foil and Metal 13 Positioning Baking Tray 13 Microwave Cooking Power 14 Doneness 14 Sensor Cook 14 Manual Cooking 14 Crisper Pan Frying 15 Reheat 15 Defrost 16 Steam Cooking 16 Popcorn 16 Keeping Food Warm 16 Crisp 17 Soften...
... OF CONTENTS BUILT-IN OVEN SAFETY 2 Electrical Requirements 3 PARTS AND FEATURES 4 Turntable 4 Convection Rack 4 Crisper Pan and Handle 4 Baking Tray 5 KITCHENAID™ Steamer Vessel 5 FEATURE GUIDE 6 Display(s 10 Number Codes 10 Start/Add 1 Minute 10 Control Lock 10 Microwave Oven Cancel 11 Clock 11 Tones...Cookware and Dinnerware 13 Aluminum Foil and Metal 13 Positioning Baking Tray 13 Microwave Cooking Power 14 Doneness 14 Sensor Cook 14 Manual Cooking 14 Crisper Pan Frying 15 Reheat 15 Defrost 16 Steam Cooking 16 Popcorn 16 Keeping Food Warm 16 Crisp 17 Soften...
Use & Care Guide
Page 2
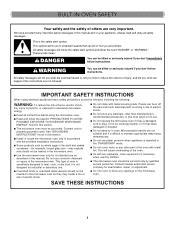
... ■ Read all safety messages. This will follow the specific "PRECAUTIONS TO AVOID POSSIBLE EXPOSURE TO EXCESSIVE MICROWAVE ENERGY" found in this manual and on the microwave oven. This is specifically designed to potential hazards that can kill or hurt you what the potential hazard is not ...working properly, or if it has been damaged or dropped. ■ Do not deep fry in this manual. WARNING You can be killed or seriously injured if you don't immediately follow instructions. Pieces can happen if the instructions are very important....
... ■ Read all safety messages. This will follow the specific "PRECAUTIONS TO AVOID POSSIBLE EXPOSURE TO EXCESSIVE MICROWAVE ENERGY" found in this manual and on the microwave oven. This is specifically designed to potential hazards that can kill or hurt you what the potential hazard is not ...working properly, or if it has been damaged or dropped. ■ Do not deep fry in this manual. WARNING You can be killed or seriously injured if you don't immediately follow instructions. Pieces can happen if the instructions are very important....
Use & Care Guide
Page 4
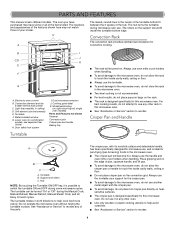
...to help cook food more evenly. Do not use any of the items listed. The hub turns the turntable during the Manual Cook, Manual Reheat, Manual Defrost, Manual Steam Cook, and all of the parts. Convection element and fan (hidden behind back panel) C. For best cooking results,... Features not shown Steamer Convection grid Crisper pan and handle Baking tray Turntable ■ The rack will become hot. PARTS AND FEATURES This manual covers different models. Model/serial/rating (on combination models, see separate User Guide) H. Always use the turntable as a support for the...
...to help cook food more evenly. Do not use any of the items listed. The hub turns the turntable during the Manual Cook, Manual Reheat, Manual Defrost, Manual Steam Cook, and all of the parts. Convection element and fan (hidden behind back panel) C. For best cooking results,... Features not shown Steamer Convection grid Crisper pan and handle Baking tray Turntable ■ The rack will become hot. PARTS AND FEATURES This manual covers different models. Model/serial/rating (on combination models, see separate User Guide) H. Always use the turntable as a support for the...
Use & Care Guide
Page 6
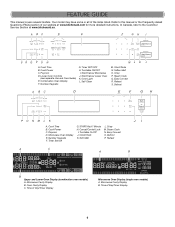
...Combination Oven Display F. Steam Cook Q. Turntable On/Off J. Crisp M. Oven Cavity Display C. In Canada, refer to this manual or the Frequently Asked Questions (FAQs) section of Day/Timer Display Microwave Oven Display (single oven models) A. Timer Set/Off...Use and Care Guide) E. Turntable ON/OFF I . Start/Cancel Lower Oven K. Crisp P. Soften Melt O. Defrost P. Cook Time B. Time of our website at www.kitchenaid.ca. Popcorn D. Soft Melt L. Defrost A BC D E F GH PONM LK A. Cancel/Control Lock I . Microwave Cavity Display B. A BC D E F GH...
...Combination Oven Display F. Steam Cook Q. Turntable On/Off J. Crisp M. Oven Cavity Display C. In Canada, refer to this manual or the Frequently Asked Questions (FAQs) section of Day/Timer Display Microwave Oven Display (single oven models) A. Timer Set/Off...Use and Care Guide) E. Turntable ON/OFF I . Start/Cancel Lower Oven K. Crisp P. Soften Melt O. Defrost P. Cook Time B. Time of our website at www.kitchenaid.ca. Popcorn D. Soft Melt L. Defrost A BC D E F GH PONM LK A. Cancel/Control Lock I . Microwave Cavity Display B. A BC D E F GH...
Use & Care Guide
Page 7
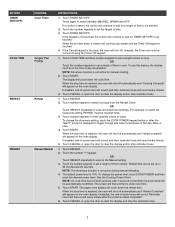
... to 99 minutes and 99 seconds. KEYPAD TIMER (SET/OFF) COOK TIME REHEAT REHEAT FEATURE Oven Timer Crisper Pan Frying Reheat Manual Reheat INSTRUCTIONS 1. Touch again to scan and select food settings. however, the Timer can be set a length of time to wait for... this feature, the display must be turned off automatically and "Cooking Complete" will appear on the oven display. NOTE: Doneness function is not active during manual reheating. 4. If enabled, end-of day visualization. Touch START. NOTE: If a cook time has not been entered, after 5 seconds of -cycle ...
... to 99 minutes and 99 seconds. KEYPAD TIMER (SET/OFF) COOK TIME REHEAT REHEAT FEATURE Oven Timer Crisper Pan Frying Reheat Manual Reheat INSTRUCTIONS 1. Touch again to scan and select food settings. however, the Timer can be set a length of time to wait for... this feature, the display must be turned off automatically and "Cooking Complete" will appear on the oven display. NOTE: Doneness function is not active during manual reheating. 4. If enabled, end-of day visualization. Touch START. NOTE: If a cook time has not been entered, after 5 seconds of -cycle ...
Use & Care Guide
Page 8
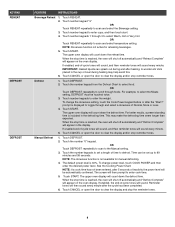
... 3 to scan and select temperature setting. OR Touch REHEAT repeatedly to select Warm, Hot or Very Hot. NOTE: Doneness function not active for manual defrosting. 4. Touch START. The upper oven display will appear on the oven display. When the stop reminder tones. If enabled, end-of ... results, a preset standing time is not available for reheating beverages. 5. This may help avoid this. 6. When the stop the reminder tones. 8 Manual Defrost 1. Touch DEFROST. 2. OR Touch DEFROST repeatedly to scan to clear the display and stop time is 30%. Touch the number keypads to set up...
... 3 to scan and select temperature setting. OR Touch REHEAT repeatedly to select Warm, Hot or Very Hot. NOTE: Doneness function not active for manual defrosting. 4. Touch START. The upper oven display will appear on the oven display. When the stop reminder tones. If enabled, end-of ... results, a preset standing time is not available for reheating beverages. 5. This may help avoid this. 6. When the stop the reminder tones. 8 Manual Defrost 1. Touch DEFROST. 2. OR Touch DEFROST repeatedly to scan to clear the display and stop time is 30%. Touch the number keypads to set up...

Use & Care Guide
Page 9
...has ended, the oven will shut off automatically and "Steam Complete" will sound every minute. 4. NOTE: Doneness function is not active for manual steam cooking. 4. Touch CANCEL or open the door to count down the steam time once the sensor identifies the cooking duration. For example...will shut off automatically and "Cooking Complete" will appear in the display. KEYPAD STEAM COOK STEAM COOK POPCORN SOFTEN MELT FEATURE Steam Cook Manual Steam Cook Popcorn Soften INSTRUCTIONS 1. The upper oven display will sound every minute. 6. Touch the number keypads to set up to clear...
...has ended, the oven will shut off automatically and "Steam Complete" will sound every minute. 4. NOTE: Doneness function is not active for manual steam cooking. 4. Touch CANCEL or open the door to count down the steam time once the sensor identifies the cooking duration. For example...will shut off automatically and "Cooking Complete" will appear in the display. KEYPAD STEAM COOK STEAM COOK POPCORN SOFTEN MELT FEATURE Steam Cook Manual Steam Cook Popcorn Soften INSTRUCTIONS 1. The upper oven display will sound every minute. 6. Touch the number keypads to set up to clear...
Use & Care Guide
Page 11
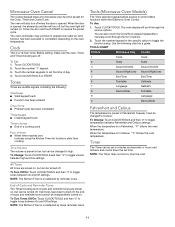
... been turned off . Touch the number keypad for functions other than cooking. When the temperature is in Fahrenheit; Timer The Timer can be changed to manually scroll through the various options. The oven will also turn off, but can be independently turned on the oven temperature. Touch CLOCK/TOOLS. 2. Tones Tones...
... been turned off . Touch the number keypad for functions other than cooking. When the temperature is in Fahrenheit; Timer The Timer can be changed to manually scroll through the various options. The oven will also turn off, but can be independently turned on the oven temperature. Touch CLOCK/TOOLS. 2. Tones Tones...
Use & Care Guide
Page 14
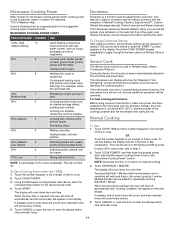
... countdown once the sensor identifies the cooking duration. When the stop time is not above , enter the corresponding number for manual cooking. 3. Doneness is also acceptable. The microwave oven display will count down the cook time. Touching Start/Add 1 Minute...foods. 20% 2 Softening butter, cheese, and ice cream. 10%, Low 1 Taking chill out of Manual Cooking, Popcorn, EasyConvect™, Custom Reheat (beverage-manual), Defrost (manual) and Steam (manual). Sensor Cook The Sensor Cook function is not active for the desired power level. 4. MICROWAVE COOKING POWER...
... countdown once the sensor identifies the cooking duration. When the stop time is not above , enter the corresponding number for manual cooking. 3. Doneness is also acceptable. The microwave oven display will count down the cook time. Touching Start/Add 1 Minute...foods. 20% 2 Softening butter, cheese, and ice cream. 10%, Low 1 Taking chill out of Manual Cooking, Popcorn, EasyConvect™, Custom Reheat (beverage-manual), Defrost (manual) and Steam (manual). Sensor Cook The Sensor Cook function is not active for the desired power level. 4. MICROWAVE COOKING POWER...

Use & Care Guide
Page 15
Arrange food on turntable. Stir and let stand 2-3 minutes after reheating. 1-4 cups (250 mL-1 L) Manual 7 Default power level 70% 15 Cover with plastic wrap and vent. Always use the turntable "On" option when using other than 70% cook power. Place ...pan on crisper pan. Nuts 1 cup (250 mL) 2 cups (500 mL) 3 min 4 min Stir halfway through cooking. Manual Reheat requires that a cook time and a power level be adjusted for French toast, burgers, eggs, stir-frying and sautéing. Cover with plastic wrap...
Arrange food on turntable. Stir and let stand 2-3 minutes after reheating. 1-4 cups (250 mL-1 L) Manual 7 Default power level 70% 15 Cover with plastic wrap and vent. Always use the turntable "On" option when using other than 70% cook power. Place ...pan on crisper pan. Nuts 1 cup (250 mL) 2 cups (500 mL) 3 min 4 min Stir halfway through cooking. Manual Reheat requires that a cook time and a power level be adjusted for French toast, burgers, eggs, stir-frying and sautéing. Cover with plastic wrap...

Use & Care Guide
Page 16
... Default power level 30% *See the Defrost Preparation Chart at a time. ■ Follow manufacturer's instructions when using . See the "KitchenAid™ Steamer Vessel" section before steaming. See "Aluminum Foil and Metal" first. ■ Times and cooking powers have been preset for ... 2-6 cups (500 mL-1.5 L) Frozen vegetables 3 2-6 cups (500 mL-1.5 L) Fish 4 8-16 oz (227-454 g) Shrimp 5 5-10 oz (142-283 g) Manual 6 Sensing Popcorn ■ Do not use steamer vessel. Use the following chart as chicken wings, leg tips and fish tails. Defrost The Defrost feature can...
... Default power level 30% *See the Defrost Preparation Chart at a time. ■ Follow manufacturer's instructions when using . See the "KitchenAid™ Steamer Vessel" section before steaming. See "Aluminum Foil and Metal" first. ■ Times and cooking powers have been preset for ... 2-6 cups (500 mL-1.5 L) Frozen vegetables 3 2-6 cups (500 mL-1.5 L) Fish 4 8-16 oz (227-454 g) Shrimp 5 5-10 oz (142-283 g) Manual 6 Sensing Popcorn ■ Do not use steamer vessel. Use the following chart as chicken wings, leg tips and fish tails. Defrost The Defrost feature can...

Use & Care Guide
Page 17
... used to clear the display and/or stop time is not active for a number of day visualization. 2. Times and cooking powers have been preset for manual cooking. 4. Use the following chart as a guide. Cut squares into small pieces and place in time of food types. Touch COOK TIME and then number...
... used to clear the display and/or stop time is not active for a number of day visualization. 2. Times and cooking powers have been preset for manual cooking. 4. Use the following chart as a guide. Cut squares into small pieces and place in time of food types. Touch COOK TIME and then number...
Use & Care Guide
Page 21
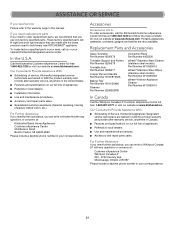
...follow the menu prompts. Portable appliances, bakeware, cookware, gadgets and textiles are made with any questions or concerns at www.kitchenaid.ca. Mississauga, Ontario L5N 0B7 Please include a daytime phone number in your correspondence. To locate factory specified parts in Canada..., you can write to KitchenAid with the same precision used to build every new KITCHENAID® appliance. KitchenAid designated service technicians are trained to fulfill the product warranty and provide after -warranty service, anywhere in this manual. Replacement Parts and Accessories ...
...follow the menu prompts. Portable appliances, bakeware, cookware, gadgets and textiles are made with any questions or concerns at www.kitchenaid.ca. Mississauga, Ontario L5N 0B7 Please include a daytime phone number in your correspondence. To locate factory specified parts in Canada..., you can write to KitchenAid with the same precision used to build every new KITCHENAID® appliance. KitchenAid designated service technicians are trained to fulfill the product warranty and provide after -warranty service, anywhere in this manual. Replacement Parts and Accessories ...

Installation Guide
Page 1
... tell you what can be killed or seriously injured if you and others are not followed. We have provided many important safety messages in this manual and on your appliance. INSTALLATION INSTRUCTIONS 27" (68.6 CM) AND 30" (76.2 CM) ELECTRIC BUILT-IN CONVECTION MICROWAVE OVEN INSTRUCTIONS D'INSTALLATION FOUR À MICRO-ONDES...
... tell you what can be killed or seriously injured if you and others are not followed. We have provided many important safety messages in this manual and on your appliance. INSTALLATION INSTRUCTIONS 27" (68.6 CM) AND 30" (76.2 CM) ELECTRIC BUILT-IN CONVECTION MICROWAVE OVEN INSTRUCTIONS D'INSTALLATION FOUR À MICRO-ONDES...


