

Use & Care Guide
Page 5
... be grounded. or 20-amp electrical supply with a soft, damp cloth. 3. In the event of an electrical short circuit, grounding reduces the risk of the trim kits listed in death, fire, or electrical shock. Location Requirements WARNING Excessive Weight Hazard Use two or more people to follow these instructions can result in...
... be grounded. or 20-amp electrical supply with a soft, damp cloth. 3. In the event of an electrical short circuit, grounding reduces the risk of the trim kits listed in death, fire, or electrical shock. Location Requirements WARNING Excessive Weight Hazard Use two or more people to follow these instructions can result in...

Use & Care Guide
Page 15
... using one year from the original date of the following trim kits*. These factory specified parts will , at : KitchenAid Brand Home Appliances Customer eXperience Center 553 Benson Road Benton Harbor, MI 49022-2692 Please include a daytime phone number in which it was purchased. KitchenAid designated service technicians are made with the same precision used...
... using one year from the original date of the following trim kits*. These factory specified parts will , at : KitchenAid Brand Home Appliances Customer eXperience Center 553 Benson Road Benton Harbor, MI 49022-2692 Please include a daytime phone number in which it was purchased. KitchenAid designated service technicians are made with the same precision used...

Warranty Information
Page 1
... a service call us to better respond to correct defects in by a KitchenAid designated service company. KIT SIZE KIT MODEL NUMBERS/COLORS 27" (68.6 cm) MK2167AW / White MK2167AB / Black MK2167AS / Stainless 30" (76.2 cm) MK2160AW / White MK2160AB / Black MK2160AS / Stainless *The built-in trim kits can write to 30" (76.2 cm). When calling, please know the...
... a service call us to better respond to correct defects in by a KitchenAid designated service company. KIT SIZE KIT MODEL NUMBERS/COLORS 27" (68.6 cm) MK2167AW / White MK2167AB / Black MK2167AS / Stainless 30" (76.2 cm) MK2160AW / White MK2160AB / Black MK2160AS / Stainless *The built-in trim kits can write to 30" (76.2 cm). When calling, please know the...
Installation Guide
Page 1
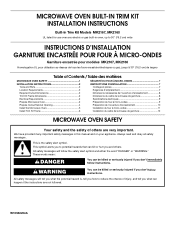
MICROWAVE OVEN BUILT-IN TRIM KIT INSTALLATION INSTRUCTIONS Built-In Trim Kit Models MK2167, MK2160 UL listed for use over any electric or gas built-in this manual and on your appliance. ...ères MICROWAVE OVEN SAFETY 1 INSTALLATION INSTRUCTIONS 2 Tools and Parts 2 Location Requirements 2 Required Cutout Dimensions 2 Trim Kit Frame Dimensions 3 Electrical Requirements 3 Prepare Microwave Oven 3 Prepare Cutout/Cabinet Opening 4 Install the Microwave Oven 5 Install Trim Kit Frame 6 SÉCURITÉ DU FOUR À MICRO-ONDES 7 INSTRUCTIONS D'INSTALLATION 7 Outillage et piè...
MICROWAVE OVEN BUILT-IN TRIM KIT INSTALLATION INSTRUCTIONS Built-In Trim Kit Models MK2167, MK2160 UL listed for use over any electric or gas built-in this manual and on your appliance. ...ères MICROWAVE OVEN SAFETY 1 INSTALLATION INSTRUCTIONS 2 Tools and Parts 2 Location Requirements 2 Required Cutout Dimensions 2 Trim Kit Frame Dimensions 3 Electrical Requirements 3 Prepare Microwave Oven 3 Prepare Cutout/Cabinet Opening 4 Install the Microwave Oven 5 Install Trim Kit Frame 6 SÉCURITÉ DU FOUR À MICRO-ONDES 7 INSTRUCTIONS D'INSTALLATION 7 Outillage et piè...

Installation Guide
Page 2
... Requirements The microwave oven may also be installed over a built-in oven. Make sure the surrounding cabinetry has clearance to scale Rails (2) Bottom duct Trim kit frame Required Cutout Dimensions For minimum depth requirements, see chart. 6" (15.2 cm) 1 2.7 cm) 17" (43.2 cm) min. See ... is a minimum of 3" (7.6 cm) between the top of cutout centerline) D. For best usability, we recommend a minimum distance of recommended region. Trim kit frame overhang B. If installing over a built-in oven, make sure there is from the floor to microwave oven cutout floor. ■...
... Requirements The microwave oven may also be installed over a built-in oven. Make sure the surrounding cabinetry has clearance to scale Rails (2) Bottom duct Trim kit frame Required Cutout Dimensions For minimum depth requirements, see chart. 6" (15.2 cm) 1 2.7 cm) 17" (43.2 cm) min. See ... is a minimum of 3" (7.6 cm) between the top of cutout centerline) D. For best usability, we recommend a minimum distance of recommended region. Trim kit frame overhang B. If installing over a built-in oven, make sure there is from the floor to microwave oven cutout floor. ■...

Installation Guide
Page 3
... Microwave oven bottom C. Do not remove ground prong. Do not use an extension cord. Unplug microwave oven before proceeding with a grounding plug. Trim Kit Frame Dimensions 26⁷⁄₈" (68.2 cm)** 29³⁄₄" (75.6 cm)** 19¹⁄₈" (48.6 cm...185;⁄₂" (8.9 cm)** 3 8.7 cm) 12¹⁄₄" (31.1 cm) 1 3.0 cm) *27" (68.6 cm) trim kit **30" (76.2 cm) trim kit Electrical Requirements WARNING Electrical Shock Hazard Plug into an outlet that is properly installed and grounded. Do not use an extension cord. Rails (2) B....
... Microwave oven bottom C. Do not remove ground prong. Do not use an extension cord. Unplug microwave oven before proceeding with a grounding plug. Trim Kit Frame Dimensions 26⁷⁄₈" (68.2 cm)** 29³⁄₄" (75.6 cm)** 19¹⁄₈" (48.6 cm...185;⁄₂" (8.9 cm)** 3 8.7 cm) 12¹⁄₄" (31.1 cm) 1 3.0 cm) *27" (68.6 cm) trim kit **30" (76.2 cm) trim kit Electrical Requirements WARNING Electrical Shock Hazard Plug into an outlet that is properly installed and grounded. Do not use an extension cord. Rails (2) B....
Installation Guide
Page 6
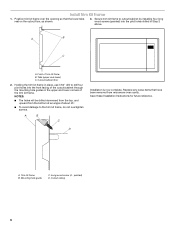
...any loose items that the lower tabs rest on the cutout floor, as shown. 3. Long wood screw (4 - Position trim kit frame over the opening so that have been removed from the bottom at an angle of about 45°. ■... C Installation is now complete. D A. Trim kit frame B. painted) D. Secure trim kit frame to the trim kit frame, do not overtighten screws. Front of the trim kit frame. Save these Installation Instructions for future reference. Mounting hole guide C. Install Trim Kit Frame 1. Cutout/cabinet floor 2. Holding the trim kit frame in place, use 7/64" drill ...
...any loose items that the lower tabs rest on the cutout floor, as shown. 3. Long wood screw (4 - Position trim kit frame over the opening so that have been removed from the bottom at an angle of about 45°. ■... C Installation is now complete. D A. Trim kit frame B. painted) D. Secure trim kit frame to the trim kit frame, do not overtighten screws. Front of the trim kit frame. Save these Installation Instructions for future reference. Mounting hole guide C. Install Trim Kit Frame 1. Cutout/cabinet floor 2. Holding the trim kit frame in place, use 7/64" drill ...

