
Use & Care Guide
Page 1
KSB5000 KSB5010 KSB5011 KSB5060 KSB5015 INSTRUCTIONS INSTRUCTIONS INSTRUCCIONES
KSB5000 KSB5010 KSB5011 KSB5060 KSB5015 INSTRUCTIONS INSTRUCTIONS INSTRUCCIONES

Use & Care Guide
Page 2
It will empower you create a lifetime of your appliance, keep this guide handy. Your satisfaction is our #1 goal. Join us in the kitchen at www.kitchenaid.com or by mail using the enclosed Product Registration Card. To help ensure the longevity and performance of delicious meals for your product online at www.kitchenaid.com. Remember to helping you with the best way to use and care for family and friends. USA: 1.800.541.6390 Canada: 1.800.807.6777 2 KitchenAid.com KitchenAid.ca WELCOME TO THE WORLD OF KITCHENAID. We're committed to register your product.
It will empower you create a lifetime of your appliance, keep this guide handy. Your satisfaction is our #1 goal. Join us in the kitchen at www.kitchenaid.com or by mail using the enclosed Product Registration Card. To help ensure the longevity and performance of delicious meals for your product online at www.kitchenaid.com. Remember to helping you with the best way to use and care for family and friends. USA: 1.800.541.6390 Canada: 1.800.807.6777 2 KitchenAid.com KitchenAid.ca WELCOME TO THE WORLD OF KITCHENAID. We're committed to register your product.

Use & Care Guide
Page 3
... Blender. English BLENDER INSTRUCTIONS TABLE OF CONTENTS BLENDER SAFETY Important safeguards 4 Electrical requirements 5 Motor horsepower 5 PARTS AND FEATURES Parts and accessories 6 ASSEMBLING THE BLENDER Preparing the Blender for your warranty. Before you use 7 OPERATING THE BLENDER Using the Blender 7 Blender function guide 10 TIPS FOR GREAT RESULTS Quick tips...11 CARE AND CLEANING Cleaning the Blender 12 TROUBLESHOOTING Understanding the Blender flash codes 13 Blender does not operate when a setting is selected 14 Blender stops while blending 14 WARRANTY AND SERVICE...
... Blender. English BLENDER INSTRUCTIONS TABLE OF CONTENTS BLENDER SAFETY Important safeguards 4 Electrical requirements 5 Motor horsepower 5 PARTS AND FEATURES Parts and accessories 6 ASSEMBLING THE BLENDER Preparing the Blender for your warranty. Before you use 7 OPERATING THE BLENDER Using the Blender 7 Blender function guide 10 TIPS FOR GREAT RESULTS Quick tips...11 CARE AND CLEANING Cleaning the Blender 12 TROUBLESHOOTING Understanding the Blender flash codes 13 Blender does not operate when a setting is selected 14 Blender stops while blending 14 WARRANTY AND SERVICE...
Use & Care Guide
Page 4
... dropped or damaged in use outdoors. 8. Handle carefully. 4 Blades are sharp. A scraper may be used by or near children. 4. Read all instructions. 2. Close supervision is necessary when any manner. Keep hands and utensils out of container while blending to reduce the risk of severe injury to persons or damage to the nearest Authorized Service Center for examination, repair or electrical or...
... dropped or damaged in use outdoors. 8. Handle carefully. 4 Blades are sharp. A scraper may be used by or near children. 4. Read all instructions. 2. Close supervision is necessary when any manner. Keep hands and utensils out of container while blending to reduce the risk of severe injury to persons or damage to the nearest Authorized Service Center for examination, repair or electrical or...

Use & Care Guide
Page 5
... the motor itself . As with any blender, the power output in the pitcher enabling your Blender to operate - avoid any way. Do not use appliance for household use to measure the mechanical power of injury to persons. 12. SAVE THESE INSTRUCTIONS Electrical requirements Voltage: 120 Volts A.C. NOTE: In accordance with blades or moveable parts. 13. The use . Motor horsepower Motor horsepower for all your recipes. This motor delivers...
... the motor itself . As with any blender, the power output in the pitcher enabling your Blender to operate - avoid any way. Do not use appliance for household use to measure the mechanical power of injury to persons. 12. SAVE THESE INSTRUCTIONS Electrical requirements Voltage: 120 Volts A.C. NOTE: In accordance with blades or moveable parts. 13. The use . Motor horsepower Motor horsepower for all your recipes. This motor delivers...
Use & Care Guide
Page 6
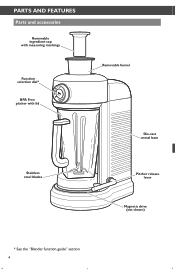
PARTS AND FEATURES Parts and accessories Removable ingredient cap with measuring markings Function selection dial* BPA Free pitcher with lid Removable funnel Die-cast metal base Stainless steel blades Pitcher release lever Magnetic drive (not shown) * See the "Blender function guide" section. 6
PARTS AND FEATURES Parts and accessories Removable ingredient cap with measuring markings Function selection dial* BPA Free pitcher with lid Removable funnel Die-cast metal base Stainless steel blades Pitcher release lever Magnetic drive (not shown) * See the "Blender function guide" section. 6

Use & Care Guide
Page 7
... of your blending for any recipe you pull the Blender out of the base before the Blender stops running, the blade brake will kick in warm, sudsy water (see "Care and cleaning" section). Dry with a damp cloth. Wash pitcher, lid, and ingredient cup in to customize your Blender, visit www.blendwithkitchenaid.com for videos. For more detailed information. 7 It also features Variable Speed and Pulse selections...
... of your blending for any recipe you pull the Blender out of the base before the Blender stops running, the blade brake will kick in warm, sudsy water (see "Care and cleaning" section). Dry with a damp cloth. Wash pitcher, lid, and ingredient cup in to customize your Blender, visit www.blendwithkitchenaid.com for videos. For more detailed information. 7 It also features Variable Speed and Pulse selections...
Use & Care Guide
Page 8
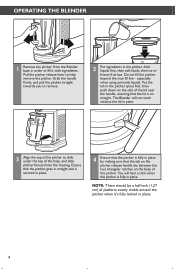
... of the pitcher. You will not work without the lid in place. OPERATING THE BLENDER 1 Remove the pitcher from the Blender base in place. 8 Add liquids first, then soft foods, then ice or frozen fruit last. Pull the pitcher release lever to remove. 2 Put ingredients in place by making sure that the pitcher is on the base of the pitcher to fill it 's fully locked in order...
... of the pitcher. You will not work without the lid in place. OPERATING THE BLENDER 1 Remove the pitcher from the Blender base in place. 8 Add liquids first, then soft foods, then ice or frozen fruit last. Pull the pitcher release lever to remove. 2 Put ingredients in place by making sure that the pitcher is on the base of the pitcher to fill it 's fully locked in order...

Use & Care Guide
Page 9
... Blender will automatically stop the Blender manually. 10 Pull the release lever to help remove the pitcher after you to remove. 9 OPERATING THE BLENDER English 5 Turn the selection knob to your desired pre-set program or variable speed selection (see the "Blender function guide" for more information). 6 Press the START/PAUSE button. 7 You may use the Pulse feature, turn the dial to PULSE, then PRESS AND HOLD the START/PAUSE button...
... Blender will automatically stop the Blender manually. 10 Pull the release lever to help remove the pitcher after you to remove. 9 OPERATING THE BLENDER English 5 Turn the selection knob to your desired pre-set program or variable speed selection (see the "Blender function guide" for more information). 6 Press the START/PAUSE button. 7 You may use the Pulse feature, turn the dial to PULSE, then PRESS AND HOLD the START/PAUSE button...

Use & Care Guide
Page 10
... 'll find the best program for fine tuned chopping and blending needs to a fine texture for recipes with foods high in min:sec) 1:05 1:39 1:25 1:29 Short pulses of blending. High blade speed to blend to prepare any recipe. Adjustable speeds for your preference on a program that require a light touch. OPERATING THE BLENDER Blender function guide The four pre-set recipe programs were each developed based on the Icy Drinks...
... 'll find the best program for fine tuned chopping and blending needs to a fine texture for recipes with foods high in min:sec) 1:05 1:39 1:25 1:29 Short pulses of blending. High blade speed to blend to prepare any recipe. Adjustable speeds for your preference on a program that require a light touch. OPERATING THE BLENDER Blender function guide The four pre-set recipe programs were each developed based on the Icy Drinks...

Use & Care Guide
Page 11
... to the Blender base if jar is not in the pitcher while the motor is running . 11 Secure the lid, remove the center ingredient cap and place a towel over the top. • The blender is not intended to be attracted to a higher speed, as needed. Blending on variable speed • For mixtures blended on a countertop. • Metal items may also be used as the Blender is free of...
... to the Blender base if jar is not in the pitcher while the motor is running . 11 Secure the lid, remove the center ingredient cap and place a towel over the top. • The blender is not intended to be attracted to a higher speed, as needed. Blending on variable speed • For mixtures blended on a countertop. • Metal items may also be used as the Blender is free of...
Use & Care Guide
Page 12
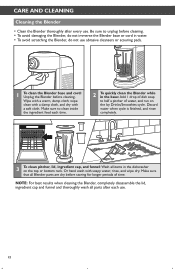
.... NOTE: For best results when cleaning the Blender, completely disassemble the lid, ingredient cap and funnel and thoroughly wash all parts after every use . 12 Make sure to clean inside the ingredient feed each use . Make sure that all items in water. • To avoid scratching the Blender, do not use abrasive cleansers or scouring pads. 1 To clean the Blender base and cord: Unplug the Blender before storing...
.... NOTE: For best results when cleaning the Blender, completely disassemble the lid, ingredient cap and funnel and thoroughly wash all parts after every use . 12 Make sure to clean inside the ingredient feed each use . Make sure that all items in water. • To avoid scratching the Blender, do not use abrasive cleansers or scouring pads. 1 To clean the Blender base and cord: Unplug the Blender before storing...

Use & Care Guide
Page 13
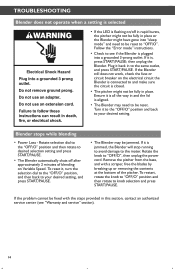
... common reasons include: - Blender has been unplugged or a power outage has occurred The Blender may have gone into "active mode". Press START/ PAUSE, then unplug the power cord. TROUBLESHOOTING Understanding the Blender flash codes IMPORTANT: The Blender will stop running to avoid damage to the motor. Then, choose your selection and press the START/ PAUSE button. Remove the pitcher from the base, and with increasing intensity...
... common reasons include: - Blender has been unplugged or a power outage has occurred The Blender may have gone into "active mode". Press START/ PAUSE, then unplug the power cord. TROUBLESHOOTING Understanding the Blender flash codes IMPORTANT: The Blender will stop running to avoid damage to the motor. Then, choose your selection and press the START/ PAUSE button. Remove the pitcher from the base, and with increasing intensity...
Use & Care Guide
Page 14
...; Follow the "Error mode" instructions. • Check to the motor. Remove the pitcher from the base, and with the steps provided in place. If it , turn the selection dial to the "OFF/O" position, and then back to the same outlet, and press START/PAUSE. Turn it is jammed, the Blender will stop running to avoid damage to see "Warranty and service" section...
...; Follow the "Error mode" instructions. • Check to the motor. Remove the pitcher from the base, and with the steps provided in place. If it , turn the selection dial to the "OFF/O" position, and then back to the same outlet, and press START/PAUSE. Turn it is jammed, the Blender will stop running to avoid damage to see "Warranty and service" section...

Use & Care Guide
Page 15
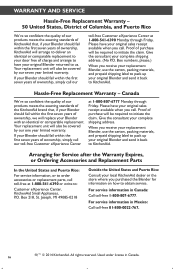
.... English WARRANTY AND SERVICE KitchenAid® Blender Warranty for the 50 United States, the District of Columbia, Puerto Rico, and Canada This warranty extends to arrange for service, or call the Customer eXperience Center toll-free at 1-800-541-6390. Length of Warranty: KitchenAid Will Pay for Blender operated outside the 50 United States, District of Columbia, Puerto Rico, and Canada. KitchenAid Will A. Repairs when Blender is used in...
.... English WARRANTY AND SERVICE KitchenAid® Blender Warranty for the 50 United States, the District of Columbia, Puerto Rico, and Canada This warranty extends to arrange for service, or call the Customer eXperience Center toll-free at 1-800-541-6390. Length of Warranty: KitchenAid Will Pay for Blender operated outside the 50 United States, District of Columbia, Puerto Rico, and Canada. KitchenAid Will A. Repairs when Blender is used in...
Use & Care Guide
Page 16
... available when you purchased the Blender for Service after the Warranty Expires, or Ordering Accessories and Replacement Parts In the United States and Puerto Rico: For service information, or to KitchenAid. For service information in Canada: Call toll-free 1-800-807-6777. When you call. Give the consultant your original sales receipt available when you receive your replacement Blender, use the carton, packing materials...
... available when you purchased the Blender for Service after the Warranty Expires, or Ordering Accessories and Replacement Parts In the United States and Puerto Rico: For service information, or to KitchenAid. For service information in Canada: Call toll-free 1-800-807-6777. When you call. Give the consultant your original sales receipt available when you receive your replacement Blender, use the carton, packing materials...


