Use & Care Guide
Page 3
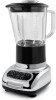
... of Contents INTRODUCTION Proof of Purchase & Product Registration Card Inside Front Cover Blender Safety...3 Important Safeguards...4 Electrical Requirements...5 FEATURES AND OPERATION Blender Features...6 Preparing the Blender for Use 8 Before First Use...8 Blender Assembly...8 Using the Blender...10 Before Use...10 Operating the Blender 10 Crush Ice...10 Pulse Mode...11 Ingredient Cup...11 Soft Start®...
... of Contents INTRODUCTION Proof of Purchase & Product Registration Card Inside Front Cover Blender Safety...3 Important Safeguards...4 Electrical Requirements...5 FEATURES AND OPERATION Blender Features...6 Preparing the Blender for Use 8 Before First Use...8 Blender Assembly...8 Using the Blender...10 Before Use...10 Operating the Blender 10 Crush Ice...10 Pulse Mode...11 Ingredient Cup...11 Soft Start®...
Use & Care Guide
Page 4
...to Order Accessories and Replacement Parts 23 NOTE: Due To The Unique Container And Blade Design, Read These Instructions Before Using Your New KitchenAid® Blender To Achieve Maximum Performance Results. 2 Canada 22 How to Arrange for Service after the Warranty Expires - ENGLISH Table of Contents RECIPES ... Vinaigrette Dressing 20 Chocolate Pot De Crème 20 Fresh Fruit Milk Shake 20 WARRANTY AND SERVICE INFORMATION KitchenAid® Blender Warranty 21 Hassle-Free Replacement Warranty - 50 United States and District of Columbia............22 Hassle-Free Replacement Warranty -
...to Order Accessories and Replacement Parts 23 NOTE: Due To The Unique Container And Blade Design, Read These Instructions Before Using Your New KitchenAid® Blender To Achieve Maximum Performance Results. 2 Canada 22 How to Arrange for Service after the Warranty Expires - ENGLISH Table of Contents RECIPES ... Vinaigrette Dressing 20 Chocolate Pot De Crème 20 Fresh Fruit Milk Shake 20 WARRANTY AND SERVICE INFORMATION KitchenAid® Blender Warranty 21 Hassle-Free Replacement Warranty - 50 United States and District of Columbia............22 Hassle-Free Replacement Warranty -

Use & Care Guide
Page 5
... seriously injured if you don't follow the safety alert symbol and either the word "DANGER" or "WARNING." Always read and obey all safety messages. ENGLISH Blender Safety Your safety and the safety of injury, and tell you what the potential hazard is the safety alert symbol. All safety messages will tell...
... seriously injured if you don't follow the safety alert symbol and either the word "DANGER" or "WARNING." Always read and obey all safety messages. ENGLISH Blender Safety Your safety and the safety of injury, and tell you what the potential hazard is the safety alert symbol. All safety messages will tell...
Use & Care Guide
Page 6
...of attachments, including canning jars, not recommended by or near children. 4. Blade assembly is designed for household use of injury to the Blender. The use only 4 When blending hot liquids, remove center piece of severe injury to persons or damage to persons. 14. Avoid contact...using electrical appliances, basic safety precautions should always be used only when the Blender is not running. 10. Always operate Blender with a damaged cord or plug or after appliance malfunctions, or is used by KitchenAid may be used but must be followed to persons including the following: ...
...of attachments, including canning jars, not recommended by or near children. 4. Blade assembly is designed for household use of injury to the Blender. The use only 4 When blending hot liquids, remove center piece of severe injury to persons or damage to persons. 14. Avoid contact...using electrical appliances, basic safety precautions should always be used only when the Blender is not running. 10. Always operate Blender with a damaged cord or plug or after appliance malfunctions, or is used by KitchenAid may be used but must be followed to persons including the following: ...
Use & Care Guide
Page 7
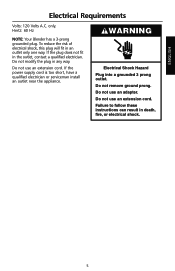
Hertz: 60 Hz Note: Your Blender has a 3-prong grounded plug. Failure to follow these instructions can result in an outlet only one way. ENGLISH Electrical Requirements Volts: 120 Volts A.C. To reduce ...
Hertz: 60 Hz Note: Your Blender has a 3-prong grounded plug. Failure to follow these instructions can result in an outlet only one way. ENGLISH Electrical Requirements Volts: 120 Volts A.C. To reduce ...
Use & Care Guide
Page 8
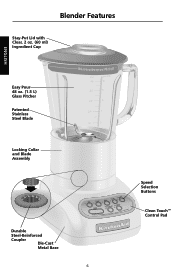
Blender Features Stay-Put Lid with Clear, 2 oz. (60 ml) Ingredient Cup ENGLISH Easy Pour 48 oz. (1.5 L) Glass Pitcher Patented Stainless Steel Blade Locking Collar and Blade Assembly oz cups 48 6 40 5 32 4 24 3 16 2 8 1 Durable Steel-Reinforced Coupler Die-Cast Metal Base 6 Speed Selection Buttons Clean Touch™ Control Pad
Blender Features Stay-Put Lid with Clear, 2 oz. (60 ml) Ingredient Cup ENGLISH Easy Pour 48 oz. (1.5 L) Glass Pitcher Patented Stainless Steel Blade Locking Collar and Blade Assembly oz cups 48 6 40 5 32 4 24 3 16 2 8 1 Durable Steel-Reinforced Coupler Die-Cast Metal Base 6 Speed Selection Buttons Clean Touch™ Control Pad

Use & Care Guide
Page 9
... instant. The PULSE MODE works with all blending tasks - Clean Touch™ Control Pad Wipes clean in measuring and adding ingredients. ENGLISH Blender Features This blender was built and tested to KitchenAid quality standards for each culinary task and control-pad setting. Easy Pour 48 oz. (1.5 L) Glass Pitcher Glass Pitcher resists scratches, stains...
... instant. The PULSE MODE works with all blending tasks - Clean Touch™ Control Pad Wipes clean in measuring and adding ingredients. ENGLISH Blender Features This blender was built and tested to KitchenAid quality standards for each culinary task and control-pad setting. Easy Pour 48 oz. (1.5 L) Glass Pitcher Glass Pitcher resists scratches, stains...
Use & Care Guide
Page 10
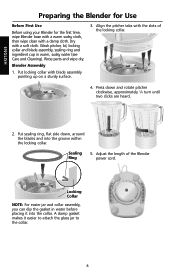
... with a warm sudsy cloth, then wipe clean with blade assembly pointing up on a sturdy surface. 3. Put locking collar with a damp cloth. Blender Assembly 1. Locking Collar NOTE: For easier jar and collar assembly, you can dip the gasket in warm, sudsy water (see Care and Cleaning). Align the ... dry. Put sealing ring, flat side down and rotate pitcher clockwise, approximately ¼ turn until two clicks are heard. 2. Dry with the slots of the Blender power cord. Press down , around the blades and into the collar.
... with a warm sudsy cloth, then wipe clean with blade assembly pointing up on a sturdy surface. 3. Put locking collar with a damp cloth. Blender Assembly 1. Locking Collar NOTE: For easier jar and collar assembly, you can dip the gasket in warm, sudsy water (see Care and Cleaning). Align the ... dry. Put sealing ring, flat side down and rotate pitcher clockwise, approximately ¼ turn until two clicks are heard. 2. Dry with the slots of the Blender power cord. Press down , around the blades and into the collar.
Use & Care Guide
Page 11
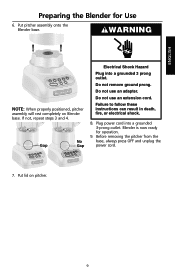
ENGLISH 32 4 24 3 Prep16 a2ring the Blender for operation. 9. If no3t2 , r4 epeat steps 3 and 4.32 4 24 3 24 3 16 2 16 2 8 1 8 1 No Gap Gap Electrical Shock Hazard Plug into a grounded 3-prong outlet. Failure ... cord. 7. WARNING NOTE: When oz cups properly positioneoz d,cupspitcher assembly 48 6 w40 ill5 rest completely on48 40 6 Bl5ender base. Do not use an extension cord. Blender is now ready for Use 8 1 6. Do not use an adapter. Put lid on pitcher. 9 Put pitcher assembly onto the...
ENGLISH 32 4 24 3 Prep16 a2ring the Blender for operation. 9. If no3t2 , r4 epeat steps 3 and 4.32 4 24 3 24 3 16 2 16 2 8 1 8 1 No Gap Gap Electrical Shock Hazard Plug into a grounded 3-prong outlet. Failure ... cord. 7. WARNING NOTE: When oz cups properly positioneoz d,cupspitcher assembly 48 6 w40 ill5 rest completely on48 40 6 Bl5ender base. Do not use an extension cord. Blender is now ready for Use 8 1 6. Do not use an adapter. Put lid on pitcher. 9 Put pitcher assembly onto the...

Use & Care Guide
Page 12
... PULSE MODE. 1. Put ingredients into the pitcher and firmly attach lid. 10 Press CRUSH ICE. The Blender will auto3m2 atica4lly pulse at staggered intervals at that speed. Do not remove pitcher lid Operating the Blender The KitchenAid® Blender has five speeds: STIR, CHOP, MIX, PURÉE and LIQUEFY. NOTE: If a gap exists between...
... PULSE MODE. 1. Put ingredients into the pitcher and firmly attach lid. 10 Press CRUSH ICE. The Blender will auto3m2 atica4lly pulse at staggered intervals at that speed. Do not remove pitcher lid Operating the Blender The KitchenAid® Blender has five speeds: STIR, CHOP, MIX, PURÉE and LIQUEFY. NOTE: If a gap exists between...

Use & Care Guide
Page 13
... 2 oz. (60 ml) ingredient cup can be locked into the locking collar or the collar is now ready for optimal performance. Pulse Mode Your KitchenAid® Blender offers pulse mode, which allows a "Pulse-at the selected speed. NOTE: Pulse mode will remain in the Pulse Mode. 4. See...to indicate that all five speeds are in Pulse Mode and the Pulse Mode indicator will stay lit when pulsing at -any Speed" feature. The Blender is not positioned properly on the button will blink to pull ingredients into pitcher, and firmly attach lid. 3. Before removing the pitcher assembly, unplug...
... 2 oz. (60 ml) ingredient cup can be locked into the locking collar or the collar is now ready for optimal performance. Pulse Mode Your KitchenAid® Blender offers pulse mode, which allows a "Pulse-at the selected speed. NOTE: Pulse mode will remain in the Pulse Mode. 4. See...to indicate that all five speeds are in Pulse Mode and the Pulse Mode indicator will stay lit when pulsing at -any Speed" feature. The Blender is not positioned properly on the button will blink to pull ingredients into pitcher, and firmly attach lid. 3. Before removing the pitcher assembly, unplug...
Use & Care Guide
Page 14
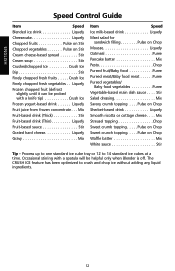
... drink Liquefy Fruit juice from frozen concentrate. . . Liquefy Frozen chopped fruit (defrost slightly until it can be probed with a spatula will be helpful only when Blender is off. Process up to one standard ice cube tray or 12 to crush and chop ice without adding any liquid ingredients. 12 Crush Ice...
... drink Liquefy Fruit juice from frozen concentrate. . . Liquefy Frozen chopped fruit (defrost slightly until it can be probed with a spatula will be helpful only when Blender is off. Process up to one standard ice cube tray or 12 to crush and chop ice without adding any liquid ingredients. 12 Crush Ice...

Use & Care Guide
Page 15
..., and dry with warm water until clean. 2. To clean the lid and ingredient cup, wash in a straight, upwards motion off the Blender base. Remove the pitcher and empty contents. NOTE: Pitcher can be easily cleaned as individual components or together without disassembly. • Clean the... 1. Lift the pitcher assembly in warm soapy water, then rinse and dry thoroughly. 3. Rinse with a soft cloth. ENGLISH Care and Cleaning The Blender pitcher, locking collar and blade assembly can be placed in the bottom rack of dishwashing liquid. wipe clean with a damp cloth, and dry with ...
..., and dry with warm water until clean. 2. To clean the lid and ingredient cup, wash in a straight, upwards motion off the Blender base. Remove the pitcher and empty contents. NOTE: Pitcher can be easily cleaned as individual components or together without disassembly. • Clean the... 1. Lift the pitcher assembly in warm soapy water, then rinse and dry thoroughly. 3. Rinse with a soft cloth. ENGLISH Care and Cleaning The Blender pitcher, locking collar and blade assembly can be placed in the bottom rack of dishwashing liquid. wipe clean with a damp cloth, and dry with ...

Use & Care Guide
Page 16
...cord. The Blender may also reduce the load on the Blender. Press OFF to engage the coupler. USA/Puerto Rico: Canada: 1-800-541-6390 1-800-807-6777 Mexico: 01-800-024-17-17 (JV Distribuciones) 01-800-902-31-00 (Industrias Birtman) See the KitchenAid Warranty and Service... section additional details. See Blender Assembly. The Blender stops while...
...cord. The Blender may also reduce the load on the Blender. Press OFF to engage the coupler. USA/Puerto Rico: Canada: 1-800-541-6390 1-800-807-6777 Mexico: 01-800-024-17-17 (JV Distribuciones) 01-800-902-31-00 (Industrias Birtman) See the KitchenAid Warranty and Service... section additional details. See Blender Assembly. The Blender stops while...
Use & Care Guide
Page 17
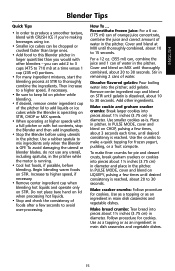
...is reached, about 20 to 30 seconds. Remove center ingredient cup and blend on CHOP, pulsing a few seconds to avoid over-processing. Add other blenders - Use as a topping or as an ingredient in pitcher. Make cracker crumbs: Follow procedure for cookies. Then increase to a higher speed, if... operating on pitcher while blending. • If desired, remove center ingredient cup of water in main dish casseroles and vegetable dishes. ENGLISH Blender Tips Quick Tips • In order to produce a smoother texture, blend with CRUSH ICE if you're making beverages using utensils in ...
...is reached, about 20 to 30 seconds. Remove center ingredient cup and blend on CHOP, pulsing a few seconds to avoid over-processing. Add other blenders - Use as a topping or as an ingredient in pitcher. Make cracker crumbs: Follow procedure for cookies. Then increase to a higher speed, if... operating on pitcher while blending. • If desired, remove center ingredient cup of water in main dish casseroles and vegetable dishes. ENGLISH Blender Tips Quick Tips • In order to produce a smoother texture, blend with CRUSH ICE if you're making beverages using utensils in ...

Use & Care Guide
Page 18
...baked goods: Pour liquid ingredients in pitcher. Prepare white sauce: Place milk, flour, and salt, if desired, in an automatic dishwasher. Stop the Blender and scrape sides of gravy: If sauce or gravy becomes lumpy, place in pitcher. For hard cheeses, such as needed . Rinse and dry. For... or milk per cup (235 ml) of dishwashing liquid. Cover and blend on STIR until desired consistency, about 5 to 10 seconds. Rinse your Blender jar: Fill pitcher half full with warm water. Grate cheese: Cut very cold cheese into saucepan and cook as needed . Cover and blend on ...
...baked goods: Pour liquid ingredients in pitcher. Prepare white sauce: Place milk, flour, and salt, if desired, in an automatic dishwasher. Stop the Blender and scrape sides of gravy: If sauce or gravy becomes lumpy, place in pitcher. For hard cheeses, such as needed . Rinse and dry. For... or milk per cup (235 ml) of dishwashing liquid. Cover and blend on STIR until desired consistency, about 5 to 10 seconds. Rinse your Blender jar: Fill pitcher half full with warm water. Grate cheese: Cut very cold cheese into saucepan and cook as needed . Cover and blend on ...

Use & Care Guide
Page 23
... OF REMEDIES IMPLIED WARRANTIES, INCLUDING TO THE EXTENT APPLICABLE WARRANTIES OF MERCHANTABILITY OR FITNESS FOR A PARTICULAR PURPOSE, ARE EXCLUDED TO THE EXTENT LEGALLY PERMISSIBLE. ENGLISH KitchenAid® Blender Warranty Length of Warranty: 50 United States, the District of Columbia, Canada, and Puerto Rico: One-year limited warranty from accident, alteration, misuse or...
... OF REMEDIES IMPLIED WARRANTIES, INCLUDING TO THE EXTENT APPLICABLE WARRANTIES OF MERCHANTABILITY OR FITNESS FOR A PARTICULAR PURPOSE, ARE EXCLUDED TO THE EXTENT LEGALLY PERMISSIBLE. ENGLISH KitchenAid® Blender Warranty Length of Warranty: 50 United States, the District of Columbia, Canada, and Puerto Rico: One-year limited warranty from accident, alteration, misuse or...

Use & Care Guide
Page 24
..., ON L5N 0B7 How to Arrange for replacement parts and labor costs to correct defects in materials and workmanship. If your KitchenAid® Blender should fail within the first year of ownership, simply call our toll-free Customer Satisfaction Center at 1-800-541-6390 Monday ... United States and District of Columbia We're so confident the quality of our products meets the exacting standards of KitchenAid that , if your Blender should fail within the first year of ownership, KitchenAid Canada will replace your complete shipping address. (No P.O. to 5 p.m. to 8 p.m. (Eastern Time), or ...
..., ON L5N 0B7 How to Arrange for replacement parts and labor costs to correct defects in materials and workmanship. If your KitchenAid® Blender should fail within the first year of ownership, simply call our toll-free Customer Satisfaction Center at 1-800-541-6390 Monday ... United States and District of Columbia We're so confident the quality of our products meets the exacting standards of KitchenAid that , if your Blender should fail within the first year of ownership, KitchenAid Canada will replace your complete shipping address. (No P.O. to 5 p.m. to 8 p.m. (Eastern Time), or ...
Use & Care Guide
Page 25
... Mississauga, ON L5N 0B7 How to Arrange for Service Outside these Locations Consult your Blender in Canada, call toll-free 1-800-807-6777. to Arrange for your local KitchenAid dealer or the store where you . For service information in Mexico, call toll-free 01-800-024-17-17 (JV ...Distribuciones) Or 01-800-902-31-00 (Industrias Birtman) How to : Customer eXperience Centre KitchenAid Canada Mississauga, ON L5N 0B7 To order accessories or replacement parts for Service after the Warranty Expires - Box 218 St. ENGLISH How to 8 p.m. ...
... Mississauga, ON L5N 0B7 How to Arrange for Service Outside these Locations Consult your Blender in Canada, call toll-free 1-800-807-6777. to Arrange for your local KitchenAid dealer or the store where you . For service information in Mexico, call toll-free 01-800-024-17-17 (JV ...Distribuciones) Or 01-800-902-31-00 (Industrias Birtman) How to : Customer eXperience Centre KitchenAid Canada Mississauga, ON L5N 0B7 To order accessories or replacement parts for Service after the Warranty Expires - Box 218 St. ENGLISH How to 8 p.m. ...


