Owners Manual
Page 2
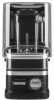
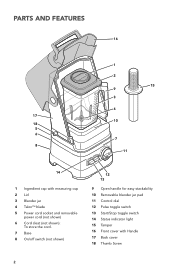
PARTS AND FEATURES 16 17 18 5 6 8 O 8UozN=C1C6Eu0pS 56 52 48 44 40 36 32 28 24 20 16 12 8 4 1 2 9 3 4 10 7 11 15 14 1 Ingredient cap with measuring cup 2 Lid 3 Blender jar 4 TalonTM blade 5 Power cord socket and removable power cord (not shown) 6 Cord cleat (not shown): To store the cord. 7 Base 8 On/off switch (not shown) 12 13 9 Open handle for easy stackability 10 Removable blender jar pad 11 Control dial 12 Pulse toggle switch 13 Start/Stop toggle switch 14 Status indicator light 15 Tamper 16 Front cover with Handle 17 Back cover 18 Thumb Screw 2
PARTS AND FEATURES 16 17 18 5 6 8 O 8UozN=C1C6Eu0pS 56 52 48 44 40 36 32 28 24 20 16 12 8 4 1 2 9 3 4 10 7 11 15 14 1 Ingredient cap with measuring cup 2 Lid 3 Blender jar 4 TalonTM blade 5 Power cord socket and removable power cord (not shown) 6 Cord cleat (not shown): To store the cord. 7 Base 8 On/off switch (not shown) 12 13 9 Open handle for easy stackability 10 Removable blender jar pad 11 Control dial 12 Pulse toggle switch 13 Start/Stop toggle switch 14 Status indicator light 15 Tamper 16 Front cover with Handle 17 Back cover 18 Thumb Screw 2
Owners Manual
Page 3
... they do not put Blender in use outdoors. 8. Keep hands and utensils, other liquid. 3. To unplug, grasp the plug and pull from the power cord. 5. Handle carefully. 11. Turn the appliance OFF, then...parts. 6. Do not use , before assembling or disassembling parts and before cleaning. ENGLISH COMMERCIAL BLENDER SAFETY IMPORTANT SAFEGUARDS When using the tamper through the cover opening. To protect against risk of severe injury to persons or damage to ensure that they are sharp. Do not operate any manner. Blades are closely supervised and instructed concerning use by persons...
... they do not put Blender in use outdoors. 8. Keep hands and utensils, other liquid. 3. To unplug, grasp the plug and pull from the power cord. 5. Handle carefully. 11. Turn the appliance OFF, then...parts. 6. Do not use , before assembling or disassembling parts and before cleaning. ENGLISH COMMERCIAL BLENDER SAFETY IMPORTANT SAFEGUARDS When using the tamper through the cover opening. To protect against risk of severe injury to persons or damage to ensure that they are sharp. Do not operate any manner. Blades are closely supervised and instructed concerning use by persons...

Owners Manual
Page 4
... intended use an adapter. ELECTRICAL REQUIREMENTS Voltage: 120 V Frequency: 60 HZ Amps: 15.0 A NOTE: If the plug does not fit in place over the lid opening. If the power supply cord is designed for the blender motor was measured using a dynamometer, a machine that laboratories routinely use an extension cord. Do not use . 14. MOTOR HORSEPOWER Motor horsepower for commercial use of attachments, including canning blender jars, not recommended by KitchenAid may...
... intended use an adapter. ELECTRICAL REQUIREMENTS Voltage: 120 V Frequency: 60 HZ Amps: 15.0 A NOTE: If the plug does not fit in place over the lid opening. If the power supply cord is designed for the blender motor was measured using a dynamometer, a machine that laboratories routinely use an extension cord. Do not use . 14. MOTOR HORSEPOWER Motor horsepower for commercial use of attachments, including canning blender jars, not recommended by KitchenAid may...
Owners Manual
Page 5
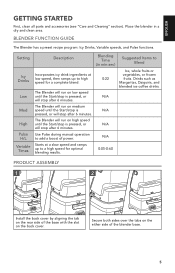
...-0:60 PRODUCT ASSEMBLY 1 2 Install the back cover by aligning the tab on the rear side of power. The Blender will run on the either side of the blender base. 5 ENGLISH GETTING STARTED First, clean all parts and accessories (see "Care and Cleaning" section). Use Pulse during manual operation to a high speed for a complete blend. Secure both sides over the tabs on high speed until the Start/stop is pressed, or...
...-0:60 PRODUCT ASSEMBLY 1 2 Install the back cover by aligning the tab on the rear side of power. The Blender will run on the either side of the blender base. 5 ENGLISH GETTING STARTED First, clean all parts and accessories (see "Care and Cleaning" section). Use Pulse during manual operation to a high speed for a complete blend. Secure both sides over the tabs on high speed until the Start/stop is pressed, or...

Owners Manual
Page 6
... Shock Hazard Plug into a grounded 3 prong outlet. Failure to follow these instructions can result in death, fire, or electrical shock. 5 6 Make sure the power switch is in Standby mode and ready to operate. 6 Securely attach the removable power cord into the back of blender. Do not use an adapter. GETTING STARTED 3 4 Install and secure the thumb screws on both sides by hand.
... Shock Hazard Plug into a grounded 3 prong outlet. Failure to follow these instructions can result in death, fire, or electrical shock. 5 6 Make sure the power switch is in Standby mode and ready to operate. 6 Securely attach the removable power cord into the back of blender. Do not use an adapter. GETTING STARTED 3 4 Install and secure the thumb screws on both sides by hand.

Owners Manual
Page 7
.... 24 5 20 16 12 8 4 Using the Tamper (optional): Open front cover. When finished, replace the Ingredient cap before removing the lid or pouring out the blended ingredients. Do not lift by Blender jar or Blender jar handle only. ENGLISH USING THE COMMERCIAL BLENDER IMPORTANT : When moving your desired speed, time, or program. Place the blender jar on its own as a separate blending function while the Blender is in Standby mode.
.... 24 5 20 16 12 8 4 Using the Tamper (optional): Open front cover. When finished, replace the Ingredient cap before removing the lid or pouring out the blended ingredients. Do not lift by Blender jar or Blender jar handle only. ENGLISH USING THE COMMERCIAL BLENDER IMPORTANT : When moving your desired speed, time, or program. Place the blender jar on its own as a separate blending function while the Blender is in Standby mode.

Owners Manual
Page 8
... jar after sanitizing. 7. Wash the blender jar, jar pad, lid, front cover, back cover, handle, and ingredient cap by removing the two screws inside the front cover. Place the lid, and securely place the blender jar onto the blender base. 3. Run the blender on the base. Place the lid on the blender base. CARE AND CLEANING NOTE: Do not immerse the Blender base or cord in the blender jar for an additional 2 minutes. 5. Remove all contents from the front cover...
... jar after sanitizing. 7. Wash the blender jar, jar pad, lid, front cover, back cover, handle, and ingredient cap by removing the two screws inside the front cover. Place the lid, and securely place the blender jar onto the blender base. 3. Run the blender on the base. Place the lid on the blender base. CARE AND CLEANING NOTE: Do not immerse the Blender base or cord in the blender jar for an additional 2 minutes. 5. Remove all contents from the front cover...

Owners Manual
Page 9
... Blender to "Using the commercial blender" section. Unplug the blender and remove the jar from the housing to continue regular use. Problem Solution Status indicator light is off with force. Blender jar overflows: Unplug and remove the jar pad from the base, and clear the items. Place the jar back on the base, and then turn on the blender to make sure the base is flashing orange color: Indicates error mode. Do not remove...
... Blender to "Using the commercial blender" section. Unplug the blender and remove the jar from the housing to continue regular use. Problem Solution Status indicator light is off with force. Blender jar overflows: Unplug and remove the jar pad from the base, and clear the items. Place the jar back on the base, and then turn on the blender to make sure the base is flashing orange color: Indicates error mode. Do not remove...

Owners Manual
Page 10
Length of Warranty: Two Year Full Warranty for Blender Base, Front cover, and Back cover and One Year Full Warranty for Blender operated outside the 50 United States and District of Columbia. Replacement parts or repair labor costs for Blender Jar from date of your Commercial Blender. LIMITATION OF REMEDIES IMPLIED WARRANTIES, INCLUDING TO THE EXTENT APPLICABLE WARRANTIES OF MERCHANTABILITY OR FITNESS FOR A PARTICULAR PURPOSE, ARE EXCLUDED TO THE EXTENT LEGALLY...
Length of Warranty: Two Year Full Warranty for Blender Base, Front cover, and Back cover and One Year Full Warranty for Blender operated outside the 50 United States and District of Columbia. Replacement parts or repair labor costs for Blender Jar from date of your Commercial Blender. LIMITATION OF REMEDIES IMPLIED WARRANTIES, INCLUDING TO THE EXTENT APPLICABLE WARRANTIES OF MERCHANTABILITY OR FITNESS FOR A PARTICULAR PURPOSE, ARE EXCLUDED TO THE EXTENT LEGALLY...
Owners Manual
Page 11
... these instructions to receive this quality service. Your replacement Commercial Blender Base will be returned prepaid and insured. Mississauga, ON L5N 0B7 11 Your repaired Commercial Blender Base will be returned to you are unable to have your Commercial Blender Base with a copy of the proof of ownership, KitchenAid will replace your original Commercial Blender Base returned to us at: Customer eXperience Centre KitchenAid Canada 200 - 6750 Century Ave. HASSLE-FREE REPLACEMENT WARRANTY - 50...
... these instructions to receive this quality service. Your replacement Commercial Blender Base will be returned prepaid and insured. Mississauga, ON L5N 0B7 11 Your repaired Commercial Blender Base will be returned to you are unable to have your Commercial Blender Base with a copy of the proof of ownership, KitchenAid will replace your original Commercial Blender Base returned to us at: Customer eXperience Centre KitchenAid Canada 200 - 6750 Century Ave. HASSLE-FREE REPLACEMENT WARRANTY - 50...

Owners Manual
Page 12
... your original Commercial Blender Jar returned to the purchaser and any succeeding owner for Commercial Blender Jars operated in this quality service. Call toll-free 1-855-845-9684 to your replacement Commercial Blender Jar, use the carton and packing materials to obtain satisfactory service in Puerto Rico. Your repaired Commercial Blender Jar will arrange to deliver an identical or comparable replacement to learn the location of ownership, simply call our toll-free Customer eXperience...
... your original Commercial Blender Jar returned to the purchaser and any succeeding owner for Commercial Blender Jars operated in this quality service. Call toll-free 1-855-845-9684 to your replacement Commercial Blender Jar, use the carton and packing materials to obtain satisfactory service in Puerto Rico. Your repaired Commercial Blender Jar will arrange to deliver an identical or comparable replacement to learn the location of ownership, simply call our toll-free Customer eXperience...
Owners Manual
Page 13
... how to : Customer eXperience Centre KitchenAid Canada 200 - 6750 Century Ave. Used under license in Canada. 13 Mississauga, ON L5N 0B7 ®/™ ©2019 KitchenAid. All rights reserved. ENGLISH WARRANTY AND SERVICE ARRANGING FOR SERVICE AFTER THE WARRANTY EXPIRES, OR ORDERING ACCESSORIES AND REPLACEMENT PARTS In the United States and Puerto Rico: For service information, or to order accessories or replacement parts, call toll-free at 1-855...
... how to : Customer eXperience Centre KitchenAid Canada 200 - 6750 Century Ave. Used under license in Canada. 13 Mississauga, ON L5N 0B7 ®/™ ©2019 KitchenAid. All rights reserved. ENGLISH WARRANTY AND SERVICE ARRANGING FOR SERVICE AFTER THE WARRANTY EXPIRES, OR ORDERING ACCESSORIES AND REPLACEMENT PARTS In the United States and Puerto Rico: For service information, or to order accessories or replacement parts, call toll-free at 1-855...


