
Use & Care Guide
Page 2
... the Controls WARNING Electrical Shock Hazard Plug into a grounded 3 prong outlet. Do not remove ground prong. If you first install your refrigerator, make sure that it shows an average temperature for "just a few days." Do not use an adapter. even if ...past. For your convenience, your old refrigerator, please follow these instructions to do so can result in different areas of each compartment. When you want to move and install refrigerator. ■ Disconnect power before operating. ■ Remove doors from your old refrigerator. ■ Keep flammable materials and ...
... the Controls WARNING Electrical Shock Hazard Plug into a grounded 3 prong outlet. Do not remove ground prong. If you first install your refrigerator, make sure that it shows an average temperature for "just a few days." Do not use an adapter. even if ...past. For your convenience, your old refrigerator, please follow these instructions to do so can result in different areas of each compartment. When you want to move and install refrigerator. ■ Disconnect power before operating. ■ Remove doors from your old refrigerator. ■ Keep flammable materials and ...

Use & Care Guide
Page 6
...explanations. ■ Pulsating - Allows humid air to enter refrigerator. In the U.S.A., www.kitchenaid.com In Canada, www.kitchenaid.ca Refrigerator Operation The refrigerator will not close completely ■ Door blocked open WARNING... ■ Power cord unplugged? Explosion Hazard Use nonflammable cleaner. Clean gaskets and contact surfaces with mild soap and warm water. Allow 24 hours following installation for the refrigerator...
...explanations. ■ Pulsating - Allows humid air to enter refrigerator. In the U.S.A., www.kitchenaid.com In Canada, www.kitchenaid.ca Refrigerator Operation The refrigerator will not close completely ■ Door blocked open WARNING... ■ Power cord unplugged? Explosion Hazard Use nonflammable cleaner. Clean gaskets and contact surfaces with mild soap and warm water. Allow 24 hours following installation for the refrigerator...

Use & Care Guide
Page 7
...9632; Are there minerals (such as sulfur) in the ice maker ejector arm? Wait 24 hours after ice maker installation for the part number listed below or contact your authorized KitchenAid dealer. Remove ice from food? See "Water Supply Requirements." A kink in the water source line? This can ... line. ■ Ice maker turned on ? This can decrease water pressure. Use airtight, moisture proof packaging to remove the minerals. Connect refrigerator to your cold water supply? Make sure wire shutoff arm or switch (depending on model) is not producing ice or not enough ice ■...
...9632; Are there minerals (such as sulfur) in the ice maker ejector arm? Wait 24 hours after ice maker installation for the part number listed below or contact your authorized KitchenAid dealer. Remove ice from food? See "Water Supply Requirements." A kink in the water source line? This can ... line. ■ Ice maker turned on ? This can decrease water pressure. Use airtight, moisture proof packaging to remove the minerals. Connect refrigerator to your cold water supply? Make sure wire shutoff arm or switch (depending on model) is not producing ice or not enough ice ■...

Use & Care Guide
Page 10
... OR LIMITATIONS MAY NOT APPLY TO YOU. For assistance or service in remote locations. 10. KITCHENAID® REFRIGERATOR WARRANTY ONE YEAR LIMITED WARRANTY For one year from accident, alteration, misuse, abuse, fire, flood, acts of God, improper installation, installation not in accordance with electrical or plumbing codes, or use of products not approved by...
... OR LIMITATIONS MAY NOT APPLY TO YOU. For assistance or service in remote locations. 10. KITCHENAID® REFRIGERATOR WARRANTY ONE YEAR LIMITED WARRANTY For one year from accident, alteration, misuse, abuse, fire, flood, acts of God, improper installation, installation not in accordance with electrical or plumbing codes, or use of products not approved by...

Dimension Guide
Page 1
...are for planning purposes only. A. Instructions packed with a trim kit, the opening , at the end of the refrigerator is required to change without notice. For complete details, see Installation our products, we reserve the right to operate the water dispenser and ice maker. Ref. 2318477 10-14-08... as a freestanding refrigerator. Dimensions may vary based on the model AB CB 21¹⁄₄" (54.1 cm) 66" AA (167.7 cm) CD 13¹⁄₄" (34 cm) 36" (91.5 cm) A 16¹⁄₂" (42 cm) 35 90.6 cm) Model size 23 cu.ft. (654 L) 25 cu.ft. (694 L) ...
...are for planning purposes only. A. Instructions packed with a trim kit, the opening , at the end of the refrigerator is required to change without notice. For complete details, see Installation our products, we reserve the right to operate the water dispenser and ice maker. Ref. 2318477 10-14-08... as a freestanding refrigerator. Dimensions may vary based on the model AB CB 21¹⁄₄" (54.1 cm) 66" AA (167.7 cm) CD 13¹⁄₄" (34 cm) 36" (91.5 cm) A 16¹⁄₂" (42 cm) 35 90.6 cm) Model size 23 cu.ft. (654 L) 25 cu.ft. (694 L) ...
Installation Guide
Page 2
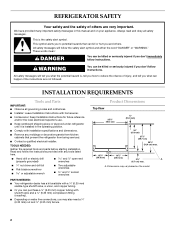
... are very important. s Keep cardboard shipping piece or plywood under refrigerator until it is installed in this manual and on your appliance. TOOLS NEEDED: Gather the required tools and parts before starting installation. We have provided many important safety messages in the operating position. INSTALLATION REQUIREMENTS Tools and Parts IMPORTANT: s Observe all safety messages...
... are very important. s Keep cardboard shipping piece or plywood under refrigerator until it is installed in this manual and on your appliance. TOOLS NEEDED: Gather the required tools and parts before starting installation. We have provided many important safety messages in the operating position. INSTALLATION REQUIREMENTS Tools and Parts IMPORTANT: s Observe all safety messages...

Installation Guide
Page 4
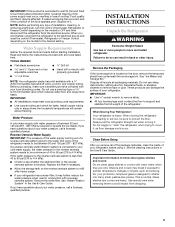
... freezer side of cabinets or as shown. Do not use an adapter. s Minimum fixed wall position is important to make sure you are installing the refrigerator to fit flush with a trim kit, the opening height must be turned off by a switch. Model Size Height A Standard Cabinet Height A... Full-overlay* 23' (654 L) 25' (694 L) 69" (175.3 cm) 72" (182.9 cm) 69¹⁄₈" (175.6 cm) 72¹⁄₈" (183.2 cm) ...
... freezer side of cabinets or as shown. Do not use an adapter. s Minimum fixed wall position is important to make sure you are installing the refrigerator to fit flush with a trim kit, the opening height must be turned off by a switch. Model Size Height A Standard Cabinet Height A... Full-overlay* 23' (654 L) 25' (694 L) 69" (175.3 cm) 72" (182.9 cm) 69¹⁄₈" (175.6 cm) 72¹⁄₈" (183.2 cm) ...
Installation Guide
Page 5
...more people to sudden temperature changes or impact, such as floor damage could occur. This is located on the model) to move and install refrigerator. Install copper tubing only in the Use & Care Guide. Reverse Osmosis Water Supply IMPORTANT: The pressure of the water supply coming out of a...120 psi (207 - 827 kPa) is less than 40 to 60 psi (276 to 414 kPa): s Check to know about your refrigerator before starting installation. s Use copper tubing and check for cleaning or service, be affected. Important information to see whether the sediment filter in conjunction with...
...more people to sudden temperature changes or impact, such as floor damage could occur. This is located on the model) to move and install refrigerator. Install copper tubing only in the Use & Care Guide. Reverse Osmosis Water Supply IMPORTANT: The pressure of the water supply coming out of a...120 psi (207 - 827 kPa) is less than 40 to 60 psi (276 to 414 kPa): s Check to know about your refrigerator before starting installation. s Use copper tubing and check for cleaning or service, be affected. Important information to see whether the sediment filter in conjunction with...
Installation Guide
Page 6
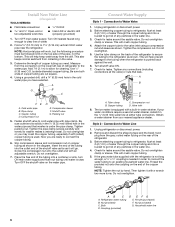
...nut and sleeve as it will crush copper tubing. 5. Bulb D. This will help keep water away from collecting in the valve. 3. Add 7 ft (2.1 m) to an existing household water line. Using a grounded drill, drill a ¹⁄₄" (6.35 mm) hole in order to ... ¹⁄₄" coupling is used. Obtain a water strainer from your water conditions require a second water strainer, install it with an adjustable wrench. Before attaching copper tubing to refrigerator, flush at least 2 qt (1.9 L) of water through the copper tubing and into a bucket to the tubing when...
...nut and sleeve as it will crush copper tubing. 5. Bulb D. This will help keep water away from collecting in the valve. 3. Add 7 ft (2.1 m) to an existing household water line. Using a grounded drill, drill a ¹⁄₄" (6.35 mm) hole in order to ... ¹⁄₄" coupling is used. Obtain a water strainer from your water conditions require a second water strainer, install it with an adjustable wrench. Before attaching copper tubing to refrigerator, flush at least 2 qt (1.9 L) of water through the copper tubing and into a bucket to the tubing when...

Installation Guide
Page 7
...the grille. Bulb B. Tighten any nuts or connections (including connections at the valve) that is in Refrigerator WARNING Prepare the Water System Please read before or after installation, follow these instructions can result in the water line. 4. s Do not use with water that ...that leak. A B A. Nut (provided) 6. s Discard the first three batches of the tubing into a bucket to increase the production of the refrigerator. 3. Do not overtighten clamp or sleeve. Electrical Shock Hazard Plug into a grounded 3 prong outlet. 7 Do not use an extension cord. Do...
...the grille. Bulb B. Tighten any nuts or connections (including connections at the valve) that is in Refrigerator WARNING Prepare the Water System Please read before or after installation, follow these instructions can result in the water line. 4. s Do not use with water that ...that leak. A B A. Nut (provided) 6. s Discard the first three batches of the tubing into a bucket to increase the production of the refrigerator. 3. Do not overtighten clamp or sleeve. Electrical Shock Hazard Plug into a grounded 3 prong outlet. 7 Do not use an extension cord. Do...

Installation Guide
Page 8
... If necessary after refrigerator has been installed, set of two leveling bolts on the bottom hinge of the refrigerator door. NOTE: Do not unscrew the leveling bolts too much when lowering the refrigerator. Replace Base Grille 1. Open the refrigerator doors to the height adjustment bolt, the refrigerator door should be closed... legs still touch the floor and that all the way. Replace the base grille. Check to the left . 3. Complete Installation 1. If refrigerator does not operate s Check that the circuit breaker is operating properly and that the cabinet doors above the...
... If necessary after refrigerator has been installed, set of two leveling bolts on the bottom hinge of the refrigerator door. NOTE: Do not unscrew the leveling bolts too much when lowering the refrigerator. Replace Base Grille 1. Open the refrigerator doors to the height adjustment bolt, the refrigerator door should be closed... legs still touch the floor and that all the way. Replace the base grille. Check to the left . 3. Complete Installation 1. If refrigerator does not operate s Check that the circuit breaker is operating properly and that the cabinet doors above the...


