

Warranty Information
Page 1
...OF MERCHANTABILITY OR FITNESS LASTS, SO THE ABOVE LIMITATIONS OR EXCLUSIONS MAY NOT APPLY TO YOU. IF THIS PRODUCT FAILS TO WORK AS WARRANTED, CUSTOMER'S SOLE AND EXCLUSIVE REMEDY SHALL BE REPAIR OR REPLACEMENT ACCORDING TO THE TERMS OF THIS LIMITED WARRANTY. OR...WARRANTIES OF MERCHANTABILITY OR FITNESS FOR A PARTICULAR PURPOSE, ARE EXCLUDED TO THE EXTENT LEGALLY PERMISSIBLE. KITCHENAID AND KITCHENAID CANADA DO NOT ASSUME ANY RESPONSIBILITY FOR INCIDENTAL OR CONSEQUENTIAL DAMAGES. KitchenAid Will A. Replacement parts or repair labor costs for service, or call the Customer eXperience Center ...
...OF MERCHANTABILITY OR FITNESS LASTS, SO THE ABOVE LIMITATIONS OR EXCLUSIONS MAY NOT APPLY TO YOU. IF THIS PRODUCT FAILS TO WORK AS WARRANTED, CUSTOMER'S SOLE AND EXCLUSIVE REMEDY SHALL BE REPAIR OR REPLACEMENT ACCORDING TO THE TERMS OF THIS LIMITED WARRANTY. OR...WARRANTIES OF MERCHANTABILITY OR FITNESS FOR A PARTICULAR PURPOSE, ARE EXCLUDED TO THE EXTENT LEGALLY PERMISSIBLE. KITCHENAID AND KITCHENAID CANADA DO NOT ASSUME ANY RESPONSIBILITY FOR INCIDENTAL OR CONSEQUENTIAL DAMAGES. KitchenAid Will A. Replacement parts or repair labor costs for service, or call the Customer eXperience Center ...

Use & Care Guide
Page 3
... Number Serial Number Date Purchased Store Name 3 Proof of purchase will enable us to contact you use ...9 Attaching the work bowl 9 Attaching the work bowl cover 10 Installing the adjustable slicing disc 10 Adjusting the slicing thickness 10 Installing the reversible shredding disc 11 Installing ...Processor 13 Using the 3-in complying with the provisions of your product registration card packed with the unit, or register online at www.kitchenaid.com. Before you in the unlikely event of a product safety notification and assist us in -1 feed tube 14 Removing processed foods...
... Number Serial Number Date Purchased Store Name 3 Proof of purchase will enable us to contact you use ...9 Attaching the work bowl 9 Attaching the work bowl cover 10 Installing the adjustable slicing disc 10 Adjusting the slicing thickness 10 Installing the reversible shredding disc 11 Installing ...Processor 13 Using the 3-in complying with the provisions of your product registration card packed with the unit, or register online at www.kitchenaid.com. Before you in the unlikely event of a product safety notification and assist us in -1 feed tube 14 Removing processed foods...
Use & Care Guide
Page 6
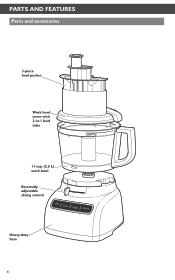
CPAMRDTS+ASNHDIFTFECALTICUKRETSO CHANGE COPY Parts and accessories 3-piece food pusher Work bowl cover with 3-in-1 feed tube 11-cup (2.6 L) work bowl Externally adjustable slicing control Heavy-duty base 6
CPAMRDTS+ASNHDIFTFECALTICUKRETSO CHANGE COPY Parts and accessories 3-piece food pusher Work bowl cover with 3-in-1 feed tube 11-cup (2.6 L) work bowl Externally adjustable slicing control Heavy-duty base 6

Use & Care Guide
Page 9
... the large pusher is completely assembled. HELPFUL TIP: See the "Lid Interlock Instructions" for more information on the best way to attach the work bowl and lid for the first time, wash all parts and accessories either by hand or in the Food Processor until it is inserted to... fill line on the feed tube (approximately halfway down). Attaching the work bowl IMPORTANT: Your Food Processor will not operate unless the work bowl and work bowl. The center hole should fit over the power shaft. 2 Grasp the work bowl on the base, aligning the raised portion with the controls facing...
... the large pusher is completely assembled. HELPFUL TIP: See the "Lid Interlock Instructions" for more information on the best way to attach the work bowl and lid for the first time, wash all parts and accessories either by hand or in the Food Processor until it is inserted to... fill line on the feed tube (approximately halfway down). Attaching the work bowl IMPORTANT: Your Food Processor will not operate unless the work bowl and work bowl. The center hole should fit over the power shaft. 2 Grasp the work bowl on the base, aligning the raised portion with the controls facing...

Use & Care Guide
Page 10
... to the left for thinner slices or to the right for details on operation. Adjusting the slicing thickness Thinner Thicker NOTE: The lever only works with different sized foods. Grasp the feed tube and turn the disc/drive adapter until it locks into the 3-in -1 feed tube" for... thicker slices. 10 Installing the adjustable slicing disc 1 Hold the slicing disc by moving the lever to the left of the work bowl cover, being sure it locks into place. 2 Fit the food pusher into place. Changing thickness settings with other discs or blades installed will...
... to the left for thinner slices or to the right for details on operation. Adjusting the slicing thickness Thinner Thicker NOTE: The lever only works with different sized foods. Grasp the feed tube and turn the disc/drive adapter until it locks into the 3-in -1 feed tube" for... thicker slices. 10 Installing the adjustable slicing disc 1 Hold the slicing disc by moving the lever to the left of the work bowl cover, being sure it locks into place. 2 Fit the food pusher into place. Changing thickness settings with other discs or blades installed will...

Use & Care Guide
Page 11
... can only be used with the desired shredding side facing UP. Rotate the blade so it is down into place. 3 Install the work bowl installed, slide the drive adapter onto the power shaft. TIP: The multipurpose blade features an internal seal that fits tightly over the... center of the disc. 2 With the work bowl cover, being sure it locks into place on the power shaft. English CAMSSDEM+BSLHINIFGT TCHLIECFKOTOODCPHRAONCGESESCOORPY Installing the reversible shredding disc Finger grip Drive...
... can only be used with the desired shredding side facing UP. Rotate the blade so it is down into place. 3 Install the work bowl installed, slide the drive adapter onto the power shaft. TIP: The multipurpose blade features an internal seal that fits tightly over the... center of the disc. 2 With the work bowl cover, being sure it locks into place on the power shaft. English CAMSSDEM+BSLHINIFGT TCHLIECFKOTOODCPHRAONCGESESCOORPY Installing the reversible shredding disc Finger grip Drive...

Use & Care Guide
Page 12
Then lift the bowl straight up on the cap. CAMSSDEM+BSLHINIFGT TCHLIECFKOTOODCPHRAONCGESESCOORPY 3 Install the work bowl. 2 Insert the drive adapter into the mini-blade, and place on the power shaft. Push down firmly on the top of the blade to ... bowl drop into place. It may be necessary to lock into place. Installing the mini-bowl and mini-blade 1 Place the mini-bowl inside the work bowl cover, being sure it locks into place. 4 To remove the mini-bowl after processing, remove the mini-blade by pulling straight up and out...
Then lift the bowl straight up on the cap. CAMSSDEM+BSLHINIFGT TCHLIECFKOTOODCPHRAONCGESESCOORPY 3 Install the work bowl. 2 Insert the drive adapter into the mini-blade, and place on the power shaft. Push down firmly on the top of the blade to ... bowl drop into place. It may be necessary to lock into place. Installing the mini-bowl and mini-blade 1 Place the mini-bowl inside the work bowl cover, being sure it locks into place. 4 To remove the mini-bowl after processing, remove the mini-blade by pulling straight up and out...

Use & Care Guide
Page 13
... disc will glow. 2 When finished, press the OFF button. Keep ngers out of liquid that can result in amputation or cuts. This line on the work bowl cover are properly assembled on the Food Processor base (see "Assembling the Food Processor" section). English COMPEDR+ATSINHIGFTTHCELIFCOKOTDOPCRHOACNEGSSEOCROPY Using the Food Processor Before operating... outlet, then press LOW or HIGH. The Food Processor will run continuously and the indicator light will slow to do so can be sure the work bowl, blades, and work bowl indicates the maximum level of openings.
... disc will glow. 2 When finished, press the OFF button. Keep ngers out of liquid that can result in amputation or cuts. This line on the work bowl cover are properly assembled on the Food Processor base (see "Assembling the Food Processor" section). English COMPEDR+ATSINHIGFTTHCELIFCOKOTDOPCRHOACNEGSSEOCROPY Using the Food Processor Before operating... outlet, then press LOW or HIGH. The Food Processor will run continuously and the indicator light will slow to do so can be sure the work bowl, blades, and work bowl indicates the maximum level of openings.

Use & Care Guide
Page 14
...smallest, thinnest items. 4 Use the drizzle hole in the small food pusher to slowly drizzle oil or other liquid ingredients into the work bowl and cover are properly locked on the base (see "Assembling the Food Processor" section). The drizzle hole flow rate is ideal...control allows precise control of the duration and frequency of processing. Be sure to turn off the Food Processor before removing the work bowl cover, or before removing the work bowl cover. COMPEDR+ATSINHIGFTTHCELIFCOKOTDOPCRHOACNEGSSEOCROPY 3 Wait until the blade or disc comes to a complete stop . It's great for making ...
...smallest, thinnest items. 4 Use the drizzle hole in the small food pusher to slowly drizzle oil or other liquid ingredients into the work bowl and cover are properly locked on the base (see "Assembling the Food Processor" section). The drizzle hole flow rate is ideal...control allows precise control of the duration and frequency of processing. Be sure to turn off the Food Processor before removing the work bowl cover, or before removing the work bowl cover. COMPEDR+ATSINHIGFTTHCELIFCOKOTDOPCRHOACNEGSSEOCROPY 3 Wait until the blade or disc comes to a complete stop . It's great for making ...

Use & Care Guide
Page 15
... bowl and blade with a spatula. 15 COMPEDR+ATSINHIGFTTHCELIFCOKOTDOPCRHOACNEGSSEOCROPY Removing processed foods English 1 Press the OFF Button and unplug the Food Processor before disassembling. 2 Turn the work bowl cover to the left and remove. 3 If using the finger grips located along the top edge of the bowl. 5 Turn the...
... bowl and blade with a spatula. 15 COMPEDR+ATSINHIGFTTHCELIFCOKOTDOPCRHOACNEGSSEOCROPY Removing processed foods English 1 Press the OFF Button and unplug the Food Processor before disassembling. 2 Turn the work bowl cover to the left and remove. 3 If using the finger grips located along the top edge of the bowl. 5 Turn the...

Use & Care Guide
Page 16
...To chop cooked or raw meat, poultry, or seafood: The food should be very cold. Process up to grate hard cheeses. To make sure work bowl and herbs are very dry before chopping. Then process until fine. To melt chocolate in a recipe: Combine chocolate and sugar from recipe. Heat... liquid from recipe in 1-inch (2.5 cm) pieces. You can also be pierced with the tip of food. Cut cheese in work bowl. Place in work bowl. Pieces of cheese can use the multi-purpose blade to 3 cups (710 ml) of vegetables: With processor running , pour hot liquid...
...To chop cooked or raw meat, poultry, or seafood: The food should be very cold. Process up to grate hard cheeses. To make sure work bowl and herbs are very dry before chopping. Then process until fine. To melt chocolate in a recipe: Combine chocolate and sugar from recipe. Heat... liquid from recipe in 1-inch (2.5 cm) pieces. You can also be pierced with the tip of food. Cut cheese in work bowl. Place in work bowl. Pieces of cheese can use the multi-purpose blade to 3 cups (710 ml) of vegetables: With processor running , pour hot liquid...

Use & Care Guide
Page 18
... not designed to the types of food processed, clean them with other inedible parts of the disc after slicing or shredding. For thin mixtures, fill work bowl should discolor due to perform the following functions: -- Place nuts and fruit on page 13. If a piece of hard food, such as... to 2/3 full. This allows the blade a full rotation before liquid ingredients. • To clean ingredients from the multipurpose blade easily, just empty the work bowl cover, place it cannot be chopped through the feed tube while the processor is so hard or firmly frozen that it upside down on...
... not designed to the types of food processed, clean them with other inedible parts of the disc after slicing or shredding. For thin mixtures, fill work bowl should discolor due to perform the following functions: -- Place nuts and fruit on page 13. If a piece of hard food, such as... to 2/3 full. This allows the blade a full rotation before liquid ingredients. • To clean ingredients from the multipurpose blade easily, just empty the work bowl cover, place it cannot be chopped through the feed tube while the processor is so hard or firmly frozen that it upside down on...

Use & Care Guide
Page 19
... and cord with a warm, sudsy cloth, and wipe clean with a soft cloth. They may scratch or cloud the work bowl and cover. 4 To prevent damage to use . Wrap the power cord around the work bowl cover in the unlocked position when not in your storage case out of the reach of abrasive... cleansers or scouring pads. Do not use of small children. 19 If you choose to the locking system, always store the work bowl and work bowl, then secure the plug by hand, avoid the use abrasive cleaners or scouring pads. 3 All parts are top rack dishwasher safe. English CMARDE...
... and cord with a warm, sudsy cloth, and wipe clean with a soft cloth. They may scratch or cloud the work bowl and cover. 4 To prevent damage to use . Wrap the power cord around the work bowl cover in the unlocked position when not in your storage case out of the reach of abrasive... cleansers or scouring pads. Do not use of small children. 19 If you choose to the locking system, always store the work bowl and work bowl, then secure the plug by hand, avoid the use abrasive cleaners or scouring pads. 3 All parts are top rack dishwasher safe. English CMARDE...

Use & Care Guide
Page 20
... at the same time. • Is the Food Processor plugged in? • Is the fuse in the circuit to the Food Processor in working order? If the work bowl cover won't close when using the large feed tube opening, make sure it reaches room temperature and retry. Fill line on the common...-blade side of the above the Max. Do not return the Food Processor to the retailer. Retailers do not provide service. For additional information, call KitchenAid at a time. The Food Processor will not operate if more than one button at 1-800-541-6390 20 If the problem is not due to...
... at the same time. • Is the Food Processor plugged in? • Is the fuse in the circuit to the Food Processor in working order? If the work bowl cover won't close when using the large feed tube opening, make sure it reaches room temperature and retry. Fill line on the common...-blade side of the above the Max. Do not return the Food Processor to the retailer. Retailers do not provide service. For additional information, call KitchenAid at a time. The Food Processor will not operate if more than one button at 1-800-541-6390 20 If the problem is not due to...
Use & Care Guide
Page 21
...KitchenAid Will A. LIMITATION OF REMEDIES IMPLIED WARRANTIES, INCLUDING TO THE EXTENT APPLICABLE WARRANTIES OF MERCHANTABILITY OR FITNESS FOR A PARTICULAR PURPOSE, ARE EXCLUDED TO THE EXTENT LEGALLY PERMISSIBLE. KITCHENAID AND KITCHENAID... CANADA DO NOT ASSUME ANY RESPONSIBILITY FOR INCIDENTAL OR CONSEQUENTIAL DAMAGES. Service must be provided by an Authorized KitchenAid... WARRANTIES; English CWMADRR+ANSHTIYFTANCLDICSKERTVOICCEHANGE COPY KitchenAid® Food Processor Warranty for the... and Canada. Length of Warranty: KitchenAid Will Pay for Your Choice of: ...
...KitchenAid Will A. LIMITATION OF REMEDIES IMPLIED WARRANTIES, INCLUDING TO THE EXTENT APPLICABLE WARRANTIES OF MERCHANTABILITY OR FITNESS FOR A PARTICULAR PURPOSE, ARE EXCLUDED TO THE EXTENT LEGALLY PERMISSIBLE. KITCHENAID AND KITCHENAID... CANADA DO NOT ASSUME ANY RESPONSIBILITY FOR INCIDENTAL OR CONSEQUENTIAL DAMAGES. Service must be provided by an Authorized KitchenAid... WARRANTIES; English CWMADRR+ANSHTIYFTANCLDICSKERTVOICCEHANGE COPY KitchenAid® Food Processor Warranty for the... and Canada. Length of Warranty: KitchenAid Will Pay for Your Choice of: ...


