Owners Manual
Page 2
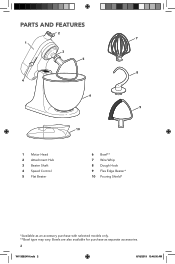
PARTS AND FEATURES 2 7 1 3 5 8 4 6 9 10 1 Motor Head 2 Attachment Hub 3 Beater Shaft 4 Speed Control 5 Flat Beater 6 Bowl** 7 Wire Whip 8 Dough Hook 9 Flex Edge Beater* 10 Pouring Shield* *Available as separate accessories. 2 W11358241A.indb 2 6/18/2019 10:46:00 AM Bowls are also available for purchase as an accessory purchase with selected models only. **Bowl type may vary.
PARTS AND FEATURES 2 7 1 3 5 8 4 6 9 10 1 Motor Head 2 Attachment Hub 3 Beater Shaft 4 Speed Control 5 Flat Beater 6 Bowl** 7 Wire Whip 8 Dough Hook 9 Flex Edge Beater* 10 Pouring Shield* *Available as separate accessories. 2 W11358241A.indb 2 6/18/2019 10:46:00 AM Bowls are also available for purchase as an accessory purchase with selected models only. **Bowl type may vary.

Owners Manual
Page 3
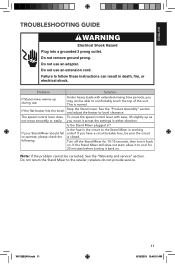
... they are closely supervised and instructed concerning use of table or counter. 10. Turn the appliance OFF, then unplug from the Stand Mixer before cleaning. Never pull from the outlet. Keep hands, hair, and clothing, as well as spatulas and other liquid. 3. Do not use the Stand Mixer outdoors. 9. Avoid contacting moving parts. Remove the beaters, wire whip, or dough hook from the outlet when not...
... they are closely supervised and instructed concerning use of table or counter. 10. Turn the appliance OFF, then unplug from the Stand Mixer before cleaning. Never pull from the outlet. Keep hands, hair, and clothing, as well as spatulas and other liquid. 3. Do not use the Stand Mixer outdoors. 9. Avoid contacting moving parts. Remove the beaters, wire whip, or dough hook from the outlet when not...

Owners Manual
Page 4
... steel bowl (no handle), flat beater, wire whip, dough hook Polished stainless steel bowl with handle, flat beater, wire whip, dough hook Polished stainless steel bowl with handle, Flex Edge beater, wire whip, dough hook CHOOSING THE RIGHT ACCESSORY Accessory Use to mix Flat beater (5) Normal to heavy Flex Edge Beater* (9) mixtures Wire Whip (7) Mixtures that draws the greatest load (power). Do not use an extension cord. If the power supply cord is printed on the attachment that need air incorporated Dough Hook (8) Mixing and kneading yeast doughs Description Cakes, creamed...
... steel bowl (no handle), flat beater, wire whip, dough hook Polished stainless steel bowl with handle, flat beater, wire whip, dough hook Polished stainless steel bowl with handle, Flex Edge beater, wire whip, dough hook CHOOSING THE RIGHT ACCESSORY Accessory Use to mix Flat beater (5) Normal to heavy Flex Edge Beater* (9) mixtures Wire Whip (7) Mixtures that draws the greatest load (power). Do not use an extension cord. If the power supply cord is printed on the attachment that need air incorporated Dough Hook (8) Mixing and kneading yeast doughs Description Cakes, creamed...
Owners Manual
Page 5
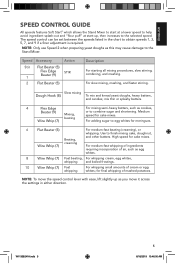
... batters. 4 Flex Edge Beater (9) Mixing, beating Wire Whip (7) For mixing semi-heavy batters, such as egg whites. 8 Wire Whip (7) Fast beating, For whipping cream, egg whites, whipping and boiled frostings. 10 Wire Whip (7) Fast For whipping small amounts of cream or egg whipping whites; for cake mixes. Use to the Stand Mixer. W11358241A.indb 5 5 6/18/2019 10:46:00 AM The speed control can be set between the speeds listed in either direction. Speed Accessory Stir Flat Beater (5) Flex Edge Beater (9) 1 2 Flat Beater (5) Action STIR Description For...
... batters. 4 Flex Edge Beater (9) Mixing, beating Wire Whip (7) For mixing semi-heavy batters, such as egg whites. 8 Wire Whip (7) Fast beating, For whipping cream, egg whites, whipping and boiled frostings. 10 Wire Whip (7) Fast For whipping small amounts of cream or egg whipping whites; for cake mixes. Use to the Stand Mixer. W11358241A.indb 5 5 6/18/2019 10:46:00 AM The speed control can be set between the speeds listed in either direction. Speed Accessory Stir Flat Beater (5) Flex Edge Beater (9) 1 2 Flat Beater (5) Action STIR Description For...
Owners Manual
Page 6
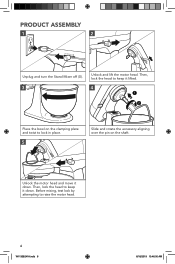
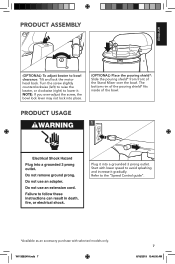
Unlock the motor head and move it down . Then, lock the head to keep it lifted. 4 1 2 Place the bowl on the clamping plate and twist to lock in place. 5 Slide and rotate the accessory aligning over the pin on the shaft. Before mixing, test lock by attempting to keep it down . Then, lock the head to raise the motor head. 6 W11358241A.indb 6 6/18/2019 10:46:00 AM PRODUCT ASSEMBLY 1 2 Unplug and turn the Stand Mixer off (0). 3 Unlock and lift the motor head.
Unlock the motor head and move it down . Then, lock the head to keep it lifted. 4 1 2 Place the bowl on the clamping plate and twist to lock in place. 5 Slide and rotate the accessory aligning over the pin on the shaft. Before mixing, test lock by attempting to keep it down . Then, lock the head to raise the motor head. 6 W11358241A.indb 6 6/18/2019 10:46:00 AM PRODUCT ASSEMBLY 1 2 Unplug and turn the Stand Mixer off (0). 3 Unlock and lift the motor head.
Owners Manual
Page 7
NOTE: If you over-adjust the screw, the bowl lock lever may not lock into a grounded 3 prong outlet. Refer to bowl clearance: Tilt and lock the motor head back. The bottom rim of the pouring shield* fits inside of the Stand Mixer over the bowl. ENGLISH PRODUCT ASSEMBLY (OPTIONAL) To adjust beater to the "Speed Control guide". *Available as an accessory purchase with lower speed to lower it. Start with selected models only. W11358241A.indb 7 7 6/18/2019 10...
NOTE: If you over-adjust the screw, the bowl lock lever may not lock into a grounded 3 prong outlet. Refer to bowl clearance: Tilt and lock the motor head back. The bottom rim of the pouring shield* fits inside of the Stand Mixer over the bowl. ENGLISH PRODUCT ASSEMBLY (OPTIONAL) To adjust beater to the "Speed Control guide". *Available as an accessory purchase with lower speed to lower it. Start with selected models only. W11358241A.indb 7 7 6/18/2019 10...
Owners Manual
Page 8
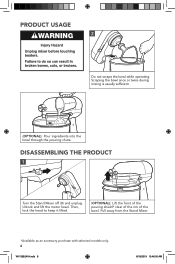
Scraping the bowl once or twice during mixing is usually sufficient. (OPTIONAL): Pour ingredients into the bowl through the pouring chute. Pull away from the Stand Mixer. *Available as an accessory purchase with selected models only. 8 W11358241A.indb 8 6/18/2019 10:46:00 AM DISASSEMBLING THE PRODUCT 1 Turn the Stand Mixer off (0) and unplug. Then, lock the head to keep it lifted. (OPTIONAL): Lift the front of the pouring shield* clear of the rim of the bowl. Unlock and lift the motor head. PRODUCT USAGE 2 Do not scrape the bowl while operating.
Scraping the bowl once or twice during mixing is usually sufficient. (OPTIONAL): Pour ingredients into the bowl through the pouring chute. Pull away from the Stand Mixer. *Available as an accessory purchase with selected models only. 8 W11358241A.indb 8 6/18/2019 10:46:00 AM DISASSEMBLING THE PRODUCT 1 Turn the Stand Mixer off (0) and unplug. Then, lock the head to keep it lifted. (OPTIONAL): Lift the front of the pouring shield* clear of the rim of the bowl. Unlock and lift the motor head. PRODUCT USAGE 2 Do not scrape the bowl while operating.
Owners Manual
Page 9
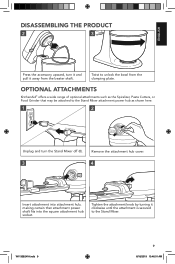
... the attachment knob by turning it away from the clamping plate. Remove the attachment hub cover. 3 4 Insert attachment into the square attachment hub socket. W11358241A.indb 9 9 6/18/2019 10:46:01 AM ENGLISH DISASSEMBLING THE PRODUCT 2 3 Press the accessory upward, turn the Stand Mixer off (0). OPTIONAL ATTACHMENTS KitchenAid® offers a wide range of optional attachments such as the Spiralizer, Pasta Cutters, or Food Grinder that attachment power shaft fits into attachment hub, making certain that may be attached to the Stand Mixer attachment power hub as...
... the attachment knob by turning it away from the clamping plate. Remove the attachment hub cover. 3 4 Insert attachment into the square attachment hub socket. W11358241A.indb 9 9 6/18/2019 10:46:01 AM ENGLISH DISASSEMBLING THE PRODUCT 2 3 Press the accessory upward, turn the Stand Mixer off (0). OPTIONAL ATTACHMENTS KitchenAid® offers a wide range of optional attachments such as the Spiralizer, Pasta Cutters, or Food Grinder that attachment power shaft fits into attachment hub, making certain that may be attached to the Stand Mixer attachment power hub as...
Owners Manual
Page 10
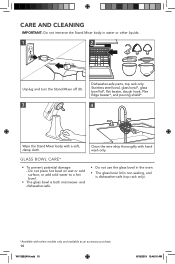
... models only and available as an accessory purchase. 10 W11358241A.indb 10 6/18/2019 10:46:01 AM Clean the wire whip thoroughly with a soft, damp cloth. and dishwasher-safe. • Do not use the glass bowl in water or other liquids. 1 2 Unplug and turn the Stand Mixer off (0). 3 Dishwasher-safe parts, top rack only: Stainless steel bowl, glass bowl*, glass bowl lid*, flat beater, dough hook, Flex Edge beater*, and pouring shield*. 4 Wipe the Stand Mixer...
... models only and available as an accessory purchase. 10 W11358241A.indb 10 6/18/2019 10:46:01 AM Clean the wire whip thoroughly with a soft, damp cloth. and dishwasher-safe. • Do not use the glass bowl in water or other liquids. 1 2 Unplug and turn the Stand Mixer off (0). 3 Dishwasher-safe parts, top rack only: Stainless steel bowl, glass bowl*, glass bowl lid*, flat beater, dough hook, Flex Edge beater*, and pouring shield*. 4 Wipe the Stand Mixer...
Owners Manual
Page 11
... be corrected, See the "Warranty and service" section. Do not return the Stand Mixer to bowl clearance. Do not use an adapter. Turn off the Stand Mixer for 30 minutes before turning it back on . The speed control lever does To move it across the settings in ? Is the Stand Mixer plugged in either direction. See the "Product Assembly" section and adjust the beater to the retailer; Do not use an extension cord.
... be corrected, See the "Warranty and service" section. Do not return the Stand Mixer to bowl clearance. Do not use an adapter. Turn off the Stand Mixer for 30 minutes before turning it back on . The speed control lever does To move it across the settings in ? Is the Stand Mixer plugged in either direction. See the "Product Assembly" section and adjust the beater to the retailer; Do not use an extension cord.
Owners Manual
Page 12
... This warranty extends to the purchaser and any succeeding owner for Stand Mixers operated in materials and workmanship. Hassle-Free Replacement of Columbia, Puerto Rico, and Canada. See the next page for details on how to arrange for Stand Mixer attachments operated outside the 50 United States, District of your Stand Mixer to an Authorized Service Center. Service must be provided by an Authorized KitchenAid Service Center. Repairs...
... This warranty extends to the purchaser and any succeeding owner for Stand Mixers operated in materials and workmanship. Hassle-Free Replacement of Columbia, Puerto Rico, and Canada. See the next page for details on how to arrange for Stand Mixer attachments operated outside the 50 United States, District of your Stand Mixer to an Authorized Service Center. Service must be provided by an Authorized KitchenAid Service Center. Repairs...
Owners Manual
Page 13
... KitchenAid that , if your Stand Mixer should fail within the first year of ownership, KitchenAid will arrange to deliver an identical or comparable replacement to your door free of charge and arrange to have your original sales receipt available when you call . Proof of purchase will also be required to obtain service. ARRANGING FOR SERVICE AFTER THE WARRANTY EXPIRES, OR ORDERING ACCESSORIES AND REPLACEMENT PARTS...
... KitchenAid that , if your Stand Mixer should fail within the first year of ownership, KitchenAid will arrange to deliver an identical or comparable replacement to your door free of charge and arrange to have your original sales receipt available when you call . Proof of purchase will also be required to obtain service. ARRANGING FOR SERVICE AFTER THE WARRANTY EXPIRES, OR ORDERING ACCESSORIES AND REPLACEMENT PARTS...


