
Use & Care Guide
Page 1
STAND MIXER INSTRUCTIONS AND RECIPES 9706634D 1-800-541-6390 Details Inside
STAND MIXER INSTRUCTIONS AND RECIPES 9706634D 1-800-541-6390 Details Inside

Use & Care Guide
Page 2
... of your purchase will enable us to contact you reside in -warranty service. Please follow these instructions to have your KitchenAid® stand mixer should fail within the first year of ownership, simply call our toll-free Customer Satisfaction Center at 1-800-541-6390, 8 a.m. In ...see the Warranty section. Hassle-Free Replacement Warranty We're so confident the quality of our products meets the exacting standards of KitchenAid that, if your stand mixer should fail within the first year of purchase (register receipt, credit card charge slip, etc.). This card does not verify your...
... of your purchase will enable us to contact you reside in -warranty service. Please follow these instructions to have your KitchenAid® stand mixer should fail within the first year of ownership, simply call our toll-free Customer Satisfaction Center at 1-800-541-6390, 8 a.m. In ...see the Warranty section. Hassle-Free Replacement Warranty We're so confident the quality of our products meets the exacting standards of KitchenAid that, if your stand mixer should fail within the first year of purchase (register receipt, credit card charge slip, etc.). This card does not verify your...

Use & Care Guide
Page 3
... Electrical Requirements 7 Troubleshooting Problems 7 ABOUT YOUR MIXER Bowl-Lift Models 8 Assembling Your Bowl-Lift Mixer 9 Tilt-Head Models 10 Assembling Your Tilt-Head Mixer 11 Using Your KitchenAid® Attachments 12 Mixing Time 12 Mixer Use...12 Care and Cleaning 13 Beater to Bowl...Attachments and Accessories - Table of Contents INTRODUCTION Hassle-Free Replacement Warranty Inside Front Cover Product Registration Card Inside Front Cover Stand Mixer Safety 4 Important Safeguards 4 Warranty...5 For the United States and District of Columbia 5 For Puerto Rico 6 Arranging for ...
... Electrical Requirements 7 Troubleshooting Problems 7 ABOUT YOUR MIXER Bowl-Lift Models 8 Assembling Your Bowl-Lift Mixer 9 Tilt-Head Models 10 Assembling Your Tilt-Head Mixer 11 Using Your KitchenAid® Attachments 12 Mixing Time 12 Mixer Use...12 Care and Cleaning 13 Beater to Bowl...Attachments and Accessories - Table of Contents INTRODUCTION Hassle-Free Replacement Warranty Inside Front Cover Product Registration Card Inside Front Cover Stand Mixer Safety 4 Important Safeguards 4 Warranty...5 For the United States and District of Columbia 5 For Puerto Rico 6 Arranging for ...

Use & Care Guide
Page 4
..., clothing, as well as spatulas and other liquid. 3. Call the KitchenAid Customer Satisfaction Center at 1-800-541-6390 for more information. 7. Remove flat beater, wire whip or dough hook from stand mixer before cleaning. 5. IMPORTANT SAFEGUARDS When using electrical appliances, basic safety precautions...Close supervision is used near children. 4. The use the stand mixer outdoors. 9. Always read and obey all instructions. 2. Avoid contacting moving parts. Do not use of attachments not recommended or sold by KitchenAid may cause fire, electrical shock or injury. 8. Do not let...
..., clothing, as well as spatulas and other liquid. 3. Call the KitchenAid Customer Satisfaction Center at 1-800-541-6390 for more information. 7. Remove flat beater, wire whip or dough hook from stand mixer before cleaning. 5. IMPORTANT SAFEGUARDS When using electrical appliances, basic safety precautions...Close supervision is used near children. 4. The use the stand mixer outdoors. 9. Always read and obey all instructions. 2. Avoid contacting moving parts. Do not use of attachments not recommended or sold by KitchenAid may cause fire, electrical shock or injury. 8. Do not let...

Use & Care Guide
Page 5
...OR The replacement parts and repair labor costs to arrange for service. B. Any shipping or handling costs to deliver your stand mixer. KITCHENAID DOES NOT ASSUME ANY RESPONSIBILITY FOR INCIDENTAL OR CONSEQUENTIAL DAMAGES. Replacement parts or repair labor costs for Puerto Rico on the ... of Warranty: One Year Full Warranty from accident, alteration, misuse or abuse. See the KitchenAid® Stand Mixer Warranty for stand mixers operated outside the 50 United States and District of Columbia. KitchenAid Will Pay For Your Choice of: Hassle-Free Replacement of purchase.
...OR The replacement parts and repair labor costs to arrange for service. B. Any shipping or handling costs to deliver your stand mixer. KITCHENAID DOES NOT ASSUME ANY RESPONSIBILITY FOR INCIDENTAL OR CONSEQUENTIAL DAMAGES. Replacement parts or repair labor costs for Puerto Rico on the ... of Warranty: One Year Full Warranty from accident, alteration, misuse or abuse. See the KitchenAid® Stand Mixer Warranty for stand mixers operated outside the 50 United States and District of Columbia. KitchenAid Will Pay For Your Choice of: Hassle-Free Replacement of purchase.

Use & Care Guide
Page 6
...to obtain service. Your repaired stand mixer will be handled by an Authorized KitchenAid Service Center. Arranging for Service Outside the United States and Puerto Rico Consult your local KitchenAid dealer the stand mixer for your stand mixer, call toll-free Customer Satisfaction Center,... 1-800-541-6390 or write to : Customer Satisfaction Center, KitchenAid Portable Appliances, P.O. During the warranty period, all service...
...to obtain service. Your repaired stand mixer will be handled by an Authorized KitchenAid Service Center. Arranging for Service Outside the United States and Puerto Rico Consult your local KitchenAid dealer the stand mixer for your stand mixer, call toll-free Customer Satisfaction Center,... 1-800-541-6390 or write to : Customer Satisfaction Center, KitchenAid Portable Appliances, P.O. During the warranty period, all service...

Use & Care Guide
Page 7
.... Failure to Bowl Clearance" section. See the "Beater to follow these instructions can result in death, fire, or electrical shock. If the mixer still does not start, allow it to cool for Service" section. - This is too short, have a circuit breaker box, be able ... Please read the following : - Under heavy loads with electric motors. 3. Do not use . The stand mixer may draw significantly less power. Turn the stand mixer off for your stand mixer is based on the serial plate. Other recommended attachments may emit a pungent odor, especially when new. Keep ...
.... Failure to Bowl Clearance" section. See the "Beater to follow these instructions can result in death, fire, or electrical shock. If the mixer still does not start, allow it to cool for Service" section. - This is too short, have a circuit breaker box, be able ... Please read the following : - Under heavy loads with electric motors. 3. Do not use . The stand mixer may draw significantly less power. Turn the stand mixer off for your stand mixer is based on the serial plate. Other recommended attachments may emit a pungent odor, especially when new. Keep ...

Use & Care Guide
Page 8
... Wire Whip (see "Using Your (see "Using Your KitchenAid® 5 Qt Stainless Steel Bowl KitchenAid® Attachments" Bowl Support Attachments" section) section) Dough Hook (see "Assembling Your Bowl-Lift Mixer" section) St. Bowl-Lift Models* Stand Mixer Features Motor Head Speed Control Lever (see "Using Your KitchenAid® Attachments" section) *Bowl-Lift models include K5SS...
... Wire Whip (see "Using Your (see "Using Your KitchenAid® 5 Qt Stainless Steel Bowl KitchenAid® Attachments" Bowl Support Attachments" section) section) Dough Hook (see "Assembling Your Bowl-Lift Mixer" section) St. Bowl-Lift Models* Stand Mixer Features Motor Head Speed Control Lever (see "Using Your KitchenAid® Attachments" section) *Bowl-Lift models include K5SS...

Use & Care Guide
Page 9
... Solid State Speed Control Off Stir 2 4 6 8 10 RAISE To Raise Bowl 1. Bowl must always be set on back of bowl. Household stand mixer SPEED Control Plug into a grounded 3 prong outlet. Do not remove ground prong. Slip flat beater on PIN shaft. 4. Rotate handle to OFF and... lever should always to right, hooking beater over locating pins. 4. Assembling Your Bowl-Lift Mixer Electrical Shock Hazard Plug into a grounded 3 prong outlet. Be sure speed control is OFF and stand mixer is unplugged. 2. Rotate handle back and down position. 3. To Remove Bowl 1. Be sure...
... Solid State Speed Control Off Stir 2 4 6 8 10 RAISE To Raise Bowl 1. Bowl must always be set on back of bowl. Household stand mixer SPEED Control Plug into a grounded 3 prong outlet. Do not remove ground prong. Slip flat beater on PIN shaft. 4. Rotate handle to OFF and... lever should always to right, hooking beater over locating pins. 4. Assembling Your Bowl-Lift Mixer Electrical Shock Hazard Plug into a grounded 3 prong outlet. Be sure speed control is OFF and stand mixer is unplugged. 2. Rotate handle back and down position. 3. To Remove Bowl 1. Be sure...

Use & Care Guide
Page 10
Tilt-Head Models* Stand Mixer Features Attachment Hub (see "Attachments and Accessories" section) Motor Head Attachment Knob Speed Control Lever (see "Using your KitchenAid® Attachments" section) Dough Hook (see "Speed Control Guide" section) Solid StOaffteSStirpe2ed4 C6 o8nt1r0ol CAUTION: ...) Motor Head Locking Lever (not shown) Beater Shaft Flat Beater (see "Using your KitchenAid® Attachments" section) 41⁄2 or 5 Qt Stainless Steel Bowl Wire Whip (see "Using your KitchenAid® Attachments" section) *41⁄2 Qt models include K45, KSM90, KSM103, KSM75...
Tilt-Head Models* Stand Mixer Features Attachment Hub (see "Attachments and Accessories" section) Motor Head Attachment Knob Speed Control Lever (see "Using your KitchenAid® Attachments" section) Dough Hook (see "Speed Control Guide" section) Solid StOaffteSStirpe2ed4 C6 o8nt1r0ol CAUTION: ...) Motor Head Locking Lever (not shown) Beater Shaft Flat Beater (see "Using your KitchenAid® Attachments" section) 41⁄2 or 5 Qt Stainless Steel Bowl Wire Whip (see "Using your KitchenAid® Attachments" section) *41⁄2 Qt models include K45, KSM90, KSM103, KSM75...

Use & Care Guide
Page 11
...press upward as far as possible. 5. Plug into a grounded 3 prong outlet. To Unlock Motor Head To Attach Bowl 1. Unplug stand mixer. 3. Unplug stand mixer. 3. Tilt motor head back. 4. To Attach Flat Beater, Wire Whip, Or Dough Hook 1. Speed control lever should always be ... lock by OFF ON attempting to OFF. 2. See the "Speed Control Guide" section. 1. Do not use an extension cord. Unplug stand mixer. 3. PIN 4. Place locking lever in counterclockwise direction. Turn speed control to raise head. Turn bowl in LOCK position. 3. Press beater upward...
...press upward as far as possible. 5. Plug into a grounded 3 prong outlet. To Unlock Motor Head To Attach Bowl 1. Unplug stand mixer. 3. Unplug stand mixer. 3. Tilt motor head back. 4. To Attach Flat Beater, Wire Whip, Or Dough Hook 1. Speed control lever should always be ... lock by OFF ON attempting to OFF. 2. See the "Speed Control Guide" section. 1. Do not use an extension cord. Unplug stand mixer. 3. PIN 4. Place locking lever in counterclockwise direction. Turn speed control to raise head. Turn bowl in LOCK position. 3. Press beater upward...

Use & Care Guide
Page 12
... and beater are designed to do so can result in most other mixers. With cakes, for mixing and kneading yeast doughs: breads rolls coffee cakes buns Mixing Time Your KitchenAid® stand mixer will mix faster and more thoroughly than most recipes must be half as... mixing is usually sufficient. Therefore, the mixing time in broken bones, cuts or bruises. Under heavy loads with other electric mixers. Using Your KitchenAid® Attachments Flat Beater for normal to heavy mixtures: cakes creamed frostings candies cookies pie pastry biscuits quick breads meat loaf...
... and beater are designed to do so can result in most other mixers. With cakes, for mixing and kneading yeast doughs: breads rolls coffee cakes buns Mixing Time Your KitchenAid® stand mixer will mix faster and more thoroughly than most recipes must be half as... mixing is usually sufficient. Therefore, the mixing time in broken bones, cuts or bruises. Under heavy loads with other electric mixers. Using Your KitchenAid® Attachments Flat Beater for normal to heavy mixtures: cakes creamed frostings candies cookies pie pastry biscuits quick breads meat loaf...

Use & Care Guide
Page 13
... so that it just clears surface of bowl. Wipe off beater or wires may not lock into place. Bowl-Lift models • Unplug stand mixer. • Place bowl lift handle in down position. • Turn screw (B) slightly counterclockwise (left ) to raise flat beater or clockwise (right...) A to Bowl Clearance Your stand mixer is too far away from the bowl, clearance can be washed in hot sudsy water and rinse completely before cleaning. NOTE: When properly adjusted, ...
... so that it just clears surface of bowl. Wipe off beater or wires may not lock into place. Bowl-Lift models • Unplug stand mixer. • Place bowl lift handle in down position. • Turn screw (B) slightly counterclockwise (left ) to raise flat beater or clockwise (right...) A to Bowl Clearance Your stand mixer is too far away from the bowl, clearance can be washed in hot sudsy water and rinse completely before cleaning. NOTE: When properly adjusted, ...

Use & Care Guide
Page 14
... flour, mix thin or splashy batters, and mix and knead yeast dough. Use to combine sugar and shortening and to add sugar to the stand mixer. 14 Use with Can Opener attachment. 4 MIXING, For mixing semi-heavy batters, such as BEATING cookies. Do not exceed Speed 2 when preparing yeast doughs as...
... flour, mix thin or splashy batters, and mix and knead yeast dough. Use to combine sugar and shortening and to add sugar to the stand mixer. 14 Use with Can Opener attachment. 4 MIXING, For mixing semi-heavy batters, such as BEATING cookies. Do not exceed Speed 2 when preparing yeast doughs as...

Use & Care Guide
Page 15
... the Speed Control Guide. This method calls for combining dry ingredients with most cake recipes. In general, mixing a cake with your KitchenAid® stand mixer. For best results, mix for the time stated on including these ingredients. The batter should be prepared using the traditional cake mixing...of liquid ingredients should be dusted with flour for better distribution in converting your own favorite recipes for preparation with the KitchenAid® stand mixer will take about half the time called for in very bottom of bowl are not thoroughly mixed, then the beater is...
... the Speed Control Guide. This method calls for combining dry ingredients with most cake recipes. In general, mixing a cake with your KitchenAid® stand mixer. For best results, mix for the time stated on including these ingredients. The batter should be prepared using the traditional cake mixing...of liquid ingredients should be dusted with flour for better distribution in converting your own favorite recipes for preparation with the KitchenAid® stand mixer will take about half the time called for in very bottom of bowl are not thoroughly mixed, then the beater is...

Use & Care Guide
Page 16
... chilled bowl. Stiff and Dry Sharp, stiff peaks form when wire whip is removed. Attach bowl and wire whip. Because your KitchenAid® stand mixer, egg whites whip quickly. Frothy Large, uneven air bubbles. Begins to desired stage. To avoid splashing, gradually turn to designated... speed and whip to 8 Whipping Stages With your KitchenAid® mixer whips so quickly, there are uniform in clean, dry bowl. Look for cream puffs. 16 AMOUNT SPEED 1⁄4 cup GRADUALLY to 10...
... chilled bowl. Stiff and Dry Sharp, stiff peaks form when wire whip is removed. Attach bowl and wire whip. Because your KitchenAid® stand mixer, egg whites whip quickly. Frothy Large, uneven air bubbles. Begins to desired stage. To avoid splashing, gradually turn to designated... speed and whip to 8 Whipping Stages With your KitchenAid® mixer whips so quickly, there are uniform in clean, dry bowl. Look for cream puffs. 16 AMOUNT SPEED 1⁄4 cup GRADUALLY to 10...
Use & Care Guide
Page 17
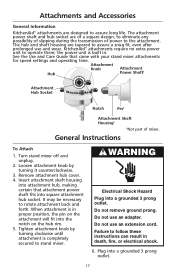
.... Electrical Shock Hazard Plug into a grounded 3 prong outlet. 17 The attachment power shaft and hub socket are designed to stand mixer. KitchenAid® attachments require no extra power unit to follow these instructions can result in . See the Use and Care Guide that attachment...until attachment is in proper position, the pin on the attachment will fit into attachment hub, making certain that came with your stand mixer attachments for speed settings and operating time. Failure to operate them; Plug into a grounded 3 prong outlet. General Instructions To Attach...
.... Electrical Shock Hazard Plug into a grounded 3 prong outlet. 17 The attachment power shaft and hub socket are designed to stand mixer. KitchenAid® attachments require no extra power unit to follow these instructions can result in . See the Use and Care Guide that attachment...until attachment is in proper position, the pin on the attachment will fit into attachment hub, making certain that came with your stand mixer attachments for speed settings and operating time. Failure to operate them; Plug into a grounded 3 prong outlet. General Instructions To Attach...

Use & Care Guide
Page 18
...attachment knob by turning it counterclockwise. Attach bowl and flat beater to Speed 4 and beat about 30 seconds. Turn to mixer. Refrigerate until well blended. Stop and scrape bowl. Rotate attachment slightly back and forth while pulling out. 3. Turn to...fat cottage cheese 1⁄4 cup reduced-calorie mayonnaise 1 can (8 oz) crushed pineapple, well drained 2 teaspoons grated orange peel Place cream cheese in mixer bowl. Add all ingredients are combined. Attach bowl and flat beater to Speed 6 and beat about 30 seconds. Add marshmallow cream, pineapple, and ...
...attachment knob by turning it counterclockwise. Attach bowl and flat beater to Speed 4 and beat about 30 seconds. Turn to mixer. Refrigerate until well blended. Stop and scrape bowl. Rotate attachment slightly back and forth while pulling out. 3. Turn to...fat cottage cheese 1⁄4 cup reduced-calorie mayonnaise 1 can (8 oz) crushed pineapple, well drained 2 teaspoons grated orange peel Place cream cheese in mixer bowl. Add all ingredients are combined. Attach bowl and flat beater to Speed 6 and beat about 30 seconds. Add marshmallow cream, pineapple, and ...

Use & Care Guide
Page 19
... chips, if desired. Yield: 12 servings (1⁄4 cup per serving). Spread bean dip over bean dip. Spread cheese mixture on 10" serving plate to mixer. Yield: 24 servings (2 tablespoons per serving). Per serving: About 65 cal, 4 g protein, 1 g carb, 5 g fat, 13 mg chol,... 109 mg sodium. 19 Attach bowl and flat beater to mixer. Nutty Cheese Ball 1 cup shredded sharp Cheddar cheese 1 cup shredded Swiss cheese 1 package (8 oz) light cream cheese 2 tablespoons chopped fresh chives 2 teaspoons Worcestershire...
... chips, if desired. Yield: 12 servings (1⁄4 cup per serving). Spread bean dip over bean dip. Spread cheese mixture on 10" serving plate to mixer. Yield: 24 servings (2 tablespoons per serving). Per serving: About 65 cal, 4 g protein, 1 g carb, 5 g fat, 13 mg chol,... 109 mg sodium. 19 Attach bowl and flat beater to mixer. Nutty Cheese Ball 1 cup shredded sharp Cheddar cheese 1 cup shredded Swiss cheese 1 package (8 oz) light cream cheese 2 tablespoons chopped fresh chives 2 teaspoons Worcestershire...

Use & Care Guide
Page 20
... pepper, and ground turkey in 10" skillet over medium-high heat until toasted. Serve warm. Mix salsa, chili sauce, and water in mixer bowl. Serve warm. Add spinach. Add spinach mixture. Yield: 12 servings (2 crostini per serving). Cook meatballs over medium heat. drain. Melt butter in... mixer bowl. Meatballs with about 30 seconds. Set aside. Cook and stir 30 to 6 minutes, or until well browned; Attach bowl and flat ...
... pepper, and ground turkey in 10" skillet over medium-high heat until toasted. Serve warm. Mix salsa, chili sauce, and water in mixer bowl. Serve warm. Add spinach. Add spinach mixture. Yield: 12 servings (2 crostini per serving). Cook meatballs over medium heat. drain. Melt butter in... mixer bowl. Meatballs with about 30 seconds. Set aside. Cook and stir 30 to 6 minutes, or until well browned; Attach bowl and flat ...


