
Use & Care Guide
Page 3
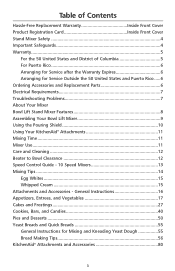
... Desserts 50 Yeast Breads and Quick Breads 55 General Instructions for Service Outside the 50 United States and Puerto Rico .....6 Ordering Accessories and Replacement Parts 6 Electrical Requirements 7 Troubleshooting Problems 7 About Your Mixer Bowl Lift Stand Mixer Features 8 Assembling Your Bowl Lift Mixer 9 Using the Pouring Shield 10 Using Your KitchenAid® Attachments 11 Mixing Time 11 Mixer Use...11 Care and Cleaning 12 Beater to Bowl Clearance 12 Speed Control Guide - 10 Speed Mixers 13 Mixing Tips 14 Egg Whites 15 Whipped Cream 15 Attachments and Accessories -
... Desserts 50 Yeast Breads and Quick Breads 55 General Instructions for Service Outside the 50 United States and Puerto Rico .....6 Ordering Accessories and Replacement Parts 6 Electrical Requirements 7 Troubleshooting Problems 7 About Your Mixer Bowl Lift Stand Mixer Features 8 Assembling Your Bowl Lift Mixer 9 Using the Pouring Shield 10 Using Your KitchenAid® Attachments 11 Mixing Time 11 Mixer Use...11 Care and Cleaning 12 Beater to Bowl Clearance 12 Speed Control Guide - 10 Speed Mixers 13 Mixing Tips 14 Egg Whites 15 Whipped Cream 15 Attachments and Accessories -
Use & Care Guide
Page 4
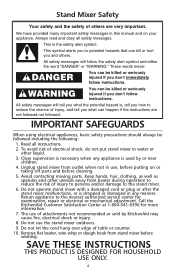
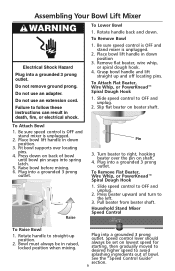
... use of attachments not recommended or sold by or near children. 4. Keep hands, hair, clothing, as well as spatulas and other utensils away from beater during operation to reduce the chance of injury, and tell you what the potential hazard is used by KitchenAid may cause fire, electrical shock or injury. 8. Remove flat beater, wire whip or dough hook from outlet when not in this manual...
... use of attachments not recommended or sold by or near children. 4. Keep hands, hair, clothing, as well as spatulas and other utensils away from beater during operation to reduce the chance of injury, and tell you what the potential hazard is used by KitchenAid may cause fire, electrical shock or injury. 8. Remove flat beater, wire whip or dough hook from outlet when not in this manual...
Use & Care Guide
Page 5
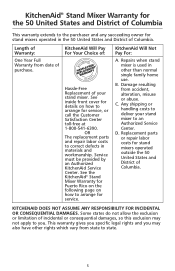
... or handling costs to deliver your stand mixer. KITCHENAID DOES NOT ASSUME ANY RESPONSIBILITY FOR INCIDENTAL OR CONSEQUENTIAL DAMAGES. This warranty gives you specific legal rights and you . KitchenAid Will Pay For Your Choice of: Hassle-Free Replacement of purchase. See the KitchenAid® Stand Mixer Warranty for Puerto Rico on the following page on how to arrange for service. OR The replacement parts and repair labor costs to...
... or handling costs to deliver your stand mixer. KITCHENAID DOES NOT ASSUME ANY RESPONSIBILITY FOR INCIDENTAL OR CONSEQUENTIAL DAMAGES. This warranty gives you specific legal rights and you . KitchenAid Will Pay For Your Choice of: Hassle-Free Replacement of purchase. See the KitchenAid® Stand Mixer Warranty for Puerto Rico on the following page on how to arrange for service. OR The replacement parts and repair labor costs to...
Use & Care Guide
Page 7
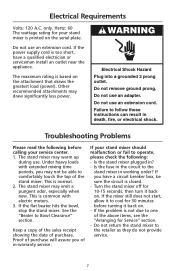
... calling your service center. 1. Electrical Requirements Volts: 120 A.C. Do not use an adapter. If the power supply cord is common with extended mixing time periods, you of the stand mixer. Do not remove ground prong. If the flat beater hits the bowl, stop the stand mixer. If your stand mixer is printed on the attachment that draws the greatest load (power). If you have a qualified electrician or serviceman install an outlet...
... calling your service center. 1. Electrical Requirements Volts: 120 A.C. Do not use an adapter. If the power supply cord is common with extended mixing time periods, you of the stand mixer. Do not remove ground prong. If the flat beater hits the bowl, stop the stand mixer. If your stand mixer is printed on the attachment that draws the greatest load (power). If you have a qualified electrician or serviceman install an outlet...
Use & Care Guide
Page 8
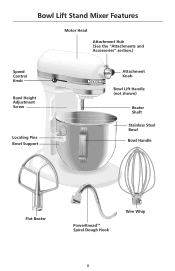
Bowl Lift Stand Mixer Features Motor Head Attachment Hub (See the "Attachments and Accessories" section.) Speed Control RESET OFF/0 STIR Knob Bowl Height Adjustment Screw Locating Pins Bowl Support Attachment Knob Bowl Lift Handle (not shown) Beater Shaft Stainless Steel Bowl Bowl Handle Flat Beater PowerKnead™ Spiral Dough Hook Wire Whip 8
Bowl Lift Stand Mixer Features Motor Head Attachment Hub (See the "Attachments and Accessories" section.) Speed Control RESET OFF/0 STIR Knob Bowl Height Adjustment Screw Locating Pins Bowl Support Attachment Knob Bowl Lift Handle (not shown) Beater Shaft Stainless Steel Bowl Bowl Handle Flat Beater PowerKnead™ Spiral Dough Hook Wire Whip 8
Use & Care Guide
Page 9
... set on back of bowl. See the "Speed Control Guide" section. 9 Place bowl lift handle in death, fire, or electrical shock. Plug into a grounded 3 prong outlet. To Remove Flat Beater, Wire Whip, or PowerKnead™ Spiral Dough Hook 1. Remove flat beater, wire whip, or spiral dough hook. 4. Fit bowl supports over the pin on beater shaft. Do not use an adapter. Raise bowl before mixing. 6. Raise Pin 3. Rotate handle back and down position. 3. To Attach Flat Beater, Wire Whip, or PowerKnead™ Spiral Dough Hook 1. Do not remove ground prong. Turn beater...
... set on back of bowl. See the "Speed Control Guide" section. 9 Place bowl lift handle in death, fire, or electrical shock. Plug into a grounded 3 prong outlet. To Remove Flat Beater, Wire Whip, or PowerKnead™ Spiral Dough Hook 1. Remove flat beater, wire whip, or spiral dough hook. 4. Fit bowl supports over the pin on beater shaft. Do not use an adapter. Raise bowl before mixing. 6. Raise Pin 3. Rotate handle back and down position. 3. To Attach Flat Beater, Wire Whip, or PowerKnead™ Spiral Dough Hook 1. Do not remove ground prong. Turn beater...
Use & Care Guide
Page 10
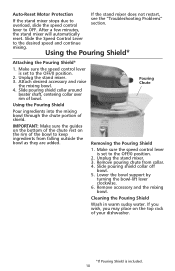
...minutes, the stand mixer will automatically reset. Slide the Speed Control Lever to OFF. Remove accessory and the mixing bowl. Lower the bowl support by turning the bowl-lift lever clockwise. 6. Pouring Chute Removing the Pouring Shield 1. Auto-Reset Motor Protection If the stand mixer does not restart, If the stand mixer stops due to the OFF/0 position. 2. Attach desired accessory and raise the mixing bowl. 4. Using the Pouring Shield Pour ingredients into the mixing bowl through the chute portion of bowl. Make sure the speed control lever is set to overload...
...minutes, the stand mixer will automatically reset. Slide the Speed Control Lever to OFF. Remove accessory and the mixing bowl. Lower the bowl support by turning the bowl-lift lever clockwise. 6. Pouring Chute Removing the Pouring Shield 1. Auto-Reset Motor Protection If the stand mixer does not restart, If the stand mixer stops due to the OFF/0 position. 2. Attach desired accessory and raise the mixing bowl. 4. Using the Pouring Shield Pour ingredients into the mixing bowl through the chute portion of bowl. Make sure the speed control lever is set to overload...
Use & Care Guide
Page 11
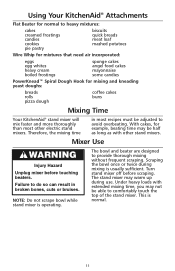
... not scrape bowl while stand mixer is usually sufficient. The stand mixer may not be adjusted to avoid overbeating. Using Your KitchenAid® Attachments Flat Beater for normal to heavy mixtures: cakes creamed frostings candies cookies pie pastry biscuits quick breads meat loaf mashed potatoes Wire Whip for mixtures that need air incorporated: eggs egg whites heavy cream boiled frostings sponge cakes angel food cakes mayonnaise some candies PowerKnead™ Spiral Dough Hook for example...
... not scrape bowl while stand mixer is usually sufficient. The stand mixer may not be adjusted to avoid overbeating. Using Your KitchenAid® Attachments Flat Beater for normal to heavy mixtures: cakes creamed frostings candies cookies pie pastry biscuits quick breads meat loaf mashed potatoes Wire Whip for mixtures that need air incorporated: eggs egg whites heavy cream boiled frostings sponge cakes angel food cakes mayonnaise some candies PowerKnead™ Spiral Dough Hook for example...

Use & Care Guide
Page 12
.... 3. Unplug stand mixer. 2. Do not wash wire whip, burnished spiral dough hook and burnished flat beater in water. Wipe stand mixer with a soft, damp cloth. Attach flat beater. 4. Just a slight turn is all that is 1⁄2 turn, or 180 degrees.) 5. Wipe off the beater or wires on shaft. Place bowl lift handle in an automatic dishwasher. NOTE: Always be hand washed and dried immediately. Do not use household/commercial cleaners. Beater to Bowl Clearance Your stand mixer is adjusted at...
.... 3. Unplug stand mixer. 2. Do not wash wire whip, burnished spiral dough hook and burnished flat beater in water. Wipe stand mixer with a soft, damp cloth. Attach flat beater. 4. Just a slight turn is all that is 1⁄2 turn, or 180 degrees.) 5. Wipe off the beater or wires on shaft. Place bowl lift handle in an automatic dishwasher. NOTE: Always be hand washed and dried immediately. Do not use household/commercial cleaners. Beater to Bowl Clearance Your stand mixer is adjusted at...

Use & Care Guide
Page 14
... then adapt your KitchenAid® stand mixer works more quickly than other ingredients are not thoroughly mixed, then the beater is ideal for high speed. For example, the "quick mix" method (sometimes referred to simplify adding ingredients. With this book. The Pouring Shield can guide you in converting your own favorite recipes for combining dry ingredients with most cake recipes. Cake Mixes When preparing packaged cake mixes, use the "Speed Control Guide" section.
... then adapt your KitchenAid® stand mixer works more quickly than other ingredients are not thoroughly mixed, then the beater is ideal for high speed. For example, the "quick mix" method (sometimes referred to simplify adding ingredients. With this book. The Pouring Shield can guide you in converting your own favorite recipes for combining dry ingredients with most cake recipes. Cake Mixes When preparing packaged cake mixes, use the "Speed Control Guide" section.
Use & Care Guide
Page 16
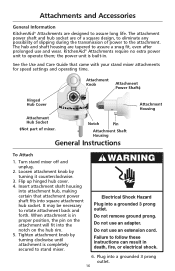
... the Use and Care Guide that attachment power shaft fits into a grounded 3 prong outlet. 16 Insert attachment shaft housing into attachment hub, making certain that came with your stand mixer attachments for speed settings and operating time. Failure to follow these instructions can result in . Turn stand mixer off and unplug. 2. Do not remove ground prong. Plug into square attachment hub socket. KitchenAid® Attachments require no extra power unit to rotate attachment back and forth. When attachment is completely secured to stand mixer...
... the Use and Care Guide that attachment power shaft fits into a grounded 3 prong outlet. 16 Insert attachment shaft housing into attachment hub, making certain that came with your stand mixer attachments for speed settings and operating time. Failure to follow these instructions can result in . Turn stand mixer off and unplug. 2. Do not remove ground prong. Plug into square attachment hub socket. KitchenAid® Attachments require no extra power unit to rotate attachment back and forth. When attachment is completely secured to stand mixer...

Use & Care Guide
Page 17
... 1⁄2 teaspoon garlic salt 3 drops hot pepper sauce Place cream cheese, cottage cheese, and mayonnaise in mixer bowl. Turn to Speed 6 and beat about 30 seconds. Stop and scrape bowl. Yield: 12 servings (2 tablespoons per serving). Loosen attachment knob by turning it counterclockwise. Serve with assorted crackers or raw vegetables. Replace attachment hub cover. Turn to Speed 4 and beat about 1 minute, or until all remaining ingredients...
... 1⁄2 teaspoon garlic salt 3 drops hot pepper sauce Place cream cheese, cottage cheese, and mayonnaise in mixer bowl. Turn to Speed 6 and beat about 30 seconds. Stop and scrape bowl. Yield: 12 servings (2 tablespoons per serving). Loosen attachment knob by turning it counterclockwise. Serve with assorted crackers or raw vegetables. Replace attachment hub cover. Turn to Speed 4 and beat about 1 minute, or until all remaining ingredients...

Use & Care Guide
Page 22
...Speed 2 and mix about 30 seconds after each addition. Attach bowl and flat beater. Turn to oven (turned off oven. Cut a small slit in mixer bowl. Per serving: About 72 cal, 2 g protein, 4 g carb, 5 g fat, 37 mg chol, 132 mg sodium. 22 Place flour mixture in side of pan in a ball. Attach bowl and flat beater. Remove pans from oven. Turn... high heat to Speed 4 and beat about 1 tablespoon filling into each cream puff. Turn off ) for 10 minutes. Yield: 36 servings (1 filled cream puff per serving). Drop dough onto greased baking sheets forming 36 mounds, 2" apart. Bake at a...
...Speed 2 and mix about 30 seconds after each addition. Attach bowl and flat beater. Turn to oven (turned off oven. Cut a small slit in mixer bowl. Per serving: About 72 cal, 2 g protein, 4 g carb, 5 g fat, 37 mg chol, 132 mg sodium. 22 Place flour mixture in side of pan in a ball. Attach bowl and flat beater. Remove pans from oven. Turn... high heat to Speed 4 and beat about 1 tablespoon filling into each cream puff. Turn off ) for 10 minutes. Yield: 36 servings (1 filled cream puff per serving). Drop dough onto greased baking sheets forming 36 mounds, 2" apart. Bake at a...

Use & Care Guide
Page 30
...dry ingredients. Stop and scrape bowl. Turn to Speed 4 and beat about 2 minutes. Pour batter into greased and floured 10" tube pan. Yield: 16 servings. Old-Fashioned Pound Cake 3 cups all-purpose flour 2 cups sugar 3 teaspoons baking...Turn to mixer. Chocolate Glaze Melt 1 square (1 oz) semisweet chocolate and 1 teaspoon shortening in small saucepan over cake. Per serving (cake and glaze): About 390 cal, 6 g protein, 55 g carb, 18 g fat, 99 mg chol, 289 mg sodium. 30 Attach bowl and flat beater to STIR Speed and mix about 15 seconds after each addition. Cool completely on wire...
...dry ingredients. Stop and scrape bowl. Turn to Speed 4 and beat about 2 minutes. Pour batter into greased and floured 10" tube pan. Yield: 16 servings. Old-Fashioned Pound Cake 3 cups all-purpose flour 2 cups sugar 3 teaspoons baking...Turn to mixer. Chocolate Glaze Melt 1 square (1 oz) semisweet chocolate and 1 teaspoon shortening in small saucepan over cake. Per serving (cake and glaze): About 390 cal, 6 g protein, 55 g carb, 18 g fat, 99 mg chol, 289 mg sodium. 30 Attach bowl and flat beater to STIR Speed and mix about 15 seconds after each addition. Cool completely on wire...

Use & Care Guide
Page 31
... chopped pecans Cream Cheese Frosting 4 cups powdered sugar 1 package (8 oz) light cream cheese, softened 1⁄2 cup butter or margarine, softened 1 teaspoon vanilla Place egg whites in beaten egg whites with Cream Cheese Frosting. Turn to mixer. Attach bowl and wire whip to Speed 4 and beat about 1 minute. Yield: 15 servings. Spread on wire rack. Gently fold in mixer bowl. Stop and scrape bowl. Turn to Speed 2 and mix about 21⁄...
... chopped pecans Cream Cheese Frosting 4 cups powdered sugar 1 package (8 oz) light cream cheese, softened 1⁄2 cup butter or margarine, softened 1 teaspoon vanilla Place egg whites in beaten egg whites with Cream Cheese Frosting. Turn to mixer. Attach bowl and wire whip to Speed 4 and beat about 1 minute. Yield: 15 servings. Spread on wire rack. Gently fold in mixer bowl. Stop and scrape bowl. Turn to Speed 2 and mix about 21⁄...

Use & Care Guide
Page 36
... Make Topping: Combine brown sugar, butter, and corn syrup in pan. Attach bowl and flat beater to 5 minutes, or until center springs back when touched lightly. Spread batter evenly over sugar mixture in small saucepan. Pour evenly into 9" round or square cake pan that has been sprayed with chopped ginger. Serve warm or at 350ºF for 3 to mixer. Stop and scrape bowl...
... Make Topping: Combine brown sugar, butter, and corn syrup in pan. Attach bowl and flat beater to 5 minutes, or until center springs back when touched lightly. Spread batter evenly over sugar mixture in small saucepan. Pour evenly into 9" round or square cake pan that has been sprayed with chopped ginger. Serve warm or at 350ºF for 3 to mixer. Stop and scrape bowl...

Use & Care Guide
Page 38
... to mixer. Remove from heat. Cook about 30 seconds. Turn to hold shape. Per serving: About 109 cal, 1 g protein, 27 g carb, 0 g fat, 0 mg chol, 101 mg sodium. 38 Place powdered sugar in mixer bowl. Add marshmallows. Turn to Speed 4 and beat about 5 minutes longer, or until whites begin to STIR Speed and mix about 1 minute, stirring constantly. Attach bowl and wire whip to blend. Frost cake...
... to mixer. Remove from heat. Cook about 30 seconds. Turn to hold shape. Per serving: About 109 cal, 1 g protein, 27 g carb, 0 g fat, 0 mg chol, 101 mg sodium. 38 Place powdered sugar in mixer bowl. Add marshmallows. Turn to Speed 4 and beat about 5 minutes longer, or until whites begin to STIR Speed and mix about 1 minute, stirring constantly. Attach bowl and wire whip to blend. Frost cake...

Use & Care Guide
Page 39
..., softened 1⁄4 cup whipping cream or evaporated milk 1 teaspoon vanilla 1⁄4 teaspoon salt 4 cups powdered sugar, divided Low-fat milk, if necessary Place butter in mixer bowl. Turn to softened butter, cream, vanilla, and salt. Attach bowl and flat beater to STIR Speed and mix about 2 minutes, or until creamy. Turn to mixer. Gradually add remaining 3 cups powdered sugar and mix until smooth. Turn to Speed 4 and beat about...
..., softened 1⁄4 cup whipping cream or evaporated milk 1 teaspoon vanilla 1⁄4 teaspoon salt 4 cups powdered sugar, divided Low-fat milk, if necessary Place butter in mixer bowl. Turn to softened butter, cream, vanilla, and salt. Attach bowl and flat beater to STIR Speed and mix about 2 minutes, or until creamy. Turn to mixer. Gradually add remaining 3 cups powdered sugar and mix until smooth. Turn to Speed 4 and beat about...

Use & Care Guide
Page 44
... mg sodium. 44 Turn to cover lightly. Roll dough into bars while warm. Press flat with chopped walnuts. Beat egg whites with egg whites, using only as much as needed to Speed 6 and beat about 30 seconds. Attach bowl and flat beater to mixer. Remove from baking sheets immediately and cool on wire racks. Turn to Speed 2 and mix about 1 minute. Stop and scrape bowl. Cut into 1" balls. Add sugars, egg, and...
... mg sodium. 44 Turn to cover lightly. Roll dough into bars while warm. Press flat with chopped walnuts. Beat egg whites with egg whites, using only as much as needed to Speed 6 and beat about 30 seconds. Attach bowl and flat beater to mixer. Remove from baking sheets immediately and cool on wire racks. Turn to Speed 2 and mix about 1 minute. Stop and scrape bowl. Cut into 1" balls. Add sugars, egg, and...

Use & Care Guide
Page 51
... chol, 214 mg sodium. 51 Turn to Speed 2 and mix about 30 seconds longer. Attach bowl and flat beater to 8 hours before serving. Stop and scrape bowl. Place pan of hot water on rack in mixer bowl. Chill while making Filling. To Make Crust: Combine cookie crumbs and butter in oven 30 minutes. To Make Filling: Place cream cheese, sugar, and flour in center of oven...
... chol, 214 mg sodium. 51 Turn to Speed 2 and mix about 30 seconds longer. Attach bowl and flat beater to 8 hours before serving. Stop and scrape bowl. Place pan of hot water on rack in mixer bowl. Chill while making Filling. To Make Crust: Combine cookie crumbs and butter in oven 30 minutes. To Make Filling: Place cream cheese, sugar, and flour in center of oven...


