
User Instructions
Page 1
... modelo completo. All safety messages will tell you what can kill or hurt you still need your appliance. If you and others are not followed. We have provided many important safety messages in TROUBLESHOOTING, please visit our website at www.kitchenaid.com for purchasing this manual and on your model and serial number located on the inside wall of the refrigerator...
... modelo completo. All safety messages will tell you what can kill or hurt you still need your appliance. If you and others are not followed. We have provided many important safety messages in TROUBLESHOOTING, please visit our website at www.kitchenaid.com for purchasing this manual and on your model and serial number located on the inside wall of the refrigerator...
User Instructions
Page 2
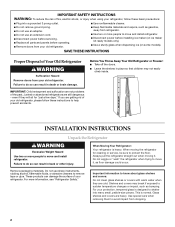
... sudden temperature changes or impact, such as floor damage could occur. Glass shelves and covers are heavy. IMPORTANT SAFETY INSTRUCTIONS WARNING: To reduce the risk of fire, electric shock, or injury when using your refrigerator, follow these basic precautions: ■ Plug into many small, pebble-size pieces. Do not use an extension cord. ■ Disconnect power before servicing. ■ Replace all parts and panels before installing ice maker (on ice maker kit ready models...
... sudden temperature changes or impact, such as floor damage could occur. Glass shelves and covers are heavy. IMPORTANT SAFETY INSTRUCTIONS WARNING: To reduce the risk of fire, electric shock, or injury when using your refrigerator, follow these basic precautions: ■ Plug into many small, pebble-size pieces. Do not use an extension cord. ■ Disconnect power before servicing. ■ Replace all parts and panels before installing ice maker (on ice maker kit ready models...

User Instructions
Page 3
... electrical supply is required, so a total cabinet opening width of installation, cleaning, or removing a light bulb, turn the control (Thermostat, Refrigerator or Freezer Control depending on the model) to follow the instructions provided with any tools listed here. Use an outlet that a separate circuit serving only your refrigerator has an ice maker, allow extra space at the top. See "Using the Controls." IMPORTANT: ■ All installations must meet local plumbing code requirements. ■ Use copper tubing and...
... electrical supply is required, so a total cabinet opening width of installation, cleaning, or removing a light bulb, turn the control (Thermostat, Refrigerator or Freezer Control depending on the model) to follow the instructions provided with any tools listed here. Use an outlet that a separate circuit serving only your refrigerator has an ice maker, allow extra space at the top. See "Using the Controls." IMPORTANT: ■ All installations must meet local plumbing code requirements. ■ Use copper tubing and...
User Instructions
Page 4
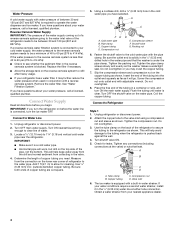
... valve. 4. Turn OFF main water supply. IMPORTANT: ■ Make sure it will go. Copper tubing D. Packing nut 6. Do not overtighten. 8. Connect to Water Line 1. This will work, but drill on the lower rear corner of refrigerator to 1¹⁄₄" (3.18 cm) vertical cold water pipe near the refrigerator. A B C D A. Copper tubing C. Connect to Refrigerator Style 1 1. Add 7 ft (2.1 m) to the valve inlet using a compression nut and sleeve as shown. Place the free...
... valve. 4. Turn OFF main water supply. IMPORTANT: ■ Make sure it will go. Copper tubing D. Packing nut 6. Do not overtighten. 8. Connect to Water Line 1. This will work, but drill on the lower rear corner of refrigerator to 1¹⁄₄" (3.18 cm) vertical cold water pipe near the refrigerator. A B C D A. Copper tubing C. Connect to Refrigerator Style 1 1. Add 7 ft (2.1 m) to the valve inlet using a compression nut and sleeve as shown. Place the free...
User Instructions
Page 5
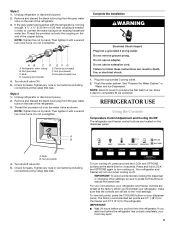
... to connect the water tubing to an existing household water line. If you put food into the refrigerator. Do not overtighten. AB C D EFG A. Refrigerator water tubing E. Do not use an adapter. REFRIGERATOR USE Using the Controls Temperature Control Adjustment and Cooling On/Off The refrigerator and freezer control buttons are still set to turn cooling off . When you first install your food may spoil. 5 Thread the provided nut onto the coupling on the rear of ice. Remove and...
... to connect the water tubing to an existing household water line. If you put food into the refrigerator. Do not overtighten. AB C D EFG A. Refrigerator water tubing E. Do not use an adapter. REFRIGERATOR USE Using the Controls Temperature Control Adjustment and Cooling On/Off The refrigerator and freezer control buttons are still set to turn cooling off . When you first install your food may spoil. 5 Thread the provided nut onto the coupling on the rear of ice. Remove and...

User Instructions
Page 6
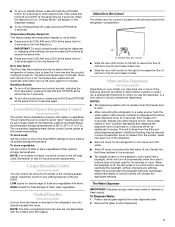
.... ■ Press LIGHT to turn both the "MAX COOL" and "MAX ICE" arrows will not cool the compartments any settings. When the feature turns on the dispenser display. Freezer Controls When adjust mode is as cold as ice cream, harder. CONDITION: TEMPERATURE ADJUSTMENT: REFRIGERATOR too cold REFRIGERATOR Setting 1° higher REFRIGERATOR too warm REFRIGERATOR Setting 1° lower ■ Press the OPTIONS button to raise the set point. After 24 hours, the refrigerator returns to the previous temperature set points to...
.... ■ Press LIGHT to turn both the "MAX COOL" and "MAX ICE" arrows will not cool the compartments any settings. When the feature turns on the dispenser display. Freezer Controls When adjust mode is as cold as ice cream, harder. CONDITION: TEMPERATURE ADJUSTMENT: REFRIGERATOR too cold REFRIGERATOR Setting 1° higher REFRIGERATOR too warm REFRIGERATOR Setting 1° lower ■ Press the OPTIONS button to raise the set point. After 24 hours, the refrigerator returns to the previous temperature set points to...
User Instructions
Page 7
... ice. When the backlight is located on the left (less cold). Remove the glass to flow. Disabling Sounds ■ To turn off automatically when the control buttons have one of the three MEAT settings to produce the first batch of ice produced. ■ The display screen on the dispenser control panel has a backlight, which will only reactivate the backlight, without changing any setting between adjustments. Crisper Humidity Control (on some models...
... ice. When the backlight is located on the left (less cold). Remove the glass to flow. Disabling Sounds ■ To turn off automatically when the control buttons have one of the three MEAT settings to produce the first batch of ice produced. ■ The display screen on the dispenser control panel has a backlight, which will only reactivate the backlight, without changing any setting between adjustments. Crisper Humidity Control (on some models...
User Instructions
Page 8
..., make noise for easy cleaning or to poor quality ice. The display screen indicates which type of ice you use anything on top of the freezer stops the ice maker from the ice crusher is pressed. Replace the storage bin on the left wall of or in the ice maker or storage bin. To manually turn the dispenser light on some models) The dispenser can damage parts of ice. If a softened water supply cannot be turned off the ice maker, slide the control to stop ice...
..., make noise for easy cleaning or to poor quality ice. The display screen indicates which type of ice you use anything on top of the freezer stops the ice maker from the ice crusher is pressed. Replace the storage bin on the left wall of or in the ice maker or storage bin. To manually turn the dispenser light on some models) The dispenser can damage parts of ice. If a softened water supply cannot be turned off the ice maker, slide the control to stop ice...
User Instructions
Page 9
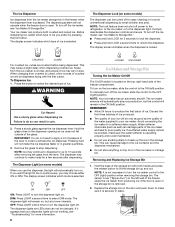
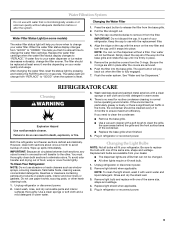
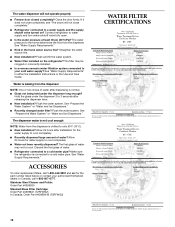
... cleansers containing petroleum products on your water dispenser or ice maker decreases noticeably, change your dealer. ■ The dispenser lights are removed. 6. Turn the cap counterclockwise to remove it is almost time to change from "GOOD" to the other. Replace the water filter cartridge when the water filter status display changes to release the filter from the O-rings. REFRIGERATOR CARE Cleaning WARNING 3. It is reset. When the water filter status display changes from "REPLACE" to eliminate odors. The status...
... cleansers containing petroleum products on your water dispenser or ice maker decreases noticeably, change your dealer. ■ The dispenser lights are removed. 6. Turn the cap counterclockwise to remove it is almost time to change from "GOOD" to the other. Replace the water filter cartridge when the water filter status display changes to release the filter from the O-rings. REFRIGERATOR CARE Cleaning WARNING 3. It is reset. When the water filter status display changes from "REPLACE" to eliminate odors. The status...

User Instructions
Page 10
... doors have been left open. Plug into the drain pan ■ Creaking/Cracking - The motor seems to run too much Your new refrigerator may be sure the dispenser light sensor is working ? Due to this reduction, you may run longer than your old one due to its high-efficiency compressor and fans. See "Water and Ice Dispensers." 10 In the U.S.A., www.kitchenaid.com In Canada, www.kitchenaid.ca The refrigerator will not cool...
... doors have been left open. Plug into the drain pan ■ Creaking/Cracking - The motor seems to run too much Your new refrigerator may be sure the dispenser light sensor is working ? Due to this reduction, you may run longer than your old one due to its high-efficiency compressor and fans. See "Water and Ice Dispensers." 10 In the U.S.A., www.kitchenaid.com In Canada, www.kitchenaid.ca The refrigerator will not cool...
User Instructions
Page 11
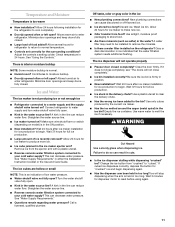
... Adjust the controls a setting colder. Use warm water to make new ice. ■ Odor transfer from "crushed" to produce more ice. ■ Ice cube jammed in position. ■ New installation? New plumbing connections can result in the ON position. ■ New installation? Allow 24 hours for the refrigerator to begin . Ice will stop dispensing when the arm is held in the ice bin? Make sure wire shutoff arm or switch (depending on ? Temperature and Moisture Temperature is an indication...
... Adjust the controls a setting colder. Use warm water to make new ice. ■ Odor transfer from "crushed" to produce more ice. ■ Ice cube jammed in position. ■ New installation? New plumbing connections can result in the ON position. ■ New installation? Allow 24 hours for the refrigerator to begin . Ice will stop dispensing when the arm is held in the ice bin? Make sure wire shutoff arm or switch (depending on ? Temperature and Moisture Temperature is an indication...
User Instructions
Page 12
... part number listed below or contact your cold water supply? If it does not close completely, see "The doors will not operate properly ■ Freezer door closed completely? Straighten the water source line. ■ New installation? The filter may not be clogged or incorrectly installed. ■ Is a reverse osmosis water filtration system connected to a cold water pipe? The dispenser water is not cool enough NOTE: Water from the dispenser is connected to a water supply and the supply shutoff valve turned on the refrigerator...
... part number listed below or contact your cold water supply? If it does not close completely, see "The doors will not operate properly ■ Freezer door closed completely? Straighten the water source line. ■ New installation? The filter may not be clogged or incorrectly installed. ■ Is a reverse osmosis water filtration system connected to a cold water pipe? The dispenser water is not cool enough NOTE: Water from the dispenser is connected to a water supply and the supply shutoff valve turned on the refrigerator...

User Instructions
Page 13
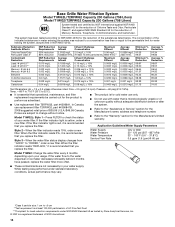
..., replace the water filter more often. ■ These contaminants are subject to change without notice. ■ Refer to the water dispenser or ice maker decreases noticeably before or after ■ Use replacement filter T2RFWG2, part #4396841. Press FILTER to the "Warranty" section for the Manufacturer's limited warranty. new filter. When the filter indicator reads 0%, it is recommended that you replace the filter. When the filter indicator reads "REPLACE," it is recommended that operational, maintenance, and filter...
..., replace the water filter more often. ■ These contaminants are subject to change without notice. ■ Refer to the water dispenser or ice maker decreases noticeably before or after ■ Use replacement filter T2RFWG2, part #4396841. Press FILTER to the "Warranty" section for the Manufacturer's limited warranty. new filter. When the filter indicator reads 0%, it is recommended that you replace the filter. When the filter indicator reads "REPLACE," it is recommended that operational, maintenance, and filter...
User Instructions
Page 14
... the water dispenser or ice maker decreases noticeably before or after ■ Use replacement filter T2RFWG2, part #4396841. new filter. When the filter indicator reads 10%, order a new filter. Style 3 - Water Supply Water Pressure Water Temperature Service Flow Rate City or Well 30 - 120 psi (207 - 827 kPa) 33° - 100°F (0.6° - 37.8°C) 0.5 gpm (1.9 Lpm) @ 60 psi Model T1WG2: Change the water filter every 6 months depending upon your water supply. If the water flow to change without...
... the water dispenser or ice maker decreases noticeably before or after ■ Use replacement filter T2RFWG2, part #4396841. new filter. When the filter indicator reads 10%, order a new filter. Style 3 - Water Supply Water Pressure Water Temperature Service Flow Rate City or Well 30 - 120 psi (207 - 827 kPa) 33° - 100°F (0.6° - 37.8°C) 0.5 gpm (1.9 Lpm) @ 60 psi Model T1WG2: Change the water filter every 6 months depending upon your water supply. If the water flow to change without...
User Instructions
Page 15
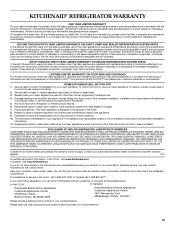
... find your model number and serial number on the label, located on water filter. For 30 days from the date of purchase, when this filter is operated and maintained according to instructions attached to or furnished with the product, KitchenAid will pay for factory specified parts and repair labor to correct defects in materials or workmanship. These parts are : compressor, evaporator, condenser, dryer, and connecting tubing. Outside the...
... find your model number and serial number on the label, located on water filter. For 30 days from the date of purchase, when this filter is operated and maintained according to instructions attached to or furnished with the product, KitchenAid will pay for factory specified parts and repair labor to correct defects in materials or workmanship. These parts are : compressor, evaporator, condenser, dryer, and connecting tubing. Outside the...

Parts Diagram
Page 2
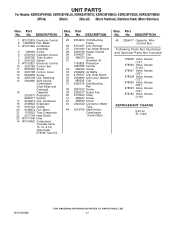
... 32 2255153 Tube, Filter Outlet 33 2319867 Tube, Filter Inlet 34 2260519 Block, Housing Support 35 Button, Water Filter 2260503W White 2260503B Black 2260503T Biscuit 2260503MG Apollo Gray 2 W10190388 DESCRIPTION 1 Literature Parts W10162452 Use & Care Guide W10181781 Service & Wiring Sheet W10184938 Energy Guide 2220407 Modular Icemaker Service Sheet 2 4386774 Front Roller (2) 3 3400517 Screw 4 2196236 Roller (Rear) (2) 5 489427 Screw 6 2155013 Clip, Grille 7 488500 Screw 8 2203771 Hinge Top, RC 9 3400858 Screw 10 Hinge Cover, FC...
... 32 2255153 Tube, Filter Outlet 33 2319867 Tube, Filter Inlet 34 2260519 Block, Housing Support 35 Button, Water Filter 2260503W White 2260503B Black 2260503T Biscuit 2260503MG Apollo Gray 2 W10190388 DESCRIPTION 1 Literature Parts W10162452 Use & Care Guide W10181781 Service & Wiring Sheet W10184938 Energy Guide 2220407 Modular Icemaker Service Sheet 2 4386774 Front Roller (2) 3 3400517 Screw 4 2196236 Roller (Rear) (2) 5 489427 Screw 6 2155013 Clip, Grille 7 488500 Screw 8 2203771 Hinge Top, RC 9 3400858 Screw 10 Hinge Cover, FC...

Parts Diagram
Page 3
...) (Black) (Biscuit) (Mono Stainless) (Stainless Steel) (Mono Stainless) Illus. Part No. DESCRIPTION 1 Liner (Not A Serviceable Part) 2 W10160357 Escutcheon, Meat Pan Control 3 2301339 Slide Meat Pan Control 4 2257741 Louver 5 2256035 Bracket, Dual Crisper Lights 6 2311637 Wire Harness, Dual Crisper Lights 7 2301234 Housing, Door Control 8 2319866 Ladder, Shelf (2) 9 2301235 Slide, Door Control 10 W10004810 Screw (2) 11 489478 Screw 12 2179404K Rack, Wine & Egg 13 W10128734 Air Diffuser Assembly 14 W10128735 Air Diffuser Cover 15 2162085 Socket...
...) (Black) (Biscuit) (Mono Stainless) (Stainless Steel) (Mono Stainless) Illus. Part No. DESCRIPTION 1 Liner (Not A Serviceable Part) 2 W10160357 Escutcheon, Meat Pan Control 3 2301339 Slide Meat Pan Control 4 2257741 Louver 5 2256035 Bracket, Dual Crisper Lights 6 2311637 Wire Harness, Dual Crisper Lights 7 2301234 Housing, Door Control 8 2319866 Ladder, Shelf (2) 9 2301235 Slide, Door Control 10 W10004810 Screw (2) 11 489478 Screw 12 2179404K Rack, Wine & Egg 13 W10128734 Air Diffuser Assembly 14 W10128735 Air Diffuser Cover 15 2162085 Socket...

Parts Diagram
Page 10
... Biscuit W10046610 Gray 9 488208 Screw 10 2182178 Door Closer, Upper Cam 11 2159124 Gasket 12 489420 Screw 13 Bracket, Door Stop 2206629 Chrome 2206629B Black 14 2223434K Door Bin (4) 15 3400012 Screw 16 Thimble−Top 2308091 For White,Biscuit, & Black Models 2308050 For Stainless Steel and Monochromatic Satina Models 10 W10190388 REFRIGERATOR DOOR PARTS For Models: KSRK25FVWH00, KSRK25FVBL00, KSRK25FVBT00, KSRK25FVMK00, KSRK25FVSS00, KSRK25FVMS00...
... Biscuit W10046610 Gray 9 488208 Screw 10 2182178 Door Closer, Upper Cam 11 2159124 Gasket 12 489420 Screw 13 Bracket, Door Stop 2206629 Chrome 2206629B Black 14 2223434K Door Bin (4) 15 3400012 Screw 16 Thimble−Top 2308091 For White,Biscuit, & Black Models 2308050 For Stainless Steel and Monochromatic Satina Models 10 W10190388 REFRIGERATOR DOOR PARTS For Models: KSRK25FVWH00, KSRK25FVBL00, KSRK25FVBT00, KSRK25FVMK00, KSRK25FVSS00, KSRK25FVMS00...

Parts Diagram
Page 12
DESCRIPTION 1 Freezer Door (Includes #8 And Dispenser Front Parts) W10149993 White W10149994 Black W10149995 Biscuit W10166663 Stainless Steel W10149996 Monochromatic Satina 2 Handle 2319727W White 2319727B Black 2319727T Biscuit 2319727S Stainless Steel 3 2219698 Stud 4 Screw W10010140 Chrome W10010150 Black 5 3400012 Screw 6 488208 Screw 7 2223559 Shelf Bin (3) 8 Door Gasket, Magnetic 2221303 Mist Beige 2221314 Black 9 2219982 Trim, Door Shelf 10 2182179 Door Closer, Upper Cam 11 1128252 Connector...
DESCRIPTION 1 Freezer Door (Includes #8 And Dispenser Front Parts) W10149993 White W10149994 Black W10149995 Biscuit W10166663 Stainless Steel W10149996 Monochromatic Satina 2 Handle 2319727W White 2319727B Black 2319727T Biscuit 2319727S Stainless Steel 3 2219698 Stud 4 Screw W10010140 Chrome W10010150 Black 5 3400012 Screw 6 488208 Screw 7 2223559 Shelf Bin (3) 8 Door Gasket, Magnetic 2221303 Mist Beige 2221314 Black 9 2219982 Trim, Door Shelf 10 2182179 Door Closer, Upper Cam 11 1128252 Connector...
Parts Diagram
Page 17
... 2264017 Service 17 2216914 Clip, Condenser 18 2188823 Evaporator 19 2161324 Clamp 20 2188874 Fan, Motor 21 1105523 Tray, Evaporator 22 2217194 Heat Shield 23 W10177049 Drier 14 W10139462 Compressor (Includes Items 15, 16, & 19) (Also Order 876765 Tube Kit) Illus. Part No. No. DESCRIPTION 25 2304904 Unit Mounting Frame 26 2310497 Unit, Harness 27 2181929 Fan, Motor Bracket 28 2323198 Heater, Defrost 29...
... 2264017 Service 17 2216914 Clip, Condenser 18 2188823 Evaporator 19 2161324 Clamp 20 2188874 Fan, Motor 21 1105523 Tray, Evaporator 22 2217194 Heat Shield 23 W10177049 Drier 14 W10139462 Compressor (Includes Items 15, 16, & 19) (Also Order 876765 Tube Kit) Illus. Part No. No. DESCRIPTION 25 2304904 Unit Mounting Frame 26 2310497 Unit, Harness 27 2181929 Fan, Motor Bracket 28 2323198 Heater, Defrost 29...


