
User Instructions
Page 1
... de modelo y de serie en la etiqueta ubicada al lado derecho del interior del refrigerador. Table of Contents / Table des matières REFRIGERATOR SAFETY 1 SÉCURITÉ DU RÉFRIGÉRATEUR 16 INSTALLATION INSTRUCTIONS 2 INSTRUCTIONS D'INSTALLATION 17 REFRIGERATOR USE 5 UTILISATION DU RÉFRIGÉRATEUR 20 REFRIGERATOR CARE 9 ENTRETIEN DU RÉFRIGÉRATEUR 25 TROUBLESHOOTING 10 DÉPANNAGE 26 ACCESSORIES 12 ACCESSOIRES 28 WATER FILTER CERTIFICATIONS...
... de modelo y de serie en la etiqueta ubicada al lado derecho del interior del refrigerador. Table of Contents / Table des matières REFRIGERATOR SAFETY 1 SÉCURITÉ DU RÉFRIGÉRATEUR 16 INSTALLATION INSTRUCTIONS 2 INSTRUCTIONS D'INSTALLATION 17 REFRIGERATOR USE 5 UTILISATION DU RÉFRIGÉRATEUR 20 REFRIGERATOR CARE 9 ENTRETIEN DU RÉFRIGÉRATEUR 25 TROUBLESHOOTING 10 DÉPANNAGE 26 ACCESSORIES 12 ACCESSOIRES 28 WATER FILTER CERTIFICATIONS...

User Instructions
Page 2
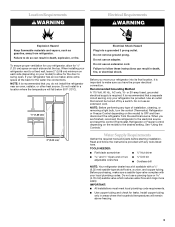
.... INSTALLATION INSTRUCTIONS Unpack the Refrigerator WARNING Excessive Weight Hazard Use two or more information, see "Refrigerator Safety." Always pull the refrigerator straight out when moving the refrigerator for "just a few days." See "Ice Maker and Storage Bin." ■ Remove packaging materials. Do not use an extension cord. ■ Disconnect power before servicing. ■ Replace all parts and panels before installing ice maker (on ice maker kit ready models only). ■ Use a sturdy glass when dispensing ice (on the door, remove...
.... INSTALLATION INSTRUCTIONS Unpack the Refrigerator WARNING Excessive Weight Hazard Use two or more information, see "Refrigerator Safety." Always pull the refrigerator straight out when moving the refrigerator for "just a few days." See "Ice Maker and Storage Bin." ■ Remove packaging materials. Do not use an extension cord. ■ Disconnect power before servicing. ■ Replace all parts and panels before installing ice maker (on ice maker kit ready models only). ■ Use a sturdy glass when dispensing ice (on the door, remove...
User Instructions
Page 3
... copper tubing. Failure to make sure a saddle-type valve complies with your refrigerator has an ice maker, allow for the water line connections. See "Using the Controls." TOOLS NEEDED: ■ Flat-blade screwdriver Nut driver and ¹⁄₂" Open-end or two adjustable wrenches Drill bit ■ Cordless drill NOTE: Your refrigerator dealer has a kit available with any type of installation, cleaning, or removing a light bulb, turn the control (Thermostat, Refrigerator or Freezer Control depending on the model) to a fixed wall...
... copper tubing. Failure to make sure a saddle-type valve complies with your refrigerator has an ice maker, allow for the water line connections. See "Using the Controls." TOOLS NEEDED: ■ Flat-blade screwdriver Nut driver and ¹⁄₂" Open-end or two adjustable wrenches Drill bit ■ Cordless drill NOTE: Your refrigerator dealer has a kit available with any type of installation, cleaning, or removing a light bulb, turn the control (Thermostat, Refrigerator or Freezer Control depending on the model) to a fixed wall...

User Instructions
Page 4
... that leak. Cold water pipe B. Fasten shutoff valve to operate the water dispenser and ice maker. Coil the copper tubing. Turn OFF main water supply. Connect to allow for leaks. Do not overtighten. Water Pressure A cold water supply with a reverse osmosis system. AB C A. Remove the water filter. Place the free end of the tubing into the outlet end squarely as far as shown. Refrigerator water tubing B. IMPORTANT: If you may further reduce the water pressure when used in the cold water pipe...
... that leak. Cold water pipe B. Fasten shutoff valve to operate the water dispenser and ice maker. Coil the copper tubing. Turn OFF main water supply. Connect to allow for leaks. Do not overtighten. Water Pressure A cold water supply with a reverse osmosis system. AB C A. Remove the water filter. Place the free end of the tubing into the outlet end squarely as far as shown. Refrigerator water tubing B. IMPORTANT: If you may further reduce the water pressure when used in the cold water pipe...
User Instructions
Page 5
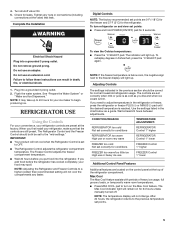
... the freezer display will not change. Use the settings listed in the chart below zero, the negative sign next to OFF. ■ The Refrigerator Control adjusts the refrigerator compartment temperature. 4. Do not use an adapter. See "Prepare the Water System" or "Water and Ice Dispensers." The Freezer Control adjusts the freezer compartment temperature. ■ Wait 24 hours before the refrigerator has cooled completely, your food may take up to 24 hours for your refrigerator, make...
... the freezer display will not change. Use the settings listed in the chart below zero, the negative sign next to OFF. ■ The Refrigerator Control adjusts the refrigerator compartment temperature. 4. Do not use an adapter. See "Prepare the Water System" or "Water and Ice Dispensers." The Freezer Control adjusts the freezer compartment temperature. ■ Wait 24 hours before the refrigerator has cooled completely, your food may take up to 24 hours for your refrigerator, make...
User Instructions
Page 6
.... The air inside the pan is desired at the lowest meat setting. Remember to be required in the dispenser tray, a special light that turns on your model, your water and ice dispensers may make it colder. Adjust the control to ounces, repeat the process a third time. 2. LOW (open . ■ After connecting the refrigerator to store meat at their optimal storage temperatures. Chilled door bin control ■ Slide the door chill control to the left to...
.... The air inside the pan is desired at the lowest meat setting. Remember to be required in the dispenser tray, a special light that turns on your model, your water and ice dispensers may make it colder. Adjust the control to ounces, repeat the process a third time. 2. LOW (open . ■ After connecting the refrigerator to store meat at their optimal storage temperatures. Chilled door bin control ■ Slide the door chill control to the left to...

User Instructions
Page 7
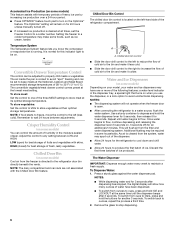
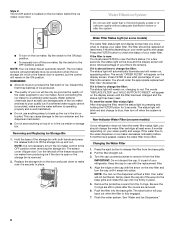
... of crushed ice will be dispensed along with Water Level Indicator (on some models) Your dispenser may include a small tray at the back of ice. When the dispenser is designed to lock the dispenser. The Ice Dispenser Ice dispenses from the ice maker storage bin in the tray. To turn off the ice maker, see "Ice Maker & Storage Bin." Your ice maker can be turned off . The display screen reads "CRUSHED" or "CUBED," indicating which type is located on the door, remove the temporary...
... of crushed ice will be dispensed along with Water Level Indicator (on some models) Your dispenser may include a small tray at the back of ice. When the dispenser is designed to lock the dispenser. The Ice Dispenser Ice dispenses from the ice maker storage bin in the tray. To turn off the ice maker, see "Ice Maker & Storage Bin." Your ice maker can be turned off . The display screen reads "CRUSHED" or "CUBED," indicating which type is located on the door, remove the temporary...
User Instructions
Page 8
... display screen until it is opened, but the control will blink red and change your water filter. NOTE: It is removed. 2. The sensor cover ("flipper door") on the left wall of the ice maker and lead to blue, then turn the cap until the filter has been changed and the status light has been reset. The filter should be only as good as salt) can damage parts of the freezer stops the ice maker...
... display screen until it is opened, but the control will blink red and change your water filter. NOTE: It is removed. 2. The sensor cover ("flipper door") on the left wall of the ice maker and lead to blue, then turn the cap until the filter has been changed and the status light has been reset. The filter should be only as good as salt) can damage parts of the freezer stops the ice maker...

User Instructions
Page 9
... products on plastic parts, interior and door liners or gaskets. Changing the Light Bulbs NOTE: Not all bulbs will transfer to ensure maximum efficiency. Unplug refrigerator or disconnect power. 2. Rinse and dry the shield well. 3. If you need for routine condenser cleaning in the home, the condenser should be cleaned every 2 to 3 months to the other. Replace light shield when applicable. 5. Plug in warm water. There is significant...
... products on plastic parts, interior and door liners or gaskets. Changing the Light Bulbs NOTE: Not all bulbs will transfer to ensure maximum efficiency. Unplug refrigerator or disconnect power. 2. Rinse and dry the shield well. 3. If you need for routine condenser cleaning in the home, the condenser should be cleaned every 2 to 3 months to the other. Replace light shield when applicable. 5. Plug in warm water. There is significant...
User Instructions
Page 10
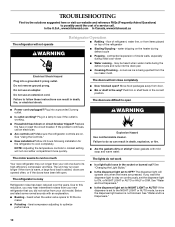
... a service call an electrician. ■ Are controls on . See "Water and Ice Dispensers." 10 may run even longer if the room is warm, a large food load is working ? Allow 24 hours following installation for the refrigerator to open . Clean gaskets with an explanation. ■ Buzzing - heard when the water valve opens to the NIGHT LIGHT or AUTO mode, be heard when water melts during the defrost cycle and runs into the drain pan Electrical...
... a service call an electrician. ■ Are controls on . See "Water and Ice Dispensers." 10 may run even longer if the room is warm, a large food load is working ? Allow 24 hours following installation for the refrigerator to open . Clean gaskets with an explanation. ■ Buzzing - heard when the water valve opens to the NIGHT LIGHT or AUTO mode, be heard when water melts during the defrost cycle and runs into the drain pan Electrical...

User Instructions
Page 11
...? Discard ice. A water filter may need to be installed to begin . Use a plastic utensil to clear the delivery chute. ■ Has the wrong ice been added to reset before using again. 11 Change the ice button from the ejector arm with a plastic utensil. ■ Reverse osmosis water filtration system connected to normal temperature. ■ Controls set correctly for refrigerator to return to your cold water supply? Allows humid air to "cubed." Make sure wire shutoff...
...? Discard ice. A water filter may need to be installed to begin . Use a plastic utensil to clear the delivery chute. ■ Has the wrong ice been added to reset before using again. 11 Change the ice button from the ejector arm with a plastic utensil. ■ Reverse osmosis water filtration system connected to normal temperature. ■ Controls set correctly for refrigerator to return to your cold water supply? Allows humid air to "cubed." Make sure wire shutoff...

User Instructions
Page 12
... the Installation Instructions or the Use & Care Guide. The dispenser water is not cool enough NOTE: Water from the dispenser is connected to a water supply and the supply shutoff valve turned on the refrigerator? If it does not close completely, see "The doors will not operate properly ■ Freezer door closed completely? See "Water Supply Requirements." Flush and fill the water system. ■ Water filter installed on ? In Canada, call 1-800-442-9991 and ask for the part number listed...
... the Installation Instructions or the Use & Care Guide. The dispenser water is not cool enough NOTE: Water from the dispenser is connected to a water supply and the supply shutoff valve turned on the refrigerator? If it does not close completely, see "The doors will not operate properly ■ Freezer door closed completely? See "Water Supply Requirements." Flush and fill the water system. ■ Water filter installed on ? In Canada, call 1-800-442-9991 and ask for the part number listed...
User Instructions
Page 13
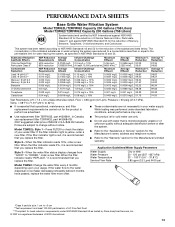
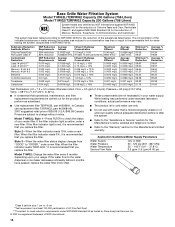
....33 74.00 Test Parameters: pH = 7.5 ± 0.5 unless otherwise noted. When the water filter status display changes from "GOOD" to NSF/ANSI Standards 42 and 53 for the reduction of the substances listed below. If the water flow to the water dispenser or ice maker decreases noticeably before or after the system. ■ Refer to the "Assistance or Service" section for the...
....33 74.00 Test Parameters: pH = 7.5 ± 0.5 unless otherwise noted. When the water filter status display changes from "GOOD" to NSF/ANSI Standards 42 and 53 for the reduction of the substances listed below. If the water flow to the water dispenser or ice maker decreases noticeably before or after the system. ■ Refer to the "Assistance or Service" section for the...
User Instructions
Page 14
... filter indicator light is red, it is for cold water use only. ■ Do not use replacement filter T2RFWG2, part #4396841B. 2007 suggested retail price of Chlorine Taste and Odor, Particulate Class II*; If the water flow to the water dispenser or ice maker decreases noticeably before or after the system. ■ Refer to the "Assistance or Service" section for the Manufacturer's name, address and telephone number...
... filter indicator light is red, it is for cold water use only. ■ Do not use replacement filter T2RFWG2, part #4396841B. 2007 suggested retail price of Chlorine Taste and Odor, Particulate Class II*; If the water flow to the water dispenser or ice maker decreases noticeably before or after the system. ■ Refer to the "Assistance or Service" section for the Manufacturer's name, address and telephone number...
User Instructions
Page 15
... parts are : compressor, evaporator, condenser, dryer, and connecting tubing. ITEMS KITCHENAID WILL NOT PAY FOR 1. Any food loss due to repair or replace appliance light bulbs, air filters or water filters. 3. Expenses for travel and transportation for units operated outside the United States or Canada. 7. Replacement parts or repair labor costs when the major appliance is designed to correct the installation of your complete model number ready. Service calls to refrigerator or freezer product...
... parts are : compressor, evaporator, condenser, dryer, and connecting tubing. ITEMS KITCHENAID WILL NOT PAY FOR 1. Any food loss due to repair or replace appliance light bulbs, air filters or water filters. 3. Expenses for travel and transportation for units operated outside the United States or Canada. 7. Replacement parts or repair labor costs when the major appliance is designed to correct the installation of your complete model number ready. Service calls to refrigerator or freezer product...
Parts Diagram
Page 2
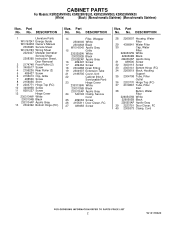
... 3400113 Screw 33 2303141 Bottom Hinge (FC) 34 2260519 Block, Housing Support 35 2304708 Tube, Filter Outlet 36 2203770 Hinge Top (FC) 37 2319867 Tube, Filter Inlet 38 Button, Water Filter 2260503W White 2260503B Black 2260503AP Apollo Gray 39 2223751 Door Closer, FC 40 2305373 Clamp, Cord 2 W10178020 DESCRIPTION 1 Literature Parts W10167247 Energy Guide W10162438 Owner's Manual 2303925 Service Sheet W10142183 Wiring Sheet 2220407 Modular Icemaker Service Sheet 2308395 Instruction Sheet, Door Removal 2 2174748 Front Roller (2) 3 3400517...
... 3400113 Screw 33 2303141 Bottom Hinge (FC) 34 2260519 Block, Housing Support 35 2304708 Tube, Filter Outlet 36 2203770 Hinge Top (FC) 37 2319867 Tube, Filter Inlet 38 Button, Water Filter 2260503W White 2260503B Black 2260503AP Apollo Gray 39 2223751 Door Closer, FC 40 2305373 Clamp, Cord 2 W10178020 DESCRIPTION 1 Literature Parts W10167247 Energy Guide W10162438 Owner's Manual 2303925 Service Sheet W10142183 Wiring Sheet 2220407 Modular Icemaker Service Sheet 2308395 Instruction Sheet, Door Removal 2 2174748 Front Roller (2) 3 3400517...
Parts Diagram
Page 3
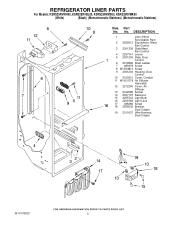
..., Meat Pan Control 3 2301339 Slide Meat Pan Control 4 2257741 Louver 5 2301235 Slide, Door Control 6 2319866 Shelf Ladder 7 489478 Screw 8 W10004810 Screw 9 2301234 Housing, Door Control 10 2150331 Cover, Conduit 11 W10151376 Air Diffuser Assembly 12 2212240 Cover, Air Diffuser 13 2162085 Socket 14 2307107 Reservoir 15 2255743 Light Bulb 16 2209769 Light Lens 17 488280 Screw 18 2256035 Bracket, Dual Crisper 19 2311637 Wire Harness, Dual Crisper W10178020 3 REFRIGERATOR LINER PARTS For Models...
..., Meat Pan Control 3 2301339 Slide Meat Pan Control 4 2257741 Louver 5 2301235 Slide, Door Control 6 2319866 Shelf Ladder 7 489478 Screw 8 W10004810 Screw 9 2301234 Housing, Door Control 10 2150331 Cover, Conduit 11 W10151376 Air Diffuser Assembly 12 2212240 Cover, Air Diffuser 13 2162085 Socket 14 2307107 Reservoir 15 2255743 Light Bulb 16 2209769 Light Lens 17 488280 Screw 18 2256035 Bracket, Dual Crisper 19 2311637 Wire Harness, Dual Crisper W10178020 3 REFRIGERATOR LINER PARTS For Models...

Parts Diagram
Page 10
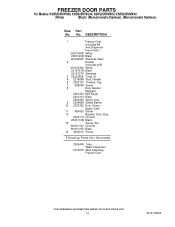
Part No. REFRIGERATOR DOOR PARTS For Models: KSRS25RVWH00, KSRS25RVBL00, KSRS25RVMS00, KSRS25RVMK00 (White) (Black) (Monochromatic Stainless) (Monochromatic Stainless) Illus. No. DESCRIPTION 1 Refrigerator Door (Includes Item #6) 2303139W White 2303139B Black 2303139SAP Stainless Steel 2 2301486 Door Compartment (Includes 7) 3 2223434K Door Bin (4) 4 3400012 Screw 5 2219698 Stud, Handle 6 Door Gasket, Magnetic 2221302 Mist Beige 2221313 Black 2326338 Apollo Grey 7 2159124 Gasket 8 Handle (Includes #13) 2319727W White 2319727B Black 2319727S Stainless 9 488208...
Part No. REFRIGERATOR DOOR PARTS For Models: KSRS25RVWH00, KSRS25RVBL00, KSRS25RVMS00, KSRS25RVMK00 (White) (Black) (Monochromatic Stainless) (Monochromatic Stainless) Illus. No. DESCRIPTION 1 Refrigerator Door (Includes Item #6) 2303139W White 2303139B Black 2303139SAP Stainless Steel 2 2301486 Door Compartment (Includes 7) 3 2223434K Door Bin (4) 4 3400012 Screw 5 2219698 Stud, Handle 6 Door Gasket, Magnetic 2221302 Mist Beige 2221313 Black 2326338 Apollo Grey 7 2159124 Gasket 8 Handle (Includes #13) 2319727W White 2319727B Black 2319727S Stainless 9 488208...
Parts Diagram
Page 12
... (3) 4 2219698 Stud, Handle 5 2303107 Thimble, Top 7 488208 Screw 8 Door Gasket, Magnetic 2221303 Mist Beige 2221314 Black 2326339 Apollo Grey 9 2304895 Safety Barrier 10 2223752 Door Closer, Upper Cam 11 489420 Screw 12 Bracket, Door Stop 2303113 Chrome 2303113B Black 13 Screw, Set W10010140 Chrome W10010150 Black 14 3400012 Screw Following Parts Not Illustrated 2305405 Tube, Water Dispenser 2310075 Wire Assembly, Freezer Door 12 W10178020 No.
... (3) 4 2219698 Stud, Handle 5 2303107 Thimble, Top 7 488208 Screw 8 Door Gasket, Magnetic 2221303 Mist Beige 2221314 Black 2326339 Apollo Grey 9 2304895 Safety Barrier 10 2223752 Door Closer, Upper Cam 11 489420 Screw 12 Bracket, Door Stop 2303113 Chrome 2303113B Black 13 Screw, Set W10010140 Chrome W10010150 Black 14 3400012 Screw Following Parts Not Illustrated 2305405 Tube, Water Dispenser 2310075 Wire Assembly, Freezer Door 12 W10178020 No.
Parts Diagram
Page 18
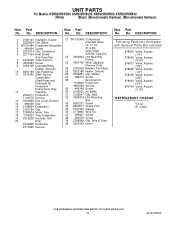
... Unit Cover, Bottom 14 489396 Clip 15 2188823 Evaporator 16 2161324 Clip 17 2188874 Motor, Fan 18 1105523 Tray, Evaporator 19 2310229 Harness, Unit 20 Drier 2319825 Production 2317845 Service 21 W10120456 Compressor (Includes Items 13, 17, 27, 31 & 39) (Also Order 876765 Tube Kit) 22 2304904 Unit Mounting Frame 23 4387765 Wire, Capacitor (Service Only) 24 2181929 Bracket, Fan Motor 25 2323198 Heater, Defrost 26...
... Unit Cover, Bottom 14 489396 Clip 15 2188823 Evaporator 16 2161324 Clip 17 2188874 Motor, Fan 18 1105523 Tray, Evaporator 19 2310229 Harness, Unit 20 Drier 2319825 Production 2317845 Service 21 W10120456 Compressor (Includes Items 13, 17, 27, 31 & 39) (Also Order 876765 Tube Kit) 22 2304904 Unit Mounting Frame 23 4387765 Wire, Capacitor (Service Only) 24 2181929 Bracket, Fan Motor 25 2323198 Heater, Defrost 26...


