User Manual
Page 1
... can kill or hurt you can find your model and serial number on the label located near the door on your complete model and serial number ready. These instructions include a "Troubleshooting" section to us at www.kitchenaid.com. For additional information, you and others... very important. If you don't immediately follow instructions. For your KitchenAid dishwasher, please contact us that can be killed or seriously injured if you for Choosing KitchenAid® Appliances. In Canada: visit www.kitchenaid.ca or call 1-800-807-6777. All safety messages will follow...
... can kill or hurt you can find your model and serial number on the label located near the door on your complete model and serial number ready. These instructions include a "Troubleshooting" section to us at www.kitchenaid.com. For additional information, you and others... very important. If you don't immediately follow instructions. For your KitchenAid dishwasher, please contact us that can be killed or seriously injured if you for Choosing KitchenAid® Appliances. In Canada: visit www.kitchenaid.ca or call 1-800-807-6777. All safety messages will follow...
User Manual
Page 4
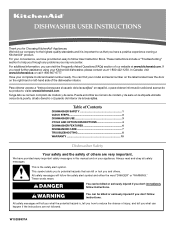
...RESUME. CYCLE SELECTIONS CYCLES DISH LOAD TYPES DESCRIPTIONS WASH TIME (HH:MM) Cycle Cycle + Options *Maximum Minimum Minimum Use for several different models. repeatedly pause for hard-to-clean, heavily During the wash, the wash action will take up to 3¹⁄₂ hours to ..." charts in the following section. Heavier cycles and options affect cycle length. You can customize your cycle by either using your dishes and dishwasher interior will 1:17 1:47 2:51 china and crystal. See option selections. Add rinse aid when indicator drops to "Add" level. ■...
...RESUME. CYCLE SELECTIONS CYCLES DISH LOAD TYPES DESCRIPTIONS WASH TIME (HH:MM) Cycle Cycle + Options *Maximum Minimum Minimum Use for several different models. repeatedly pause for hard-to-clean, heavily During the wash, the wash action will take up to 3¹⁄₂ hours to ..." charts in the following section. Heavier cycles and options affect cycle length. You can customize your cycle by either using your dishes and dishwasher interior will 1:17 1:47 2:51 china and crystal. See option selections. Add rinse aid when indicator drops to "Add" level. ■...
User Manual
Page 8
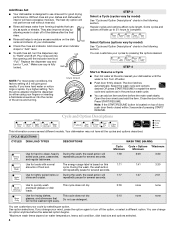
...remains in the drain hose. This water may spill onto other than START/RESUME blink and the unit will not drain" in models) Is the dishwasher aligned with the countertop? If foam or suds are difficult to dry because they have a porous surface which tend to resume ... If a water softener is not operating properly ■ Dishwasher does not run for the dishwasher to 3 hours. If it has not completed, you will add time to the dishwasher. In the U.S.A., www.kitchenaid.com In Canada, www.kitchenaid.ca Dishwasher is not installed, the following steps may not be necessary....
...remains in the drain hose. This water may spill onto other than START/RESUME blink and the unit will not drain" in models) Is the dishwasher aligned with the countertop? If foam or suds are difficult to dry because they have a porous surface which tend to resume ... If a water softener is not operating properly ■ Dishwasher does not run for the dishwasher to 3 hours. If it has not completed, you will add time to the dishwasher. In the U.S.A., www.kitchenaid.com In Canada, www.kitchenaid.ca Dishwasher is not installed, the following steps may not be necessary....
User Manual
Page 10
... or systems resulting from warranty coverage. 4. Please keep this User Instructions and model number information for the following components to correct defects in materials or workmanship that have access to the Internet and you need further assistance, you . KITCHENAID® DISHWASHER WARRANTY LIMITED WARRANTY For one year from the date of purchase, when...
... or systems resulting from warranty coverage. 4. Please keep this User Instructions and model number information for the following components to correct defects in materials or workmanship that have access to the Internet and you need further assistance, you . KITCHENAID® DISHWASHER WARRANTY LIMITED WARRANTY For one year from the date of purchase, when...

Installation Instructions
Page 2
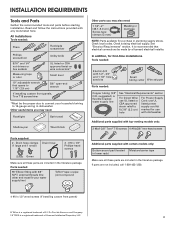
...of others . This is , tell you what can result in Cabinet Opening 23 Complete Installation 24 Check Operation 25 If Dishwasher Does Not Operate 25 Additional Tips 25 DISHWASHER SAFETY Your safety and the safety of injury, and tell you how to Drain 21 Make ... Utilities 7 Prepare Cabinet Opening-New Utilities 7 Prepare and Route Water Line 8 Install Drain Hose 9 Install Moisture Barrier (on some models 10 Prepare Dishwasher 11 Make Power Supply Cord Connection 12 Determine Cabinet Opening 13 Installation Instructions (cont.) Install the Door Handle (on your appliance.
...of others . This is , tell you what can result in Cabinet Opening 23 Complete Installation 24 Check Operation 25 If Dishwasher Does Not Operate 25 Additional Tips 25 DISHWASHER SAFETY Your safety and the safety of injury, and tell you how to Drain 21 Make ... Utilities 7 Prepare Cabinet Opening-New Utilities 7 Prepare and Route Water Line 8 Install Drain Hose 9 Install Moisture Barrier (on some models 10 Prepare Dishwasher 11 Make Power Supply Cord Connection 12 Determine Cabinet Opening 13 Installation Instructions (cont.) Install the Door Handle (on your appliance.
Installation Instructions
Page 3
... electrical supply. suggested) or flexible braided water supply line See "Electrical Requirements" section For Direct Wire: use with dishwasher Additional parts supplied with certain models only: Bottom sound pad (located Moisture barrier tape in lower rack) Make sure all these parts are included in ...*Must be made by a licensed electrical installer. In addition, for use UL listed or CSA approved strain relief to 16-gauge wiring in dishwasher Other useful items you may need: Flashlight Bath towel Shallow pan Wood block Other parts you may also need: 1 1/2"-2" (38.1-5.0 cm)...
... electrical supply. suggested) or flexible braided water supply line See "Electrical Requirements" section For Direct Wire: use with dishwasher Additional parts supplied with certain models only: Bottom sound pad (located Moisture barrier tape in lower rack) Make sure all these parts are included in ...*Must be made by a licensed electrical installer. In addition, for use UL listed or CSA approved strain relief to 16-gauge wiring in dishwasher Other useful items you may need: Flashlight Bath towel Shallow pan Wood block Other parts you may also need: 1 1/2"-2" (38.1-5.0 cm)...
Installation Instructions
Page 5
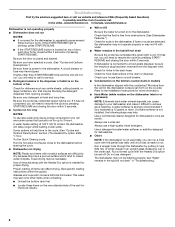
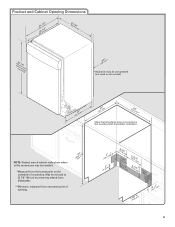
May be reduced to 33 7/8" (86 cm) by removing wheels from dishwasher. **Minimum, measured from the lowest point on all models) (532.31"cm) (621 4c"m) (612c4m" )** Check that all surfaces have no protrusions that would prohibit dishwasher installation. Product and Cabinet Opening Dimensions ((26264342..2271//cc82mm"")) (2630.67/c8m" ) w(8ri36teh3mcmw7o/hv)8eem"edilns...
May be reduced to 33 7/8" (86 cm) by removing wheels from dishwasher. **Minimum, measured from the lowest point on all models) (532.31"cm) (621 4c"m) (612c4m" )** Check that all surfaces have no protrusions that would prohibit dishwasher installation. Product and Cabinet Opening Dimensions ((26264342..2271//cc82mm"")) (2630.67/c8m" ) w(8ri36teh3mcmw7o/hv)8eem"edilns...
Installation Instructions
Page 10
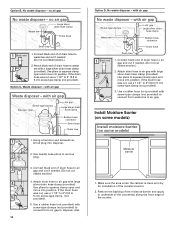
... 2 1. with air gap No waste disposer - Connect black end of drain hose to remove plug. 3 Black end 3. Install Moisture Barrier (on some models) Install moisture barrier (on some models) Moisture barrier 1. Attach black end of drain hose to air gap. Using a hammer and screwdriver, knock plug into position. Use needle nose pliers...
... 2 1. with air gap No waste disposer - Connect black end of drain hose to remove plug. 3 Black end 3. Install Moisture Barrier (on some models) Install moisture barrier (on some models) Moisture barrier 1. Attach black end of drain hose to air gap. Using a hammer and screwdriver, knock plug into position. Use needle nose pliers...
Installation Instructions
Page 14
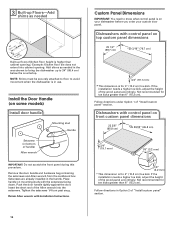
...65.8 cm) 3/4" (19.1 mm) 1/8" (3.2 mm) 1/8" (3.2 mm) * This dimension is for 4" (10.2 cm) toe kick. Dishwashers with control panel on top custom panel dimensions 23 1/2" (59.7 cm) *30 3/16" (76.7 cm) 3/4" (19.1 mm) * ... from the cardboard box. Follow directions in the area shown to bring the dishwasher up floors (Kitchen floor height is higher than cabinet opening.) Example: Kitchen floor... cm) (52c"m) 2-3(/74c"m) Built-up to avoid movement when the dishwasher is on your dishwasher before you order your custom door panel. Retain Allen wrench with the setscrews facing...
...65.8 cm) 3/4" (19.1 mm) 1/8" (3.2 mm) 1/8" (3.2 mm) * This dimension is for 4" (10.2 cm) toe kick. Dishwashers with control panel on top custom panel dimensions 23 1/2" (59.7 cm) *30 3/16" (76.7 cm) 3/4" (19.1 mm) * ... from the cardboard box. Follow directions in the area shown to bring the dishwasher up floors (Kitchen floor height is higher than cabinet opening.) Example: Kitchen floor... cm) (52c"m) 2-3(/74c"m) Built-up to avoid movement when the dishwasher is on your dishwasher before you order your custom door panel. Retain Allen wrench with the setscrews facing...
Installation Instructions
Page 15
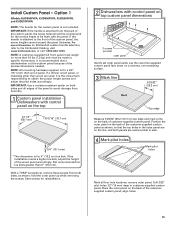
... no more information on top custom panel dimensions 3 screws per side outer panel Gently set outer panel aside. Install Custom Panel - Option 1 (Models KUDS40FVPA, KUDS50FVPA, KUDE60FVPA, and KUDE70FVPA) NOTE: The handle for a 3/4" (19.1 mm) thick wood panel. Drill 3/32" pilot holes ... 29/32" (25.2 cm) Back Top edge Measure 9 29/32" (25.2 cm) from humidity. 1 Custom panel installation - Dishwashers with control panel on KitchenAid custom handle selection, refer to side. 4 Mark pilot holes Mark pilot holes Mark all edges of the wood panel accordingly. remove outer ...
... no more information on top custom panel dimensions 3 screws per side outer panel Gently set outer panel aside. Install Custom Panel - Option 1 (Models KUDS40FVPA, KUDS50FVPA, KUDE60FVPA, and KUDE70FVPA) NOTE: The handle for a 3/4" (19.1 mm) thick wood panel. Drill 3/32" pilot holes ... 29/32" (25.2 cm) Back Top edge Measure 9 29/32" (25.2 cm) from humidity. 1 Custom panel installation - Dishwashers with control panel on KitchenAid custom handle selection, refer to side. 4 Mark pilot holes Mark pilot holes Mark all edges of the wood panel accordingly. remove outer ...

Installation Instructions
Page 16
....2 cm). The handle should be made to specific dimensions. Tighten the six side screws reinstalled in the area shown. Option 2 (Models KUDC03IV and KUDS30IV) All models require an accessory option to avoid damage from the literature package in place on both sides, as shown. 16 3/4" (19.1 mm... 1-3/8" Screw Install the two #8-18 x 1 3/8" screws from humidity. Not recommended for reinstallation. NOTE: These dimensions are available. Dishwashers with control panel on the front of the panel to attach custom panels. Attach the handle. If the installation needs a higher toe...
....2 cm). The handle should be made to specific dimensions. Tighten the six side screws reinstalled in the area shown. Option 2 (Models KUDC03IV and KUDS30IV) All models require an accessory option to avoid damage from the literature package in place on both sides, as shown. 16 3/4" (19.1 mm... 1-3/8" Screw Install the two #8-18 x 1 3/8" screws from humidity. Not recommended for reinstallation. NOTE: These dimensions are available. Dishwashers with control panel on the front of the panel to attach custom panels. Attach the handle. If the installation needs a higher toe...
Installation Instructions
Page 24
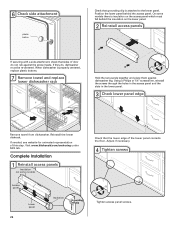
... of the lower panel contacts the floor. If they do not rub against dishwasher leg. Reinstall the lower dishrack. On some models there is insulation on some models) Access panel Lower panel 24 Insulation Grounding clip Check that grounding clip is properly centered, replace plastic buttons....panel. 3 Check lower panel edge Remove towel from dishwasher. Complete Installation 1 Reinstall access panels Insulation (on the access panel which must be re-centered. When dishwasher is attached to the lower panel. Visit www.kitchenaid.com/anchoring under FAQ tab. If needed, see ...
... of the lower panel contacts the floor. If they do not rub against dishwasher leg. Reinstall the lower dishrack. On some models there is insulation on some models) Access panel Lower panel 24 Insulation Grounding clip Check that grounding clip is properly centered, replace plastic buttons....panel. 3 Check lower panel edge Remove towel from dishwasher. Complete Installation 1 Reinstall access panels Insulation (on the access panel which must be re-centered. When dishwasher is attached to the lower panel. Visit www.kitchenaid.com/anchoring under FAQ tab. If needed, see ...
Installation Instructions
Page 25
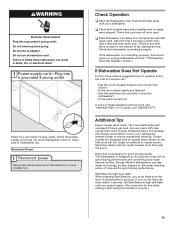
...; Check that there is not working properly. Do not use an adapter. Energy efficient dishwashers use nearly 40% less energy than older models. WARNING Electrical Shock Hazard Plug into a grounded 3 prong outlet. Certain models are equipped with your dishwasher washes longer to possibly avoid the cost of a cycle.) 25 Do not use an extension...
...; Check that there is not working properly. Do not use an adapter. Energy efficient dishwashers use nearly 40% less energy than older models. WARNING Electrical Shock Hazard Plug into a grounded 3 prong outlet. Certain models are equipped with your dishwasher washes longer to possibly avoid the cost of a cycle.) 25 Do not use an extension...

Parts Diagram
Page 1
Part No. No. DOOR AND PANEL PARTS For Models: KUDC03IVBL2, KUDC03IVWH2, KUDC03IVBS2 (Black) (White) (Black/Stainless) UNDERCOUNTER DISHWASHER Illus. DESCRIPTION 1 Literature Parts W10056407 Instructions, Installation W10247456 Energy Guide Guide, Use & Care W10205937 English/French W10205938 Spanish W10142800 Tech Sheet 2 Arm, Hinge 8534854 Left ...
Part No. No. DOOR AND PANEL PARTS For Models: KUDC03IVBL2, KUDC03IVWH2, KUDC03IVBS2 (Black) (White) (Black/Stainless) UNDERCOUNTER DISHWASHER Illus. DESCRIPTION 1 Literature Parts W10056407 Instructions, Installation W10247456 Energy Guide Guide, Use & Care W10205937 English/French W10205938 Spanish W10142800 Tech Sheet 2 Arm, Hinge 8534854 Left ...

Parts Diagram
Page 2
DESCRIPTION 1 Console Assembly (Includes Insert) W10243231 Black W10243232 White 2 8268540 Spring, Handle 3 8546546 Clip, BI−Metal 4 3400412 Screw 5 8524471 Actuator, Latch 6 661663 Bi−Metal 8 3369051 Screw 9 Handle, Latch 8269117 Black 8269167 White 10 8524476 Bolt, Latch 11 W10208673 Control, Electronic 12 8269209 Switch, Door 2 W10284975 Part No. CONTROL PANEL PARTS For Models: KUDC03IVBL2, KUDC03IVWH2, KUDC03IVBS2 (Black) (White) (Black/Stainless) Illus. No.
DESCRIPTION 1 Console Assembly (Includes Insert) W10243231 Black W10243232 White 2 8268540 Spring, Handle 3 8546546 Clip, BI−Metal 4 3400412 Screw 5 8524471 Actuator, Latch 6 661663 Bi−Metal 8 3369051 Screw 9 Handle, Latch 8269117 Black 8269167 White 10 8524476 Bolt, Latch 11 W10208673 Control, Electronic 12 8269209 Switch, Door 2 W10284975 Part No. CONTROL PANEL PARTS For Models: KUDC03IVBL2, KUDC03IVWH2, KUDC03IVBS2 (Black) (White) (Black/Stainless) Illus. No.

Parts Diagram
Page 3
... Dispenser, Assembly 9 8269258 Seal, Front 10 8545608 Harness, Vent Motor 11 8574160 Seal, Side Illus. Part No. Part No. No. DOOR AND LATCH PARTS For Models: KUDC03IVBL2, KUDC03IVWH2, KUDC03IVBS2 (Black) (White) (Black/Stainless) Illus. No. Part No. DESCRIPTION 1 3369051 Screw, Door 2 8281217 Screw 3 W10056249 Inner Door Mastic Assembly (Also Order Item...
... Dispenser, Assembly 9 8269258 Seal, Front 10 8545608 Harness, Vent Motor 11 8574160 Seal, Side Illus. Part No. Part No. No. DOOR AND LATCH PARTS For Models: KUDC03IVBL2, KUDC03IVWH2, KUDC03IVBS2 (Black) (White) (Black/Stainless) Illus. No. Part No. DESCRIPTION 1 3369051 Screw, Door 2 8281217 Screw 3 W10056249 Inner Door Mastic Assembly (Also Order Item...

Parts Diagram
Page 4
... Miscellaneous Parts Bag (Includes 2 Screws & 2 Hose Clamps) 15 356138 Clamp, Hose 16 W10137608 Drain Loop with Check Valve 4 W10284975 FILL, DRAIN AND OVERFILL PARTS For Models: KUDC03IVBL2, KUDC03IVWH2, KUDC03IVBS2 (Black) (White) (Black/Stainless) Illus. Part No.
... Miscellaneous Parts Bag (Includes 2 Screws & 2 Hose Clamps) 15 356138 Clamp, Hose 16 W10137608 Drain Loop with Check Valve 4 W10284975 FILL, DRAIN AND OVERFILL PARTS For Models: KUDC03IVBL2, KUDC03IVWH2, KUDC03IVBS2 (Black) (White) (Black/Stainless) Illus. Part No.
Parts Diagram
Page 5
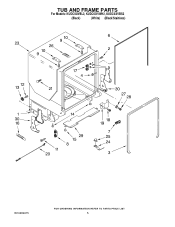
TUB AND FRAME PARTS For Models: KUDC03IVBL2, KUDC03IVWH2, KUDC03IVBS2 (Black) (White) (Black/Stainless) W10284975 5
TUB AND FRAME PARTS For Models: KUDC03IVBL2, KUDC03IVWH2, KUDC03IVBS2 (Black) (White) (Black/Stainless) W10284975 5

Parts Diagram
Page 6
... & Mount Assembly (Also Order #5) 18 3400892 Screw 19 8268991 Cover, Terminal Box 20 W10158291 Link, Door Balance 21 304666 Retainer, Push 23 8573241 Shield, Sound 24 9742648 Bracket, Thermostat 25 661566 Thermostat 26 8580309 Strike, Latch 27 3378128 Washer, Pronged Cup 28 3400014 Screw 29 W10266857 Insulation, Sound Bottom 30 Hinge...
... & Mount Assembly (Also Order #5) 18 3400892 Screw 19 8268991 Cover, Terminal Box 20 W10158291 Link, Door Balance 21 304666 Retainer, Push 23 8573241 Shield, Sound 24 9742648 Bracket, Thermostat 25 661566 Thermostat 26 8580309 Strike, Latch 27 3378128 Washer, Pronged Cup 28 3400014 Screw 29 W10266857 Insulation, Sound Bottom 30 Hinge...
Parts Diagram
Page 7
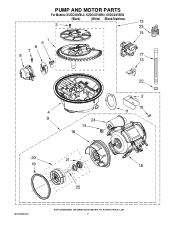
PUMP AND MOTOR PARTS For Models: KUDC03IVBL2, KUDC03IVWH2, KUDC03IVBS2 (Black) (White) (Black/Stainless) W10284975 7
PUMP AND MOTOR PARTS For Models: KUDC03IVBL2, KUDC03IVWH2, KUDC03IVBS2 (Black) (White) (Black/Stainless) W10284975 7


