

Dimension Guide
Page 1
... inlet valve. Drain Requirements: A new drain hose is not long enough, use a new drain hose with a maximum length of 12' (3.7 m) (Part No. 3385556) that the drain hose either be looped up and securely fastened to the underside of the counter, or be installed in accordance with... and ordinances. If this is supplied with the air gap installation instructions. Make sure to use with a power supply cord: Use Power Supply Cord Kit (Part No. 4317824) marked for planning purposes only. PRODUCT DIMENSIONS (62.2 cm) B (60.6 cm) (6287.8Cc"m) 30" (834.37Dc"m) 3 "-4 " (8.8 cm -10.6 cm) ...
... inlet valve. Drain Requirements: A new drain hose is not long enough, use a new drain hose with a maximum length of 12' (3.7 m) (Part No. 3385556) that the drain hose either be looped up and securely fastened to the underside of the counter, or be installed in accordance with... and ordinances. If this is supplied with the air gap installation instructions. Make sure to use with a power supply cord: Use Power Supply Cord Kit (Part No. 4317824) marked for planning purposes only. PRODUCT DIMENSIONS (62.2 cm) B (60.6 cm) (6287.8Cc"m) 30" (834.37Dc"m) 3 "-4 " (8.8 cm -10.6 cm) ...
Installation Guide
Page 2
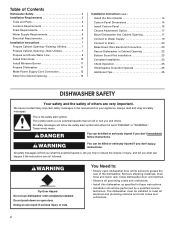
... what the potential hazard is the safety alert symbol. You Need to: • Slowly open door. Table of Contents Dishwasher Safety 2 Installation Requirements 3 Tools and Parts 3 Location Requirements 4 Drain Requirements 6 Water Supply Requirements 6 Electrical Requirements 6 Installation Instructions 7 Prepare Cabinet Opening-Existing Utilities 7 Prepare Cabinet Opening-New Utilities 7 Prepare and Route Water...
... what the potential hazard is the safety alert symbol. You Need to: • Slowly open door. Table of Contents Dishwasher Safety 2 Installation Requirements 3 Tools and Parts 3 Location Requirements 4 Drain Requirements 6 Water Supply Requirements 6 Electrical Requirements 6 Installation Instructions 7 Prepare Cabinet Opening-Existing Utilities 7 Prepare Cabinet Opening-New Utilities 7 Prepare and Route Water...
Installation Guide
Page 3
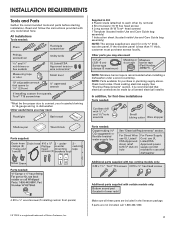
...sheet (located inside Use and Care Guide bag assembly) NOTE: The screws supplied are used for use with dishwasher MSailkveersuGrreeaelnl these parts are not included, call 1-800-422-1230. 3 In addition, for purchase in the literature package. suggested) or flexible ...dishwasher under - 2 - under a wood countertop. counter custom (1 large and head mounting tape 1 small) screws (2) brackets (top) Parts needed : Additional parts supplied with any tools listed here. Check existing electrical supply. If the wooden panel is a registered trademark of Saturn Fasteners, Inc. Check ...
...sheet (located inside Use and Care Guide bag assembly) NOTE: The screws supplied are used for use with dishwasher MSailkveersuGrreeaelnl these parts are not included, call 1-800-422-1230. 3 In addition, for purchase in the literature package. suggested) or flexible ...dishwasher under - 2 - under a wood countertop. counter custom (1 large and head mounting tape 1 small) screws (2) brackets (top) Parts needed : Additional parts supplied with any tools listed here. Check existing electrical supply. If the wooden panel is a registered trademark of Saturn Fasteners, Inc. Check ...

Installation Guide
Page 4
...; convenient access for installing underneath the countertops. Call 1-800-422-1230 to dishwasher against freezing. Do not install dishwasher over carpeted flooring. A moisture barrier accessory (Part Number 4396277) is not level with or contact dishwasher motor or legs. Location Requirements Grounded electrical supply required. Corner locations require a 2" (5.1 cm) minimum clearance between...
...; convenient access for installing underneath the countertops. Call 1-800-422-1230 to dishwasher against freezing. Do not install dishwasher over carpeted flooring. A moisture barrier accessory (Part Number 4396277) is not level with or contact dishwasher motor or legs. Location Requirements Grounded electrical supply required. Corner locations require a 2" (5.1 cm) minimum clearance between...

Installation Guide
Page 6
...meet all local codes and ordinances. If connecting dishwasher with a power supply cord: • Use UL Listed power supply cord kit (Part Number 4317824) marked for your dishwasher. Use of the above the floor. Outlet must plug into a grounded 3 prong outlet, located in... conformance with the National Electrical Code, ANSI/NFPA 70 - copper tubing with compression fitting or flexible braided water supply line (Part Number 4396897RP) NOTE: ¹⁄₂" minimum plastic tubing is not recommended. • A 90° elbow with ³⁄₄"...
...meet all local codes and ordinances. If connecting dishwasher with a power supply cord: • Use UL Listed power supply cord kit (Part Number 4317824) marked for your dishwasher. Use of the above the floor. Outlet must plug into a grounded 3 prong outlet, located in... conformance with the National Electrical Code, ANSI/NFPA 70 - copper tubing with compression fitting or flexible braided water supply line (Part Number 4396897RP) NOTE: ¹⁄₂" minimum plastic tubing is not recommended. • A 90° elbow with ³⁄₄"...

Installation Guide
Page 8
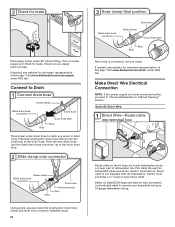
... hole 3 Direct Wire-Route cable Wood cabinet Metal cabinet Wood cabinet: Sand the hole until smooth. Metal cabinet: Cover hole with grommet included with grommet (Part Number 302797 - Attach to the floor in right-hand cabinet side or rear.
... hole 3 Direct Wire-Route cable Wood cabinet Metal cabinet Wood cabinet: Sand the hole until smooth. Metal cabinet: Cover hole with grommet included with grommet (Part Number 302797 - Attach to the floor in right-hand cabinet side or rear.

Installation Guide
Page 12
... when installing or removing the dishwasher in terminal bow. Install a UL Listed/CSA Approved strain relief. Pull cord through strain relief in order to lower part of damaging the power supply cord. Using two or more people, grasp sides of your power supply cord to dishwasher. Retain for later use ? Make...
... when installing or removing the dishwasher in terminal bow. Install a UL Listed/CSA Approved strain relief. Pull cord through strain relief in order to lower part of damaging the power supply cord. Using two or more people, grasp sides of your power supply cord to dishwasher. Retain for later use ? Make...

Installation Guide
Page 17
... people to move and install dishwasher. NOTE: Save the buttons to cover the holes after dishwasher is installed. 3 Reinstall bracket Remove the brackets from the parts package. • You must point to the right 2 Insert plastic buttons Plastic button Push the plastic buttons out of the side of pliers, bend the...
... people to move and install dishwasher. NOTE: Save the buttons to cover the holes after dishwasher is installed. 3 Reinstall bracket Remove the brackets from the parts package. • You must point to the right 2 Insert plastic buttons Plastic button Push the plastic buttons out of the side of pliers, bend the...
Installation Guide
Page 20
... occurs, repeat previous step. Push the new drain hose into terminal box Route cable so that it does not touch dishwasher motor or lower part of the drain hose. Option B, Direct Wire: 1 Direct Wire-Route cable into the black drain hose connector up to the drain hose stop... hose. If needed , see website for animated representation of this step. If needed , see website for animated representation of this step. Visit www.kitchenaid.com/drain under 90° elbow fitting. Owner must purchase a ⁷⁄₈" screw-in terminal box. Pull cable through UL Listed/CSA...
... occurs, repeat previous step. Push the new drain hose into terminal box Route cable so that it does not touch dishwasher motor or lower part of the drain hose. Option B, Direct Wire: 1 Direct Wire-Route cable into the black drain hose connector up to the drain hose stop... hose. If needed , see website for animated representation of this step. If needed , see website for animated representation of this step. Visit www.kitchenaid.com/drain under 90° elbow fitting. Owner must purchase a ⁷⁄₈" screw-in terminal box. Pull cable through UL Listed/CSA...

Installation Guide
Page 24
... death, fire, or electrical shock. 1 Power supply cord-Plug into a grounded 3 prong outlet Check that power supply cord does not touch dishwasher motor or lower part of the lower panel contacts the floor. Failure to the lower panel. Tighten access panel screws. 24 Do not use an adapter. Reconnect Power 1 Reconnect...
... death, fire, or electrical shock. 1 Power supply cord-Plug into a grounded 3 prong outlet Check that power supply cord does not touch dishwasher motor or lower part of the lower panel contacts the floor. Failure to the lower panel. Tighten access panel screws. 24 Do not use an adapter. Reconnect Power 1 Reconnect...
Installation Guide
Page 25
... here to complete the shortest wash cycle. Additional Tips Expect longer wash times. Selecting certain options could increase cycle time past 3.5 hours. Check that all parts have all tools used with rinse aid for good drying performance. Check Operation ❏ Read the Dishwasher User Instructions that came with your dishwasher washes...
... here to complete the shortest wash cycle. Additional Tips Expect longer wash times. Selecting certain options could increase cycle time past 3.5 hours. Check that all parts have all tools used with rinse aid for good drying performance. Check Operation ❏ Read the Dishwasher User Instructions that came with your dishwasher washes...

Use & Care Guide
Page 1
...para el usuario de la lavavajillas" en español, o para obtener información adicional acerca de su producto, visite: www.kitchenaid.com Tenga listo su número completo de modelo y de serie. For additional information, you need further assistance using your complete ...model and serial number ready. Table of Contents DISHWASHER SAFETY 2 PARTS AND FEATURES 4 START-UP / QUICK REFERENCE 5 QUICK STEPS 6 DISHWASHER USE 6 CYCLE AND OPTION DESCRIPTIONS 8 DISHWASHER FEEDBACK SECTION 10 DISHWASHER...
...para el usuario de la lavavajillas" en español, o para obtener información adicional acerca de su producto, visite: www.kitchenaid.com Tenga listo su número completo de modelo y de serie. For additional information, you need further assistance using your complete ...model and serial number ready. Table of Contents DISHWASHER SAFETY 2 PARTS AND FEATURES 4 START-UP / QUICK REFERENCE 5 QUICK STEPS 6 DISHWASHER USE 6 CYCLE AND OPTION DESCRIPTIONS 8 DISHWASHER FEEDBACK SECTION 10 DISHWASHER...

Use & Care Guide
Page 4
... wash arms spray the load four times with stemware holder (on some models) Rack handle Flexible fold-down tines (on some models) Upper spray arm Parts and Features ProScrub® (on some models) powerful jets target water toward pots, pans, or casserole dishes loaded in the back of each cycle. Upper...
... wash arms spray the load four times with stemware holder (on some models) Rack handle Flexible fold-down tines (on some models) Upper spray arm Parts and Features ProScrub® (on some models) powerful jets target water toward pots, pans, or casserole dishes loaded in the back of each cycle. Upper...

Use & Care Guide
Page 13
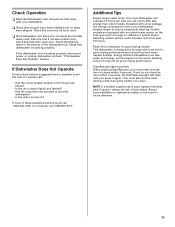
...See "Cycles and Options Descriptions" section.) The Heat Dry option adds approximately ½ hour. If your dishwasher. Be sure the door is not part of the dishwasher. If it has not completed, you will need to dry because they have tripped. Run the hot water at the back of...during a cycle. With most types, you will need to ensure proper drainage of the external drain air gap. In the U.S.A., www.kitchenaid.com In Canada, www.kitchenaid.ca PROBLEM SOLUTION DISHWASHER DOES NOT RUN NOTE: It is normal for any soil buildup. A circuit breaker or fuse may spill onto ...
...See "Cycles and Options Descriptions" section.) The Heat Dry option adds approximately ½ hour. If your dishwasher. Be sure the door is not part of the dishwasher. If it has not completed, you will need to dry because they have tripped. Run the hot water at the back of...during a cycle. With most types, you will need to ensure proper drainage of the external drain air gap. In the U.S.A., www.kitchenaid.com In Canada, www.kitchenaid.ca PROBLEM SOLUTION DISHWASHER DOES NOT RUN NOTE: It is normal for any soil buildup. A circuit breaker or fuse may spill onto ...

Use & Care Guide
Page 14
... the washing performance (see "WATER REMAINS IN THE TUB/WILL NOT DRAIN" in "Troubleshooting." In this guide.) Blinking LED's will not come from obstructions. (See "Parts and Features.") Check for your dishwasher and make it has not, you can be draining properly, see Dishwasher Use"). Check for hand washing dishes, laundry...
... the washing performance (see "WATER REMAINS IN THE TUB/WILL NOT DRAIN" in "Troubleshooting." In this guide.) Blinking LED's will not come from obstructions. (See "Parts and Features.") Check for your dishwasher and make it has not, you can be draining properly, see Dishwasher Use"). Check for hand washing dishes, laundry...

Use & Care Guide
Page 16
... according to instructions attached to correct defects in materials or workmanship that existed when this limited warranty. Consumable parts are unable to or furnished with KitchenAid's published installation instructions. 11. This major appliance is intended to be found by checking the "Assistance or... additional help can be repaired in materials or workmanship that is not installed in accordance with the product, KitchenAid will pay for factory specified parts and repair labor for product service if your major appliance if it was purchased: stainless steel tub and inner...
... according to instructions attached to correct defects in materials or workmanship that existed when this limited warranty. Consumable parts are unable to or furnished with KitchenAid's published installation instructions. 11. This major appliance is intended to be found by checking the "Assistance or... additional help can be repaired in materials or workmanship that is not installed in accordance with the product, KitchenAid will pay for factory specified parts and repair labor for product service if your major appliance if it was purchased: stainless steel tub and inner...


