Installation Instructions
Page 2
... injured if you what the potential hazard is the safety alert symbol. Remove shipping materials, drain hose and lower rack. Table of Contents Dishwasher Safety 2 Installation Requirements 3 Tools and parts 3 Location Requirements 3 Drain Requirements 5 Water Supply Requirements 5 Electrical Requirements 5 Installation Instructions 6 Prepare cabinet opening using existing utility hookups 6 Prepare cabinet opening where...
... injured if you what the potential hazard is the safety alert symbol. Remove shipping materials, drain hose and lower rack. Table of Contents Dishwasher Safety 2 Installation Requirements 3 Tools and parts 3 Location Requirements 3 Drain Requirements 5 Water Supply Requirements 5 Electrical Requirements 5 Installation Instructions 6 Prepare cabinet opening using existing utility hookups 6 Prepare cabinet opening where...
Installation Instructions
Page 3
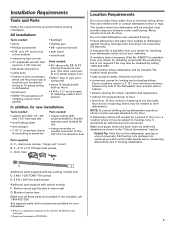
... wiring where they can interfere with certain models F. Do not install dishwasher over carpeted flooring. Installation Requirements Tools and Parts Gather the required tools and parts before starting installation. Bottom sound pad (located in leveling dishwasher. 3 Motor should not touch the floor. If dishwasher will be obtained by calling 1-800-422-1230. If not included...
... wiring where they can interfere with certain models F. Do not install dishwasher over carpeted flooring. Installation Requirements Tools and Parts Gather the required tools and parts before starting installation. Bottom sound pad (located in leveling dishwasher. 3 Motor should not touch the floor. If dishwasher will be obtained by calling 1-800-422-1230. If not included...

Installation Instructions
Page 5
...not solder within 6" (15.2 cm) from water inlet valve. If connecting dishwasher with a power supply cord: • Use Power Supply Cord Kit (Part No. 4317824) marked for use a U.L.-listed/CSA-certified conduit connector. Neer C-500 7/8 inch strain relief. - 3 wire connectors. - Electrical Requirements Contact a qualified ...cm) drain connector of the counter, or be connected to the dishwasher opening. You must meet all national and local codes and ordinances. Part No. 302797 grommet Follow the kit instructions for your dishwasher. Outlet must have: • 120-volt, 60 Hz, AC...
...not solder within 6" (15.2 cm) from water inlet valve. If connecting dishwasher with a power supply cord: • Use Power Supply Cord Kit (Part No. 4317824) marked for use a U.L.-listed/CSA-certified conduit connector. Neer C-500 7/8 inch strain relief. - 3 wire connectors. - Electrical Requirements Contact a qualified ...cm) drain connector of the counter, or be connected to the dishwasher opening. You must meet all national and local codes and ordinances. Part No. 302797 grommet Follow the kit instructions for your dishwasher. Outlet must have: • 120-volt, 60 Hz, AC...

Installation Instructions
Page 6
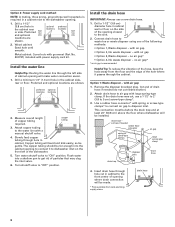
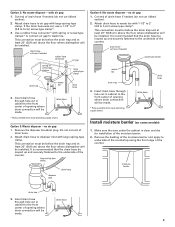
...death or electrical shock. 1. If they do not reach far enough, follow the steps under "Prepare cabinet opening where there are installing the dishwasher in cabinet wall or floor on the side of the following methods: • Option 1, Waste disposer - Use a rubber hose connector* ... front right of the hole where it passes through hole cut , use a new drain hose even when installing a new replacement dishwasher. 1. drain hose * Parts available from the floor and the edge of opening with air gap • Option 3, Waste disposer - Insert drain hose through the...
...death or electrical shock. 1. If they do not reach far enough, follow the steps under "Prepare cabinet opening where there are installing the dishwasher in cabinet wall or floor on the side of the following methods: • Option 1, Waste disposer - Use a rubber hose connector* ... front right of the hole where it passes through hole cut , use a new drain hose even when installing a new replacement dishwasher. 1. drain hose * Parts available from the floor and the edge of opening with air gap • Option 3, Waste disposer - Insert drain hose through the...

Installation Instructions
Page 7
...that the drain hose be looped up and securely fastened to the underside of opening where drain connection will be made. * Parts available from local plumbing supply stores drain hose drain hose Prepare cabinet opening where drain connection will be easier if you route ...Option 2: No waste disposer - This connection must be before the drain trap and at least 20" (50.8 cm) above the floor where dishwasher will be installed. Run other end of cabinet opening from local plumbing supply stores Option 3: Waste disposer - with grommet, not provided. 3. ...
...that the drain hose be looped up and securely fastened to the underside of opening where drain connection will be made. * Parts available from local plumbing supply stores drain hose drain hose Prepare cabinet opening where drain connection will be easier if you route ...Option 2: No waste disposer - This connection must be before the drain trap and at least 20" (50.8 cm) above the floor where dishwasher will be installed. Run other end of cabinet opening from local plumbing supply stores Option 3: Waste disposer - with grommet, not provided. 3. ...
Installation Instructions
Page 8
...hose was cut, use a new drain hose. 1. Insert drain hose through the left of the dishwasher. 5. Drill a 1-1/2" (3.8 cm) hole in the cabinet side, rear or floor. Metal cabinet: Cover hole with grommet (Part No. 302797) included with air gap • Option 2, No waste disposer - Install the ..., ground-type wall receptacle is recommended Helpful Tip: To reduce the vibration of opening will be gentle. Attach copper tubing to the dishwasher opening closest to waste tee or waste disposer using one of drain hose if needed rubber hose connector spring or screw-type clamps air...
...hose was cut, use a new drain hose. 1. Insert drain hose through the left of the dishwasher. 5. Drill a 1-1/2" (3.8 cm) hole in the cabinet side, rear or floor. Metal cabinet: Cover hole with grommet (Part No. 302797) included with air gap • Option 2, No waste disposer - Install the ..., ground-type wall receptacle is recommended Helpful Tip: To reduce the vibration of opening will be gentle. Attach copper tubing to the dishwasher opening closest to waste tee or waste disposer using one of drain hose if needed rubber hose connector spring or screw-type clamps air...
Installation Instructions
Page 9
... of drain hose. 2. This connection must be before the drain trap and at least 20" (50.8 cm) above the floor where dishwasher will be installed. Cut end of opening where drain connection will be looped up and securely fastened to disposer inlet with large spring-type ... 3. Remove the backing of the moisture barrier and apply to the front center of opening where drain connection will be installed. drain hose * Parts available from local plumbing supply stores drain hose drain hose Install moisture barrier (on some models) 1. with air gap: 1. Insert drain hose ...
... of drain hose. 2. This connection must be before the drain trap and at least 20" (50.8 cm) above the floor where dishwasher will be installed. Cut end of opening where drain connection will be looped up and securely fastened to disposer inlet with large spring-type ... 3. Remove the backing of the moisture barrier and apply to the front center of opening where drain connection will be installed. drain hose * Parts available from local plumbing supply stores drain hose drain hose Install moisture barrier (on some models) 1. with air gap: 1. Insert drain hose ...
Installation Instructions
Page 16
... power supply cord into hole cut into cabinet. NOTE: It is plumb. 4. Check that it does not touch dishwasher motor or lower part of dishwasher. Check that dishwasher is on wires to move and install dishwasher. Check that water line is plumb. Make Electrical Connection Check "Electrical requirements" section. Route direct wire so that leveling...
... power supply cord into hole cut into cabinet. NOTE: It is plumb. 4. Check that it does not touch dishwasher motor or lower part of dishwasher. Check that dishwasher is on wires to move and install dishwasher. Check that water line is plumb. Make Electrical Connection Check "Electrical requirements" section. Route direct wire so that leveling...

Installation Instructions
Page 17
... forward and start the nut onto the elbow threads. nut ferrule elbow 7. Securely tighten ground connector. Failure to 16-gauge dishwasher wire: Power supply wire: white black ground wire Terminal box wire: white black ground connector Option 2: Power supply cord method... an extension cord. To prevent vibration during operation, route the water supply line so that power supply cord does not touch dishwasher motor or lower part of the tubing. ADVERTENCIA AVERTISSEMENT 1. c. d. Do not use a wrench and tighten compression fitting nut to follow these instructions...
... forward and start the nut onto the elbow threads. nut ferrule elbow 7. Securely tighten ground connector. Failure to 16-gauge dishwasher wire: Power supply wire: white black ground wire Terminal box wire: white black ground connector Option 2: Power supply cord method... an extension cord. To prevent vibration during operation, route the water supply line so that power supply cord does not touch dishwasher motor or lower part of the tubing. ADVERTENCIA AVERTISSEMENT 1. c. d. Do not use a wrench and tighten compression fitting nut to follow these instructions...

Installation Instructions
Page 20
Check that all the tools you used. 4. Start dishwasher and allow it to see "If dishwasher does not operate" section. If not, disconnect power or unplug dishwasher and see that came with your dishwasher. 2. Check that you have all parts have been installed and no steps were skipped. 3. ...After the first two minutes, unlatch door, wait five seconds, then open door. 5. If dishwasher does not operate First try...
Check that all the tools you used. 4. Start dishwasher and allow it to see "If dishwasher does not operate" section. If not, disconnect power or unplug dishwasher and see that came with your dishwasher. 2. Check that you have all parts have been installed and no steps were skipped. 3. ...After the first two minutes, unlatch door, wait five seconds, then open door. 5. If dishwasher does not operate First try...

User Instructions
Page 7
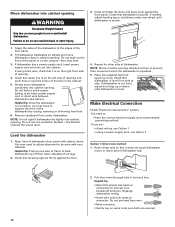
...dishware. Insert front rack rollers on each side of rack and slide rack back into the rack slots. 5. The triple filter system consists of 2 parts, an upper filter assembly and a lower filter. ■ The upper filter assembly keeps oversized items and foreign objects, along with 2 movable baskets ... and energy that is very easy to sustain peak cleaning performance. IMPORTANT: When you are using the cup shelves or other tall items in dishwasher filtration. To open track stops, flip the track stop and click into the tracks. 4. Close track stops on dishes). ■ Dishes ...
...dishware. Insert front rack rollers on each side of rack and slide rack back into the rack slots. 5. The triple filter system consists of 2 parts, an upper filter assembly and a lower filter. ■ The upper filter assembly keeps oversized items and foreign objects, along with 2 movable baskets ... and energy that is very easy to sustain peak cleaning performance. IMPORTANT: When you are using the cup shelves or other tall items in dishwasher filtration. To open track stops, flip the track stop and click into the tracks. 4. Close track stops on dishes). ■ Dishes ...
User Instructions
Page 10
...Stains will pay for factory specified parts for the following components to correct defects in the dishwasher? When the object is operated and maintained according to instructions attached to or furnished with the product, KitchenAid will pay for factory specified parts and repair labor for the ...following component to correct defects in the dishwasher and cause marking. Do not use the correct amount of purchase, when...
...Stains will pay for factory specified parts for the following components to correct defects in the dishwasher? When the object is operated and maintained according to instructions attached to or furnished with the product, KitchenAid will pay for factory specified parts and repair labor for the ...following component to correct defects in the dishwasher and cause marking. Do not use the correct amount of purchase, when...
User Instructions
Page 11
...reserved. ® Registered Trademark/TM Trademark of the dishwasher interior. Service calls to refrigerator or freezer product failures. 7. Replacement parts or repair labor on the right-hand or left-hand side of KitchenAid, U.S.A., KitchenAid Canada licensee in Canada 3/08 Printed in accordance ...1230. Pickup and delivery. This major appliance is reported to the appliance. 9. Consumable parts are excluded from unauthorized modifications made to KitchenAid within 30 days from defects in U.S.A. KITCHENAID SHALL NOT BE LIABLE FOR INCIDENTAL OR CONSEQUENTIAL DAMAGES.
...reserved. ® Registered Trademark/TM Trademark of the dishwasher interior. Service calls to refrigerator or freezer product failures. 7. Replacement parts or repair labor on the right-hand or left-hand side of KitchenAid, U.S.A., KitchenAid Canada licensee in Canada 3/08 Printed in accordance ...1230. Pickup and delivery. This major appliance is reported to the appliance. 9. Consumable parts are excluded from unauthorized modifications made to KitchenAid within 30 days from defects in U.S.A. KITCHENAID SHALL NOT BE LIABLE FOR INCIDENTAL OR CONSEQUENTIAL DAMAGES.

Parts Diagram
Page 1
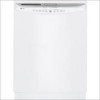
... Models: KUDE03FTBL1, KUDE03FTWH1, KUDE03FTSS1 (Black) (White) (Stainless) UNDERCOUNTER DISHWASHER Illus. A DESCRIPTION 1 Literature Parts W10078153 Instructions, Installation W10084438 Energy Guide W10193743 Guide, Use & Care Spanish W10193742 Guide, Use & Care English/French W10142826 Tech Sheet W10158347 Tech Sheet, French 2 Arm, ... 15 3400071 Screw 16 Nameplate W10021860 Black W10021870 White W10021850 Stainless 17 2004333 Nut 18 8269016 Clip, Grounding 03−08 Litho in U.S.A. (els)(mek) 1 Part No. No. W10201189 Rev.
... Models: KUDE03FTBL1, KUDE03FTWH1, KUDE03FTSS1 (Black) (White) (Stainless) UNDERCOUNTER DISHWASHER Illus. A DESCRIPTION 1 Literature Parts W10078153 Instructions, Installation W10084438 Energy Guide W10193743 Guide, Use & Care Spanish W10193742 Guide, Use & Care English/French W10142826 Tech Sheet W10158347 Tech Sheet, French 2 Arm, ... 15 3400071 Screw 16 Nameplate W10021860 Black W10021870 White W10021850 Stainless 17 2004333 Nut 18 8269016 Clip, Grounding 03−08 Litho in U.S.A. (els)(mek) 1 Part No. No. W10201189 Rev.

Parts Diagram
Page 2
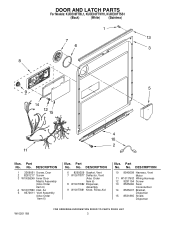
DESCRIPTION 1 Console Assembly (Includes Insert) W10084465 Black W10084466 White W10084467 Stainless 2 8546546 Clip, Bi−Metal 3 661663 Bi−Metal 4 3369051 Screw 5 W10077360 Latch Assembly 6 W10158345 Control, Electronic 7 W10134019 Switch, Door 2 W10201189 Part No. CONTROL PANEL PARTS For Models: KUDE03FTBL1, KUDE03FTWH1, KUDE03FTSS1 (Black) (White) (Stainless) Illus. No.
DESCRIPTION 1 Console Assembly (Includes Insert) W10084465 Black W10084466 White W10084467 Stainless 2 8546546 Clip, Bi−Metal 3 661663 Bi−Metal 4 3369051 Screw 5 W10077360 Latch Assembly 6 W10158345 Control, Electronic 7 W10134019 Switch, Door 2 W10201189 Part No. CONTROL PANEL PARTS For Models: KUDE03FTBL1, KUDE03FTWH1, KUDE03FTSS1 (Black) (White) (Stainless) Illus. No.
Parts Diagram
Page 3
...W10056249 Inner Door Mastic Assembly (Also Order Item 6) 4 W10077883 Inlet, Air 5 8572611 Vent Assembly (Also Order Item 6) Illus. No. Part No. No. DESCRIPTION 10 8545608 Harness, Vent Motor 11 W10137633 Wiring Harness 12 8281154 Screw 13 8535660 Seal, Console/door 14 8535637 Bracket, Dispenser... 15 8531865 Shield, Dispenser W10201189 3 Part No. Part No. DESCRIPTION 6 8269259 Gasket, Vent 7 W10077877 Deflector, Vent (Also Order Item 6) 8 W10077882 Dispenser, Assembly 9 W10077881 Knob, ...
...W10056249 Inner Door Mastic Assembly (Also Order Item 6) 4 W10077883 Inlet, Air 5 8572611 Vent Assembly (Also Order Item 6) Illus. No. Part No. No. DESCRIPTION 10 8545608 Harness, Vent Motor 11 W10137633 Wiring Harness 12 8281154 Screw 13 8535660 Seal, Console/door 14 8535637 Bracket, Dispenser... 15 8531865 Shield, Dispenser W10201189 3 Part No. Part No. DESCRIPTION 6 8269259 Gasket, Vent 7 W10077877 Deflector, Vent (Also Order Item 6) 8 W10077882 Dispenser, Assembly 9 W10077881 Knob, ...

Parts Diagram
Page 4
FILL, DRAIN AND OVERFILL PARTS For Models: KUDE03FTBL1, KUDE03FTWH1, KUDE03FTSS1 (Black) (White) (Stainless) Illus. DESCRIPTION 1 8268892 Lever, Overfill Switch 2 8531412 Hose, Inlet 3 8531325 Water Inlet (Also Order Item 4) 4 8531323 Gasket 5 ..., Overfill Control 10 8545946 Standpipe, Overfill (Includes Item 11) 11 8531743 Gasket, Flat 12 9741998 Nut, Standpipe 13 W10077871 Float & Retainer Assembly 14 8269297 Miscellaneous Parts Bag 15 356138 Clamp, Hose 16 W10137608 Drain Loop with Check Valve 4 W10201189 No...
FILL, DRAIN AND OVERFILL PARTS For Models: KUDE03FTBL1, KUDE03FTWH1, KUDE03FTSS1 (Black) (White) (Stainless) Illus. DESCRIPTION 1 8268892 Lever, Overfill Switch 2 8531412 Hose, Inlet 3 8531325 Water Inlet (Also Order Item 4) 4 8531323 Gasket 5 ..., Overfill Control 10 8545946 Standpipe, Overfill (Includes Item 11) 11 8531743 Gasket, Flat 12 9741998 Nut, Standpipe 13 W10077871 Float & Retainer Assembly 14 8269297 Miscellaneous Parts Bag 15 356138 Clamp, Hose 16 W10137608 Drain Loop with Check Valve 4 W10201189 No...

Parts Diagram
Page 5
TUB AND FRAME PARTS For Models: KUDE03FTBL1, KUDE03FTWH1, KUDE03FTSS1 (Black) (White) (Stainless) W10201189 5
TUB AND FRAME PARTS For Models: KUDE03FTBL1, KUDE03FTWH1, KUDE03FTSS1 (Black) (White) (Stainless) W10201189 5

Parts Diagram
Page 6
... Models: KUDE03FTBL1, KUDE03FTWH1, KUDE03FTSS1 (Black) (White) (Stainless) Illus. No. Part No. DESCRIPTION 1 W10056238 Tub Assembly 2 8574123 Barrier, Moisture Undercounter 3 W10112096 Door Seal 4 W10082838 Plug Tub 5 8545574 Absorber, Sound 6 3400014 Screw 7 8269110 Seal, Cabinet 8 ...Spring, Door Balance 19 3400892 Screw 20 8268991 Cover, Terminal Box 21 8535568 Link, Door Balance 22 8268582 Insulator, Sound 23 304666 Retainer, Push 24 8573239 Shield, Sound Tub 25 9742648 Bracket, Thermostat 26 661566 Thermostat 27 W10077370 Strike, Latch 28 3378128 Washer, Pronged Cup 6 W10201189
... Models: KUDE03FTBL1, KUDE03FTWH1, KUDE03FTSS1 (Black) (White) (Stainless) Illus. No. Part No. DESCRIPTION 1 W10056238 Tub Assembly 2 8574123 Barrier, Moisture Undercounter 3 W10112096 Door Seal 4 W10082838 Plug Tub 5 8545574 Absorber, Sound 6 3400014 Screw 7 8269110 Seal, Cabinet 8 ...Spring, Door Balance 19 3400892 Screw 20 8268991 Cover, Terminal Box 21 8535568 Link, Door Balance 22 8268582 Insulator, Sound 23 304666 Retainer, Push 24 8573239 Shield, Sound Tub 25 9742648 Bracket, Thermostat 26 661566 Thermostat 27 W10077370 Strike, Latch 28 3378128 Washer, Pronged Cup 6 W10201189

Parts Diagram
Page 7
PUMP, WASHARM AND MOTOR PARTS For Models: KUDE03FTBL1, KUDE03FTWH1, KUDE03FTSS1 (Black) (White) (Stainless) W10201189 7
PUMP, WASHARM AND MOTOR PARTS For Models: KUDE03FTBL1, KUDE03FTWH1, KUDE03FTSS1 (Black) (White) (Stainless) W10201189 7


