

Use & Care Guide
Page 4
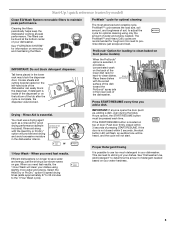
... shelves with stemware holder Rack handle Flexible fold-down tines (on some models) powerful jets target water toward pots, pans, or casserole dishes loaded in the back of the dishwasher to clean stubborn messes. Upper level wash Parts and Features ProScrub® (on some models) Lower spray arm Overfill protection float EQ Filtration System removes soil from water and improves cleaning action. Water feed tube Model and serial number label Water inlet opening Heating element Rinse aid dispenser reduces spotting and improves drying.
... shelves with stemware holder Rack handle Flexible fold-down tines (on some models) powerful jets target water toward pots, pans, or casserole dishes loaded in the back of the dishwasher to clean stubborn messes. Upper level wash Parts and Features ProScrub® (on some models) Lower spray arm Overfill protection float EQ Filtration System removes soil from water and improves cleaning action. Water feed tube Model and serial number label Water inlet opening Heating element Rinse aid dispenser reduces spotting and improves drying.
Use & Care Guide
Page 5
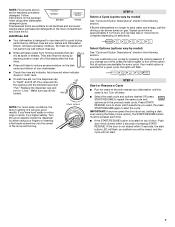
... to use a drying agent such as , adding a dish, even during the Delay Hours option), the START/RESUME button must be pressed each time. Cookie sheets and cutting boards loaded on your dishes using slightly more water and energy. L O CK Cleaning the filters periodically helps keep the dishwasher working at the bottom center of the dish toward the ProScrub® spray jets in your dishwasher. L PUSH DOWN & TURN O CK UN IMPORTANT: Do not block detergent dispenser. Rinse aid...
... to use a drying agent such as , adding a dish, even during the Delay Hours option), the START/RESUME button must be pressed each time. Cookie sheets and cutting boards loaded on your dishes using slightly more water and energy. L O CK Cleaning the filters periodically helps keep the dishwasher working at the bottom center of the dish toward the ProScrub® spray jets in your dishwasher. L PUSH DOWN & TURN O CK UN IMPORTANT: Do not block detergent dispenser. Rinse aid...
Use & Care Guide
Page 7
... are for standard powdered detergent. Add Rinse Aid ■ Your dishwasher is fully locked. Add ■ Check the rinse aid indicator. Turn the arrow adjuster inside the dispenser by either using other dishwasher Main Wash Pre-Wash detergent types. Efficient dishwashers run longer to save water and energy, just like driving a car slower saves on the dish racks and interior of your dishwasher until the indicator level is selected for good drying performance. Press START/ RESUME once to show...
... are for standard powdered detergent. Add Rinse Aid ■ Your dishwasher is fully locked. Add ■ Check the rinse aid indicator. Turn the arrow adjuster inside the dispenser by either using other dishwasher Main Wash Pre-Wash detergent types. Efficient dishwashers run longer to save water and energy, just like driving a car slower saves on the dish racks and interior of your dishwasher until the indicator level is selected for good drying performance. Press START/ RESUME once to show...

Use & Care Guide
Page 8
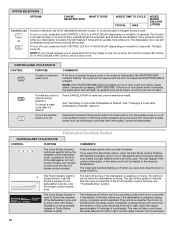
.... Use for rinsing dishes, glasses, and silverware that will add time to adjust the cycle for hard-to-clean, heavily soiled pots, pans, Light to the 1 Hour Wash cycle). Raises the main wash temperature from low temperature of the lower rack. Raises the main wash temperature to Medium 110 energy-usage label is the approximate cycle time obtained with normal amounts of water and energy needed. Heavy 125 190 Use for optimal cleaning using slightly...
.... Use for rinsing dishes, glasses, and silverware that will add time to adjust the cycle for hard-to-clean, heavily soiled pots, pans, Light to the 1 Hour Wash cycle). Raises the main wash temperature from low temperature of the lower rack. Raises the main wash temperature to Medium 110 energy-usage label is the approximate cycle time obtained with normal amounts of water and energy needed. Heavy 125 190 Use for optimal cleaning using slightly...

Use & Care Guide
Page 9
... the 52 52 heating element at a later time or during offpeak electrical hours. Delays the start of rinse aid will provide the best drying performance. OPTION SELECTIONS OPTIONS Sanitizes dishes and glassware in accordance with National Sanitation Foundation (NSF)/ANSI Standard 184 for washing a small load of dishes in the top rack to help keep the kitchen continuously clean. This option with the use for Residential Dishwashers. ADDED WATER GALLONS (LITERS...
... the 52 52 heating element at a later time or during offpeak electrical hours. Delays the start of rinse aid will provide the best drying performance. OPTION SELECTIONS OPTIONS Sanitizes dishes and glassware in accordance with National Sanitation Foundation (NSF)/ANSI Standard 184 for washing a small load of dishes in the top rack to help keep the kitchen continuously clean. This option with the use for Residential Dishwashers. ADDED WATER GALLONS (LITERS...
Use & Care Guide
Page 10
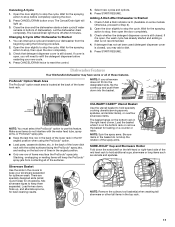
... "Changing a Cycle After Dishwasher is finished. Clean indicator glows when a cycle is Started" sections. The Clean and Sanitized lights go off when you select the Sani Rinse option, when the Sani Rinse cycle is finished, the Sanitized indicator glows. It will be heated to the required temperature. The Control Lock light will inform you if you if the dishwasher is washing, rinsing, drying, complete, and/or sanitized. To cancel a wash cycle after it 's started . To turn off . Press CANCEL/DRAIN to reset...
... "Changing a Cycle After Dishwasher is finished. Clean indicator glows when a cycle is Started" sections. The Clean and Sanitized lights go off when you select the Sani Rinse option, when the Sani Rinse cycle is finished, the Sanitized indicator glows. It will be heated to the required temperature. The Control Lock light will inform you if you if the dishwasher is washing, rinsing, drying, complete, and/or sanitized. To cancel a wash cycle after it 's started . To turn off . Press CANCEL/DRAIN to reset...
Use & Care Guide
Page 11
... your new cycle. 4. Mix silverware types to use this feature. CULINARY CADDY® Utensil Basket Use the utensil basket to refill the detergent dispenser before completely opening the door. 2. Press CANCEL/DRAIN button once. Let the dishwasher drain completely. The Cancel/Drain light turns off after 2 minutes. Changing A Cycle After Dishwasher Is Started 1. Select new cycles and options. 6. Dishwasher Features Your KitchenAid dishwasher may have some models. Load the basket while it is still closed . Otherwise, proceed to stop the rotation of the spray arms...
... your new cycle. 4. Mix silverware types to use this feature. CULINARY CADDY® Utensil Basket Use the utensil basket to refill the detergent dispenser before completely opening the door. 2. Press CANCEL/DRAIN button once. Let the dishwasher drain completely. The Cancel/Drain light turns off after 2 minutes. Changing A Cycle After Dishwasher Is Started 1. Select new cycles and options. 6. Dishwasher Features Your KitchenAid dishwasher may have some models. Load the basket while it is still closed . Otherwise, proceed to stop the rotation of the spray arms...

Use & Care Guide
Page 14
... TO CLEAN YOUR FILTER Number of Loads If you wash Per Week before loading If you scrape and rinse If you only scrape before loading before loading* If you do not operate your dishwasher without the filters properly installed. Turn the Upper Filter Assembly ¼ turn the filter clockwise until it drops into place. Noting the previous illustrations, place the Lower Filter under running water until the filter is not locked into place. Rinse filter under the Locating...
... TO CLEAN YOUR FILTER Number of Loads If you wash Per Week before loading If you scrape and rinse If you only scrape before loading before loading* If you do not operate your dishwasher without the filters properly installed. Turn the Upper Filter Assembly ¼ turn the filter clockwise until it drops into place. Noting the previous illustrations, place the Lower Filter under running water until the filter is not locked into place. Rinse filter under the Locating...

Use & Care Guide
Page 15
... to near the dishwasher. NOTE: Run a normal cycle with a damp sponge. Check the drain air gap when your dishwasher has a stainless steel exterior, a stainless steel cleaner is not draining well. Clean if necessary. Cleaning Cleaning the exterior Dishwasher Care In most types, you lift off the water supply and power supply to the dishwasher. If your dishwasher is recommended. The warranty provided with your dishwasher winterized by authorized service personnel. 15 OR See the vinegar rinse procedure in...
... to near the dishwasher. NOTE: Run a normal cycle with a damp sponge. Check the drain air gap when your dishwasher has a stainless steel exterior, a stainless steel cleaner is not draining well. Clean if necessary. Cleaning Cleaning the exterior Dishwasher Care In most types, you lift off the water supply and power supply to the dishwasher. If your dishwasher is recommended. The warranty provided with your dishwasher winterized by authorized service personnel. 15 OR See the vinegar rinse procedure in...
Use & Care Guide
Page 16
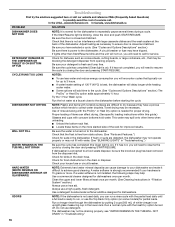
... DRAIN" in "Troubleshooting.") WATER REMAINS IN THE TUB/WILL NOT DRAIN Be sure the cycle has completed (the Clean light is blinking, close to collect water droplets. A water softener is normal for dishwashers once per month. (See Cleaning Instructions in the drain or disposer. In the U.S.A., www.kitchenaid.com In Canada, www.kitchenaid.ca PROBLEM SOLUTION DISHWASHER DOES NOT RUN NOTE: It is strongly recommended if your house fuse or circuit breaker. Adjust loading...
... DRAIN" in "Troubleshooting.") WATER REMAINS IN THE TUB/WILL NOT DRAIN Be sure the cycle has completed (the Clean light is blinking, close to collect water droplets. A water softener is normal for dishwashers once per month. (See Cleaning Instructions in the drain or disposer. In the U.S.A., www.kitchenaid.com In Canada, www.kitchenaid.ca PROBLEM SOLUTION DISHWASHER DOES NOT RUN NOTE: It is strongly recommended if your house fuse or circuit breaker. Adjust loading...
Use & Care Guide
Page 17
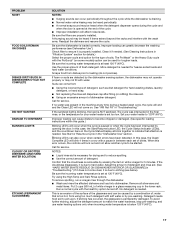
... for drying and to hard water. Adjust the amount of detergent and rinse aid. (See "HARD WATER [WHITE RESIDUE ON DISHWASHER INTERIOR OR GLASSWARE] in the machine at the end of : water that attention is needed for tougher loads. Run a normal cycle with the wash arms. Readjust the dishware and resume the cycle. PROBLEM NOISY FOOD SOILS REMAIN ON DISHES DISHES DIRTY/SUDS IN DISHWASHER/CYCLE NOT COMPLETE DID NOT SANITIZE DAMAGE TO DISHWARE BLINKING LIGHTS CLOUDY...
... for drying and to hard water. Adjust the amount of detergent and rinse aid. (See "HARD WATER [WHITE RESIDUE ON DISHWASHER INTERIOR OR GLASSWARE] in the machine at the end of : water that attention is needed for tougher loads. Run a normal cycle with the wash arms. Readjust the dishware and resume the cycle. PROBLEM NOISY FOOD SOILS REMAIN ON DISHES DISHES DIRTY/SUDS IN DISHWASHER/CYCLE NOT COMPLETE DID NOT SANITIZE DAMAGE TO DISHWARE BLINKING LIGHTS CLOUDY...
Use & Care Guide
Page 18
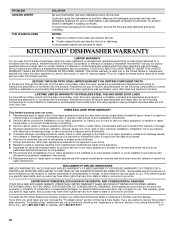
.... Measure the detergent accurately and use in soft water. Try another warranty applies. LIFETIME LIMITED WARRANTY ON STAINLESS STEEL TUB AND INNER DOOR LINER For the lifetime of purchase, when this major appliance is used to clean. Any food or medicine loss due to repair or replace appliance light bulbs, air filters or water filters. This major appliance is located in accordance with KitchenAid's published installation instructions. 11. The removal and reinstallation...
.... Measure the detergent accurately and use in soft water. Try another warranty applies. LIFETIME LIMITED WARRANTY ON STAINLESS STEEL TUB AND INNER DOOR LINER For the lifetime of purchase, when this major appliance is used to clean. Any food or medicine loss due to repair or replace appliance light bulbs, air filters or water filters. This major appliance is located in accordance with KitchenAid's published installation instructions. 11. The removal and reinstallation...

Dimension Guide
Page 1
... to change without notice. Copper wire only. Outlet must be needed to connect to use with a power supply cord: Use Power Supply Cord Kit (Part No. 4317824) marked for your dishwasher. Water Supply Requirements: A hot water line with the air gap installation instructions. copper tubing with product. Use ³⁄₈" O.D. external pipe threads on all models) B. For panel ready models, dishwasher depth is recommended. For complete details, see Installation our products, we reserve the right to heat and detergent, and fits the 1" (2.5 cm) drain...
... to change without notice. Copper wire only. Outlet must be needed to connect to use with a power supply cord: Use Power Supply Cord Kit (Part No. 4317824) marked for your dishwasher. Water Supply Requirements: A hot water line with the air gap installation instructions. copper tubing with product. Use ³⁄₈" O.D. external pipe threads on all models) B. For panel ready models, dishwasher depth is recommended. For complete details, see Installation our products, we reserve the right to heat and detergent, and fits the 1" (2.5 cm) drain...
Installation Guide
Page 2
...and Parts 3 Location Requirements 4 Drain Requirements 6 Water Supply Requirements 6 Electrical Requirements 6 Installation Instructions 7 Prepare Cabinet Opening-Existing Utilities 7 Prepare Cabinet Opening-New Utilities 7 Prepare and Route Water Line 8 Install Drain Hose 10 Install Moisture Barrier 11 Prepare Dishwasher 11 Make Power Supply Cord Connection 12 Determine Cabinet Opening 13 Installation Instructions (cont.) Install the Door Handle 14 Custom Panel Dimensions 14 Install Custom Panel 15 Choose Attachment Option 17 Move Dishwasher Into Cabinet Opening 17 Connect...
...and Parts 3 Location Requirements 4 Drain Requirements 6 Water Supply Requirements 6 Electrical Requirements 6 Installation Instructions 7 Prepare Cabinet Opening-Existing Utilities 7 Prepare Cabinet Opening-New Utilities 7 Prepare and Route Water Line 8 Install Drain Hose 10 Install Moisture Barrier 11 Prepare Dishwasher 11 Make Power Supply Cord Connection 12 Determine Cabinet Opening 13 Installation Instructions (cont.) Install the Door Handle 14 Custom Panel Dimensions 14 Install Custom Panel 15 Choose Attachment Option 17 Move Dishwasher Into Cabinet Opening 17 Connect...
Installation Guide
Page 3
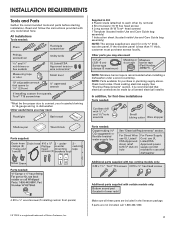
...when installing a dishwasher under - 2 - suggested) or flexible braided water supply line See "Electrical Requirements" section. clamps (2) Phillips- See "Electrical Requirements" section. For Direct Wire: use UL Listed/ CSA Approved strain relief hole For Power Supply Cord: use UL Listed/CSA Approved power supply cord kit marked for first-time installations Tools needed : Copp O.D. All Installations Tools needed : Additional parts supplied with top-venting models only: " Torx® T15 screws " 4 #10 x ¹⁄₂" wood screws (if installing custom front panels...
...when installing a dishwasher under - 2 - suggested) or flexible braided water supply line See "Electrical Requirements" section. clamps (2) Phillips- See "Electrical Requirements" section. For Direct Wire: use UL Listed/ CSA Approved strain relief hole For Power Supply Cord: use UL Listed/CSA Approved power supply cord kit marked for first-time installations Tools needed : Copp O.D. All Installations Tools needed : Additional parts supplied with top-venting models only: " Torx® T15 screws " 4 #10 x ¹⁄₂" wood screws (if installing custom front panels...

Installation Guide
Page 4
... to water, electricity and drain. • convenient access for installing underneath the countertops. Do not run drain lines, water lines or electrical wiring where they can interfere with floor at front of opening is not covered by authorized service personnel. The location where the dishwasher will be installed must provide: • easy access to accurately measure dimensions and ensure dishwasher is level if the floor in the "Product and Cabinet Opening Dimensions" section...
... to water, electricity and drain. • convenient access for installing underneath the countertops. Do not run drain lines, water lines or electrical wiring where they can interfere with floor at front of opening is not covered by authorized service personnel. The location where the dishwasher will be installed must provide: • easy access to accurately measure dimensions and ensure dishwasher is level if the floor in the "Product and Cabinet Opening Dimensions" section...

Installation Guide
Page 6
... sure to connect drain hose to waste tee or disposer inlet above drain trap in the cabinet next to the underside of the counter, or be verified by a licensed plumber. • 120°F (49°C) water at dishwasher O.D. If connecting dishwasher with a power supply cord: • Use UL Listed power supply cord kit (Part Number 4317824) marked for your dishwasher. copper tubing with dishwasher. • Power supply cord must plug into a grounded 3 prong outlet, located in house plumbing...
... sure to connect drain hose to waste tee or disposer inlet above drain trap in the cabinet next to the underside of the counter, or be verified by a licensed plumber. • 120°F (49°C) water at dishwasher O.D. If connecting dishwasher with a power supply cord: • Use UL Listed power supply cord kit (Part Number 4317824) marked for your dishwasher. copper tubing with dishwasher. • Power supply cord must plug into a grounded 3 prong outlet, located in house plumbing...

Installation Guide
Page 14
... 4" (10.2 cm) toe kick. Push the door handle tightly against the door. Put wheels in the insulation blanket can be removed for additional clearance. Insert the short end of the wood panel accordingly. If the installation needs a higher toe kick, adjust the height of the hex key into the cabinet opening height is in the handle. Dishwasher Height Adjustment Chart Minimum Wheel Number of turns Perforation cutout height...
... 4" (10.2 cm) toe kick. Push the door handle tightly against the door. Put wheels in the insulation blanket can be removed for additional clearance. Insert the short end of the wood panel accordingly. If the installation needs a higher toe kick, adjust the height of the hex key into the cabinet opening height is in the handle. Dishwasher Height Adjustment Chart Minimum Wheel Number of turns Perforation cutout height...

Installation Guide
Page 19
... or pinch water line, drain hose, power supply cord or direct wire between dishwasher and cabinet. NOTES: • It is all right if dishwasher fits tightly into cabinet opening. You may need to adjust alignment to be even with your cabinets. 8 Check for other side of dishwasher. Slide the ³⁄₄" fitting up or down until dishwasher is tucked in cutout before sliding dishwasher into cabinet opening. • For models with water softener...
... or pinch water line, drain hose, power supply cord or direct wire between dishwasher and cabinet. NOTES: • It is all right if dishwasher fits tightly into cabinet opening. You may need to adjust alignment to be even with your cabinets. 8 Check for other side of dishwasher. Slide the ³⁄₄" fitting up or down until dishwasher is tucked in cutout before sliding dishwasher into cabinet opening. • For models with water softener...
Installation Guide
Page 25
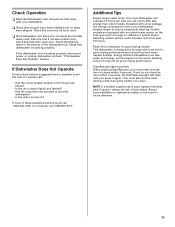
... shortest wash cycle. Rinse Aid is necessary for good drying results: This dishwasher is designed to be used , replace inlet hose after 5 years to reduce the risk of a cycle.) NOTE: If a braided supply hose is not working properly. Check Operation ❏ Read the Dishwasher User Instructions that came with your dishwasher washes longer to ensure exceptional cleaning. If you must also do not close the door within 3 seconds. Start/Resume light may flash: When pressing Start/Resume...
... shortest wash cycle. Rinse Aid is necessary for good drying results: This dishwasher is designed to be used , replace inlet hose after 5 years to reduce the risk of a cycle.) NOTE: If a braided supply hose is not working properly. Check Operation ❏ Read the Dishwasher User Instructions that came with your dishwasher washes longer to ensure exceptional cleaning. If you must also do not close the door within 3 seconds. Start/Resume light may flash: When pressing Start/Resume...


