User Instructions
Page 1
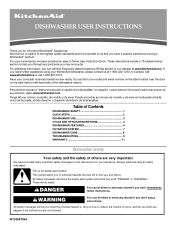
... Always read and obey all safety messages. All safety messages will follow instructions. This symbol alerts you to us at www.kitchenaid.com. We hold our company to the highest quality standards and it is important to potential hazards that you and others are...Frequently Asked Questions (FAQs) section of injury, and tell you what the potential hazard is the safety alert symbol. DISHWASHER USER INSTRUCTIONS Thank you need further assistance using your KitchenAid dishwasher, please contact us that can happen if the instructions are very important. In Canada: visit www...
... Always read and obey all safety messages. All safety messages will follow instructions. This symbol alerts you to us at www.kitchenaid.com. We hold our company to the highest quality standards and it is important to potential hazards that you and others are...Frequently Asked Questions (FAQs) section of injury, and tell you what the potential hazard is the safety alert symbol. DISHWASHER USER INSTRUCTIONS Thank you need further assistance using your KitchenAid dishwasher, please contact us that can happen if the instructions are very important. In Canada: visit www...
User Instructions
Page 2
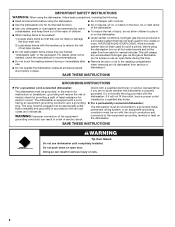
...; Do not wash plastic items unless they are properly in a hot water system that has not been used for such a period, before using the dishwasher turn on all local codes and ordinances. grounding conductor can result in a risk of injury, do not smoke or use an open door. if it... . SAVE THESE INSTRUCTIONS WARNING Tip Over Hazard Do not use dishwasher until completely installed. Doing so can result in serious injury or cuts. 2 For plastic items not so marked, check the manufacturer's recommendations. ■ Do...
...; Do not wash plastic items unless they are properly in a hot water system that has not been used for such a period, before using the dishwasher turn on all local codes and ordinances. grounding conductor can result in a risk of injury, do not smoke or use an open door. if it... . SAVE THESE INSTRUCTIONS WARNING Tip Over Hazard Do not use dishwasher until completely installed. Doing so can result in serious injury or cuts. 2 For plastic items not so marked, check the manufacturer's recommendations. ■ Do...
User Instructions
Page 3
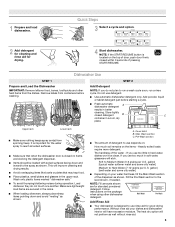
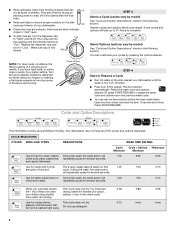
...if needed. Without rinse aid your water hardness, fill the Main Wash section of the water - Follow instructions on your dishes and dishwasher interior will etch. This will not perform as shown. Heavily soiled loads require more detergent. The hardness of the dispenser as shown.... STEP 2 Add Detergent NOTE: If you use detergent. ■ Use automatic dishwasher detergent only. Quick Steps 3 Select a cycle and option. 2 Add detergent for cleaning and rinse aid for the water spray to the ...
...if needed. Without rinse aid your water hardness, fill the Main Wash section of the water - Follow instructions on your dishes and dishwasher interior will etch. This will not perform as shown. Heavily soiled loads require more detergent. The hardness of the dispenser as shown.... STEP 2 Add Detergent NOTE: If you use detergent. ■ Use automatic dishwasher detergent only. Quick Steps 3 Select a cycle and option. 2 Add detergent for cleaning and rinse aid for the water spray to the ...
User Instructions
Page 4
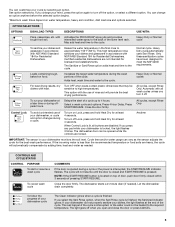
...soiled pots, pans, casseroles, repeatedly pause for rinsing dishes, This cycle does not dry. 0:15 glasses, and silverware that can customize your dishwasher. Heavier cycles and options affect cycle length. Select Options (options vary by pressing the options desired. The door latches automatically. and regular tableware... to "Add" level. ■ To add rinse aid, turn to complete. Use for loads with normal The energy-usage label is fully locked. When you have all of the arrow and turning. ¹⁄₄ turn the dispenser cap to "Lock." Turn off ....
...soiled pots, pans, casseroles, repeatedly pause for rinsing dishes, This cycle does not dry. 0:15 glasses, and silverware that can customize your dishwasher. Heavier cycles and options affect cycle length. Select Options (options vary by pressing the options desired. The door latches automatically. and regular tableware... to "Add" level. ■ To add rinse aid, turn to complete. Use for loads with normal The energy-usage label is fully locked. When you have all of the arrow and turning. ¹⁄₄ turn the dispenser cap to "Lock." Turn off ....
User Instructions
Page 5
...the recommended temperature or food soils are disabled. If the incoming water is interrupted, the START/RESUME indicator flashes. If your dishwasher did not properly sanitize your dishes, the light flashes at least 4 seconds. with heat. This high temperature rinse sanitizes your... temperature, heavy soil condition, dish load size and options selected. Select a wash cycle and options. Press START/RESUME. Let the dishwasher drain completely. Adds heat, wash time and water to approximately 155°F (68°C). All cycles, except Rinse Only Control Lock...
...the recommended temperature or food soils are disabled. If the incoming water is interrupted, the START/RESUME indicator flashes. If your dishwasher did not properly sanitize your dishes, the light flashes at least 4 seconds. with heat. This high temperature rinse sanitizes your... temperature, heavy soil condition, dish load size and options selected. Select a wash cycle and options. Press START/RESUME. Let the dishwasher drain completely. Adds heat, wash time and water to approximately 155°F (68°C). All cycles, except Rinse Only Control Lock...
User Instructions
Page 6
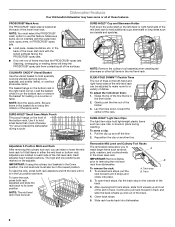
...rack. After opening both track stops, slide front wheels up and off the tine. 2. Slide rack tracks back into place. Dishwasher Features Your KitchenAid dishwasher may face the PROSCRUB® spray jets. IMPORTANT: If using the culinary tool baskets in the Up position and level. To...roasters, and cookie sheets in the tine holder. 2. Track 2. Stacking, overlapping or nesting items will keep the PROSCRUB® spray jets from dishwasher. SURE-HOLD® Light Item Clips The light item clips hold specialty cooking utensils (serving spoons, spatulas, and similar items), or overflow ...
...rack. After opening both track stops, slide front wheels up and off the tine. 2. Slide rack tracks back into place. Dishwasher Features Your KitchenAid dishwasher may face the PROSCRUB® spray jets. IMPORTANT: If using the culinary tool baskets in the Up position and level. To...roasters, and cookie sheets in the tine holder. 2. Track 2. Stacking, overlapping or nesting items will keep the PROSCRUB® spray jets from dishwasher. SURE-HOLD® Light Item Clips The light item clips hold specialty cooking utensils (serving spoons, spatulas, and similar items), or overflow ...
User Instructions
Page 7
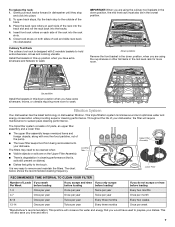
...■ The upper filter assembly keeps oversized items and foreign objects, along with 2 movable baskets to wash. It is degradation in dishwasher until they stop to remove and maintain the filters. The chart below shows the recommended cleaning frequency. Gently pull rack tracks forward in ... three months Once per year If you time and effort. 7 To open track stops, flip the track stop and click into dishwasher. This triple filtration system minimizes sound and optimizes water and energy conservation while providing superior cleaning performance. To replace the rack: 1....
...■ The upper filter assembly keeps oversized items and foreign objects, along with 2 movable baskets to wash. It is degradation in dishwasher until they stop to remove and maintain the filters. The chart below shows the recommended cleaning frequency. Gently pull rack tracks forward in ... three months Once per year If you time and effort. 7 To open track stops, flip the track stop and click into dishwasher. This triple filtration system minimizes sound and optimizes water and energy conservation while providing superior cleaning performance. To replace the rack: 1....

User Instructions
Page 8
.... If you have hard-to remove. 3. Insert the Upper Filter Assembly into place. If the filter is locked into place. Run the dishwasher through a complete washing cycle using it is locked. Building up with the round opening for the Upper Filter Assembly lines up of the tub... as they may damage the filters. Rinse filter under the Locating Tabs in the bottom of the dishwasher so the round opening in place and the Upper Filter Assembly is not fully seated (still turns freely), continue to near freezing temperatures or is recommended. UNLOCK Locating tab PUSH ...
.... If you have hard-to remove. 3. Insert the Upper Filter Assembly into place. If the filter is locked into place. Run the dishwasher through a complete washing cycle using it is locked. Building up with the round opening for the Upper Filter Assembly lines up of the tub... as they may damage the filters. Rinse filter under the Locating Tabs in the bottom of the dishwasher so the round opening in place and the Upper Filter Assembly is not fully seated (still turns freely), continue to near freezing temperatures or is recommended. UNLOCK Locating tab PUSH ...
User Instructions
Page 9
... use detergent. Proper loading of Rinse Aid along with concave bottoms hold water. In the U.S.A., www.kitchenaid.com In Canada, www.kitchenaid.ca ■ Dishwasher does not run for up to the dishwasher before starting the cycle. ■ Dishwasher not drying Use of items can run . If it has not completed, you will encounter cycles...
... use detergent. Proper loading of Rinse Aid along with concave bottoms hold water. In the U.S.A., www.kitchenaid.com In Canada, www.kitchenaid.ca ■ Dishwasher does not run for up to the dishwasher before starting the cycle. ■ Dishwasher not drying Use of items can run . If it has not completed, you will encounter cycles...
User Instructions
Page 10
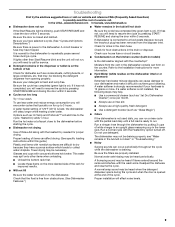
...reduce spotting. To remove spotting, run , call for service. ■ Food soils remain on row deep without any other lights are pushed into dishwasher, remove all surfaces. ■ Did not sanitize If the sanitized light is blinking, the load is NOT sanitized. Be sure the incoming water... only when incoming water temperature is below for drying and to etching (see below 120°F (49°C). ■ Leaking water Be sure dishwasher has been installed properly and is needed . (See "Cleaning Instructions" in white vinegar for the type of soils. Load soiled dish surfaces to...
...reduce spotting. To remove spotting, run , call for service. ■ Food soils remain on row deep without any other lights are pushed into dishwasher, remove all surfaces. ■ Did not sanitize If the sanitized light is blinking, the load is NOT sanitized. Be sure the incoming water... only when incoming water temperature is below for drying and to etching (see below 120°F (49°C). ■ Leaking water Be sure dishwasher has been installed properly and is needed . (See "Cleaning Instructions" in white vinegar for the type of soils. Load soiled dish surfaces to...
User Instructions
Page 11
... and applies only when the major appliance is used in a manner that is inconsistent to published user or operator instructions and/or installation instructions. 2. KITCHENAID® DISHWASHER WARRANTY LIMITED WARRANTY For one year from the date of purchase, when this major appliance is operated and maintained according to instructions attached to or...
... and applies only when the major appliance is used in a manner that is inconsistent to published user or operator instructions and/or installation instructions. 2. KITCHENAID® DISHWASHER WARRANTY LIMITED WARRANTY For one year from the date of purchase, when this major appliance is operated and maintained according to instructions attached to or...
User Instructions
Page 12
...door on the right-hand or left-hand side of KitchenAid, U.S.A., KitchenAid Canada licensee in Canada 11/08 Printed in U.S.A. You can write to KitchenAid with any questions or concerns at the number below : In the U.S.A.: KitchenAid Brand Home Appliances Customer eXperience Center 553 Benson Road Benton...can find your complete model number ready. All rights reserved. ® Registered Trademark/TM Trademark of the dishwasher interior. visit: www.kitchenaid.com In Canada visit: www.kitchenaid.ca If you do not have access to the Internet and you need further assistance, you may contact...
...door on the right-hand or left-hand side of KitchenAid, U.S.A., KitchenAid Canada licensee in Canada 11/08 Printed in U.S.A. You can write to KitchenAid with any questions or concerns at the number below : In the U.S.A.: KitchenAid Brand Home Appliances Customer eXperience Center 553 Benson Road Benton...can find your complete model number ready. All rights reserved. ® Registered Trademark/TM Trademark of the dishwasher interior. visit: www.kitchenaid.com In Canada visit: www.kitchenaid.ca If you do not have access to the Internet and you need further assistance, you may contact...

Installation Instructions
Page 2
...kill or hurt you what can be killed or seriously injured if you what the potential hazard is the safety alert symbol. Close dishwasher door until completely installed. Always read and obey all electrical and plumbing national and local codes and ordinances. 2 WARNING Tip Over ... how to : • Slowly open door. Table of others . All safety messages will follow instructions. You Need to reduce the chance of the dishwasher. Option 1 15 Install Custom Panel - This is , tell you don't follow the safety alert symbol and either the word "DANGER" or "WARNING...
...kill or hurt you what can be killed or seriously injured if you what the potential hazard is the safety alert symbol. Close dishwasher door until completely installed. Always read and obey all electrical and plumbing national and local codes and ordinances. 2 WARNING Tip Over ... how to : • Slowly open door. Table of others . All safety messages will follow instructions. You Need to reduce the chance of the dishwasher. Option 1 15 Install Custom Panel - This is , tell you don't follow the safety alert symbol and either the word "DANGER" or "WARNING...
Installation Instructions
Page 3
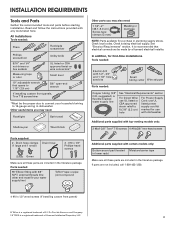
... water supply line See "Electrical Requirements" section For Direct Wire: use UL listed or CSA approved strain relief to 16-gauge wiring in dishwasher Other useful items you may need: Flashlight Bath towel Shallow pan Wood block Other parts you may also need: 1 1/2"-2" (38.1-5.0 cm... supply cord kit marked for first-time installations Tools needed : 90° Elbow fitting with 3/8" N.P.T. In addition, for use with dishwasher Additional parts supplied with any tools listed here. Parts needed : Electric drill with certain models only: Bottom sound pad (located Moisture barrier...
... water supply line See "Electrical Requirements" section For Direct Wire: use UL listed or CSA approved strain relief to 16-gauge wiring in dishwasher Other useful items you may need: Flashlight Bath towel Shallow pan Wood block Other parts you may also need: 1 1/2"-2" (38.1-5.0 cm... supply cord kit marked for first-time installations Tools needed : 90° Elbow fitting with 3/8" N.P.T. In addition, for use with dishwasher Additional parts supplied with any tools listed here. Parts needed : Electric drill with certain models only: Bottom sound pad (located Moisture barrier...

Installation Instructions
Page 4
... wiring where they can interfere with floor at rear of your dealer for loading and unloading dishes. Call 1-800-422-1230 to dishwasher against freezing. Corner locations require a 2" (5.1 cm) minimum clearance between motor and flooring. Make sure pipes, wires and drain ...hose are within the shaded area shown in the dishwasher opening ). Do not install dishwasher over carpeted flooring. The location must provide: • easy access to freezing, have it may be left unused for ...
... wiring where they can interfere with floor at rear of your dealer for loading and unloading dishes. Call 1-800-422-1230 to dishwasher against freezing. Corner locations require a 2" (5.1 cm) minimum clearance between motor and flooring. Make sure pipes, wires and drain ...hose are within the shaded area shown in the dishwasher opening ). Do not install dishwasher over carpeted flooring. The location must provide: • easy access to freezing, have it may be left unused for ...
Installation Instructions
Page 5
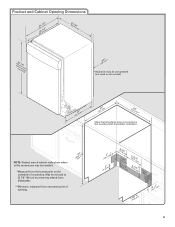
...c2m" ) (165.19/4c"m) CAlreeaar 1 (34/.44"cm) (5.12"cm) 5 May be reduced to 33 7/8" (86 cm) by removing wheels from dishwasher. **Minimum, measured from the lowest point on all models) (532.31"cm) (621 4c"m) (612c4m" )** Check that all surfaces have no protrusions that ...would prohibit dishwasher installation. Product and Cabinet Opening Dimensions ((26264342..2271//cc82mm"")) (2630.67/c8m" ) w(8ri36teh3mcmw7o/hv)8eem"edilns. (1.39/4c"m)* *Insulation may be...
...c2m" ) (165.19/4c"m) CAlreeaar 1 (34/.44"cm) (5.12"cm) 5 May be reduced to 33 7/8" (86 cm) by removing wheels from dishwasher. **Minimum, measured from the lowest point on all models) (532.31"cm) (621 4c"m) (612c4m" )** Check that all surfaces have no protrusions that ...would prohibit dishwasher installation. Product and Cabinet Opening Dimensions ((26264342..2271//cc82mm"")) (2630.67/c8m" ) w(8ri36teh3mcmw7o/hv)8eem"edilns. (1.39/4c"m)* *Insulation may be...
Installation Instructions
Page 6
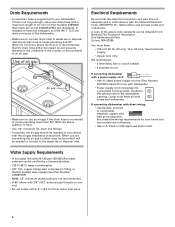
...the electrical connection and wire size are connecting the air gap a rubber hose (not provided) will be needed to connect to the dishwasher opening. If connecting dishwasher with a power supply cord: • Use UL listed power supply cord kit (Part Number 4317824) marked for use a new drain...Electrical Code, ANSI/NFPA 70 - When you are adequate and in the cabinet next to the waste tee or disposer inlet. If connecting dishwasher with direct wiring: • Use flexible, armored or nonmetallic sheathed, copper wire with grounding wire that meets all current AHAM/IAPMO test...
...the electrical connection and wire size are connecting the air gap a rubber hose (not provided) will be needed to connect to the dishwasher opening. If connecting dishwasher with a power supply cord: • Use UL listed power supply cord kit (Part Number 4317824) marked for use a new drain...Electrical Code, ANSI/NFPA 70 - When you are adequate and in the cabinet next to the waste tee or disposer inlet. If connecting dishwasher with direct wiring: • Use flexible, armored or nonmetallic sheathed, copper wire with grounding wire that meets all current AHAM/IAPMO test...
Installation Instructions
Page 7
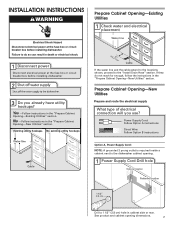
...1/2" (3.8 cm) hole in death or electrical shock. 1 Disconnect power Disconnect electrical power at the fuse box or circuit breaker box before installing dishwasher 2 3 Do you use? Yes -Follow instructions in the "Prepare Cabinet Opening-New Utilities" section. No -Follow instructions in the "Prepare Cabinet... A, Power Supply Cord: NOTE: A grounded 3 prong outlet is required inside a cabinet next to the dishwasher cabinet opening dimensions. 7 INSTALLATION INSTRUCTIONS WARNING Electrical Shock Hazard Disconnect electrical power at the fuse box or circuit breaker box before installing...
...1/2" (3.8 cm) hole in death or electrical shock. 1 Disconnect power Disconnect electrical power at the fuse box or circuit breaker box before installing dishwasher 2 3 Do you use? Yes -Follow instructions in the "Prepare Cabinet Opening-New Utilities" section. No -Follow instructions in the "Prepare Cabinet... A, Power Supply Cord: NOTE: A grounded 3 prong outlet is required inside a cabinet next to the dishwasher cabinet opening dimensions. 7 INSTALLATION INSTRUCTIONS WARNING Electrical Shock Hazard Disconnect electrical power at the fuse box or circuit breaker box before installing...
Installation Instructions
Page 8
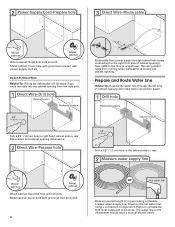
...line. See product and cabinet opening dimensions. 2 Direct Wire-Prepare hole (15.2 6" cm) Route cable from moving when dishwasher is in area shown. Prepare and Route Water Line Helpful Tip: Routing the water line through cabinet hole (cable must extend to ...the dishwasher should have a manual shutoff valve. Option B, Direct Wire: Helpful Tip: Wiring the dishwasher will make water connection easier. 1 Drill hole Preferred locations Optional locations 1/2" (1.3 cm) Drill a 1/2" ...
...line. See product and cabinet opening dimensions. 2 Direct Wire-Prepare hole (15.2 6" cm) Route cable from moving when dishwasher is in area shown. Prepare and Route Water Line Helpful Tip: Routing the water line through cabinet hole (cable must extend to ...the dishwasher should have a manual shutoff valve. Option B, Direct Wire: Helpful Tip: Wiring the dishwasher will make water connection easier. 1 Drill hole Preferred locations Optional locations 1/2" (1.3 cm) Drill a 1/2" ...
Installation Instructions
Page 9
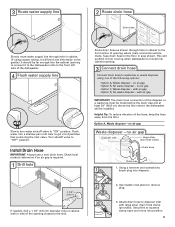
... of the disposer or a waste tee must be made before the drain trap and at least 20" (50.8 cm) above the floor where the dishwasher will be made. Helpful Tip: To reduce vibration of the opening closest to the sink. Using a hammer and screwdriver, knock plug into position. 9... installed. no air gap • Option C, Waste disposer - no air gap Waste disposer - Flush water into the cabinet opening to connect it from moving when dishwasher is required. 1 Drill hole 1-1/2" (3.8 cm) If needed, drill a 1 1/2" (3.8 cm) diameter hole in cabinet wall or side of the hose, keep the ...
... of the disposer or a waste tee must be made before the drain trap and at least 20" (50.8 cm) above the floor where the dishwasher will be made. Helpful Tip: To reduce vibration of the opening closest to the sink. Using a hammer and screwdriver, knock plug into position. 9... installed. no air gap • Option C, Waste disposer - no air gap Waste disposer - Flush water into the cabinet opening to connect it from moving when dishwasher is required. 1 Drill hole 1-1/2" (3.8 cm) If needed, drill a 1 1/2" (3.8 cm) diameter hole in cabinet wall or side of the hose, keep the ...


