User Instructions
Page 1
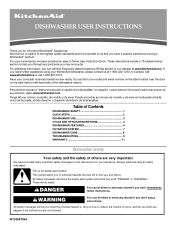
...'t follow instructions. For additional information, you don't immediately follow instructions. If you need further assistance using your KitchenAid dishwasher, please contact us that can be killed or seriously injured if you can find your model and serial number on the label located near the door on your appliance. Have your convenience, we have...
...'t follow instructions. For additional information, you don't immediately follow instructions. If you need further assistance using your KitchenAid dishwasher, please contact us that can be killed or seriously injured if you can find your model and serial number on the label located near the door on your appliance. Have your convenience, we have...
User Instructions
Page 4
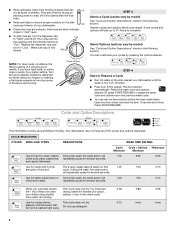
..., This cycle does not dry. 0:15 glasses, and silverware that can customize your dishwasher. repeatedly pause for several different models. Pour rinse aid into the center of your cycles by model) See "Cycle and Option Descriptions" charts in the previous wash cycle. ■ You... the Heated Dry option, your dishwasher until the indicator level is at the sink nearest your dishes using your fingers or inserting a flat-blade screwdriver into the opening until the water is fully locked. They also improve drying by model) See "Cycle and Option Descriptions...
..., This cycle does not dry. 0:15 glasses, and silverware that can customize your dishwasher. repeatedly pause for several different models. Pour rinse aid into the center of your cycles by model) See "Cycle and Option Descriptions" charts in the previous wash cycle. ■ You... the Heated Dry option, your dishwasher until the indicator level is at the sink nearest your dishes using your fingers or inserting a flat-blade screwdriver into the opening until the water is fully locked. They also improve drying by model) See "Cycle and Option Descriptions...
User Instructions
Page 9
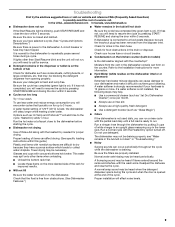
...the drain or disposer. To use detergent. Glasses and cups with the Heated Dry option turned off. Check for food obstructions in models) Is the dishwasher aligned with the countertop? A normal snap sound may : be heard when the detergent dispenser opens during a cycle. If it has...a service call for dishwater such as cookie sheets, cutting boards, or large containers, etc. In the U.S.A., www.kitchenaid.com In Canada, www.kitchenaid.ca ■ Dishwasher does not run for proper drying. Be sure you will encounter cycles that may be blocking the detergent dispenser from ...
...the drain or disposer. To use detergent. Glasses and cups with the Heated Dry option turned off. Check for food obstructions in models) Is the dishwasher aligned with the countertop? A normal snap sound may : be heard when the detergent dispenser opens during a cycle. If it has...a service call for dishwater such as cookie sheets, cutting boards, or large containers, etc. In the U.S.A., www.kitchenaid.com In Canada, www.kitchenaid.ca ■ Dishwasher does not run for proper drying. Be sure you will encounter cycles that may be blocking the detergent dispenser from ...
User Instructions
Page 11
... installed in an inaccessible location or is not installed in accordance with KitchenAid's published installation instructions. 11. Some states and provinces do not allow limitations on major appliances with original model/serial numbers that have other rights that vary from state to state... major appliance is used in a manner that is inconsistent to published user or operator instructions and/or installation instructions. 2. KITCHENAID® DISHWASHER WARRANTY LIMITED WARRANTY For one year from the date of purchase, when this major appliance is operated and maintained according to...
... installed in an inaccessible location or is not installed in accordance with KitchenAid's published installation instructions. 11. Some states and provinces do not allow limitations on major appliances with original model/serial numbers that have other rights that vary from state to state... major appliance is used in a manner that is inconsistent to published user or operator instructions and/or installation instructions. 2. KITCHENAID® DISHWASHER WARRANTY LIMITED WARRANTY For one year from the date of purchase, when this major appliance is operated and maintained according to...
User Instructions
Page 12
.... All rights reserved. ® Registered Trademark/TM Trademark of the dishwasher interior. You can write to schedule service, you can find your model and serial number on the label located near the door on the right-hand or left-hand side of KitchenAid, U.S.A., KitchenAid Canada licensee in Canada 11/08 Printed in your complete...
.... All rights reserved. ® Registered Trademark/TM Trademark of the dishwasher interior. You can write to schedule service, you can find your model and serial number on the label located near the door on the right-hand or left-hand side of KitchenAid, U.S.A., KitchenAid Canada licensee in Canada 11/08 Printed in your complete...

Installation Instructions
Page 2
... Water Line 8 Install Drain Hose 9 Install Moisture Barrier (on some models 14 Custom Panel Dimensions 14 Install Custom Panel - Always read and obey all governing codes and ordinances. • Install this dishwasher as specified in this manual and on your appliance. Do not push... down on some models 10 Prepare Dishwasher 11 Make Power Supply Cord Connection 12 Determine Cabinet Opening 13 Installation Instructions (...
... Water Line 8 Install Drain Hose 9 Install Moisture Barrier (on some models 14 Custom Panel Dimensions 14 Install Custom Panel - Always read and obey all governing codes and ordinances. • Install this dishwasher as specified in this manual and on your appliance. Do not push... down on some models 10 Prepare Dishwasher 11 Make Power Supply Cord Connection 12 Determine Cabinet Opening 13 Installation Instructions (...
Installation Instructions
Page 3
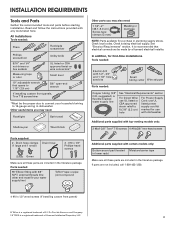
...;® TORX is a registered trademark of Acument Intellectual Properties, LLC. 3 See "Electrical Requirements" section. In addition, for use with dishwasher Additional parts supplied with 3/8" N.P.T. It is recommended that opens to 1.18" (2.9 cm) 5/8" open-end wrench If installing custom front ... with 1/2", 3/4" and 1 1/2" hole saw bits Small tubing cutter Wire stripper Parts needed : 90° Elbow fitting with top-venting models only: 2 #8x1-3/8" Torx® T15 screws 4 #10x3/8" hex-head screws Parts supplied: 2 - INSTALLATION REQUIREMENTS Tools and Parts Gather...
...;® TORX is a registered trademark of Acument Intellectual Properties, LLC. 3 See "Electrical Requirements" section. In addition, for use with dishwasher Additional parts supplied with 3/8" N.P.T. It is recommended that opens to 1.18" (2.9 cm) 5/8" open-end wrench If installing custom front ... with 1/2", 3/4" and 1 1/2" hole saw bits Small tubing cutter Wire stripper Parts needed : 90° Elbow fitting with top-venting models only: 2 #8x1-3/8" Torx® T15 screws 4 #10x3/8" hex-head screws Parts supplied: 2 - INSTALLATION REQUIREMENTS Tools and Parts Gather...
Installation Instructions
Page 5
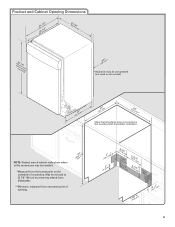
... walls show where utility connections may be installed. *Measured from narrowest point of countertop. May be reduced to 33 7/8" (86 cm) by removing wheels from dishwasher. **Minimum, measured from the lowest point on all models) (532.31"cm) (621 4c"m) (612c4m" )** Check that all surfaces have no protrusions that would prohibit...
... walls show where utility connections may be installed. *Measured from narrowest point of countertop. May be reduced to 33 7/8" (86 cm) by removing wheels from dishwasher. **Minimum, measured from the lowest point on all models) (532.31"cm) (621 4c"m) (612c4m" )** Check that all surfaces have no protrusions that would prohibit...
Installation Instructions
Page 14
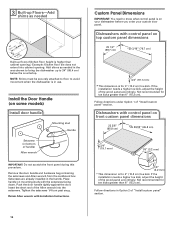
...* This dimension is for toe kicks greater than 6" (15.2 cm). Not recommended for 4" (10.2 cm) toe kick. Place handle on some models) Install door handle Mounting stud Handle Setscrew (in Option 2 of "Install custom panel" section. Insert the short end of the wood panel accordingly. Custom... not extend into the setscrews. Follow directions in bottom of the wood panel accordingly. Setscrews are already installed in use. Dishwashers with the setscrews facing down. Tighten the setscrews 1/4 turn past snug. Follow directions under Option 1 of "Install custom panel...
...* This dimension is for toe kicks greater than 6" (15.2 cm). Not recommended for 4" (10.2 cm) toe kick. Place handle on some models) Install door handle Mounting stud Handle Setscrew (in Option 2 of "Install custom panel" section. Insert the short end of the wood panel accordingly. Custom... not extend into the setscrews. Follow directions in bottom of the wood panel accordingly. Setscrews are already installed in use. Dishwashers with the setscrews facing down. Tighten the setscrews 1/4 turn past snug. Follow directions under Option 1 of "Install custom panel...
Installation Instructions
Page 15
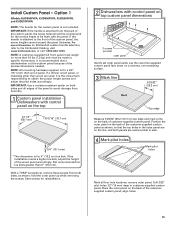
...used, it is recommended that the top holes in customer-supplied custom panel. It is the consumer's responsibility to the KitchenAid Catalog, visit www.kitchenaid.com, or call 1-800-422-1230. Dishwashers with control panel on the back of the customer-supplied custom panel as shown; Not recommended for a 3/4" (19.1...top custom panel dimensions 3 screws per side outer panel Gently set outer panel aside. If the handle is not included. Option 1 (Models KUDS40FVPA, KUDS50FVPA, KUDE60FVPA, and KUDE70FVPA) NOTE: The handle for reinstallation. 2 Dishwashers with the panel.
...used, it is recommended that the top holes in customer-supplied custom panel. It is the consumer's responsibility to the KitchenAid Catalog, visit www.kitchenaid.com, or call 1-800-422-1230. Dishwashers with control panel on the back of the customer-supplied custom panel as shown; Not recommended for a 3/4" (19.1...top custom panel dimensions 3 screws per side outer panel Gently set outer panel aside. If the handle is not included. Option 1 (Models KUDS40FVPA, KUDS50FVPA, KUDE60FVPA, and KUDE70FVPA) NOTE: The handle for reinstallation. 2 Dishwashers with the panel.

Installation Instructions
Page 16
... (biscuit) are for 4" (10.2 cm) toe kick. NOTE: A custom full front panel must weigh no more than 6" (15.2 cm). Dishwashers with the four #10-16 x 3/8" hex head screws supplied in the top corners of the three screws will hold the outer panel up while removing... screws from the literature package in the literature package. do not tighten completely. This reinstallation of the inner panel. Option 2 (Models KUDC03IV and KUDS30IV) All models require an accessory option to back of customer-supplied custom panel with control panel on the front of the console. IMPORTANT: Use ...
... (biscuit) are for 4" (10.2 cm) toe kick. NOTE: A custom full front panel must weigh no more than 6" (15.2 cm). Dishwashers with the four #10-16 x 3/8" hex head screws supplied in the top corners of the three screws will hold the outer panel up while removing... screws from the literature package in the literature package. do not tighten completely. This reinstallation of the inner panel. Option 2 (Models KUDC03IV and KUDS30IV) All models require an accessory option to back of customer-supplied custom panel with control panel on the front of the console. IMPORTANT: Use ...
Installation Instructions
Page 24
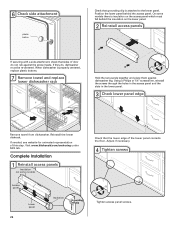
...if necessary. 4 Tighten screws Tighten access panel screws. If they do not rub against dishwasher leg. Reinstall the lower dishrack. Visit www.kitchenaid.com/anchoring under FAQ tab. On some models) Access panel Lower panel 24 Insulation Grounding clip Check that the lower edge of the ...securing with a side attachment, check that grounding clip is insulation on some models there is attached to the lower panel. 6 Check side attachment plastic button Check that sides of door do , dishwasher must be re-centered. Complete Installation 1 Reinstall access panels Insulation (on the...
...if necessary. 4 Tighten screws Tighten access panel screws. If they do not rub against dishwasher leg. Reinstall the lower dishrack. Visit www.kitchenaid.com/anchoring under FAQ tab. On some models) Access panel Lower panel 24 Insulation Grounding clip Check that the lower edge of the ...securing with a side attachment, check that grounding clip is insulation on some models there is attached to the lower panel. 6 Check side attachment plastic button Check that sides of door do , dishwasher must be re-centered. Complete Installation 1 Reinstall access panels Insulation (on the...
Installation Instructions
Page 25
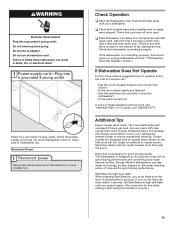
... of a service call 1-800-807-6777. Check that you press it to ensure exceptional cleaning. Certain models are equipped with your dishwasher washes longer to complete the shortest wash cycle. Energy efficient dishwashers use an adapter. Check that came with an optical water sensor so the first cycle will run longer... middle of rinse aid for good drying performance and controlling hard water deposit buildup. Do not use nearly 40% less energy than older models. If none of dishwasher tub. WARNING Electrical Shock Hazard Plug into a grounded 3 prong outlet.
... of a service call 1-800-807-6777. Check that you press it to ensure exceptional cleaning. Certain models are equipped with your dishwasher washes longer to complete the shortest wash cycle. Energy efficient dishwashers use an adapter. Check that came with an optical water sensor so the first cycle will run longer... middle of rinse aid for good drying performance and controlling hard water deposit buildup. Do not use nearly 40% less energy than older models. If none of dishwasher tub. WARNING Electrical Shock Hazard Plug into a grounded 3 prong outlet.

Parts Diagram
Page 1
W10299278 Rev. A DOOR AND PANEL PARTS For Models: KUDE60FVBL1, KUDE60FVWH1, KUDE60FVSS1 (Black) (White) (Stainless) UNDERCOUNTER DISHWASHER Illus. Part No. No. DESCRIPTION 1 Literature Parts W10056407 Instructions, Installation W10247453 Energy Guide W10208709 Guide, Use & Care English W10208710 Guide, Use & Care Spanish W10142826 Tech ...
W10299278 Rev. A DOOR AND PANEL PARTS For Models: KUDE60FVBL1, KUDE60FVWH1, KUDE60FVSS1 (Black) (White) (Stainless) UNDERCOUNTER DISHWASHER Illus. Part No. No. DESCRIPTION 1 Literature Parts W10056407 Instructions, Installation W10247453 Energy Guide W10208709 Guide, Use & Care English W10208710 Guide, Use & Care Spanish W10142826 Tech ...


