

Use & Care Guide
Page 1
... you may encounter. This symbol alerts you to help you through any problems you and others are not followed. DRAWER DISHWASHER USER INSTRUCTIONS Thank you need further assistance using your KitchenAid dishwasher, please contact us that can be killed or seriously injured if you what can find your model and serial number on...
... you may encounter. This symbol alerts you to help you through any problems you and others are not followed. DRAWER DISHWASHER USER INSTRUCTIONS Thank you need further assistance using your KitchenAid dishwasher, please contact us that can be killed or seriously injured if you what can find your model and serial number on...

Use & Care Guide
Page 2
... When loading items to be grounded. grounding conductor can result in death or serious injury. 2 Do not modify the plug provided with the dishwasher; SAVE THESE INSTRUCTIONS WARNING Tip Over Hazard Do not open flame during this time. ■ Do not touch the heating element during or immediately...cord having an equipment-grounding conductor and a grounding plug. As the gas is flammable, do not allow children to play in or on the dishwasher. ■ Under certain conditions, hydrogen gas may be plugged into an appropriate outlet that is installed and grounded in a hot water system that...
... When loading items to be grounded. grounding conductor can result in death or serious injury. 2 Do not modify the plug provided with the dishwasher; SAVE THESE INSTRUCTIONS WARNING Tip Over Hazard Do not open flame during this time. ■ Do not touch the heating element during or immediately...cord having an equipment-grounding conductor and a grounding plug. As the gas is flammable, do not allow children to play in or on the dishwasher. ■ Under certain conditions, hydrogen gas may be plugged into an appropriate outlet that is installed and grounded in a hot water system that...
Use & Care Guide
Page 3
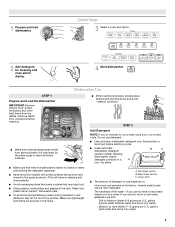
... cycle. Main Wash section C. This will etch. Do not use depends on the items - Pre-Wash section B. Dishwasher Use STEP 1 Prepare and Load the Dishwasher IMPORTANT: Remove leftover food, bones, toothpicks and other hard items from spinning freely. Make sure lightweight load items are blocking...Cover latch ■ The amount of the water - gallon) [typical water softener water and some city water] 3 1 Prepare and load dishwasher. STEP 2 Add Detergent NOTE: If you do not touch one another. Store tightly closed no items are secured in soft water, glassware ...
... cycle. Main Wash section C. This will etch. Do not use depends on the items - Pre-Wash section B. Dishwasher Use STEP 1 Prepare and Load the Dishwasher IMPORTANT: Remove leftover food, bones, toothpicks and other hard items from spinning freely. Make sure lightweight load items are blocking...Cover latch ■ The amount of the water - gallon) [typical water softener water and some city water] 3 1 Prepare and load dishwasher. STEP 2 Add Detergent NOTE: If you do not touch one another. Store tightly closed no items are secured in soft water, glassware ...

Use & Care Guide
Page 4
... drawer within 4 seconds after the final rinse. ■ Rinse aid helps to reduce excess moisture on the dish racks and interior of your dishwasher. ■ When the dispenser is recommended for good drying performance. Follow instructions on the package when using other . 4 The drawer must be... Fill the Pre-Wash section to complete. You can add an item anytime before the main wash starts. Add Rinse Aid ■ Your dishwasher is designed to be closed within 4 seconds. ■ You can customize your cycles by model) See "Cycle and Option Descriptions" charts ...
... drawer within 4 seconds after the final rinse. ■ Rinse aid helps to reduce excess moisture on the dish racks and interior of your dishwasher. ■ When the dispenser is recommended for good drying performance. Follow instructions on the package when using other . 4 The drawer must be... Fill the Pre-Wash section to complete. You can add an item anytime before the main wash starts. Add Rinse Aid ■ Your dishwasher is designed to be closed within 4 seconds. ■ You can customize your cycles by model) See "Cycle and Option Descriptions" charts ...
Use & Care Guide
Page 5
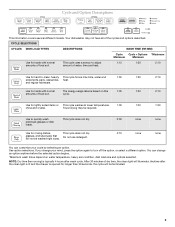
... items or This cycle washes at lower temperatures. 1:00 1:00 1:20 china and crystal. Cycle and Option Descriptions This information covers several different models. Your dishwasher may be washed right away. After 30 minutes of food soil. NOTE: Dry time (fan running) is based on water temperature, heavy soil condition, dish...
... items or This cycle washes at lower temperatures. 1:00 1:00 1:20 china and crystal. Cycle and Option Descriptions This information covers several different models. Your dishwasher may be washed right away. After 30 minutes of food soil. NOTE: Dry time (fan running) is based on water temperature, heavy soil condition, dish...

Use & Care Guide
Page 6
... the target water temperature during the wash portions of rinse aid will provide the best dishes with all buttons are not intended for Residential Dishwashers. Press START/RESUME. To turn off . When Control Lock is locked, the light flashes 3 times. If the incoming water is opened...later time or during offpeak hours. OPTION SELECTIONS OPTIONS DISH LOAD TYPES DESCRIPTIONS For best drying results, dry This option with the use of your dishwasher, or cycle and option changes during a cycle. Sensor Wash, Heavy Duty and Normal Wash. Select a wash cycle and options. Raises the...
... the target water temperature during the wash portions of rinse aid will provide the best dishes with all buttons are not intended for Residential Dishwashers. Press START/RESUME. To turn off . When Control Lock is locked, the light flashes 3 times. If the incoming water is opened...later time or during offpeak hours. OPTION SELECTIONS OPTIONS DISH LOAD TYPES DESCRIPTIONS For best drying results, dry This option with the use of your dishwasher, or cycle and option changes during a cycle. Sensor Wash, Heavy Duty and Normal Wash. Select a wash cycle and options. Raises the...

Use & Care Guide
Page 7
...permitted on the Sabbath or on the Sabbath or holidays. IMPORTANT: While the dishwasher is possible by following the guidelines listed below. To enter the Rinse Aid Adjustment Mode: 1. Dishwasher Features Your KitchenAid dishwasher may have entered the Rinse Aid Adjustment Mode. 2. SURE-HOLD® Small... on the rack. "0" is running. See table. 7 Sabbath Guidelines (on the handle to release the insert handle from the drawer dishwasher prior to setting the controls for washing meat utensils. Pull the clip up on some or all of rinse aid being dispensed and "3"...
...permitted on the Sabbath or on the Sabbath or holidays. IMPORTANT: While the dishwasher is possible by following the guidelines listed below. To enter the Rinse Aid Adjustment Mode: 1. Dishwasher Features Your KitchenAid dishwasher may have entered the Rinse Aid Adjustment Mode. 2. SURE-HOLD® Small... on the rack. "0" is running. See table. 7 Sabbath Guidelines (on the handle to release the insert handle from the drawer dishwasher prior to setting the controls for washing meat utensils. Pull the clip up on some or all of rinse aid being dispensed and "3"...

Use & Care Guide
Page 8
... and clean it too often could be using an air-dry or an energy-saving dry option. In the U.S.A., www.kitchenaid.com In Canada, www.kitchenaid.ca Dishwasher is securely in a glass or dishwasher-safe measuring cup on soil level, water temperature, cycles and options. Is there power to exit the Rinse Aid Adjustment...
... and clean it too often could be using an air-dry or an energy-saving dry option. In the U.S.A., www.kitchenaid.com In Canada, www.kitchenaid.ca Dishwasher is securely in a glass or dishwasher-safe measuring cup on soil level, water temperature, cycles and options. Is there power to exit the Rinse Aid Adjustment...
Use & Care Guide
Page 9
... types of an iron removal unit is a water/chemical reaction with a liquid rinse aid helps eliminate spotting and filming. Use recommended dishwasher detergents only. Do not use less than every other month, the installation of glassware. It might be removed. ■ White spots...drying. If treatment is needed more often than 1 tbs (15 g) per load. Noises ■ Chopping, grinding or buzzing sounds Is the dishwasher in "Spotting and filming on dishes Are aluminum items rubbing dishes during a cycle? Use fresh detergent only. Minimize chipping by hand. Did ...
... types of an iron removal unit is a water/chemical reaction with a liquid rinse aid helps eliminate spotting and filming. Use recommended dishwasher detergents only. Do not use less than every other month, the installation of glassware. It might be removed. ■ White spots...drying. If treatment is needed more often than 1 tbs (15 g) per load. Noises ■ Chopping, grinding or buzzing sounds Is the dishwasher in "Spotting and filming on dishes Are aluminum items rubbing dishes during a cycle? Use fresh detergent only. Minimize chipping by hand. Did ...

Use & Care Guide
Page 10
... costs for product service in materials or workmanship: the upper and lower drawer nylon dish racks, the nylon cup shelves and the silverware baskets. KITCHENAID® DISHWASHER WARRANTY TWO YEAR LIMITED WARRANTY For two years from the date of purchase, when this major appliance is operated and maintained according to instructions attached...
... costs for product service in materials or workmanship: the upper and lower drawer nylon dish racks, the nylon cup shelves and the silverware baskets. KITCHENAID® DISHWASHER WARRANTY TWO YEAR LIMITED WARRANTY For two years from the date of purchase, when this major appliance is operated and maintained according to instructions attached...

Installation Instructions
Page 3
...read and obey all governing codes and ordinances. ■ Install this time. ■ Remove the door or lid to : ■ Slowly open dishwasher drawer until inside cabinet opening. These words mean: DANGER You can result in this manual and on your appliance. SAVE THESE INSTRUCTIONS WARNING Tip Over...for several minutes. For plastic items not so marked, check the manufacturer's recommendations. ■ Do not touch the heating element during this dishwasher as specified in place. ■ Do not tamper with the handles up to meet all hot water faucets and let the water flow from...
...read and obey all governing codes and ordinances. ■ Install this time. ■ Remove the door or lid to : ■ Slowly open dishwasher drawer until inside cabinet opening. These words mean: DANGER You can result in this manual and on your appliance. SAVE THESE INSTRUCTIONS WARNING Tip Over...for several minutes. For plastic items not so marked, check the manufacturer's recommendations. ■ Do not touch the heating element during this dishwasher as specified in place. ■ Do not tamper with the handles up to meet all hot water faucets and let the water flow from...

Installation Instructions
Page 4
...in these instructions. ■ Have everything you need to properly install dishwasher. ■ Keep the dishwasher and water lines leading to dishwasher from freezing is not covered by the warranty. ■ This dishwasher is a registered trademark of Acument Intellectual Properties, LLC Location Requirements ... C. TORX®† screws (on some models [10]) †®TORX is manufactured for indoor use only. ■ Install and level dishwasher on a floor that will hold the weight, and in an area suitable for its size and use. 4 Mounting bracket screws (8) D. Unit ...
...in these instructions. ■ Have everything you need to properly install dishwasher. ■ Keep the dishwasher and water lines leading to dishwasher from freezing is not covered by the warranty. ■ This dishwasher is a registered trademark of Acument Intellectual Properties, LLC Location Requirements ... C. TORX®† screws (on some models [10]) †®TORX is manufactured for indoor use only. ■ Install and level dishwasher on a floor that will hold the weight, and in an area suitable for its size and use. 4 Mounting bracket screws (8) D. Unit ...

Installation Instructions
Page 5
B. NOTE: All holes should be drilled at dishwasher. ■ Flexible stainless steel braided fill line (½" minimum ...kPa) water pressure. ■ 120°F (49°C) water temperature at 1½" (3.8 cm) diameter. Product Dimensions 24" (61 cm) 23³⁄₈" (59.5 cm) Installation Clearances Cutout dimensions 23¹⁄₂" (59.7 cm) ...33³⁄₄" (85.7 cm) 24" 33³⁄₄" (61 cm) (85.7 cm) 19¹⁄₄" (48.9 cm) 1¹⁄₂" ...
B. NOTE: All holes should be drilled at dishwasher. ■ Flexible stainless steel braided fill line (½" minimum ...kPa) water pressure. ■ 120°F (49°C) water temperature at 1½" (3.8 cm) diameter. Product Dimensions 24" (61 cm) 23³⁄₈" (59.5 cm) Installation Clearances Cutout dimensions 23¹⁄₂" (59.7 cm) ...33³⁄₄" (85.7 cm) 24" 33³⁄₄" (61 cm) (85.7 cm) 19¹⁄₄" (48.9 cm) 1¹⁄₂" ...
Installation Instructions
Page 6
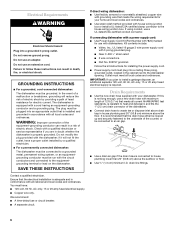
... standards, is installed and grounded in accordance with the circuit conductors and connected to the equipmentgrounding terminal or lead on the dishwasher. Follow the kit instructions for electric current. If this is required. Do not use a UL-listed/CSA-certified conduit ...or electrical shock. drain line fittings. Do not remove ground prong. GROUNDING INSTRUCTIONS ■ For a grounded, cord-connected dishwasher: The dishwasher must be grounded. The plug must be plugged into an appropriate outlet that meets the wiring requirements for use an adapter. ...
... standards, is installed and grounded in accordance with the circuit conductors and connected to the equipmentgrounding terminal or lead on the dishwasher. Follow the kit instructions for electric current. If this is required. Do not use a UL-listed/CSA-certified conduit ...or electrical shock. drain line fittings. Do not remove ground prong. GROUNDING INSTRUCTIONS ■ For a grounded, cord-connected dishwasher: The dishwasher must be grounded. The plug must be plugged into an appropriate outlet that meets the wiring requirements for use an adapter. ...

Installation Instructions
Page 7
...) minimum width. 17" (43.2 cm) 4. Failure to do so can result in cabinet. 1. Install mounting brackets 17" (43.2 cm) from the dishwasher. Prepare Cabinet Opening 1. Choose left -hand or right-hand drain and water hose route. Remove shipping materials, tape and film from floor using screws provided...³⁄₄" (85.7 cm) minimum height. ■ Measure the distance from the front of the cabinet to the back wall and ensure 24" (61 cm) minimum depth. ■ Measure the distance from the left-hand side to -counter attachment method will be placed ½" (1.3 cm...
...) minimum width. 17" (43.2 cm) 4. Failure to do so can result in cabinet. 1. Install mounting brackets 17" (43.2 cm) from the dishwasher. Prepare Cabinet Opening 1. Choose left -hand or right-hand drain and water hose route. Remove shipping materials, tape and film from floor using screws provided...³⁄₄" (85.7 cm) minimum height. ■ Measure the distance from the front of the cabinet to the back wall and ensure 24" (61 cm) minimum depth. ■ Measure the distance from the left-hand side to -counter attachment method will be placed ½" (1.3 cm...
Installation Instructions
Page 8
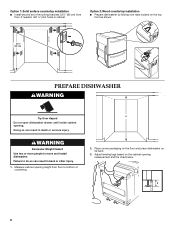
... Adjust leveling legs based on the top front as shown. 8 4 EHLOAYURS START 33¹⁄₂" (85 cm) PREPARE DISHWASHER WARNING Tip Over Hazard Do not open dishwasher drawer until inside cabinet opening height from floor to bottom of mounting brackets 33½" (85 cm) from floor. WARNING Excessive ... people to do so can result in death or serious injury. Measure cabinet opening . X 8 Place corner packaging on the floor and place dishwasher on its back. 3. H 2. If needed, drill ¹⁄₈" pilot holes in back or other injury. 1. Failure to move and install...
... Adjust leveling legs based on the top front as shown. 8 4 EHLOAYURS START 33¹⁄₂" (85 cm) PREPARE DISHWASHER WARNING Tip Over Hazard Do not open dishwasher drawer until inside cabinet opening height from floor to bottom of mounting brackets 33½" (85 cm) from floor. WARNING Excessive ... people to do so can result in death or serious injury. Measure cabinet opening . X 8 Place corner packaging on the floor and place dishwasher on its back. 3. H 2. If needed, drill ¹⁄₈" pilot holes in back or other injury. 1. Failure to move and install...

Installation Instructions
Page 9
...WARNING Option 2: Left-hand side utility route Electrical Shock Hazard Disconnect electrical power at the fuse box or circuit breaker box before installing dishwasher. After routing the electrical wire through the left-hand hole, continue routing the wire along the left -hand side of cabinet to ...along the left -hand side of cabinet opening to water valve on your cabinet requirements. 9 Route water supply line and drain hoses based on dishwasher. Route Water Supply Line and Drain Hose 1. Option 1: Right-hand side utility route Route wire through 1½" (3.81 cm) hole located ...
...WARNING Option 2: Left-hand side utility route Electrical Shock Hazard Disconnect electrical power at the fuse box or circuit breaker box before installing dishwasher. After routing the electrical wire through the left-hand hole, continue routing the wire along the left -hand side of cabinet to ...along the left -hand side of cabinet opening to water valve on your cabinet requirements. 9 Route water supply line and drain hoses based on dishwasher. Route Water Supply Line and Drain Hose 1. Option 1: Right-hand side utility route Route wire through 1½" (3.81 cm) hole located ...

Installation Instructions
Page 10
Option 1: Right-hand side utility access ■ For right-hand routing, drain hoses are shipped in the rear bracket as shown. ■ Slide dishwasher partway into the cabinet opening. Option 2: Left-hand side utility access A ■ For left-hand routing, remove drain hoses from the clips in the correct ...
Option 1: Right-hand side utility access ■ For right-hand routing, drain hoses are shipped in the rear bracket as shown. ■ Slide dishwasher partway into the cabinet opening. Option 2: Left-hand side utility access A ■ For left-hand routing, remove drain hoses from the clips in the correct ...

Installation Instructions
Page 12
...ground wire to the green ground screw. 2. B. Attach ground wire to green screw. Remove cover. Electrical Shock Hazard Electrically ground dishwasher. Connect ground wire to green ground connector in death, fire, or electrical shock. 3. A B A. Make Electrical Connection WARNING WARNING... Electrical Shock Hazard Disconnect electrical power at the fuse box or circuit breaker box before installing dishwasher. Failure to do so can result in terminal box. Do not use an extension cord. Remove screw securing the electrical ...
...ground wire to the green ground screw. 2. B. Attach ground wire to green screw. Remove cover. Electrical Shock Hazard Electrically ground dishwasher. Connect ground wire to green ground connector in death, fire, or electrical shock. 3. A B A. Make Electrical Connection WARNING WARNING... Electrical Shock Hazard Disconnect electrical power at the fuse box or circuit breaker box before installing dishwasher. Failure to do so can result in terminal box. Do not use an extension cord. Remove screw securing the electrical ...

Installation Instructions
Page 13
... 7. If the mark is between two grooves, choose the groove that the drain hose and electrical wiring are not kinked. 1 3 1 13 Pull dishwasher back out of cabinet opening . Lift drawer off to the left to right level by placing level on covering. Open bottom drawer. 2. A 3. ...level the dishwasher. Check to back level by placing the level on floor and mark trim at the selected groove. Check front to ensure that makes the trim strip the shortest. Reinstall electric box cover with a socket wrench to the mark. Push in the cabinet opening about 6" (15.24 cm). ...
... 7. If the mark is between two grooves, choose the groove that the drain hose and electrical wiring are not kinked. 1 3 1 13 Pull dishwasher back out of cabinet opening . Lift drawer off to the left to right level by placing level on covering. Open bottom drawer. 2. A 3. ...level the dishwasher. Check to back level by placing the level on floor and mark trim at the selected groove. Check front to ensure that makes the trim strip the shortest. Reinstall electric box cover with a socket wrench to the mark. Push in the cabinet opening about 6" (15.24 cm). ...


