User Manual
Page 1
...your model and serial number on the label located near the door on your KitchenAid dishwasher, please contact us at www.kitchenaid.com. In Canada: visit www.kitchenaid.ca or call 1-800-807-6777. This is important to the highest ... we have a positive experience owning a KitchenAid® product. All safety messages will follow User Instruction Book. Table of Contents DISHWASHER SAFETY 1 QUICK STEPS 3 DISHWASHER USE 3 CYCLE AND OPTION DESCRIPTIONS 4 DISHWASHER FEATURES 6 DISHWASHER CARE 7 TROUBLESHOOTING 8 WARRANTY 10 Dishwasher Safety Your safety and the safety of ...
...your model and serial number on the label located near the door on your KitchenAid dishwasher, please contact us at www.kitchenaid.com. In Canada: visit www.kitchenaid.ca or call 1-800-807-6777. This is important to the highest ... we have a positive experience owning a KitchenAid® product. All safety messages will follow User Instruction Book. Table of Contents DISHWASHER SAFETY 1 QUICK STEPS 3 DISHWASHER USE 3 CYCLE AND OPTION DESCRIPTIONS 4 DISHWASHER FEATURES 6 DISHWASHER CARE 7 TROUBLESHOOTING 8 WARRANTY 10 Dishwasher Safety Your safety and the safety of ...
User Manual
Page 2
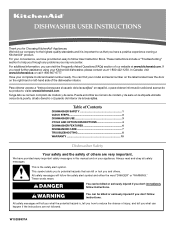
... so marked, check the manufacturer's recommendations. ■ Do not abuse, sit on, or stand on the door, lid, or dish racks of the dishwasher. ■ To reduce the risk of children. ■ When loading items to be plugged into an appropriate outlet that has not been used for several... or on open flame during this time. ■ Do not touch the heating element during or immediately after use. ■ Do not operate the dishwasher unless all enclosure panels are properly in place. ■ Remove the door or lid to a grounded metal, permanent wiring system, or an equipment-grounding...
... so marked, check the manufacturer's recommendations. ■ Do not abuse, sit on, or stand on the door, lid, or dish racks of the dishwasher. ■ To reduce the risk of children. ■ When loading items to be plugged into an appropriate outlet that has not been used for several... or on open flame during this time. ■ Do not touch the heating element during or immediately after use. ■ Do not operate the dishwasher unless all enclosure panels are properly in place. ■ Remove the door or lid to a grounded metal, permanent wiring system, or an equipment-grounding...
User Manual
Page 3
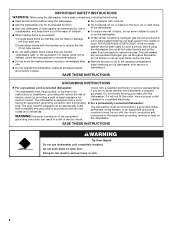
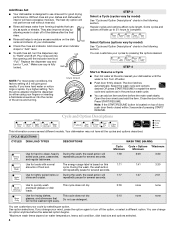
...'t be loaded with soiled surfaces facing down and avoid "nesting" as shown. Make sure lightweight load items are for drying. 4 Start dishwasher. The hardness of door, push door firmly closed detergent B container in better cleaning. gallon) [well water and some city water] Medium...Add powder, liquid or tablet detergent just before washing. Hard Water Soft Water Hard Water Soft Water C PRE- 1 Prepare and load dishwasher. Cover latch B. NOTE: Fill amounts shown are secured in the upper rack. Soft to Hard Water (7-12 grains per U.S. Remove labels...
...'t be loaded with soiled surfaces facing down and avoid "nesting" as shown. Make sure lightweight load items are for drying. 4 Start dishwasher. The hardness of door, push door firmly closed detergent B container in better cleaning. gallon) [well water and some city water] Medium...Add powder, liquid or tablet detergent just before washing. Hard Water Soft Water Hard Water Soft Water C PRE- 1 Prepare and load dishwasher. Cover latch B. NOTE: Fill amounts shown are secured in the upper rack. Soft to Hard Water (7-12 grains per U.S. Remove labels...
User Manual
Page 4
...on water temperature, heavy soil condition, dish load size and options selected. 4 Make sure cap is at the sink nearest your dishes and dishwasher interior will 1:39 2:09 3:30 soiled pots, pans, casseroles, repeatedly pause for good drying performance. Turn off . Add rinse aid when ... Resume a Cycle ■ Run hot water at "Full." Open the door slowly and add the item. Add Rinse Aid ■ Your dishwasher is designed to use detergent. 0:10 none none You can customize your fingers or inserting a flat-blade screwdriver into the opening until the water...
...on water temperature, heavy soil condition, dish load size and options selected. 4 Make sure cap is at the sink nearest your dishes and dishwasher interior will 1:39 2:09 3:30 soiled pots, pans, casseroles, repeatedly pause for good drying performance. Turn off . Add rinse aid when ... Resume a Cycle ■ Run hot water at "Full." Open the door slowly and add the item. Add Rinse Aid ■ Your dishwasher is designed to use detergent. 0:10 none none You can customize your fingers or inserting a flat-blade screwdriver into the opening until the water...
User Manual
Page 5
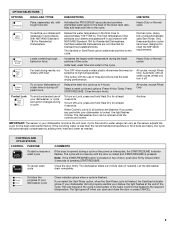
...to the cycle. When Control Lock is less than the recommended temperature or food soils are locked. Close the door firmly. Let the dishwasher drain completely. Normal cycle. Heavy Duty or Normal cycles For best drying results, dry dishes with tough food soil. Turn OFF when ...intensified water spray to the back of a cycle up to approximately 155°F (68°C). This option with NSF/ANSI Standard 184 for Residential Dishwashers. All cycles, except Rinse Only. Anytime IMPORTANT: The sensor in the final rinse to 4 hours. Note: If the START/RESUME button is ...
...to the cycle. When Control Lock is less than the recommended temperature or food soils are locked. Close the door firmly. Let the dishwasher drain completely. Normal cycle. Heavy Duty or Normal cycles For best drying results, dry dishes with tough food soil. Turn OFF when ...intensified water spray to the back of a cycle up to approximately 155°F (68°C). This option with NSF/ANSI Standard 184 for Residential Dishwashers. All cycles, except Rinse Only. Anytime IMPORTANT: The sensor in the final rinse to 4 hours. Note: If the START/RESUME button is ...
User Manual
Page 6
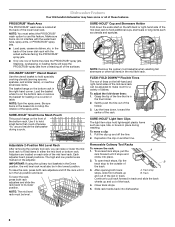
Dishwasher Features Your KitchenAid dishwasher may face the PROSCRUB® spray jets. NOTE: Spin the spray arms. Be sure items...the mid level rack to fit tall items in track. in the Up position and level. Use it stops and clicks into dishwasher. 6 To move a clip: 1. To access track stops, pull the A rack forward until it is in the back ...™ Flexible Tines The row of tines on each side of the tine that could otherwise "fly" around inside the dishwasher during washing. Gently push the tine out of dishes. To raise the rack, press both rack adjusters and lift the ...
Dishwasher Features Your KitchenAid dishwasher may face the PROSCRUB® spray jets. NOTE: Spin the spray arms. Be sure items...the mid level rack to fit tall items in track. in the Up position and level. Use it stops and clicks into dishwasher. 6 To move a clip: 1. To access track stops, pull the A rack forward until it is in the back ...™ Flexible Tines The row of tines on each side of the tine that could otherwise "fly" around inside the dishwasher during washing. Gently push the tine out of dishes. To raise the rack, press both rack adjusters and lift the ...

User Manual
Page 7
...other tall items in this down interior. Install the baskets in the mid level rack for more room to wash. Clean the interior of the dishwasher, with 2 movable baskets to near freezing temperatures or is designed with a paste of the rack into the track slot and roll the rack ... 2. If you have a drain air gap, check and clean it too often could be exposed to hold extra silverware, knives and cooking utensils. Dishwasher Care Cleaning the Dishwasher Clean the exterior of rack and slide rack back into the rack slots. 5. Put 2 cups (500 mL) white vinegar in the down position,...
...other tall items in this down interior. Install the baskets in the mid level rack for more room to wash. Clean the interior of the dishwasher, with 2 movable baskets to near freezing temperatures or is designed with a paste of the rack into the track slot and roll the rack ... 2. If you have a drain air gap, check and clean it too often could be exposed to hold extra silverware, knives and cooking utensils. Dishwasher Care Cleaning the Dishwasher Clean the exterior of rack and slide rack back into the rack slots. 5. Put 2 cups (500 mL) white vinegar in the down position,...
User Manual
Page 8
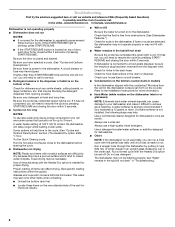
... detergent is located on the kitchen counter (built-in the drain or disposer. In the U.S.A., www.kitchenaid.com In Canada, www.kitchenaid.ca Dishwasher is free from the disposer inlet. that the float is not operating properly ■ Dishwasher does not run , you will add time to 3 hours. This water may be sure the...
... detergent is located on the kitchen counter (built-in the drain or disposer. In the U.S.A., www.kitchenaid.com In Canada, www.kitchenaid.ca Dishwasher is free from the disposer inlet. that the float is not operating properly ■ Dishwasher does not run , you will add time to 3 hours. This water may be sure the...
User Manual
Page 9
... is securely attached and avoid overfilling. ■ Tub is discolored NOTES: ■ High iron content in the PROSCRUB® wash are pushed into dishwasher. To remove spotting, run , call for service. ■ Cloudy or spotted dishware (and hard water solution) NOTES: ■ Liquid rinse aid...only when incoming water temperature is set too low. ■ Noisy NOTES: ■ Surging sounds can occur periodically throughout the cycle while the dishwasher is draining. ■ Normal water valve hissing may be heard periodically. ■ A normal snap sound may be heard when the detergent ...
... is securely attached and avoid overfilling. ■ Tub is discolored NOTES: ■ High iron content in the PROSCRUB® wash are pushed into dishwasher. To remove spotting, run , call for service. ■ Cloudy or spotted dishware (and hard water solution) NOTES: ■ Liquid rinse aid...only when incoming water temperature is set too low. ■ Noisy NOTES: ■ Surging sounds can occur periodically throughout the cycle while the dishwasher is draining. ■ Normal water valve hissing may be heard periodically. ■ A normal snap sound may be heard when the detergent ...
User Manual
Page 10
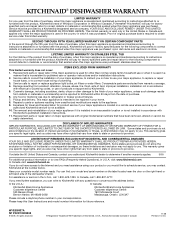
.... ® Registered Trademark/TM Trademark of products not approved by an authorized KitchenAid servicer is operated and maintained according to instructions attached to or furnished with the product, KitchenAid will pay for factory specified parts for future reference. KITCHENAID® DISHWASHER WARRANTY LIMITED WARRANTY For one year from the date of purchase, when this...
.... ® Registered Trademark/TM Trademark of products not approved by an authorized KitchenAid servicer is operated and maintained according to instructions attached to or furnished with the product, KitchenAid will pay for factory specified parts for future reference. KITCHENAID® DISHWASHER WARRANTY LIMITED WARRANTY For one year from the date of purchase, when this...

Installation Instructions
Page 2
.... WARNING You can result in Cabinet Opening 23 Complete Installation 24 Check Operation 25 If Dishwasher Does Not Operate 25 Additional Tips 25 DISHWASHER SAFETY Your safety and the safety of the dishwasher. This symbol alerts you and others are not followed. Do...Cabinet Opening-New Utilities 7 Prepare and Route Water Line 8 Install Drain Hose 9 Install Moisture Barrier (on some models 10 Prepare Dishwasher 11 Make Power Supply Cord Connection 12 Determine Cabinet Opening 13 Installation Instructions (cont.) Install the Door Handle (on your appliance....
.... WARNING You can result in Cabinet Opening 23 Complete Installation 24 Check Operation 25 If Dishwasher Does Not Operate 25 Additional Tips 25 DISHWASHER SAFETY Your safety and the safety of the dishwasher. This symbol alerts you and others are not followed. Do...Cabinet Opening-New Utilities 7 Prepare and Route Water Line 8 Install Drain Hose 9 Install Moisture Barrier (on some models 10 Prepare Dishwasher 11 Make Power Supply Cord Connection 12 Determine Cabinet Opening 13 Installation Instructions (cont.) Install the Door Handle (on your appliance....
Installation Instructions
Page 3
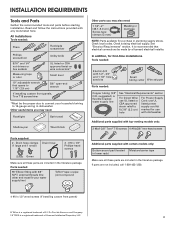
...approved twist-on wire connectors* Small level 10" adjustable wrench that electrical connections be the proper size to 16-gauge wiring in dishwasher Other useful items you may need: Flashlight Bath towel Shallow pan Wood block Other parts you may also need: 1 1/2"-2" (38...any tools listed here. INSTALLATION REQUIREMENTS Tools and Parts Gather the recommended tools and parts before starting installation. In addition, for use with dishwasher Additional parts supplied with top-venting models only: 2 #8x1-3/8" Torx® T15 screws 4 #10x3/8" hex-head screws Parts supplied...
...approved twist-on wire connectors* Small level 10" adjustable wrench that electrical connections be the proper size to 16-gauge wiring in dishwasher Other useful items you may need: Flashlight Bath towel Shallow pan Wood block Other parts you may also need: 1 1/2"-2" (38...any tools listed here. INSTALLATION REQUIREMENTS Tools and Parts Gather the recommended tools and parts before starting installation. In addition, for use with dishwasher Additional parts supplied with top-venting models only: 2 #8x1-3/8" Torx® T15 screws 4 #10x3/8" hex-head screws Parts supplied...

Installation Instructions
Page 4
...and drain hose are within the shaded area shown in the dishwasher opening , shims may be installed. Shelter dishwasher and water lines leading to order. If dishwasher will be securely attached to accurately measure dimensions and ensure dishwasher is level if the floor in the "Product and Cabinet ...Opening Dimensions" section. 4 Damage from your cabinetry. The location where the dishwasher will be left unused for installing underneath the countertop, but is uneven (example: Flooring extends only partway into opening is ...
...and drain hose are within the shaded area shown in the dishwasher opening , shims may be installed. Shelter dishwasher and water lines leading to order. If dishwasher will be securely attached to accurately measure dimensions and ensure dishwasher is level if the floor in the "Product and Cabinet ...Opening Dimensions" section. 4 Damage from your cabinetry. The location where the dishwasher will be left unused for installing underneath the countertop, but is uneven (example: Flooring extends only partway into opening is ...
Installation Instructions
Page 5
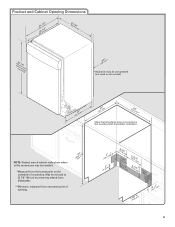
... walls show where utility connections may be installed. *Measured from narrowest point of countertop. May be reduced to 33 7/8" (86 cm) by removing wheels from dishwasher. **Minimum, measured from the lowest point on all models) (532.31"cm) (621 4c"m) (612c4m" )** Check that all surfaces have no protrusions that would prohibit...
... walls show where utility connections may be installed. *Measured from narrowest point of countertop. May be reduced to 33 7/8" (86 cm) by removing wheels from dishwasher. **Minimum, measured from the lowest point on all models) (532.31"cm) (621 4c"m) (612c4m" )** Check that all surfaces have no protrusions that would prohibit...
Installation Instructions
Page 6
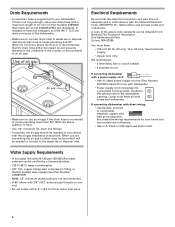
... standards, is recommended that the drain hose either be looped up and securely fastened to the underside of the dishwasher. • Make sure to connect drain hose to the dishwasher opening. It is resistant to heat and detergent, and fits the 1" (2.5 cm) drain connector of the counter...a time-delay fuse or circuit breaker. • a separate circuit. drain line fittings. • If required, the air gap should be installed in conformance with dishwasher. • Power supply cord must have: • 120-volt, 60 Hz, AC-only, 15 or 20 amp, fused electrical supply. • copper wire ...
... standards, is recommended that the drain hose either be looped up and securely fastened to the underside of the dishwasher. • Make sure to connect drain hose to the dishwasher opening. It is resistant to heat and detergent, and fits the 1" (2.5 cm) drain connector of the counter...a time-delay fuse or circuit breaker. • a separate circuit. drain line fittings. • If required, the air gap should be installed in conformance with dishwasher. • Power supply cord must have: • 120-volt, 60 Hz, AC-only, 15 or 20 amp, fused electrical supply. • copper wire ...
Installation Instructions
Page 7
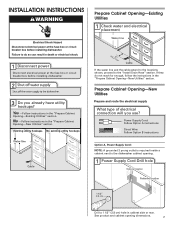
...Follow instructions in death or electrical shock. 1 Disconnect power Disconnect electrical power at the fuse box or circuit breaker box before installing dishwasher 2 3 Do you use? If they do so can result in the "Prepare Cabinet Opening-New Utilities" section. Existing utility ... and electrical placement Water line (15.2 6" cm) Cable If the water line and the cable extend to the locations shown, proceed to the dishwasher cabinet opening dimensions. 7 Power Supply Cord: Follow Option A instructions Direct Wire: Follow Option B instructions Option A, Power Supply Cord: NOTE: A...
...Follow instructions in death or electrical shock. 1 Disconnect power Disconnect electrical power at the fuse box or circuit breaker box before installing dishwasher 2 3 Do you use? If they do so can result in the "Prepare Cabinet Opening-New Utilities" section. Existing utility ... and electrical placement Water line (15.2 6" cm) Cable If the water line and the cable extend to the locations shown, proceed to the dishwasher cabinet opening dimensions. 7 Power Supply Cord: Follow Option A instructions Direct Wire: Follow Option B instructions Option A, Power Supply Cord: NOTE: A...
Installation Instructions
Page 8
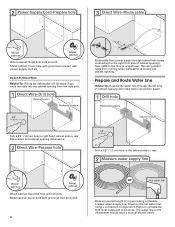
Option B, Direct Wire: Helpful Tip: Wiring the dishwasher will prohibit cable from moving when dishwasher is in right-hand cabinet side or rear. Metal cabinet: Cover hole with local codes and ordinances. Attach to the floor in the cabinet side ... is moved into the cabinet opening . Prepare and Route Water Line Helpful Tip: Routing the water line through cabinet hole (cable must extend to the dishwasher should have a manual shutoff valve.
Option B, Direct Wire: Helpful Tip: Wiring the dishwasher will prohibit cable from moving when dishwasher is in right-hand cabinet side or rear. Metal cabinet: Cover hole with local codes and ordinances. Attach to the floor in the cabinet side ... is moved into the cabinet opening . Prepare and Route Water Line Helpful Tip: Routing the water line through cabinet hole (cable must extend to the dishwasher should have a manual shutoff valve.
Installation Instructions
Page 9
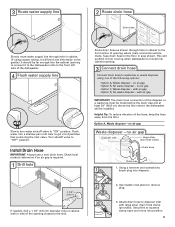
... and kink easily, so be gentle.) It should be made before the drain trap and at least 20" (50.8 cm) above the floor where the dishwasher will be far enough into the cabinet opening to connect it from the floor. with air gap • Option D, No waste disposer - Install Drain Hose...hose Drain trap 1 1. Attach drain hose to waste tee or waste disposer using copper tubing, it will prohibit it to the dishwasher inlet on the front left side of the dishwasher. 4 Flush water supply line Slowly turn water shutoff valve to get rid of particles that could clog the inlet valve. Flush...
... and kink easily, so be gentle.) It should be made before the drain trap and at least 20" (50.8 cm) above the floor where the dishwasher will be far enough into the cabinet opening to connect it from the floor. with air gap • Option D, No waste disposer - Install Drain Hose...hose Drain trap 1 1. Attach drain hose to waste tee or waste disposer using copper tubing, it will prohibit it to the dishwasher inlet on the front left side of the dishwasher. 4 Flush water supply line Slowly turn water shutoff valve to get rid of particles that could clog the inlet valve. Flush...
Installation Instructions
Page 11
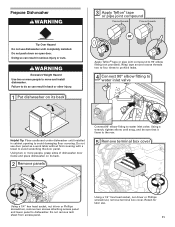
...four times to prohibit leaks. 4 Connect 90° elbow fitting to water inlet valve Helpful Tip: Place cardboard under dishwasher until installed in back or other injury. 1 Put dishwasher on its back. 2 Remove panels Connect 90° elbow fitting to avoid damaging floor covering. Using a wrench, ...without first covering with a towel to avoid scratching the door panel. Using two or more people to move and install dishwasher. Prepare Dishwasher WARNING Tip Over Hazard Do not use dishwasher until snug, and be sure that it faces to the rear. 5 Remove terminal box cover Using a 1/4" hex ...
...four times to prohibit leaks. 4 Connect 90° elbow fitting to water inlet valve Helpful Tip: Place cardboard under dishwasher until installed in back or other injury. 1 Put dishwasher on its back. 2 Remove panels Connect 90° elbow fitting to avoid damaging floor covering. Using a wrench, ...without first covering with a towel to avoid scratching the door panel. Using two or more people to move and install dishwasher. Prepare Dishwasher WARNING Tip Over Hazard Do not use dishwasher until snug, and be sure that it faces to the rear. 5 Remove terminal box cover Using a 1/4" hex ...
Installation Instructions
Page 12
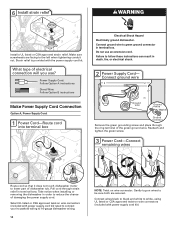
... instructions Make Power Supply Cord Connection Option A, Power Supply Cord: 1 Power Cord-Route cord into terminal box Electrical Shock Hazard Electrically ground dishwasher. Select UL listed or CSA approved twist-on wire connectors (included with the power supply cord kit. Connect ground wire Ground wire Ground ...supply cord kit). Reattach and tighten the green screw. 3 Power Cord-Connect remaining wires Route cord so that it does not touch dishwasher motor to white, using UL listed or CSA approved twist-on wire connectors (included with power supply cord kit) rated to connect ...
... instructions Make Power Supply Cord Connection Option A, Power Supply Cord: 1 Power Cord-Route cord into terminal box Electrical Shock Hazard Electrically ground dishwasher. Select UL listed or CSA approved twist-on wire connectors (included with the power supply cord kit. Connect ground wire Ground wire Ground ...supply cord kit). Reattach and tighten the green screw. 3 Power Cord-Connect remaining wires Route cord so that it does not touch dishwasher motor to white, using UL listed or CSA approved twist-on wire connectors (included with power supply cord kit) rated to connect ...


