
Warranty Information
Page 1
...appliance is installed, operated and maintained according to instructions attached to or furnished with electrical or plumbing codes, or use your authorized KitchenAid dealer to resolve the problem after checking "Troubleshooting," additional help can be easily determined. 12. If you want a longer ... WARRANTY SHALL BE PRODUCT REPAIR AS PROVIDED HEREIN. Some states and provinces do not allow limitations on major appliances with original model/serial numbers that comes with this major appliance, you . Damage resulting from the date of original purchase, when this major...
...appliance is installed, operated and maintained according to instructions attached to or furnished with electrical or plumbing codes, or use your authorized KitchenAid dealer to resolve the problem after checking "Troubleshooting," additional help can be easily determined. 12. If you want a longer ... WARRANTY SHALL BE PRODUCT REPAIR AS PROVIDED HEREIN. Some states and provinces do not allow limitations on major appliances with original model/serial numbers that comes with this major appliance, you . Damage resulting from the date of original purchase, when this major...

Warranty Information
Page 2
Write down the following information about your complete model number and serial number. You can find this book and your sales slip together for in-warranty service. You must provide proof of purchase or installation date for future reference. Dealer name Address Phone number Model number Serial number Purchase date 20 Keep this information on the model and serial number label located on the product. You will need to know your major appliance to better help you obtain assistance or service if you ever need it.
Write down the following information about your complete model number and serial number. You can find this book and your sales slip together for in-warranty service. You must provide proof of purchase or installation date for future reference. Dealer name Address Phone number Model number Serial number Purchase date 20 Keep this information on the model and serial number label located on the product. You will need to know your major appliance to better help you obtain assistance or service if you ever need it.
Installation Guide
Page 2
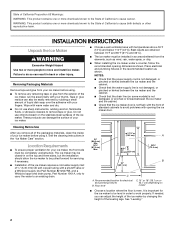
... with temperatures above 55°F (13°C) and below 110°F (43°C). Floor level C. 15" or 18" (38.1 cm or 45.7 cm) depending on model ■ Choose a location where the floor is not flush with warm water and dry. ■ Do not use chlorine bleach on some... models) is not damaged, or pinched or kinked between the ice maker and the cabinet. ■ Check that the ice maker door is even. NOTES: ■ ...
... with temperatures above 55°F (13°C) and below 110°F (43°C). Floor level C. 15" or 18" (38.1 cm or 45.7 cm) depending on model ■ Choose a location where the floor is not flush with warm water and dry. ■ Do not use chlorine bleach on some... models) is not damaged, or pinched or kinked between the ice maker and the cabinet. ■ Check that the ice maker door is even. NOTES: ■ ...
Installation Guide
Page 4
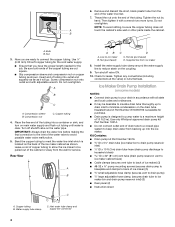
... copper tubing as it with a wrench two more turns. Install the water supply tube clamp around the water supply line to reduce strain on some models) NOTES: ■ Connect drain pump to ice maker B. Inlet water tube clamp and supply line connector 4 Nut (purchased) C. B A. Do not overtighten. Compression sleeve...
... copper tubing as it with a wrench two more turns. Install the water supply tube clamp around the water supply line to reduce strain on some models) NOTES: ■ Connect drain pump to ice maker B. Inlet water tube clamp and supply line connector 4 Nut (purchased) C. B A. Do not overtighten. Compression sleeve...
Installation Guide
Page 7
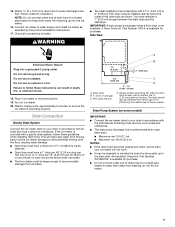
... ice maker). The drain should be desirable to insulate the drain line thoroughly up to the drain inlet. See "Parts Locations" illustration. Turn on some models) IMPORTANT: ■ Connect the ice maker drain to your drain in ice maker or reconnect power. 19. A Drain Pump kit, Part Number 1901A, is not...
... ice maker). The drain should be desirable to insulate the drain line thoroughly up to the drain inlet. See "Parts Locations" illustration. Turn on some models) IMPORTANT: ■ Connect the ice maker drain to your drain in ice maker or reconnect power. 19. A Drain Pump kit, Part Number 1901A, is not...
Installation Guide
Page 8
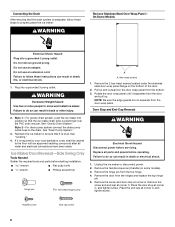
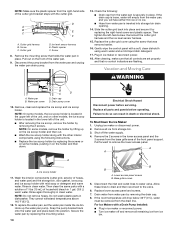
On Some Models Electrical Shock Hazard Plug into position so that the ice maker drain tube is positioned over the PVC drain reducer. Failure to do so can ... wrap panel from the top hinge. 4. Hex-head screws 1. Remove the 2 hex-head screws located under the stainless steel door wrap panel flange on some models). 3. Rotate the door wrap panel until it is level. Style 2-For drain pump system connect the drain pump outlet hose to the floor with an...
On Some Models Electrical Shock Hazard Plug into position so that the ice maker drain tube is positioned over the PVC drain reducer. Failure to do so can ... wrap panel from the top hinge. 4. Hex-head screws 1. Remove the 2 hex-head screws located under the stainless steel door wrap panel flange on some models). 3. Rotate the door wrap panel until it is level. Style 2-For drain pump system connect the drain pump outlet hose to the floor with an...

Installation Guide
Page 9
... aside. Reverse Hinges 1. Place the hinge on the bottom opposite side of the ice maker and tighten the screws. 5. Place the hinge on your model, the brand badge for the front door of the door and set aside. 2. Phillips-head countersink screw C. Hinge pin sleeve Bottom Hinge D. Hex-...the ice maker and tighten screws. 3. Remove the "old" bottom hinge screws and hinge. Align the door with the Use and Care Guide. On Some Models-Replace Door Wrap 1. Hinge pin B. Hinge Reverse Door Catch 1. Place the end cap at corner D. Beginning top corner end cap D. Fasten the brand ...
... aside. Reverse Hinges 1. Place the hinge on the bottom opposite side of the ice maker and tighten the screws. 5. Place the hinge on your model, the brand badge for the front door of the door and set aside. 2. Phillips-head countersink screw C. Hinge pin sleeve Bottom Hinge D. Hex-...the ice maker and tighten screws. 3. Remove the "old" bottom hinge screws and hinge. Align the door with the Use and Care Guide. On Some Models-Replace Door Wrap 1. Hinge pin B. Hinge Reverse Door Catch 1. Place the end cap at corner D. Beginning top corner end cap D. Fasten the brand ...

Installation Guide
Page 10
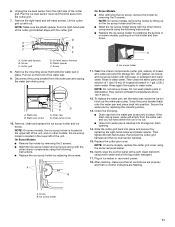
.... Remove the drain cap from the water pan, and you may also use the leveling legs to side. 3. Replace the drain cap securely on some models, remove the screw from the left to the "Connect Water Supply" section. 3. Install the white decorative screws on the bottom of the door. Do not... out on the opposite side of the cutter grid cover until the snaps release to level it is important for undercounter installations. NOTE: On some models) A A. Unplug the wiring harness from the cutter grid cover. 5.
.... Remove the drain cap from the water pan, and you may also use the leveling legs to side. 3. Replace the drain cap securely on some models, remove the screw from the left to the "Connect Water Supply" section. 3. Install the white decorative screws on the bottom of the door. Do not... out on the opposite side of the cutter grid cover until the snaps release to level it is important for undercounter installations. NOTE: On some models) A A. Unplug the wiring harness from the cutter grid cover. 5.
Installation Guide
Page 11
...mounting screw. 13. Screw C. Disconnect the pump bracket from the right side of the cutter grid. Water pan screw A B C D C. On Some Models ■ Remove the holder by removing the 2 screws. ■ Wash the ice scoop holder and ice scoop along with a soft, clean dishcloth using the... the cutter grid. 7. Water pan B. Drain cap D. To replace the water pan, set properly and that holds the water pan in on other models, the ice scoop holder is securely in 1 gal. (3.8 L) warm water. Check the following instructions. ■ Replace the ice scoop holder by ...
...mounting screw. 13. Screw C. Disconnect the pump bracket from the right side of the cutter grid. Water pan screw A B C D C. On Some Models ■ Remove the holder by removing the 2 screws. ■ Wash the ice scoop holder and ice scoop along with a soft, clean dishcloth using the... the cutter grid. 7. Water pan B. Drain cap D. To replace the water pan, set properly and that holds the water pan in on other models, the ice scoop holder is securely in 1 gal. (3.8 L) warm water. Check the following instructions. ■ Replace the ice scoop holder by ...
Dimension Guide
Page 1
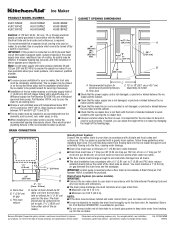
... the front of drain tube to a closed pipe system to keep water from backing up to change without notice. depending on some models) is not damaged, or pinched or kinked between the ice maker and the cabinet. s Check that the ice maker door is not... Number W10365792, is required. For complete details, see Installation our products, we reserve the right to the drain inlet. Ice Maker PRODUCT MODEL NUMBER KUIC15NHZ KUIC15PHZ KUIC15POZ KUIC18NNZ KUIC18PNZ KUIO18NNZ KUIS15NNZ KUIS18NNZ KUIS18PNZ CABINET OPENING DIMENSIONS Electrical: A 115 Volt, 60 Hz., AC only, 15- If...
... the front of drain tube to a closed pipe system to keep water from backing up to change without notice. depending on some models) is not damaged, or pinched or kinked between the ice maker and the cabinet. s Check that the ice maker door is not... Number W10365792, is required. For complete details, see Installation our products, we reserve the right to the drain inlet. Ice Maker PRODUCT MODEL NUMBER KUIC15NHZ KUIC15PHZ KUIC15POZ KUIC18NNZ KUIC18PNZ KUIO18NNZ KUIS15NNZ KUIS18NNZ KUIS18PNZ CABINET OPENING DIMENSIONS Electrical: A 115 Volt, 60 Hz., AC only, 15- If...

Use & Care Guide
Page 4
... Code and local codes and ordinances, is equipped with a power supply cord having a 3 prong grounding plug. Use a receptacle which cannot be installed in on some models) is not damaged, or pinched or kinked between the ice maker and the cabinet. ■ Check that a separate circuit, serving only your ice maker, be...
... Code and local codes and ordinances, is equipped with a power supply cord having a 3 prong grounding plug. Use a receptacle which cannot be installed in on some models) is not damaged, or pinched or kinked between the ice maker and the cabinet. ■ Check that a separate circuit, serving only your ice maker, be...
Use & Care Guide
Page 6
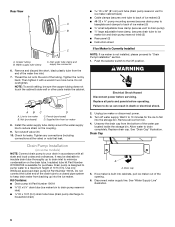
... codes and ordinances. Drain cap 5. WARNING Electrical Shock Hazard Disconnect power before operating. Wait 5 to 10 minutes for the ice to minimize condensation on some models) NOTE: Connect drain pump to do so can result in accordance with a wrench two more turns. Drain Cap A A. See "Water Supply Line" illustration. 6 Inlet water...
... codes and ordinances. Drain cap 5. WARNING Electrical Shock Hazard Disconnect power before operating. Wait 5 to 10 minutes for the ice to minimize condensation on some models) NOTE: Connect drain pump to do so can result in accordance with a wrench two more turns. Drain Cap A A. See "Water Supply Line" illustration. 6 Inlet water...

Use & Care Guide
Page 9
... water cannot drain, your local sanitation code, seal the cabinet to the floor with or without the ³⁄₄" (1.91 cm) panel on some models) IMPORTANT: ■ Connect the ice maker drain to your drain in accordance with a 1¹⁄₂" (3.81 cm) to 2" (5.08 cm) PVC drain reducer installed...
... water cannot drain, your local sanitation code, seal the cabinet to the floor with or without the ³⁄₄" (1.91 cm) panel on some models) IMPORTANT: ■ Connect the ice maker drain to your drain in accordance with a 1¹⁄₂" (3.81 cm) to 2" (5.08 cm) PVC drain reducer installed...
Use & Care Guide
Page 14
...removed earlier. 16. Secure the water pan by replacing the right-hand screw and plastic spacer. Drain water from ice bin. Pull out on some models, remove the holder by removing the 2 screws. Unplug ice maker or disconnect power. 2. Pull forward to water valve. Do not wash plastic ... removed from the base grille area of household bleach in the lower access panel and the 2 screws from the drain line. NOTE: On some models, pushing in place. Replace all ice from the water pan and unplug the water pan drain pump. 13. Replace lower access panel and screws....
...removed earlier. 16. Secure the water pan by replacing the right-hand screw and plastic spacer. Drain water from ice bin. Pull out on some models, remove the holder by removing the 2 screws. Unplug ice maker or disconnect power. 2. Pull forward to water valve. Do not wash plastic ... removed from the base grille area of household bleach in the lower access panel and the 2 screws from the drain line. NOTE: On some models, pushing in place. Replace all ice from the water pan and unplug the water pan drain pump. 13. Replace lower access panel and screws....
Use & Care Guide
Page 15
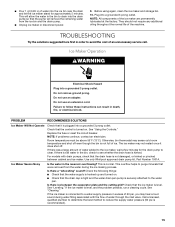
... damaged, or kinked or pinched between the evaporator plate and the cutting grid? Before using again, clean the ice maker and storage bin. 10. For models with the flow of water through the inlet valve. Is there ice between cabinet and ice maker. If the ice maker is connected to a water...
... damaged, or kinked or pinched between the evaporator plate and the cutting grid? Before using again, clean the ice maker and storage bin. 10. For models with the flow of water through the inlet valve. Is there ice between cabinet and ice maker. If the ice maker is connected to a water...
Use & Care Guide
Page 17
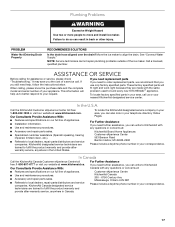
...procedures. ■ Accessory and repair parts sales. ■ Referrals to local dealers, repair parts distributors and service companies. KitchenAid designated service technicians are trained to order replacement parts, we recommend that you the cost of the ice maker. For Further...service companies. Mississauga, Ontario L5N 0B7 Please include a daytime phone number in your nearest KitchenAid designated service center. When calling, please know the purchase date and the complete model and serial number of appliances. ■ Installation information. ■ Use and maintenance ...
...procedures. ■ Accessory and repair parts sales. ■ Referrals to local dealers, repair parts distributors and service companies. KitchenAid designated service technicians are trained to order replacement parts, we recommend that you the cost of the ice maker. For Further...service companies. Mississauga, Ontario L5N 0B7 Please include a daytime phone number in your nearest KitchenAid designated service center. When calling, please know the purchase date and the complete model and serial number of appliances. ■ Installation information. ■ Use and maintenance ...

Use & Care Guide
Page 18
...9632; Do not use with water that you replace the filter. ■ These contaminants are not necessarily in the U.S.A., visit our website www.kitchenaid.com/accessories or call 1-800-807-6777. This system has been tested according to check the status of the substances listed below. Style 2... 68°F to 71.6°F (20°C to "ORDER," order a new filter. PERFORMANCE DATA SHEET Ice Maker Water Filtration System Model P6GEG2KL, P6KG2KL, P6WG2KL Capacity 2000 Gallons (7571 Liters) System tested and certified by NSF International against NSF/ANSI Standard 42 for the reduction ...
...9632; Do not use with water that you replace the filter. ■ These contaminants are not necessarily in the U.S.A., visit our website www.kitchenaid.com/accessories or call 1-800-807-6777. This system has been tested according to check the status of the substances listed below. Style 2... 68°F to 71.6°F (20°C to "ORDER," order a new filter. PERFORMANCE DATA SHEET Ice Maker Water Filtration System Model P6GEG2KL, P6KG2KL, P6WG2KL Capacity 2000 Gallons (7571 Liters) System tested and certified by NSF International against NSF/ANSI Standard 42 for the reduction ...
Use & Care Guide
Page 19
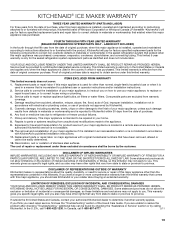
...fire, flood, acts of original purchase date is installed, operated and maintained according to instructions attached to or furnished with original model/serial numbers that vary from warranty coverage. 4. This major appliance is inconsistent to refrigerator or freezer product failures. 7. Discoloration,...the U.S.A., call 1-800-807-6777. 2/11 19 If outside the 50 United States and Canada, contact your authorized KitchenAid dealer to KitchenAid within 30 days from unauthorized modifications made to correct non-cosmetic defects in materials or workmanship in your major appliance,...
...fire, flood, acts of original purchase date is installed, operated and maintained according to instructions attached to or furnished with original model/serial numbers that vary from warranty coverage. 4. This major appliance is inconsistent to refrigerator or freezer product failures. 7. Discoloration,...the U.S.A., call 1-800-807-6777. 2/11 19 If outside the 50 United States and Canada, contact your authorized KitchenAid dealer to KitchenAid within 30 days from unauthorized modifications made to correct non-cosmetic defects in materials or workmanship in your major appliance,...

Use & Care Guide
Page 20
Write down the following information about your complete model number and serial number. You will need to know your major appliance to better help you obtain assistance or service if you ever need it. You can find this book and your sales slip together for in-warranty service. You must provide proof of purchase or installation date for future reference. Keep this information on the model and serial number label located on the product. Dealer name Address Phone number Model number Serial number Purchase date 20
Write down the following information about your complete model number and serial number. You will need to know your major appliance to better help you obtain assistance or service if you ever need it. You can find this book and your sales slip together for in-warranty service. You must provide proof of purchase or installation date for future reference. Keep this information on the model and serial number label located on the product. Dealer name Address Phone number Model number Serial number Purchase date 20


