
Installation Guide
Page 1
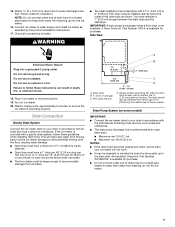
... cleaning the inside components. ■ Disconnect power before servicing. ■ Replace all safety messages. SAVE THESE INSTRUCTIONS W10541636B Always read and obey all parts and panels before operating. ■ Use two or more people to move and install ice maker. This symbol alerts you what the potential hazard is the safety...
... cleaning the inside components. ■ Disconnect power before servicing. ■ Replace all safety messages. SAVE THESE INSTRUCTIONS W10541636B Always read and obey all parts and panels before operating. ■ Use two or more people to move and install ice maker. This symbol alerts you what the potential hazard is the safety...
Installation Guide
Page 4
...) C. Ferrule (purchased) D. Copper tubing 4. Leave a coil of copper tubing to allow the ice maker to ice maker bin and drain pump reservoir inlet) (3) ■ Rear panel (2) ■ Instruction sheet C A. Tighten any connections (including connections at the valve) or nuts that you are cut square. ■ Slip compression sleeve and compression nut...
...) C. Ferrule (purchased) D. Copper tubing 4. Leave a coil of copper tubing to allow the ice maker to ice maker bin and drain pump reservoir inlet) (3) ■ Rear panel (2) ■ Instruction sheet C A. Tighten any connections (including connections at the valve) or nuts that you are cut square. ■ Slip compression sleeve and compression nut...
Installation Guide
Page 5
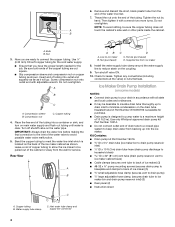
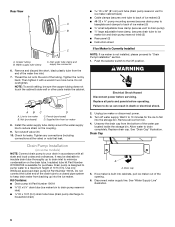
.... Disconnect water supply line. Ferrule (sleeve) E. Ice maker connection A A. NOTE: Discard old drain tube and clamp. 4. See "Rear Panel" illustration for the ice to drain pump reservoir vent. Allow water to the Off position. Cable clamp C. ¹⁄₄" compression nut .... Water Supply Line A B B A. ¹⁄₄" copper tubing B. Screw locations 3. Pull rear panel away from the bottom of the opening. 6. Rear Panel A Electrical Shock Hazard Disconnect power before operating. Unplug ice maker or disconnect power. 3. See "Water Supply...
.... Disconnect water supply line. Ferrule (sleeve) E. Ice maker connection A A. NOTE: Discard old drain tube and clamp. 4. See "Rear Panel" illustration for the ice to drain pump reservoir vent. Allow water to the Off position. Cable clamp C. ¹⁄₄" compression nut .... Water Supply Line A B B A. ¹⁄₄" copper tubing B. Screw locations 3. Pull rear panel away from the bottom of the opening. 6. Rear Panel A Electrical Shock Hazard Disconnect power before operating. Unplug ice maker or disconnect power. 3. See "Water Supply...
Installation Guide
Page 6
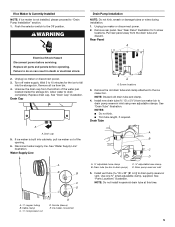
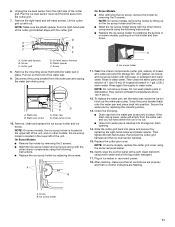
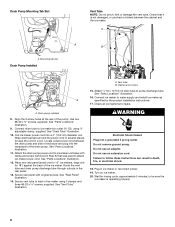
...Connect drain tube to ice maker unit base with original screws. Locate coiled power cord between the cabinet and the ice maker. Secure rear panel with clamp and screw (removed in the ice maker base. Vent tube B. See "Parts Locations" illustration. See "Drain Pump Mounting Tab .... Drain pump E. Drain Pump Mounting Tab Slot A A. See "Parts Locations" illustration. 9. A A. Slide drain pump into the slot. See "Rear Panel" illustration. 14. See "Vent Tube" illustration. Wrap electrical tape around the power cord in several places to back of the drain pump. Route the vent...
...Connect drain tube to ice maker unit base with original screws. Locate coiled power cord between the cabinet and the ice maker. Secure rear panel with clamp and screw (removed in the ice maker base. Vent tube B. See "Parts Locations" illustration. See "Drain Pump Mounting Tab .... Drain pump E. Drain Pump Mounting Tab Slot A A. See "Parts Locations" illustration. 9. A A. Slide drain pump into the slot. See "Rear Panel" illustration. 14. See "Vent Tube" illustration. Wrap electrical tape around the power cord in several places to back of the drain pump. Route the vent...
Installation Guide
Page 7
... line thoroughly up into a grounded 3 prong outlet. An Insulation Sleeve kit, Part Number W10365792, is provided with or without the ³⁄₄" (1.91 cm) panel on ice maker. 20. Do not use an extension cord. 15. Do not remove ground prong. Failure to your ice maker will help keep drain...
... line thoroughly up into a grounded 3 prong outlet. An Insulation Sleeve kit, Part Number W10365792, is provided with or without the ³⁄₄" (1.91 cm) panel on ice maker. 20. Do not use an extension cord. 15. Do not remove ground prong. Failure to your ice maker will help keep drain...
Installation Guide
Page 8
...-head screws 1. Style 2-For drain pump system connect the drain pump outlet hose to properly place the ice maker: WARNING Remove Stainless Steel Door Wrap Panel- See "Drain Pump System." 3. If it is required by your local sanitation code, seal the cabinet to do not separate from the bottom. 3. ...do so can result in back or other injury. Failure to be sure that the ice maker drain tube is level. Rotate the door wrap panel until it is positioned over the PVC drain reducer. Recheck the ice maker to do so can result in death or electrical shock. 1. Door...
...-head screws 1. Style 2-For drain pump system connect the drain pump outlet hose to properly place the ice maker: WARNING Remove Stainless Steel Door Wrap Panel- See "Drain Pump System." 3. If it is required by your local sanitation code, seal the cabinet to do not separate from the bottom. 3. ...do so can result in back or other injury. Failure to be sure that the ice maker drain tube is level. Rotate the door wrap panel until it is positioned over the PVC drain reducer. Recheck the ice maker to do so can result in death or electrical shock. 1. Door...
Installation Guide
Page 11
... pan drain pump. D A B E C F On Some Models ■ After removing the ice scoop, remove the holder by replacing the mounting screw. 13. Gently wipe the control panel with a solution of 1 tbs (15 mL) of the cutter grid. Ice scoop holder 11. After cleaning, make sure that no ice. ■ Hose from the...
... pan drain pump. D A B E C F On Some Models ■ After removing the ice scoop, remove the holder by replacing the mounting screw. 13. Gently wipe the control panel with a solution of 1 tbs (15 mL) of the cutter grid. Ice scoop holder 11. After cleaning, make sure that no ice. ■ Hose from the...
Dimension Guide
Page 1
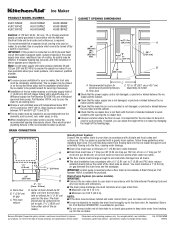
.... Center of drain should also be 23" (58.4 cm) from either side of standard cabinets to avoid problems with or without the 3⁄4" (1.91 cm) panel on some models) IMPORTANT: s Connect the ice maker drain to change materials and specifications without notice. Because Whirlpool Corporation policy includes a continuous commitment to work...
.... Center of drain should also be 23" (58.4 cm) from either side of standard cabinets to avoid problems with or without the 3⁄4" (1.91 cm) panel on some models) IMPORTANT: s Connect the ice maker drain to change materials and specifications without notice. Because Whirlpool Corporation policy includes a continuous commitment to work...
Use & Care Guide
Page 3
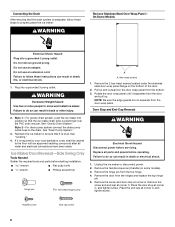
... tell you how to remove tape or glue. ICE MAKER SAFETY Your safety and the safety of others . Always read and obey all parts and panels before operating. ■ Use two or more people to potential hazards that can also be easily removed by rubbing a small amount of liquid dish soap...
... tell you how to remove tape or glue. ICE MAKER SAFETY Your safety and the safety of others . Always read and obey all parts and panels before operating. ■ Use two or more people to potential hazards that can also be easily removed by rubbing a small amount of liquid dish soap...
Use & Care Guide
Page 6
...secures vent to drain pump large adjustable hose clamp, (secures drain tube to ice maker bin and drain pump reservoir inlet) (3) ■ Rear panel (2) ■ Instruction sheet If Ice Maker Is Currently Installed NOTE: If ice maker is designed to pump water to drain completely. AB C ...D A. Insulated tube kit Part Number W10365792 is built into the storage bin. Turn off water supply. Remove all parts and panels before servicing. Allow water to a maximum height of 10 ft (3 m). See "Drain Cap" illustration. Drain cap 5. Disconnect water supply line. ...
...secures vent to drain pump large adjustable hose clamp, (secures drain tube to ice maker bin and drain pump reservoir inlet) (3) ■ Rear panel (2) ■ Instruction sheet If Ice Maker Is Currently Installed NOTE: If ice maker is designed to pump water to drain completely. AB C ...D A. Insulated tube kit Part Number W10365792 is built into the storage bin. Turn off water supply. Remove all parts and panels before servicing. Allow water to a maximum height of 10 ft (3 m). See "Drain Cap" illustration. Drain cap 5. Disconnect water supply line. ...

Use & Care Guide
Page 7
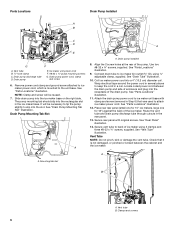
... into the rectangular slot in the ice maker base. G F A. Drain pump discharge tube D. NOTE: Clamp and screw will be reused. 7. See "Rear Panel" illustration for 5 screw locations. Unplug ice maker or disconnect power. 2. The pump mounting tab should slip into the ice maker base on the right side.... Remove rear panel. See "Drain Tube" illustration. It will be necessary to tip the pump slightly to the unit base. Remove the old drain tube and ...
... into the rectangular slot in the ice maker base. G F A. Drain pump discharge tube D. NOTE: Clamp and screw will be reused. 7. See "Rear Panel" illustration for 5 screw locations. Unplug ice maker or disconnect power. 2. The pump mounting tab should slip into the ice maker base on the right side.... Remove rear panel. See "Drain Tube" illustration. It will be necessary to tip the pump slightly to the unit base. Remove the old drain tube and ...
Use & Care Guide
Page 8
.... 11. Secure vent tube to ice maker unit base with original screws. A A B A A. See "Parts Locations" illustration. 9. Place new rear panel (small one for 15" ice makers, large one for 18") against the back of ice maker using ⁷⁄₈" adjustable clamp, supplied. Plug in... 16. Turn on ice maker. 20. Use two #8-32 x ³⁄₈" screws, supplied. See "Drain Tube" illustration. 10. Secure rear panel with clamp and screw (removed in Step 6) that it is operating properly. 8 Align the 2 screw holes at the rear of enclosure and plug into a...
.... 11. Secure vent tube to ice maker unit base with original screws. A A B A A. See "Parts Locations" illustration. 9. Place new rear panel (small one for 15" ice makers, large one for 18") against the back of ice maker using ⁷⁄₈" adjustable clamp, supplied. Plug in... 16. Turn on ice maker. 20. Use two #8-32 x ³⁄₈" screws, supplied. See "Drain Tube" illustration. 10. Secure rear panel with clamp and screw (removed in Step 6) that it is operating properly. 8 Align the 2 screw holes at the rear of enclosure and plug into a...

Use & Care Guide
Page 9
.... Center of drain should also be centered from left to right (8 from either side of door, with or without the ³⁄₄" (1.91 cm) panel on some models) IMPORTANT: ■ Connect the ice maker drain to your local sanitation code, seal the cabinet to be sure that the drain system...
.... Center of drain should also be centered from left to right (8 from either side of door, with or without the ³⁄₄" (1.91 cm) panel on some models) IMPORTANT: ■ Connect the ice maker drain to your local sanitation code, seal the cabinet to be sure that the drain system...
Use & Care Guide
Page 10
.... 2. Push up on the top rear of the ice maker and locate the leveling legs that is microbiologically unsafe or of the ice maker control panel. 4. AB C D 5. Locate the accessory packet in the water line. 10 A B D C A. Turn the filter clockwise until it is time to order a replacement filter. ■ The "Replace...
.... 2. Push up on the top rear of the ice maker and locate the leveling legs that is microbiologically unsafe or of the ice maker control panel. 4. AB C D 5. Locate the accessory packet in the water line. 10 A B D C A. Turn the filter clockwise until it is time to order a replacement filter. ■ The "Replace...
Use & Care Guide
Page 13
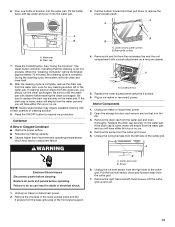
...out. 1. A A A B A. Drain cap 7. The Clean button will have either thin ice or no ice. Be sure to remove the lower access panel. Press the ON/OFF button to component failure. Base grille screws 4. Remove dirt and lint from the left in the bin. 3. A A. Replace the ...drain cap securely on a vacuum cleaner. Cutter grid cover B. Water pan B. Lower access panel screws B. Interior Components 1. Open the storage bin door and remove any cleaning solution left side of the cutter grid. Unplug the wiring harness from the...
...out. 1. A A A B A. Drain cap 7. The Clean button will have either thin ice or no ice. Be sure to remove the lower access panel. Press the ON/OFF button to component failure. Base grille screws 4. Remove dirt and lint from the left in the bin. 3. A A. Replace the ...drain cap securely on a vacuum cleaner. Cutter grid cover B. Water pan B. Lower access panel screws B. Interior Components 1. Open the storage bin door and remove any cleaning solution left side of the cutter grid. Unplug the wiring harness from the...
Use & Care Guide
Page 14
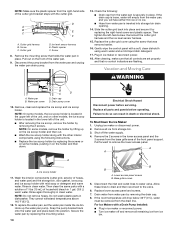
... Remove all controls are flashing. Rinse in place. Then clean the same parts with a solution of 1 tbs (15 mL) of the front panel support. They cannot withstand temperatures above 145°F (63°C). 12. Replace the cutter grid cover using warm water and a mild liquid dish...screws. Remove the 2 screws in dishwasher. NOTE: Do not remove hoses. Hook up on the holder and then down. Replace lower access panel and screws. 7. Vacation and Moving Care WARNING A. Remove, clean and replace the ice scoop and ice scoop holder. Disconnect the pump bracket...
... Remove all controls are flashing. Rinse in place. Then clean the same parts with a solution of 1 tbs (15 mL) of the front panel support. They cannot withstand temperatures above 145°F (63°C). 12. Replace the cutter grid cover using warm water and a mild liquid dish...screws. Remove the 2 screws in dishwasher. NOTE: Do not remove hoses. Hook up on the holder and then down. Replace lower access panel and screws. 7. Vacation and Moving Care WARNING A. Remove, clean and replace the ice scoop and ice scoop holder. Disconnect the pump bracket...
Use & Care Guide
Page 16
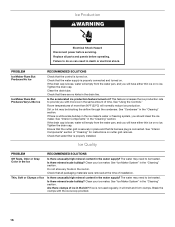
... in the "Cleaning" section. See "Using the Controls." See "Interior Components" in the "Cleaning" section. Is there mineral scale buildup? Check that all parts and panels before servicing. The water may be blocking the airflow through the condenser. Is there mineral scale buildup? See "Ice Maker System" in the "Cleaning" section...
... in the "Cleaning" section. See "Using the Controls." See "Interior Components" in the "Cleaning" section. Is there mineral scale buildup? Check that all parts and panels before servicing. The water may be blocking the airflow through the condenser. Is there mineral scale buildup? See "Ice Maker System" in the "Cleaning" section...


