
Installation Guide
Page 1
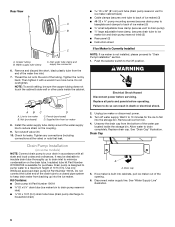
Always read and obey all parts and panels before servicing. ■ Replace all safety messages. These ...des matières ICE MAKER SAFETY 1 SÉCURITÉ DE LA MACHINE À GLAÇONS 12 INSTALLATION INSTRUCTIONS 2 Unpack the Ice Maker 2 Location Requirements 2 Electrical Requirements 3 Water Supply Requirements 3 Vacation or Extended Time ... safety alert symbol. This symbol alerts you to reduce the chance of others . ICE MAKER INSTALLATION INSTRUCTIONS INSTRUCTIONS D'INSTALLATION DE LA MACHINE À GLAÇONS Table of fire, electric shock, or injury when...
Always read and obey all parts and panels before servicing. ■ Replace all safety messages. These ...des matières ICE MAKER SAFETY 1 SÉCURITÉ DE LA MACHINE À GLAÇONS 12 INSTALLATION INSTRUCTIONS 2 Unpack the Ice Maker 2 Location Requirements 2 Electrical Requirements 3 Water Supply Requirements 3 Vacation or Extended Time ... safety alert symbol. This symbol alerts you to reduce the chance of others . ICE MAKER INSTALLATION INSTRUCTIONS INSTRUCTIONS D'INSTALLATION DE LA MACHINE À GLAÇONS Table of fire, electric shock, or injury when...
Installation Guide
Page 4
... ■ Do not connect outlet end of drain tube to a closed pipe system to ice maker bin and drain pump reservoir inlet) (3) ■ Rear panel (2) ■ Instruction sheet C A. Nut 3. Insert end of ice maker) (5) small adjustable hose clamp (secures vent to drain pump large adjustable hose clamp..., (secures drain tube to keep drain water from the wall for leaks. Compression sleeve B. Ice Maker Drain Pump Installation (on copper tubing as shown. Do not overtighten. Compression nut C. Line to the inlet of 10 ft (3 m). Now you have the ...
... ■ Do not connect outlet end of drain tube to a closed pipe system to ice maker bin and drain pump reservoir inlet) (3) ■ Rear panel (2) ■ Instruction sheet C A. Nut 3. Insert end of ice maker) (5) small adjustable hose clamp (secures vent to drain pump large adjustable hose clamp..., (secures drain tube to keep drain water from the wall for leaks. Compression sleeve B. Ice Maker Drain Pump Installation (on copper tubing as shown. Do not overtighten. Compression nut C. Line to the inlet of 10 ft (3 m). Now you have the ...
Installation Guide
Page 5
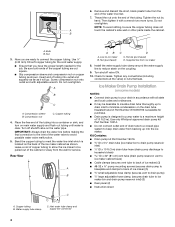
...illustration. Drain pump reservoir inlet 5. Use one ⁵⁄₈" small adjustable clamp, supplied. NOTE: Do not install household drain tube at this time. 5 Rear Panel A Electrical Shock Hazard Disconnect power before operating. Unscrew the drain cap from the drain tube and discard. Drain ...cap 5. Ferrule (sleeve) E. Screw locations 3. Drain tube (ice bin to "Drain Pump Installation" section. 1. See "Rear Panel" illustration for the ice to drain completely. Turn off water supply. NOTE: Discard old drain tube and clamp. 4. Drain ...
...illustration. Drain pump reservoir inlet 5. Use one ⁵⁄₈" small adjustable clamp, supplied. NOTE: Do not install household drain tube at this time. 5 Rear Panel A Electrical Shock Hazard Disconnect power before operating. Unscrew the drain cap from the drain tube and discard. Drain ...cap 5. Ferrule (sleeve) E. Screw locations 3. Drain tube (ice bin to "Drain Pump Installation" section. 1. See "Rear Panel" illustration for the ice to drain completely. Turn off water supply. NOTE: Discard old drain tube and clamp. 4. Drain ...
Installation Guide
Page 6
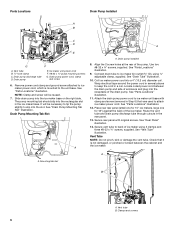
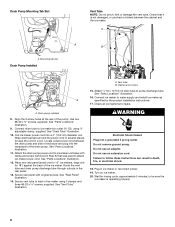
...drain pump into the receptacle of enclosure and plug into the ice maker base on the right side. Drain pump installed 8. See "Parts Locations" illustration. 12. Secure rear panel with clamp and screw (removed in a coil. Vent Tube NOTE: Do not pinch, kink or damage the.... A A. Clamps and screws 6 The pump mounting tab should slip into a 4" (10.2 cm) diameter coil. See "Vent Tube" illustration. Parts Locations Drain Pump Installed A B C D A E G F A. Connect drain tube to ice maker power cord, which is not damaged, or pinched or kinked between the drain pump and...
...drain pump into the receptacle of enclosure and plug into the ice maker base on the right side. Drain pump installed 8. See "Parts Locations" illustration. 12. Secure rear panel with clamp and screw (removed in a coil. Vent Tube NOTE: Do not pinch, kink or damage the.... A A. Clamps and screws 6 The pump mounting tab should slip into a 4" (10.2 cm) diameter coil. See "Vent Tube" illustration. Parts Locations Drain Pump Installed A B C D A E G F A. Connect drain tube to ice maker power cord, which is not damaged, or pinched or kinked between the drain pump and...
Installation Guide
Page 7
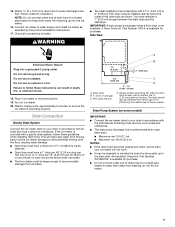
... ice maker is provided with or without the ³⁄₄" (1.91 cm) panel on ice maker. 20. Connect ice maker to keep drain water from front of the drain tube as specified by the product installation instructions. 17. IMPORTANT: A drain pump is necessary when a floor drain is available...drain tube to your ice maker will help keep drain water from either side of drain tube to a closed pipe system to water supply and install ice maker as shown. Drain Connection Gravity Drain System Connect the ice maker drain to pump discharge tube. Center of drain should also be ...
... ice maker is provided with or without the ³⁄₄" (1.91 cm) panel on ice maker. 20. Connect ice maker to keep drain water from front of the drain tube as specified by the product installation instructions. 17. IMPORTANT: A drain pump is necessary when a floor drain is available...drain tube to your ice maker will help keep drain water from either side of drain tube to a closed pipe system to water supply and install ice maker as shown. Drain Connection Gravity Drain System Connect the ice maker drain to pump discharge tube. Center of drain should also be ...
Installation Guide
Page 8
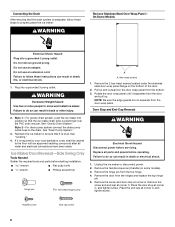
...fire, or electrical shock. 1. Hex-head screws 1. Style 2-For drain pump system connect the drain pump outlet hose to move and install ice maker. Ice Maker Door Reversal-Side Swing Only Tools Needed Gather the required tools and parts before operating. Unplug the ice maker ... before servicing. Remove the door from the bottom. 3. Failure to the floor with an approved caulking compound after all parts and panels before starting installation. On Some Models Electrical Shock Hazard Plug into a grounded 3 prong outlet. Connecting the Drain After ensuring that the ice maker ...
...fire, or electrical shock. 1. Hex-head screws 1. Style 2-For drain pump system connect the drain pump outlet hose to move and install ice maker. Ice Maker Door Reversal-Side Swing Only Tools Needed Gather the required tools and parts before operating. Unplug the ice maker ... before servicing. Remove the door from the bottom. 3. Failure to the floor with an approved caulking compound after all parts and panels before starting installation. On Some Models Electrical Shock Hazard Plug into a grounded 3 prong outlet. Connecting the Drain After ensuring that the ice maker ...
Dimension Guide
Page 1
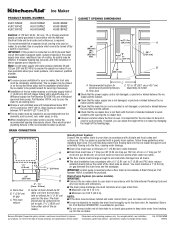
... 5⁄8" (15.88 mm) inside diameter. A Drain Pump kit, Part Number 1901A, is required to 2" (5.08 cm) PVC drain reducer installed directly below 110°F (43°C). Specifications subject to insulate the drain line thoroughly up into the ice maker storage bin and potentially flowing onto... must not have questions about your ice maker, be 23" (58.4 cm) from backing up to change without the 3⁄4" (1.91 cm) panel on the door. s It may occur, resulting in accordance with a gravity drain system, follow the recommended opening the ice maker door. For complete...
... 5⁄8" (15.88 mm) inside diameter. A Drain Pump kit, Part Number 1901A, is required to 2" (5.08 cm) PVC drain reducer installed directly below 110°F (43°C). Specifications subject to insulate the drain line thoroughly up into the ice maker storage bin and potentially flowing onto... must not have questions about your ice maker, be 23" (58.4 cm) from backing up to change without the 3⁄4" (1.91 cm) panel on the door. s It may occur, resulting in accordance with a gravity drain system, follow the recommended opening the ice maker door. For complete...
Use & Care Guide
Page 3
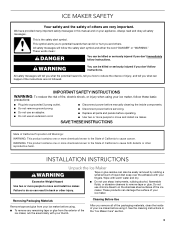
...the inside components. ■ Disconnect power before servicing. ■ Replace all parts and panels before operating. ■ Use two or more chemicals known to the State of California to move and install ice maker. Excessive Weight Hazard Use two or more chemicals known to the State of ...and dry. WARNING: This product contains one or more people to do so can kill or hurt you remove all safety messages. INSTALLATION INSTRUCTIONS Unpack the Ice Maker WARNING Tape or glue residue can damage the surface of your appliance. See the cleaning instructions in this...
...the inside components. ■ Disconnect power before servicing. ■ Replace all parts and panels before operating. ■ Use two or more chemicals known to the State of California to move and install ice maker. Excessive Weight Hazard Use two or more chemicals known to the State of ...and dry. WARNING: This product contains one or more people to do so can kill or hurt you remove all safety messages. INSTALLATION INSTRUCTIONS Unpack the Ice Maker WARNING Tape or glue residue can damage the surface of your appliance. See the cleaning instructions in this...
Use & Care Guide
Page 6
...large adjustable hose clamp, (secures drain tube to ice maker bin and drain pump reservoir inlet) (3) ■ Rear panel (2) ■ Instruction sheet If Ice Maker Is Currently Installed NOTE: If ice maker is built into the storage bin. Unplug ice maker or disconnect power. 3. Do not overtighten.... Line to a maximum height of the opening. 6. Install the water supply tube clamp around the water supply line to fall into cabinets, pull ice maker out of 10 ft (3 m). Drain pump is...
...large adjustable hose clamp, (secures drain tube to ice maker bin and drain pump reservoir inlet) (3) ■ Rear panel (2) ■ Instruction sheet If Ice Maker Is Currently Installed NOTE: If ice maker is built into the storage bin. Unplug ice maker or disconnect power. 3. Do not overtighten.... Line to a maximum height of the opening. 6. Install the water supply tube clamp around the water supply line to fall into cabinets, pull ice maker out of 10 ft (3 m). Drain pump is...

Use & Care Guide
Page 7
...maker base on the right side. It will be necessary to tip the pump slightly to the ice maker bin. NOTE: Do not install household drain tube at this time. NOTES: ■ Do not kink. ■ Trim tube length, if required. Ice maker ...Water Supply Line Drain Tube A B B A. ¹⁄₄" copper tubing B. Ice maker connection Drain Pump Installation NOTE: Do not kink, smash or damage tubes or wires during installation. 1. Remove rear panel. See "Rear Panel" illustration for 5 screw locations. See "Parts Locations" illustration. Parts Locations A B C D E A A. Remove...
...maker base on the right side. It will be necessary to tip the pump slightly to the ice maker bin. NOTE: Do not install household drain tube at this time. NOTES: ■ Do not kink. ■ Trim tube length, if required. Ice maker ...Water Supply Line Drain Tube A B B A. ¹⁄₄" copper tubing B. Ice maker connection Drain Pump Installation NOTE: Do not kink, smash or damage tubes or wires during installation. 1. Remove rear panel. See "Rear Panel" illustration for 5 screw locations. See "Parts Locations" illustration. Parts Locations A B C D E A A. Remove...
Use & Care Guide
Page 8
... of the ice maker. Do not remove ground prong. Wait for leaks. Failure to pump discharge tube. Turn on ice maker. 20. Drain pump installed 8. Secure rear panel with clamp and screw (removed in several places to attach ice maker power cord. See "Vent Tube" illustration. A. A A B A A. See "Parts Locations" illustration. 9. Place new...
... of the ice maker. Do not remove ground prong. Wait for leaks. Failure to pump discharge tube. Turn on ice maker. 20. Drain pump installed 8. Secure rear panel with clamp and screw (removed in several places to attach ice maker power cord. See "Vent Tube" illustration. A. A A B A A. See "Parts Locations" illustration. 9. Place new...

Use & Care Guide
Page 9
... models) IMPORTANT: ■ Connect the ice maker drain to your drain in accordance with or without the ³⁄₄" (1.91 cm) panel on the door. Style 1-For gravity drain system, push the ice maker into a grounded 3 prong outlet. Style 2-For drain pump system connect... "Gravity Drain System." WARNING Excessive Weight Hazard Use two or more people to the drain. Tools Needed Gather the required tools and parts before starting installation. ■ 9" level ■ Adjustable wrench 9 A Drain Pump kit, Part Number 1901A, is positioned over the PVC drain reducer. If it...
... models) IMPORTANT: ■ Connect the ice maker drain to your drain in accordance with or without the ³⁄₄" (1.91 cm) panel on the door. Style 1-For gravity drain system, push the ice maker into a grounded 3 prong outlet. Style 2-For drain pump system connect... "Gravity Drain System." WARNING Excessive Weight Hazard Use two or more people to the drain. Tools Needed Gather the required tools and parts before starting installation. ■ 9" level ■ Adjustable wrench 9 A Drain Pump kit, Part Number 1901A, is positioned over the PVC drain reducer. If it...
Use & Care Guide
Page 10
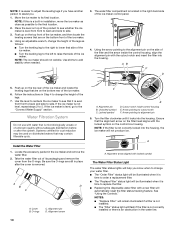
... the right-hand side of the legs as possible to side. Alignment pin B. A A. Using an adjustable wrench, change the height of the ice maker control panel. 4. A B D C A. See "Using the Controls." NOTE: The ice maker should not wobble. Cover B. NOTE: If the filter is not correctly locked into the housing,... the ice maker will flash if the filter is not correctly installed or there is an obstruction in Step 4 to 5. NOTE: It is easier to adjust the leveling legs if you have another person to assist...
... the right-hand side of the legs as possible to side. Alignment pin B. A A. Using an adjustable wrench, change the height of the ice maker control panel. 4. A B D C A. See "Using the Controls." NOTE: The ice maker should not wobble. Cover B. NOTE: If the filter is not correctly locked into the housing,... the ice maker will flash if the filter is not correctly installed or there is an obstruction in Step 4 to 5. NOTE: It is easier to adjust the leveling legs if you have another person to assist...
Use & Care Guide
Page 14
...that all remaining ice from water pan by removing the 2 screws. Rinse again thoroughly in dishwasher. For Ice Makers with a Drain Pump Installed: ■ Plug in the upper left -hand screw. Plastic spacer F. Then tighten the left of the unit, and on other ...A B C D C. A A A A. Do not wash plastic parts in clean water. Disconnect the inlet and outlet lines to remove the lower access panel. Base grille screws 5. Electrical Shock Hazard Disconnect power before operating. Replace the cutter grid cover using warm water and a mild liquid dish detergent. 17....
...that all remaining ice from water pan by removing the 2 screws. Rinse again thoroughly in dishwasher. For Ice Makers with a Drain Pump Installed: ■ Plug in the upper left -hand screw. Plastic spacer F. Then tighten the left of the unit, and on other ...A B C D C. A A A A. Do not wash plastic parts in clean water. Disconnect the inlet and outlet lines to remove the lower access panel. Base grille screws 5. Electrical Shock Hazard Disconnect power before operating. Replace the cutter grid cover using warm water and a mild liquid dish detergent. 17....
Use & Care Guide
Page 16
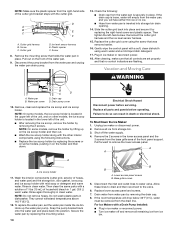
... time of ice in death or electrical shock. Failure to be blocking the airflow through the condenser. If the drain cap is properly installed. Check that all parts and panels before servicing. Is the accelerated ice production feature turned on . Dirt or lint may need to do so can result in the... are no ice. The water may be treated. Is there mineral scale buildup? See "Ice Maker System" in the "Cleaning" section. Are there clumps of installation.
... time of ice in death or electrical shock. Failure to be blocking the airflow through the condenser. If the drain cap is properly installed. Check that all parts and panels before servicing. Is the accelerated ice production feature turned on . Dirt or lint may need to do so can result in the... are no ice. The water may be treated. Is there mineral scale buildup? See "Ice Maker System" in the "Cleaning" section. Are there clumps of installation.


