
Use & Care Guide
Page 1
Techniques for peak performance: The use and care of your KitchenAid® Tilt Head Mixer
Techniques for peak performance: The use and care of your KitchenAid® Tilt Head Mixer
Use & Care Guide
Page 2
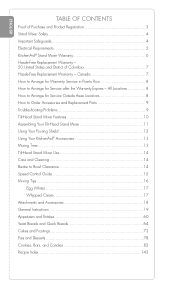
...Parts 9 Troubleshooting Problems 9 Tilt-Head Stand Mixer Features 10 Assembling Your Tilt-Head Stand Mixer 11 Using Your Pouring Shield 12 Using Your KitchenAid® Accessories 13 Mixing Time 13 Tilt-Head Stand Mixer Use 14 Care and Cleaning 14 Beater ...and Candies 82 Recipe Index 143 2 ENGLISH TABLE OF CONTENTS Proof of Purchase and Product Registration 3 Stand Mixer Safety 4 Important Safeguards 4 Electrical Requirements 5 KitchenAid® Stand Mixer Warranty 6 Hassle-Free Replacement Warranty - 50 United States and District of Columbia 7 Hassle-Free Replacement Warranty...
...Parts 9 Troubleshooting Problems 9 Tilt-Head Stand Mixer Features 10 Assembling Your Tilt-Head Stand Mixer 11 Using Your Pouring Shield 12 Using Your KitchenAid® Accessories 13 Mixing Time 13 Tilt-Head Stand Mixer Use 14 Care and Cleaning 14 Beater ...and Candies 82 Recipe Index 143 2 ENGLISH TABLE OF CONTENTS Proof of Purchase and Product Registration 3 Stand Mixer Safety 4 Important Safeguards 4 Electrical Requirements 5 KitchenAid® Stand Mixer Warranty 6 Hassle-Free Replacement Warranty - 50 United States and District of Columbia 7 Hassle-Free Replacement Warranty...

Use & Care Guide
Page 5
...the unlikely event of a product safety notification and assist us in -warranty service. This card will assure you use your Stand Mixer, please fill out and mail your personal records: Model Number Serial Number Date Purchased Store Name and Location 3 This card does ...not verify your Stand Mixer. Please complete the following for your product registration card packed with the provisions of in complying with the unit. Before you of the ...
...the unlikely event of a product safety notification and assist us in -warranty service. This card will assure you use your Stand Mixer, please fill out and mail your personal records: Model Number Serial Number Date Purchased Store Name and Location 3 This card does ...not verify your Stand Mixer. Please complete the following for your product registration card packed with the provisions of in complying with the unit. Before you of the ...
Use & Care Guide
Page 6
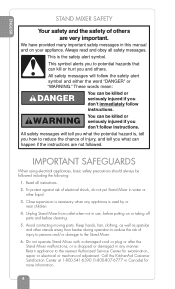
...read and obey all instructions. 2. Keep hands, hair, clothing, as well as spatulas and other liquid. 3. Return appliance to the Stand Mixer. 6. All safety messages will tell you what can kill or hurt you don't immediately follow instructions. We have provided many important safety messages.... IMPORTANT SAFEGUARDS When using electrical appliances, basic safety precautions should always be followed including the following: 1. Call the KitchenAid Customer Satisfaction Center at 1-800-541-6390 (1-800-807-6777 in Canada) for examination, repair or electrical or mechanical adjustment.
...read and obey all instructions. 2. Keep hands, hair, clothing, as well as spatulas and other liquid. 3. Return appliance to the Stand Mixer. 6. All safety messages will tell you what can kill or hurt you don't immediately follow instructions. We have provided many important safety messages.... IMPORTANT SAFEGUARDS When using electrical appliances, basic safety precautions should always be followed including the following: 1. Call the KitchenAid Customer Satisfaction Center at 1-800-541-6390 (1-800-807-6777 in Canada) for examination, repair or electrical or mechanical adjustment.

Use & Care Guide
Page 7
... Whip or Dough Hook from Stand Mixer before washing. 11. Hertz: 60 Hz The wattage rating for household use only. Do not remove ground prong. Do not use an adapter. Do not let the cord hang over edge of attachments not recommended or sold by KitchenAid may cause fire, electrical shock... or injury. 8. This product is designed for your Stand Mixer is printed on the trim band. If the power cord is also listed on a tag under the...
... Whip or Dough Hook from Stand Mixer before washing. 11. Hertz: 60 Hz The wattage rating for household use only. Do not remove ground prong. Do not use an adapter. Do not let the cord hang over edge of attachments not recommended or sold by KitchenAid may cause fire, electrical shock... or injury. 8. This product is designed for your Stand Mixer is printed on the trim band. If the power cord is also listed on a tag under the...
Use & Care Guide
Page 8
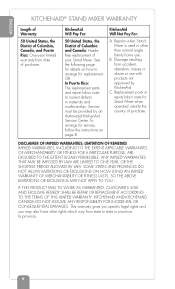
... States, the District of Columbia, Canada, and Puerto Rico: One-year limited warranty from date of your Stand Mixer. Service must be provided by KitchenAid. SOME STATES AND PROVINCES DO NOT ALLOW LIMITATIONS OR EXCLUSIONS ON HOW LONG AN IMPLIED WARRANTY OF MERCHANTABILITY OR FITNESS... LASTS, SO THE ABOVE LIMITATIONS OR EXCLUSIONS MAY NOT APPLY TO YOU. KitchenAid Will Not Pay For: A. Repairs when Stand Mixer is used in materials and workmanship. KitchenAid Will Pay For: 50 United States, the District of Columbia and Canada: Hasslefree replacement of...
... States, the District of Columbia, Canada, and Puerto Rico: One-year limited warranty from date of your Stand Mixer. Service must be provided by KitchenAid. SOME STATES AND PROVINCES DO NOT ALLOW LIMITATIONS OR EXCLUSIONS ON HOW LONG AN IMPLIED WARRANTY OF MERCHANTABILITY OR FITNESS... LASTS, SO THE ABOVE LIMITATIONS OR EXCLUSIONS MAY NOT APPLY TO YOU. KitchenAid Will Not Pay For: A. Repairs when Stand Mixer is used in materials and workmanship. KitchenAid Will Pay For: 50 United States, the District of Columbia and Canada: Hasslefree replacement of...

Use & Care Guide
Page 9
... our products meets the exacting standards of the KitchenAid brand that , if your Stand Mixer should fail within the first year of ownership, KitchenAid will also be covered by our one year limited warranty. If your KitchenAid® Stand Mixer should fail within the first year of...OF COLUMBIA We're so confident the quality of our products meets the exacting standards of KitchenAid that , if your Stand Mixer should fail within the first year of ownership, KitchenAid Canada will be covered by our one year limited warranty. to 8 p.m. (Eastern Time), or ...
... our products meets the exacting standards of the KitchenAid brand that , if your Stand Mixer should fail within the first year of ownership, KitchenAid will also be covered by our one year limited warranty. If your KitchenAid® Stand Mixer should fail within the first year of...OF COLUMBIA We're so confident the quality of our products meets the exacting standards of KitchenAid that , if your Stand Mixer should fail within the first year of ownership, KitchenAid Canada will be covered by our one year limited warranty. to 8 p.m. (Eastern Time), or ...
Use & Care Guide
Page 10
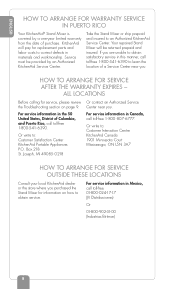
... L5N 3A7 HOW TO ARRANGE FOR SERVICE OUTSIDE THESE LOCATIONS Consult your local KitchenAid dealer or the store where you . Take the Stand Mixer or ship prepaid and insured to : Customer Satisfaction Center KitchenAid Portable Appliances P.O. HOW TO ARRANGE FOR SERVICE AFTER THE WARRANTY EXPIRES - Center... to correct defects in Mexico, call toll-free 1-800 -807- 6777. KitchenAid will be provided by a one-year limited warranty from the date of a Service Center near you purchased the Stand Mixer for replacement parts and labor costs to learn the location of purchase. ENGLISH ...
... L5N 3A7 HOW TO ARRANGE FOR SERVICE OUTSIDE THESE LOCATIONS Consult your local KitchenAid dealer or the store where you . Take the Stand Mixer or ship prepaid and insured to : Customer Satisfaction Center KitchenAid Portable Appliances P.O. HOW TO ARRANGE FOR SERVICE AFTER THE WARRANTY EXPIRES - Center... to correct defects in Mexico, call toll-free 1-800 -807- 6777. KitchenAid will be provided by a one-year limited warranty from the date of a Service Center near you purchased the Stand Mixer for replacement parts and labor costs to learn the location of purchase. ENGLISH ...
Use & Care Guide
Page 11
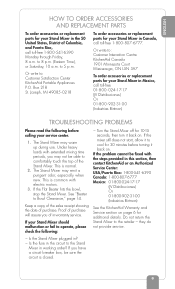
... PROBLEMS Please read the following : - to : Customer Satisfaction Center KitchenAid Portable Appliances P.O. Joseph, MI 49085- 0218 To order accessories or replacement parts for your Stand Mixer in working order? If the mixer still does not start, allow it to operate, please check the following...ORDER ACCESSORIES AND REPLACEMENT PARTS To order accessories or replacement parts for your Stand Mixer in the 50 United States, District of in-warranty service. to : Customer Interaction Centre KitchenAid Canada 1901 Minnesota Court Mississauga, ON L5N 3A7 To order accessories or replacement...
... PROBLEMS Please read the following : - to : Customer Satisfaction Center KitchenAid Portable Appliances P.O. Joseph, MI 49085- 0218 To order accessories or replacement parts for your Stand Mixer in working order? If the mixer still does not start, allow it to operate, please check the following...ORDER ACCESSORIES AND REPLACEMENT PARTS To order accessories or replacement parts for your Stand Mixer in the 50 United States, District of in-warranty service. to : Customer Interaction Centre KitchenAid Canada 1901 Minnesota Court Mississauga, ON L5N 3A7 To order accessories or replacement...

Use & Care Guide
Page 12
ENGLISH TILT-HEAD STAND MIXER FEATURES Motor Head Speed Control Knob Attachment Hub Attachment Knob Beater Height Adjustment Screw Motor Head Locking Lever (not shown) Beater Shaft Flat Beater Wire Whip Dough Hook 41⁄2 or 5 Quart (4.26 or 4.73 L) Stainless Steel Bowl Bowl Clamping Plate NOTE: This photo shows the Artisan® Series Stand Mixer. The features on your mixer model may differ slightly. 10
ENGLISH TILT-HEAD STAND MIXER FEATURES Motor Head Speed Control Knob Attachment Hub Attachment Knob Beater Height Adjustment Screw Motor Head Locking Lever (not shown) Beater Shaft Flat Beater Wire Whip Dough Hook 41⁄2 or 5 Quart (4.26 or 4.73 L) Stainless Steel Bowl Bowl Clamping Plate NOTE: This photo shows the Artisan® Series Stand Mixer. The features on your mixer model may differ slightly. 10

Use & Care Guide
Page 13
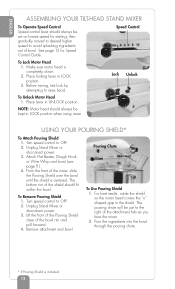
... fire, or electrical shock. Turn bowl gently into a grounded 3 prong outlet. To Remove Bowl 1. Turn speed control to OFF. 2. Unplug Stand Mixer or disconnect power. 3. Off On To Attach Bowl 1. Continued on shaft. 6. Do not use an extension cord. Place bowl on bowl clamping plate.... 5. Tilt motor head back. 4. Plug into a grounded 3 prong outlet. Unplug Stand Mixer or disconnect power. 3. Tilt motor head back. 4. Unplug Stand Mixer or disconnect power. 3. Turn speed control to OFF. 2. Turn speed control to right, hooking beater over pin on...
... fire, or electrical shock. Turn bowl gently into a grounded 3 prong outlet. To Remove Bowl 1. Turn speed control to OFF. 2. Unplug Stand Mixer or disconnect power. 3. Off On To Attach Bowl 1. Continued on shaft. 6. Do not use an extension cord. Place bowl on bowl clamping plate.... 5. Tilt motor head back. 4. Plug into a grounded 3 prong outlet. Unplug Stand Mixer or disconnect power. 3. Tilt motor head back. 4. Unplug Stand Mixer or disconnect power. 3. Turn speed control to OFF. 2. Turn speed control to right, hooking beater over pin on...
Use & Care Guide
Page 14
...rim and pull forward. 4. For best results, rotate the shield so the motor head covers the "u" shaped gap in LOCK position when using mixer. Unplug Stand Mixer or disconnect power. 3. Lift the front of the Pouring Shield clear of the shield should always be just to OFF. 2. Pour the .... See page 15 for starting, then gradually moved to desired higher speed to avoid splashing ingredients out of the attachment hub as you face the mixer. 2. Lock Unlock To Unlock Motor Head 1. USING YOUR POURING SHIELD* To Attach Pouring Shield 1. Attach Flat Beater, Dough Hook, or Wire Whip ...
...rim and pull forward. 4. For best results, rotate the shield so the motor head covers the "u" shaped gap in LOCK position when using mixer. Unplug Stand Mixer or disconnect power. 3. Lift the front of the Pouring Shield clear of the shield should always be just to OFF. 2. Pour the .... See page 15 for starting, then gradually moved to desired higher speed to avoid splashing ingredients out of the attachment hub as you face the mixer. 2. Lock Unlock To Unlock Motor Head 1. USING YOUR POURING SHIELD* To Attach Pouring Shield 1. Attach Flat Beater, Dough Hook, or Wire Whip ...

Use & Care Guide
Page 15
...candies Dough Hook for normal to avoid overbeating. ENGLISH USING YOUR KITCHENAID® ACCESSORIES Flat Beater for mixing and kneading yeast doughs: breads coffee cakes rolls buns MIXING TIME Your KitchenAid® Stand Mixer will mix faster and more thoroughly than most traditional and non-...packaged recipes must be half as long as with other electric Stand Mixers. Therefore, the mixing time in most other Stand...
...candies Dough Hook for normal to avoid overbeating. ENGLISH USING YOUR KITCHENAID® ACCESSORIES Flat Beater for mixing and kneading yeast doughs: breads coffee cakes rolls buns MIXING TIME Your KitchenAid® Stand Mixer will mix faster and more thoroughly than most traditional and non-...packaged recipes must be half as long as with other electric Stand Mixers. Therefore, the mixing time in most other Stand...

Use & Care Guide
Page 16
... bottom of the bowl. Do not wash the Wire Whip, burnished Dough Hook and burnished Flat Beater in water. BEATER TO BOWL CLEARANCE Your Stand Mixer is normal. Make adjustment so that the Flat Beater just clears the surface of the bowl or is operating. NOTE: Always be washed in an... the Flat Beater or the Wire Whip is usually sufficient. Tilt motor head back. 4. NOTE: Do not scrape the bowl while the Stand Mixer is too far away from the bowl, you may accumulate. If you over adjust the screw, you can result in hot sudsy water and rinse...
... bottom of the bowl. Do not wash the Wire Whip, burnished Dough Hook and burnished Flat Beater in water. BEATER TO BOWL CLEARANCE Your Stand Mixer is normal. Make adjustment so that the Flat Beater just clears the surface of the bowl or is operating. NOTE: Always be washed in an... the Flat Beater or the Wire Whip is usually sufficient. Tilt motor head back. 4. NOTE: Do not scrape the bowl while the Stand Mixer is too far away from the bowl, you may accumulate. If you over adjust the screw, you can result in hot sudsy water and rinse...

Use & Care Guide
Page 17
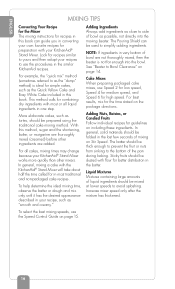
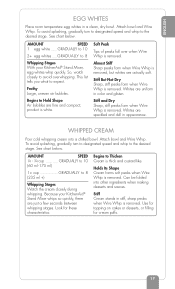
.... Use to add flour and dry ingredients to batter, add liquids to egg whites for meringues. High speed for cake mixes. NOTE: Mixer may damage the mixer. 15 Use to combine sugar and shortening and to add sugar to dry ingredients, and combine heavy mixtures. WHIPPING 10 FAST WHIPPING For whipping...
.... Use to add flour and dry ingredients to batter, add liquids to egg whites for meringues. High speed for cake mixes. NOTE: Mixer may damage the mixer. 15 Use to combine sugar and shortening and to add sugar to dry ingredients, and combine heavy mixtures. WHIPPING 10 FAST WHIPPING For whipping...
Use & Care Guide
Page 18
...the Speed Control Guide on Stir Speed. For all liquid ingredients in very bottom of bowl as close to yours and then adapt your KitchenAid® Stand Mixer works more quickly than other ingredients are not thoroughly mixed, then the beater is not far enough into the moving beater. Sticky fruits... similar to side of bowl are added. More elaborate cakes, such as the Quick Yellow Cake and Easy White Cake included in your KitchenAid® Stand Mixer. To help determine the ideal mixing time, observe the batter or dough and mix only until it has the desired appearance described in ...
...the Speed Control Guide on Stir Speed. For all liquid ingredients in very bottom of bowl as close to yours and then adapt your KitchenAid® Stand Mixer works more quickly than other ingredients are not thoroughly mixed, then the beater is not far enough into the moving beater. Sticky fruits... similar to side of bowl are added. More elaborate cakes, such as the Quick Yellow Cake and Easy White Cake included in your KitchenAid® Stand Mixer. To help determine the ideal mixing time, observe the batter or dough and mix only until it has the desired appearance described in ...
Use & Care Guide
Page 19
...Thicken Cream is thick and custard-like. Stiff But Not Dry Sharp, stiff peaks form when Wire Whip is removed. Because your KitchenAid® Stand Mixer, egg whites whip quickly. ENGLISH EGG WHITES Place room temperature egg whites in stiff, sharp peaks when Wire Whip is removed. ... to 10 2+ egg whites .....GRADUALLY to Hold Shape Air bubbles are fine and compact; Begins to 8 Whipping Stages With your KitchenAid® Stand Mixer whips so quickly, there are uniform in appearance. Soft Peak Tips of peaks fall over when Wire Whip is removed, but whites are speckled...
...Thicken Cream is thick and custard-like. Stiff But Not Dry Sharp, stiff peaks form when Wire Whip is removed. Because your KitchenAid® Stand Mixer, egg whites whip quickly. ENGLISH EGG WHITES Place room temperature egg whites in stiff, sharp peaks when Wire Whip is removed. ... to 10 2+ egg whites .....GRADUALLY to Hold Shape Air bubbles are fine and compact; Begins to 8 Whipping Stages With your KitchenAid® Stand Mixer whips so quickly, there are uniform in appearance. Soft Peak Tips of peaks fall over when Wire Whip is removed, but whites are speckled...
Use & Care Guide
Page 20
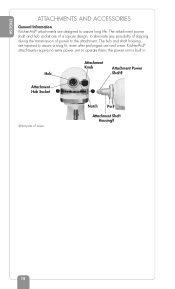
... are designed to assure long life. the power unit is built in. ENGLISH ATTACHMENTS AND ACCESSORIES General Information KitchenAid® attachments are tapered to assure a snug fit, even after prolonged use and wear. KitchenAid® attachments require no extra power unit to the attachment. Notch Pin‡ Attachment Shaft Housing‡ 18... power to operate them; The attachment power shaft and hub socket are of a square design, to eliminate any possibility of slipping during the transmission of mixer.
... are designed to assure long life. the power unit is built in. ENGLISH ATTACHMENTS AND ACCESSORIES General Information KitchenAid® attachments are tapered to assure a snug fit, even after prolonged use and wear. KitchenAid® attachments require no extra power unit to the attachment. Notch Pin‡ Attachment Shaft Housing‡ 18... power to operate them; The attachment power shaft and hub socket are of a square design, to eliminate any possibility of slipping during the transmission of mixer.

Use & Care Guide
Page 21
Unplug mixer or disconnect power. 3. Replace the attachment hub cover. Do not use an extension cord. Plug into a ... When the attachment is completely secured to OFF. 2. Tighten the attachment knob by turning it counterclockwise. Turn the speed control to mixer. Tighten attachment knob by turning it out. 4. Failure to follow these instructions can result in proper position, the pin on the...fits into the notch on the attachment will fit into the square attachment hub socket. Unplug mixer or disconnect power. 3. ENGLISH GENERAL INSTRUCTIONS To Attach 1.
Unplug mixer or disconnect power. 3. Replace the attachment hub cover. Do not use an extension cord. Plug into a ... When the attachment is completely secured to OFF. 2. Tighten the attachment knob by turning it counterclockwise. Turn the speed control to mixer. Tighten attachment knob by turning it out. 4. Failure to follow these instructions can result in proper position, the pin on the...fits into the notch on the attachment will fit into the square attachment hub socket. Unplug mixer or disconnect power. 3. ENGLISH GENERAL INSTRUCTIONS To Attach 1.

Use & Care Guide
Page 62
...dough into ball. Cook and stir until tender. Stir in waxed paper and chill 1 hour. Clean mixer bowl and beater. Add mushrooms and onions. Meanwhile, melt remaining 1 tablespoon butter in mixer bowl. Remove from heat. Turn to 20 minutes, or until well blended. ENGLISH MUSHROOM-ONION TARTLETS YIELD... in 10-inch skillet over medium heat. Form mixture into 24 pieces. Cool slightly. Place egg, remaining 1 tablespoon flour, and thyme in mixer bowl. PER SERVING: (2 TARTLETS) ABOUT 98 CAL, 4 G PRO, 8 G CARB, 6 G FAT, 33 MG CHOL, 83 MG SOD 60 APPETIZERS AND ...
...dough into ball. Cook and stir until tender. Stir in waxed paper and chill 1 hour. Clean mixer bowl and beater. Add mushrooms and onions. Meanwhile, melt remaining 1 tablespoon butter in mixer bowl. Remove from heat. Turn to 20 minutes, or until well blended. ENGLISH MUSHROOM-ONION TARTLETS YIELD... in 10-inch skillet over medium heat. Form mixture into 24 pieces. Cool slightly. Place egg, remaining 1 tablespoon flour, and thyme in mixer bowl. PER SERVING: (2 TARTLETS) ABOUT 98 CAL, 4 G PRO, 8 G CARB, 6 G FAT, 33 MG CHOL, 83 MG SOD 60 APPETIZERS AND ...


