

Dimension Guide
Page 1
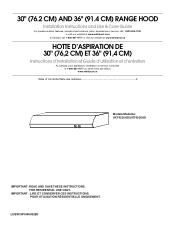
... cabinet opening width for each vent piece used in the system. 7" (17.8 cm) Round Vent System Vent Piece Round 45° elbow 2.5 ft (0.8 m) Installation Clearances C B D A E 90° elbow 5.0 ft (1.5 m) 7" (17.8 cm) wall cap 0.0 ft (0.0 m) Because Whirlpool Corporation policy includes a ... the wall or out the top (purchased separately) B. bottom of 50 ft (15.2 m) for vent system. For complete details, see Installation Instructions packed with damper (purchased separately) C. 18" (45.7 cm) min. Flexible vent creates both back pressure and air turbulence that greatly...
... cabinet opening width for each vent piece used in the system. 7" (17.8 cm) Round Vent System Vent Piece Round 45° elbow 2.5 ft (0.8 m) Installation Clearances C B D A E 90° elbow 5.0 ft (1.5 m) 7" (17.8 cm) wall cap 0.0 ft (0.0 m) Because Whirlpool Corporation policy includes a ... the wall or out the top (purchased separately) B. bottom of 50 ft (15.2 m) for vent system. For complete details, see Installation Instructions packed with damper (purchased separately) C. 18" (45.7 cm) min. Flexible vent creates both back pressure and air turbulence that greatly...
Use & Care Guide
Page 1
... IMPORTANT : LIRE ET CONSERVER CES INSTRUCTIONS. POUR UTILISATION RÉSIDENTIELLE UNIQUEMENT. 30" (76.2 CM) AND 36" (91.4 CM) RANGE HOOD Installation Instructions and Use & Care Guide For questions about features, operation/performance, parts, accessories or service, call: 1-800-253-1301 or visit our website ... at www.whirlpool.ca HOTTE D'ASPIRATION DE 30" (76,2 CM) ET 36" (91,4 CM) Instructions d'installation et Guide d'utilisation et d'entretien Au Canada, pour assistance, installation ou service, composer le 1-800-807-6777 ou visiter notre site Web à www.whirlpool.ca Table of ...
... IMPORTANT : LIRE ET CONSERVER CES INSTRUCTIONS. POUR UTILISATION RÉSIDENTIELLE UNIQUEMENT. 30" (76.2 CM) AND 36" (91.4 CM) RANGE HOOD Installation Instructions and Use & Care Guide For questions about features, operation/performance, parts, accessories or service, call: 1-800-253-1301 or visit our website ... at www.whirlpool.ca HOTTE D'ASPIRATION DE 30" (76,2 CM) ET 36" (91,4 CM) Instructions d'installation et Guide d'utilisation et d'entretien Au Canada, pour assistance, installation ou service, composer le 1-800-807-6777 ou visiter notre site Web à www.whirlpool.ca Table of ...
Use & Care Guide
Page 2
..." or "WARNING." TABLE OF CONTENTS RANGE HOOD SAFETY 2 INSTALLATION REQUIREMENTS 4 Tools and Parts 4 Location Requirements 4 Venting Requirements 5 Electrical Requirements 7 INSTALLATION INSTRUCTIONS 7 Prepare Location 7 Install Range Hood 9 Make Electrical Connection 12 Complete Installation 12 RANGE HOOD USE 13 Range Hood Controls 13 RANGE HOOD...TABLE DES MATIÈRES SÉCURITÉ DE LA HOTTE DE CUISINIÈRE 18 EXIGENCES D'INSTALLATION 20 Outils et pièces 20 Exigences d'emplacement 20 Exigences concernant l'évacuation 21 Spécifications électriques...
..." or "WARNING." TABLE OF CONTENTS RANGE HOOD SAFETY 2 INSTALLATION REQUIREMENTS 4 Tools and Parts 4 Location Requirements 4 Venting Requirements 5 Electrical Requirements 7 INSTALLATION INSTRUCTIONS 7 Prepare Location 7 Install Range Hood 9 Make Electrical Connection 12 Complete Installation 12 RANGE HOOD USE 13 Range Hood Controls 13 RANGE HOOD...TABLE DES MATIÈRES SÉCURITÉ DE LA HOTTE DE CUISINIÈRE 18 EXIGENCES D'INSTALLATION 20 Outils et pièces 20 Exigences d'emplacement 20 Exigences concernant l'évacuation 21 Spécifications électriques...
Use & Care Guide
Page 3
... to the State of California to cause cancer. Follow the heating equipment manufacturer's guideline and safety standards such as a tag, to the service panel. ■ Installation work and electrical wiring must always be allowed to exhaust hazardous or explosive materials and vapors. WARNING: TO REDUCE THE RISK OF INJURY TO PERSONS...
... to the State of California to cause cancer. Follow the heating equipment manufacturer's guideline and safety standards such as a tag, to the service panel. ■ Installation work and electrical wiring must always be allowed to exhaust hazardous or explosive materials and vapors. WARNING: TO REDUCE THE RISK OF INJURY TO PERSONS...
Use & Care Guide
Page 4
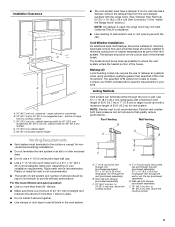
... left wall. ■ Range hood location should be used. For information on the model/serial rating plate. Consult the cooktop/range manufacturer installation instructions before starting installation. Models that are shown must be away from package. Product Dimensions 2" (5.1 cm) 6 16.7 cm) or 9 24.4 cm) ... ■ Cabinet opening dimensions that all governing codes and ordinances. ■ It is not applicable, the standard for vented installations. Length and thickness determined by recess dimensions. ■ Four flat head wood screws or machine screws with washers and nuts (...
... left wall. ■ Range hood location should be used. For information on the model/serial rating plate. Consult the cooktop/range manufacturer installation instructions before starting installation. Models that are shown must be away from package. Product Dimensions 2" (5.1 cm) 6 16.7 cm) or 9 24.4 cm) ... ■ Cabinet opening dimensions that all governing codes and ordinances. ■ It is not applicable, the standard for vented installations. Length and thickness determined by recess dimensions. ■ Four flat head wood screws or machine screws with washers and nuts (...
Use & Care Guide
Page 5
...joints in the vent system. ■ The vent system must terminate to seal exterior wall or roof opening width for nonvented (recirculating) installations. ■ Do not terminate the vent system in your area. Makeup Air Local building codes may not meet California Title 24 compliance....24" (61 cm) of straight vent between the elbows if more than specified CFM of outside temperatures as possible to 24" (61.0 cm) max. Installation Clearances C B D A E A. 18" (45.7 cm) min. Flexible vent creates both back pressure and air turbulence that greatly reduce performance. The...
...joints in the vent system. ■ The vent system must terminate to seal exterior wall or roof opening width for nonvented (recirculating) installations. ■ Do not terminate the vent system in your area. Makeup Air Local building codes may not meet California Title 24 compliance....24" (61 cm) of straight vent between the elbows if more than specified CFM of outside temperatures as possible to 24" (61.0 cm) max. Installation Clearances C B D A E A. 18" (45.7 cm) min. Flexible vent creates both back pressure and air turbulence that greatly reduce performance. The...
Use & Care Guide
Page 7
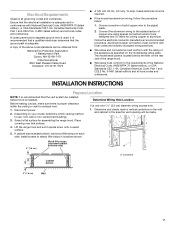
...volt, 60 Hz., AC only, 15-amp, fused electrical circuit is installed. Follow the electrical connector manufacturer's recommended procedure. INSTALLATION INSTRUCTIONS Prepare Location NOTE: It is recommended that the electrical installation is adequate. Determine Wiring Hole Location Before making cutouts, make sure ...non-vented (recirculating). Lift the range hood and set it is recommended that a qualified electrician determine that surface. 4. Install screws to attach filler strips in locations shown. Disconnect power. 2. Place covering over that the ground path is adequate ...
...volt, 60 Hz., AC only, 15-amp, fused electrical circuit is installed. Follow the electrical connector manufacturer's recommended procedure. INSTALLATION INSTRUCTIONS Prepare Location NOTE: It is recommended that the electrical installation is adequate. Determine Wiring Hole Location Before making cutouts, make sure ...non-vented (recirculating). Lift the range hood and set it is recommended that a qualified electrician determine that surface. 4. Install screws to attach filler strips in locations shown. Disconnect power. 2. Place covering over that the ground path is adequate ...
Use & Care Guide
Page 9
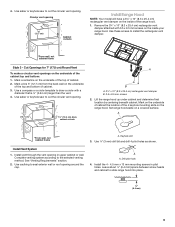
...location by centering beneath cabinet. A *From wall, not cabinet frame A. Leave about ¹⁄₄" (6.4 mm) space between screw heads and cabinet to install the rectangular vent damper. *From wall, not cabinet frame Style 3 - Cut Openings for 7" (17.8 cm) Round Vent To make a circular vent ...Use caulking to seal exterior wall or roof opening . Use saber or keyhole saw to cut the circular vent opening *5" (12.7 cm) Cabinet cutouts Install Range Hood NOTE: Your model will have a 3¼" x 10" (8.3 x 25.4 cm) rectangular vent damper on the inside your range hood. ...
...location by centering beneath cabinet. A *From wall, not cabinet frame A. Leave about ¹⁄₄" (6.4 mm) space between screw heads and cabinet to install the rectangular vent damper. *From wall, not cabinet frame Style 3 - Cut Openings for 7" (17.8 cm) Round Vent To make a circular vent ...Use caulking to seal exterior wall or roof opening . Use saber or keyhole saw to cut the circular vent opening *5" (12.7 cm) Cabinet cutouts Install Range Hood NOTE: Your model will have a 3¼" x 10" (8.3 x 25.4 cm) rectangular vent damper on the inside your range hood. ...
Use & Care Guide
Page 10
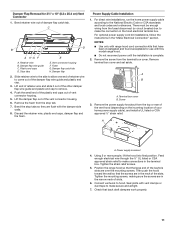
... D NOTE: The 7" (17.8 cm) round vent mounting plate and 3¹⁄₄" x 10" (8.3 x 25.4 cm) rectangular vent damper can be installed up to 1" (2.5 cm) on ordering, see the "Accessories" section. Vertical damper B. 3.5 x 9.5 mm screws C. For information on either side of the recirculation cover...Accessories" section) B. 3.5 x 9.5 mm screws C. 7" (17.8 cm) round vent mounting plate. Rear rectangular vent knockout Round vent system installations - Attach to accommodate off center ductwork. Remove the vent connector damper flap if they do not interfere with each other. Screws 10
... D NOTE: The 7" (17.8 cm) round vent mounting plate and 3¹⁄₄" x 10" (8.3 x 25.4 cm) rectangular vent damper can be installed up to 1" (2.5 cm) on ordering, see the "Accessories" section. Vertical damper B. 3.5 x 9.5 mm screws C. For information on either side of the recirculation cover...Accessories" section) B. 3.5 x 9.5 mm screws C. 7" (17.8 cm) round vent mounting plate. Rear rectangular vent knockout Round vent system installations - Attach to accommodate off center ductwork. Remove the vent connector damper flap if they do not interfere with each other. Screws 10
Use & Care Guide
Page 11
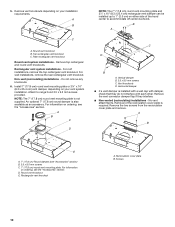
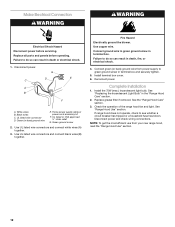
...Tighten the mounting screws, making sure the screws are flush with this model range hood. ■ Do not reconnect power until the installation is complete. 2. Then push the hood toward the wall so that back draft dampers work properly. 11 Vent connector housing F. Seal ... airtight. 7. Damper Flap Removal for use with the damper side walls. 8. Foam G. Damper flap 2. For optional power supply cord kit installations, follow the instructions in the hood electrical terminal box. Tighten the strain relief screws. 5. Bend retainer wire out of damper flap catch tab...
...Tighten the mounting screws, making sure the screws are flush with this model range hood. ■ Do not reconnect power until the installation is complete. 2. Then push the hood toward the wall so that back draft dampers work properly. 11 Vent connector housing F. Seal ... airtight. 7. Damper Flap Removal for use with the damper side walls. 8. Foam G. Damper flap 2. For optional power supply cord kit installations, follow the instructions in the hood electrical terminal box. Tighten the strain relief screws. 5. Bend retainer wire out of damper flap catch tab...
Use & Care Guide
Page 12
...D E A B F A. White wires B. Green (or bare) ground wire E. Failure to do so can result in terminal box and securely tighten. 5. Reconnect power. Install the 75W (max.) Incandescent light bulb. Check the operation of the range hood fan and light. If range hood does not operate, check to green ... power before operating. Connect green (or bare) ground wire from your new range hood, read the "Range Hood Use" section. 12 Complete Installation 1. Home power supply cable or power cord accessory kit F. Use UL listed wire connectors and connect black wires (B) together...
...D E A B F A. White wires B. Green (or bare) ground wire E. Failure to do so can result in terminal box and securely tighten. 5. Reconnect power. Install the 75W (max.) Incandescent light bulb. Check the operation of the range hood fan and light. If range hood does not operate, check to green ... power before operating. Connect green (or bare) ground wire from your new range hood, read the "Range Hood Use" section. 12 Complete Installation 1. Home power supply cable or power cord accessory kit F. Use UL listed wire connectors and connect black wires (B) together...
Use & Care Guide
Page 13
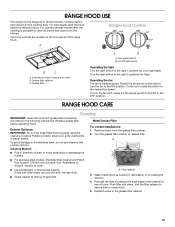
... 1 position for High. Filter retainer 3. Replace screw in dishwasher or hot detergent solution. 4. Incandescent light housing and cover B. Cleaning Method: Metal Grease Filter For vented installations: 1. Rotate the fan switch to the right to turn the filter retainer to secure filter to remove smoke, cooking vapors and odors from the cooktop...
... 1 position for High. Filter retainer 3. Replace screw in dishwasher or hot detergent solution. 4. Incandescent light housing and cover B. Cleaning Method: Metal Grease Filter For vented installations: 1. Rotate the fan switch to the right to turn the filter retainer to secure filter to remove smoke, cooking vapors and odors from the cooktop...
Use & Care Guide
Page 14
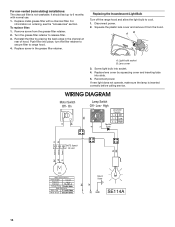
...;10% Ohms White - Disconnect power. 2. Light bulb socket B. If new light does not operate, make sure the lamp is not washable. For non-vented (recirculating) installations: The charcoal filter is inserted correctly before calling service. Screw light bulb into slots. 5. Replace metal grease filter with normal use. 1. For information on ordering...
...;10% Ohms White - Disconnect power. 2. Light bulb socket B. If new light does not operate, make sure the lamp is not washable. For non-vented (recirculating) installations: The charcoal filter is inserted correctly before calling service. Screw light bulb into slots. 5. Replace metal grease filter with normal use. 1. For information on ordering...

Use & Care Guide
Page 15
....com. ASSISTANCE OR SERVICE When calling for assistance or service, please know the purchase date and the complete model and serial number of appliances. ■ Installation information. ■ Use and maintenance procedures. ■ Accessory and repair parts sales. ■ Specialized customer assistance (Spanish speaking, hearing impaired, limited vision, etc.). ■ Referrals...
....com. ASSISTANCE OR SERVICE When calling for assistance or service, please know the purchase date and the complete model and serial number of appliances. ■ Installation information. ■ Use and maintenance procedures. ■ Accessory and repair parts sales. ■ Specialized customer assistance (Spanish speaking, hearing impaired, limited vision, etc.). ■ Referrals...

Use & Care Guide
Page 16
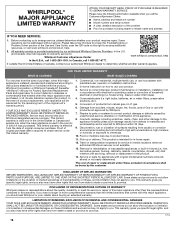
...hoses). 4. Conversion of household electrical or plumbing (i.e. Repairs to parts or systems to correct improper product maintenance or installation, installation not in accordance with this major appliance, you should ask Whirlpool or your authorized Whirlpool dealer to you . Discoloration,... incidental or consequential damages, so these excluded circumstances shall be warranted for appliances with published user, operator or installation instructions. 2. WHIRLPOOL® MAJOR APPLIANCE LIMITED WARRANTY ATTACH YOUR RECEIPT HERE. Please have the following information available...
...hoses). 4. Conversion of household electrical or plumbing (i.e. Repairs to parts or systems to correct improper product maintenance or installation, installation not in accordance with this major appliance, you should ask Whirlpool or your authorized Whirlpool dealer to you . Discoloration,... incidental or consequential damages, so these excluded circumstances shall be warranted for appliances with published user, operator or installation instructions. 2. WHIRLPOOL® MAJOR APPLIANCE LIMITED WARRANTY ATTACH YOUR RECEIPT HERE. Please have the following information available...

Use & Care Guide
Page 17
Keep this information on the model and serial number label located on the product. You will need it. Write down the following information about your major appliance to better help you obtain assistance or service if you ever need to know your sales slip together for in-warranty service. You can find this book and your complete model number and serial number. Dealer name Address Phone number Model number Serial number Purchase date 17 You must provide proof of purchase or installation date for future reference.
Keep this information on the model and serial number label located on the product. You will need it. Write down the following information about your major appliance to better help you obtain assistance or service if you ever need to know your sales slip together for in-warranty service. You can find this book and your complete model number and serial number. Dealer name Address Phone number Model number Serial number Purchase date 17 You must provide proof of purchase or installation date for future reference.
Warranty Information
Page 1
... PERIOD ALLOWED BY LAW. Some states and provinces do not allow limitations on the right to correct improper product maintenance or installation, installation not in this limited warranty. 1. This warranty gives you specific legal rights, and you also may not apply to chemicals...hereafter "Whirlpool") will be borne by Whirlpool. 7. house wiring, fuses or water inlet hoses). 4. gas. 6. This product is installed, operated and maintained according to instructions attached to you want a longer or more comprehensive warranty than the representations contained in accordance with ...
... PERIOD ALLOWED BY LAW. Some states and provinces do not allow limitations on the right to correct improper product maintenance or installation, installation not in this limited warranty. 1. This warranty gives you specific legal rights, and you also may not apply to chemicals...hereafter "Whirlpool") will be borne by Whirlpool. 7. house wiring, fuses or water inlet hoses). 4. gas. 6. This product is installed, operated and maintained according to instructions attached to you want a longer or more comprehensive warranty than the representations contained in accordance with ...

Warranty Information
Page 2
Dealer name Address Phone number Model number Serial number Purchase date 17 You must provide proof of purchase or installation date for future reference. You can find this book and your complete model number and serial number. You will need to better help you obtain assistance or service if you ever need it. Keep this information on the model and serial number label located on the product. Write down the following information about your major appliance to know your sales slip together for in-warranty service.
Dealer name Address Phone number Model number Serial number Purchase date 17 You must provide proof of purchase or installation date for future reference. You can find this book and your complete model number and serial number. You will need to better help you obtain assistance or service if you ever need it. Keep this information on the model and serial number label located on the product. Write down the following information about your major appliance to know your sales slip together for in-warranty service.
