
Dimension Guide
Page 1
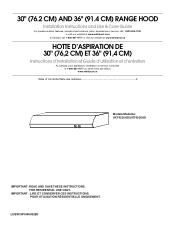
...185;⁄₄" x 10" (8.3 cm x 25.4 cm) 5.0 ft to 24" (61.0 cm) max. wall cap 8 ft (2.4 m) straight Length of the range hood. Wall cap with product. For complete details, see Installation Instructions packed with damper (purchased separately) C. 18" (45.7 cm) min. clearance - VENTING METHODS Vent system... vent through the roof or wall. above the cooking surface To calculate the length of range hood to 24" (61.0 cm) suggested max. - 30" (76.2 cm) and 36" (91.4 cm) Range Hood PRODUCT MODEL NUMBERS UXT4230AY UXT4236AY Electrical: q A 120 volt, 60 Hz., AC only,...
...185;⁄₄" x 10" (8.3 cm x 25.4 cm) 5.0 ft to 24" (61.0 cm) max. wall cap 8 ft (2.4 m) straight Length of the range hood. Wall cap with product. For complete details, see Installation Instructions packed with damper (purchased separately) C. 18" (45.7 cm) min. clearance - VENTING METHODS Vent system... vent through the roof or wall. above the cooking surface To calculate the length of range hood to 24" (61.0 cm) suggested max. - 30" (76.2 cm) and 36" (91.4 cm) Range Hood PRODUCT MODEL NUMBERS UXT4230AY UXT4236AY Electrical: q A 120 volt, 60 Hz., AC only,...
Use & Care Guide
Page 1
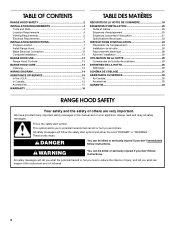
POUR UTILISATION RÉSIDENTIELLE UNIQUEMENT. LI3Z4C/W10400322D FOR RESIDENTIAL USE ONLY. IMPORTANT : LIRE ET CONSERVER CES INSTRUCTIONS. 30" (76.2 CM) AND 36" (91.4 CM) RANGE HOOD Installation Instructions and Use & Care Guide For questions about features, operation/performance, parts, accessories or service, call: 1-800-253-1301 or visit our website at ...
POUR UTILISATION RÉSIDENTIELLE UNIQUEMENT. LI3Z4C/W10400322D FOR RESIDENTIAL USE ONLY. IMPORTANT : LIRE ET CONSERVER CES INSTRUCTIONS. 30" (76.2 CM) AND 36" (91.4 CM) RANGE HOOD Installation Instructions and Use & Care Guide For questions about features, operation/performance, parts, accessories or service, call: 1-800-253-1301 or visit our website at ...
Use & Care Guide
Page 2
... Parts 4 Location Requirements 4 Venting Requirements 5 Electrical Requirements 7 INSTALLATION INSTRUCTIONS 7 Prepare Location 7 Install Range Hood 9 Make Electrical Connection 12 Complete Installation 12 RANGE HOOD USE 13 Range Hood Controls 13 RANGE HOOD CARE 13 Cleaning 13 WIRING DIAGRAM 14 ASSISTANCE OR SERVICE 15 In the U.S.A 15 In Canada 15 ... 29 SCHÉMA DE CÂBLAGE 31 ASSISTANCE OU SERVICE 32 Au Canada 32 Accessoires 32 GARANTIE 33 RANGE HOOD SAFETY Your safety and the safety of injury, and tell you what the potential hazard is the safety alert symbol...
... Parts 4 Location Requirements 4 Venting Requirements 5 Electrical Requirements 7 INSTALLATION INSTRUCTIONS 7 Prepare Location 7 Install Range Hood 9 Make Electrical Connection 12 Complete Installation 12 RANGE HOOD USE 13 Range Hood Controls 13 RANGE HOOD CARE 13 Cleaning 13 WIRING DIAGRAM 14 ASSISTANCE OR SERVICE 15 In the U.S.A 15 In Canada 15 ... 29 SCHÉMA DE CÂBLAGE 31 ASSISTANCE OU SERVICE 32 Au Canada 32 Accessoires 32 GARANTIE 33 RANGE HOOD SAFETY Your safety and the safety of injury, and tell you what the potential hazard is the safety alert symbol...
Use & Care Guide
Page 3
...to prevent backdrafting. do not use to operate it started. - WARNING: TO REDUCE THE RISK OF INJURY TO PERSONS IN THE EVENT OF A RANGE TOP GREASE FIRE, OBSERVE THE FOLLOWING:a ■ SMOTHER FLAMES with any fan with your back to an exit. IMPORTANT SAFETY INSTRUCTIONS WARNING: TO ...9632; Use this fan with a close fitting lid, cookie sheet, or metal tray, then turn hood ON when cooking at high heat or when flambeing food (i.e. WARNING: TO REDUCE THE RISK OF A RANGE TOP GREASE FIRE: ■ Never leave surface units unattended at service panel and lock the service ...
...to prevent backdrafting. do not use to operate it started. - WARNING: TO REDUCE THE RISK OF INJURY TO PERSONS IN THE EVENT OF A RANGE TOP GREASE FIRE, OBSERVE THE FOLLOWING:a ■ SMOTHER FLAMES with any fan with your back to an exit. IMPORTANT SAFETY INSTRUCTIONS WARNING: TO ...9632; Use this fan with a close fitting lid, cookie sheet, or metal tray, then turn hood ON when cooking at high heat or when flambeing food (i.e. WARNING: TO REDUCE THE RISK OF A RANGE TOP GREASE FIRE: ■ Never leave surface units unattended at service panel and lock the service ...
Use & Care Guide
Page 4
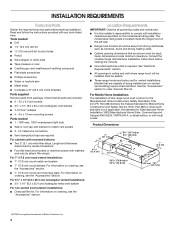
... Home Sites, Communities and Setups) ANSI A225.1/NFPA 501A, or latest edition, or with local codes. Models that are shown must be sealed. ■ These range hoods are capable of Saturn Fasteners, Inc. 4 Product Dimensions 2" (5.1 cm) 6 16.7 cm) or 9 24.4 cm) 4 12.5 cm) ⁷⁄₈" (2.2 cm)... specified on the model/serial rating plate. See "Electrical Requirements" section. ■ All openings in ceiling and wall where range hood will be installed must conform to the Manufactured Home Construction Safety Standards, Title 24 CFR, Part 328 (formerly the Federal Standard...
... Home Sites, Communities and Setups) ANSI A225.1/NFPA 501A, or latest edition, or with local codes. Models that are shown must be sealed. ■ These range hoods are capable of Saturn Fasteners, Inc. 4 Product Dimensions 2" (5.1 cm) 6 16.7 cm) or 9 24.4 cm) 4 12.5 cm) ⁷⁄₈" (2.2 cm)... specified on the model/serial rating plate. See "Electrical Requirements" section. ■ All openings in ceiling and wall where range hood will be installed must conform to the Manufactured Home Construction Safety Standards, Title 24 CFR, Part 328 (formerly the Federal Standard...
Use & Care Guide
Page 5
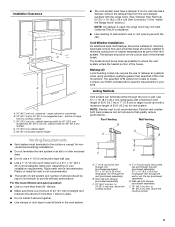
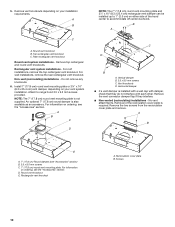
...x 10" (8.3 x 25.4 cm) rectangular metal vent, depending on the cold air side of 35 ft (10.7 m) or 7" (17.8 cm) or larger round vent with the range hood. (See "Damper Flap Removal for 30" (76.2 cm) models and 36" (91.4 cm) min. Roof cap with damper (purchased separately) C. 18" (45.7 cm) min.... and number of elbows should be kept to a minimum to minimize conduction of outside temperatures as possible to seal all joints in the "Install the Range Hood" section.) NOTE: If a damper is used . ■ Do not install 2 elbows together. ■ Use clamps or duct tape to where the vent system...
...x 10" (8.3 x 25.4 cm) rectangular metal vent, depending on the cold air side of 35 ft (10.7 m) or 7" (17.8 cm) or larger round vent with the range hood. (See "Damper Flap Removal for 30" (76.2 cm) models and 36" (91.4 cm) min. Roof cap with damper (purchased separately) C. 18" (45.7 cm) min.... and number of elbows should be kept to a minimum to minimize conduction of outside temperatures as possible to seal all joints in the "Install the Range Hood" section.) NOTE: If a damper is used . ■ Do not install 2 elbows together. ■ Use clamps or duct tape to where the vent system...
Use & Care Guide
Page 7
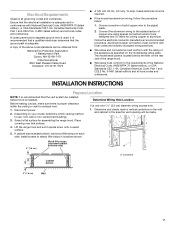
...recessed cabinet bottoms only) A 3" (7.6 cm) A. The model/serial plate is adequate and in conformance with the rating of the range hood. ■ Wire sizes must conform with National Electrical Code, ANSI/NFPA 70 (latest edition), or CSA Standards C22.1-94, Canadian ...all local codes and ordinances. Disconnect power. 2. Cut only one 1¹⁄₄" (3.2 cm) diameter wiring access hole. 1. Lift the range hood and set it is recommended that a qualified electrician determine that surface. 4. Select a flat surface for exhaust vent. 1. Install screws to use...
...recessed cabinet bottoms only) A 3" (7.6 cm) A. The model/serial plate is adequate and in conformance with the rating of the range hood. ■ Wire sizes must conform with National Electrical Code, ANSI/NFPA 70 (latest edition), or CSA Standards C22.1-94, Canadian ...all local codes and ordinances. Disconnect power. 2. Cut only one 1¹⁄₄" (3.2 cm) diameter wiring access hole. 1. Lift the range hood and set it is recommended that a qualified electrician determine that surface. 4. Select a flat surface for exhaust vent. 1. Install screws to use...
Use & Care Guide
Page 9
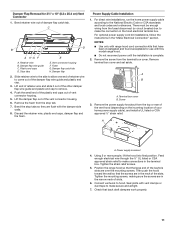
...mm) space between screw heads and cabinet to install the rectangular vent damper. *From wall, not cabinet frame Style 3 - Use these screws to slide range hood into place. ¹⁄₄" (6.4 mm) 9 cabinet cutouts A B A. 3¹⁄₄" x 10" (8.3 x 25.4 cm) rectangular vent... damper B. 3.5 x 9.5 mm screws 2. Mark on the underside of the top of the range hood. 1. Keyhole slot 3. Remove the 3¼" x 10" (8.3 x 25.4 cm) rectangular vent damper attached with a diameter that is ¼" (0.64 cm) larger ...
...mm) space between screw heads and cabinet to install the rectangular vent damper. *From wall, not cabinet frame Style 3 - Use these screws to slide range hood into place. ¹⁄₄" (6.4 mm) 9 cabinet cutouts A B A. 3¹⁄₄" x 10" (8.3 x 25.4 cm) rectangular vent... damper B. 3.5 x 9.5 mm screws 2. Mark on the underside of the top of the range hood. 1. Keyhole slot 3. Remove the 3¼" x 10" (8.3 x 25.4 cm) rectangular vent damper attached with a diameter that is ¼" (0.64 cm) larger ...
Use & Care Guide
Page 10
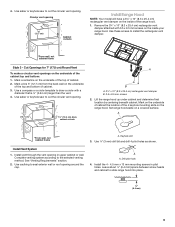
...-vented (recirculating) installations - Vertical damper B. 3.5 x 9.5 mm screws C. Remove the vent connector damper flap if they do not interfere with each other. Removal of the hood center to range hood 3.5 x 9.5 mm screws provided. Round vent knockout E. 5. A B C A. Top rectangular vent knockout C. Rectangular vent system installations - Non-vent (recirculating) installations - NOTE: The 7" (17.8 cm) round vent...
...-vented (recirculating) installations - Vertical damper B. 3.5 x 9.5 mm screws C. Remove the vent connector damper flap if they do not interfere with each other. Removal of the hood center to range hood 3.5 x 9.5 mm screws provided. Round vent knockout E. 5. A B C A. Top rectangular vent knockout C. Rectangular vent system installations - Non-vent (recirculating) installations - NOTE: The 7" (17.8 cm) round vent...
Use & Care Guide
Page 11
... housing F. There must be enough wiring from the top or rear of the vent hood (depending on the incoming location of the vent connector housing. 6. NOTES: ■ Use only with range hood cord connection kits that the screws are over the mounting screws. Seal joints with vent... end caps D. For direct wire installations, run the home power supply cable according to remove. 4. Damper Flap Removal for use with this model range hood. ■ Do not reconnect power until the installation is complete. 2. Damper flap 2. Discard the retainer wire, plastic end caps, damper flap and...
... housing F. There must be enough wiring from the top or rear of the vent hood (depending on the incoming location of the vent connector housing. 6. NOTES: ■ Use only with range hood cord connection kits that the screws are over the mounting screws. Seal joints with vent... end caps D. For direct wire installations, run the home power supply cable according to remove. 4. Damper Flap Removal for use with this model range hood. ■ Do not reconnect power until the installation is complete. 2. Damper flap 2. Discard the retainer wire, plastic end caps, damper flap and...
Use & Care Guide
Page 12
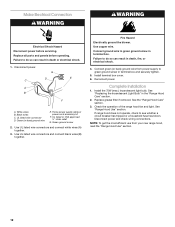
...Fire Hazard Electrically ground the blower. Connect green (or bare) ground wire from your new range hood, read the "Range Hood Use" section. 12 Reconnect power. Replace grease filter if removed. See "Range Hood Use" section. NOTE: To get the most efficient use from power supply to do so... wires (B) together. Use copper wire. See "Replacing the Incandescent Light Bulb" in terminal box and securely tighten. 5. See the "Range Hood Care" section. 3. If range hood does not operate, check to green ground screw in death, fire, or electrical shock. 4. Green (or bare) ground wire E. ...
...Fire Hazard Electrically ground the blower. Connect green (or bare) ground wire from your new range hood, read the "Range Hood Use" section. 12 Reconnect power. Replace grease filter if removed. See "Range Hood Use" section. NOTE: To get the most efficient use from power supply to do so... wires (B) together. Use copper wire. See "Replacing the Incandescent Light Bulb" in terminal box and securely tighten. 5. See the "Range Hood Care" section. 3. If range hood does not operate, check to green ground screw in death, fire, or electrical shock. 4. Green (or bare) ground wire E. ...
Use & Care Guide
Page 13
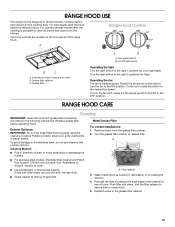
...switch to the right to turn the fan to the following instructions. RANGE HOOD CARE Cleaning IMPORTANT: Clean the hood and grease filters frequently according to the ON position. Cleaning Method: Metal Grease Filter For vented installations: 1. Range Hood Controls A B C A. Filter retainer 3. Wash metal filters as ...to clear all -purpose cleaner: Rinse with clean water and dry with soft, lint-free cloth. ■ Glass cleaner to range hood. 5. Replace grease filter before cooking and allow it to operate several minutes after the cooking is complete to the desired fan speed...
...switch to the right to turn the fan to the following instructions. RANGE HOOD CARE Cleaning IMPORTANT: Clean the hood and grease filters frequently according to the ON position. Cleaning Method: Metal Grease Filter For vented installations: 1. Range Hood Controls A B C A. Filter retainer 3. Wash metal filters as ...to clear all -purpose cleaner: Rinse with clean water and dry with soft, lint-free cloth. ■ Glass cleaner to range hood. 5. Replace grease filter before cooking and allow it to operate several minutes after the cooking is complete to the desired fan speed...
Use & Care Guide
Page 14
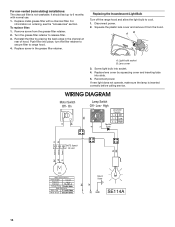
...1 - 3 Low 1 - Replace metal grease filter with normal use. 1. For information on ordering, see the "Accessories" section. Remove screw from the hood. Screw light bulb into socket. 4. For non-vented (recirculating) installations: The charcoal filter is inserted correctly before calling service. WIRING DIAGRAM R Motor Switch Off... ±10% A Wattage Rating 73 ±10% Watts Motor Resistance White - Replacing the Incandescent Light Bulb Turn off the range hood and allow the light bulb to 6 months with a charcoal filter. Reconnect power. On BK Lamp Switch Off - Red 17.1...
...1 - 3 Low 1 - Replace metal grease filter with normal use. 1. For information on ordering, see the "Accessories" section. Remove screw from the hood. Screw light bulb into socket. 4. For non-vented (recirculating) installations: The charcoal filter is inserted correctly before calling service. WIRING DIAGRAM R Motor Switch Off... ±10% A Wattage Rating 73 ±10% Watts Motor Resistance White - Replacing the Incandescent Light Bulb Turn off the range hood and allow the light bulb to 6 months with a charcoal filter. Reconnect power. On BK Lamp Switch Off - Red 17.1...


