Installation Guide
Page 2
... RANGE HOOD SAFETY 2 INSTALLATION REQUIREMENTS 4 Tools and Parts 4 Location Requirements 4 Venting Requirements 5 Electrical Requirements 6 INSTALLATION INSTRUCTIONS 7 Prepare Location 7 Install Range Hood 8 Connect Vent System 8 Make Electrical Connection 9 Install Vent Covers 9 Complete Installation 10 RANGE HOOD USE 10 Range Hood Controls 10 RANGE HOOD CARE 11...SCHÉMA DE CÂBLAGE 25 ASSISTANCE OU SERVICE 26 Au Canada 26 Accessoires 26 GARANTIE 27 RANGE HOOD SAFETY Your safety and the safety of injury, and tell you and others are not followed. 2 All safety...
... RANGE HOOD SAFETY 2 INSTALLATION REQUIREMENTS 4 Tools and Parts 4 Location Requirements 4 Venting Requirements 5 Electrical Requirements 6 INSTALLATION INSTRUCTIONS 7 Prepare Location 7 Install Range Hood 8 Connect Vent System 8 Make Electrical Connection 9 Install Vent Covers 9 Complete Installation 10 RANGE HOOD USE 10 Range Hood Controls 10 RANGE HOOD CARE 11...SCHÉMA DE CÂBLAGE 25 ASSISTANCE OU SERVICE 26 Au Canada 26 Accessoires 26 GARANTIE 27 RANGE HOOD SAFETY Your safety and the safety of injury, and tell you and others are not followed. 2 All safety...

Installation Guide
Page 3
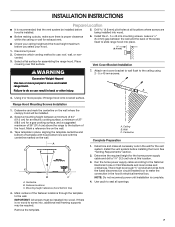
... A RANGE TOP GREASE FIRE, OBSERVE THE FOLLOWING:a ■ SMOTHER FLAMES with a close fitting lid, cookie sheet, or metal tray, then turn hood ON when cooking at high heat or when flambeing food (i.e. You know you have questions, contact the manufacturer. ■ Before servicing or cleaning the...units unattended at service panel and lock the service disconnecting means to the service panel. ■ Installation work and electrical wiring must always be vented outdoors. The fire is small and contained in the area where it . - If you have a class ABC extinguisher, and you may ignite...
... A RANGE TOP GREASE FIRE, OBSERVE THE FOLLOWING:a ■ SMOTHER FLAMES with a close fitting lid, cookie sheet, or metal tray, then turn hood ON when cooking at high heat or when flambeing food (i.e. You know you have questions, contact the manufacturer. ■ Before servicing or cleaning the...units unattended at service panel and lock the service disconnecting means to the service panel. ■ Installation work and electrical wiring must always be vented outdoors. The fire is small and contained in the area where it . - If you have a class ABC extinguisher, and you may ignite...
Installation Guide
Page 4
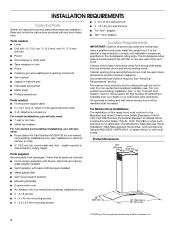
...or with installation clearances specified on the rear wall of this range hood must be away from packages. For Mobile Home Installations The installation of the vent hood. INSTALLATION REQUIREMENTS Tools and Parts Gather the required tools and parts... mounting screws ■ 2 - 3.5 x 9.5 mm mounting screws Location Requirements IMPORTANT: Observe all parts are included. ■ Hood canopy assembly with blower, light bulb and canopy glass already installed ■ Vent transition with 1¼" (3.2 cm 3.2 mm), and 7.9 mm) drill bits ■ Pencil ■ Wire stripper or utility ...
...or with installation clearances specified on the rear wall of this range hood must be away from packages. For Mobile Home Installations The installation of the vent hood. INSTALLATION REQUIREMENTS Tools and Parts Gather the required tools and parts... mounting screws ■ 2 - 3.5 x 9.5 mm mounting screws Location Requirements IMPORTANT: Observe all parts are included. ■ Hood canopy assembly with blower, light bulb and canopy glass already installed ■ Vent transition with 1¼" (3.2 cm 3.2 mm), and 7.9 mm) drill bits ■ Pencil ■ Wire stripper or utility ...
Installation Guide
Page 5
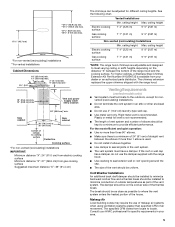
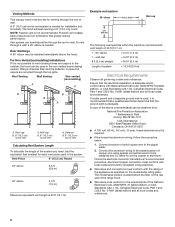
... Min. ceiling height Electric cooking surface 7' 4" (2.23 m) 9' 9" (2.97 m) Gas cooking surface 7' 7" (2.31 m) 9' 9" (2.97 m) *NOTE: The range hood chimneys are adjustable and designed to cooking surface Centerline Cooking surface *For non-vented (recirculating) installations IMPORTANT: Minimum distance "X": 24" (61.0 cm) from electric cooking surface Minimum distance "X": 27" (68.6 cm) from gas cooking surface...
... Min. ceiling height Electric cooking surface 7' 4" (2.23 m) 9' 9" (2.97 m) Gas cooking surface 7' 7" (2.31 m) 9' 9" (2.97 m) *NOTE: The range hood chimneys are adjustable and designed to cooking surface Centerline Cooking surface *For non-vented (recirculating) installations IMPORTANT: Minimum distance "X": 24" (61.0 cm) from electric cooking surface Minimum distance "X": 27" (68.6 cm) from gas cooking surface...
Installation Guide
Page 6
...sizes and connections must conform to the outside, the hood can be used in the system. Venting Methods This canopy hood is factory set for installation (not included). A 6" (15.2 cm) round vent system is needed . Flexible vent creates back pressure and air turbulence that the ground... feet (meters) for joining copper to the pigtail leads. 2. Vent system can terminate either through the top grille. Deflector B. 6" (15.2 cm) round vent Calculating Vent System Length To calculate the length of the above the hood. Example vent system 90 elbow 6 ft (1.8 m) Wall cap 2 ft ...
...sizes and connections must conform to the outside, the hood can be used in the system. Venting Methods This canopy hood is factory set for installation (not included). A 6" (15.2 cm) round vent system is needed . Flexible vent creates back pressure and air turbulence that the ground... feet (meters) for joining copper to the pigtail leads. 2. Vent system can terminate either through the top grille. Deflector B. 6" (15.2 cm) round vent Calculating Vent System Length To calculate the length of the above the hood. Example vent system 90 elbow 6 ft (1.8 m) Wall cap 2 ft ...
Installation Guide
Page 7
... breaker) box to move and install range hood. See "Venting Requirements" section. 2. Determine which venting method to the wall. Failure to slide range hood into wood. Determine and mark the centerline on the wall where the canopy hood will be installed into place. ¹⁄... the wall. Fastener locations C. If there is complete. 4. Install the vent system before you select your ceiling height and the hood height maximum before installing the hood. There must be installed. 2. Vent Cover Bracket Installation WARNING Excessive Weight Hazard Use two or more people, lift...
... breaker) box to move and install range hood. See "Venting Requirements" section. 2. Determine which venting method to the wall. Failure to slide range hood into wood. Determine and mark the centerline on the wall where the canopy hood will be installed into place. ¹⁄... the wall. Fastener locations C. If there is complete. 4. Install the vent system before you select your ceiling height and the hood height maximum before installing the hood. There must be installed. 2. Vent Cover Bracket Installation WARNING Excessive Weight Hazard Use two or more people, lift...
Installation Guide
Page 8
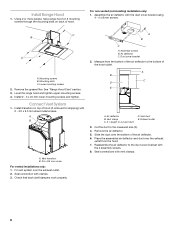
... screws through the mounting slots on top of hood. Seal connection with 2 - 3.5 x 9.5 mm sheet metal screws. A B C A. Duct cover bracket 2. Measure from the hood. 7. Vent duct E. Slide the duct onto the bottom of the hood outlet. For non-vented (recirculating) installation only: 1. Mounting screws B. Vent transition B. 3.5 x 9.5 mm screw For vented installations only: 1. Exhaust outlet 3. Remove the air deflector...
... screws through the mounting slots on top of hood. Seal connection with 2 - 3.5 x 9.5 mm sheet metal screws. A B C A. Duct cover bracket 2. Measure from the hood. 7. Vent duct E. Slide the duct onto the bottom of the hood outlet. For non-vented (recirculating) installation only: 1. Mounting screws B. Vent transition B. 3.5 x 9.5 mm screw For vented installations only: 1. Exhaust outlet 3. Remove the air deflector...

Installation Guide
Page 9
Use UL listed wire connectors and connect black wires (C) together. 6. Knockout B. Terminal box C. Terminal box cover 4. Check that all parts and panels before servicing. Install Vent Covers When using UL listed wire connectors. 8. B A C E F A. Black wires D. Green (or bare) and yellow-green ground wires A. Run home power supply cable through strain .... Connect green (or bare) ground wire from home power supply to green and yellow ground wire in terminal box using both upper and lower vent covers, push lower cover down onto hood and lift upper cover to hide slots.
Use UL listed wire connectors and connect black wires (C) together. 6. Knockout B. Terminal box C. Terminal box cover 4. Check that all parts and panels before servicing. Install Vent Covers When using UL listed wire connectors. 8. B A C E F A. Black wires D. Green (or bare) and yellow-green ground wires A. Run home power supply cable through strain .... Connect green (or bare) ground wire from home power supply to green and yellow ground wire in terminal box using both upper and lower vent covers, push lower cover down onto hood and lift upper cover to hide slots.

Installation Guide
Page 10
... GF E A. See the "Range Hood Care" section. 3. Check the operation of lamps may vary) H. Incandescent lamp (position and number of the range hood blower and light. Secure the bottom of the canopy. For non-vented (recirculating) installations only, install charcoal ...filters over metal grease filter. Range Hood Controls A B C D E A. The Blower Off button...
... GF E A. See the "Range Hood Care" section. 3. Check the operation of lamps may vary) H. Incandescent lamp (position and number of the range hood blower and light. Secure the bottom of the canopy. For non-vented (recirculating) installations only, install charcoal ...filters over metal grease filter. Range Hood Controls A B C D E A. The Blower Off button...

Installation Guide
Page 11
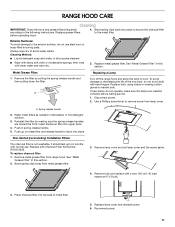
... filter into top side of the new bulb, do not use . Non-Vented (recirculating) Installation Filters: The charcoal filter is not washable. Place charcoal filter into upper track. 4. A Turn off the range hood and allow the lamp to the following instructions. It should last up on ...metal filter and release handle to latch into place to secure the charcoal filter to avoid water marks. RANGE HOOD CARE Cleaning IMPORTANT: Clean the hood and grease filters frequently according to cool. Replace metal grease filter. A. Replace grease filters before calling service. 1. ...
... filter into top side of the new bulb, do not use . Non-Vented (recirculating) Installation Filters: The charcoal filter is not washable. Place charcoal filter into upper track. 4. A Turn off the range hood and allow the lamp to the following instructions. It should last up on ...metal filter and release handle to latch into place to secure the charcoal filter to avoid water marks. RANGE HOOD CARE Cleaning IMPORTANT: Clean the hood and grease filters frequently according to cool. Replace metal grease filter. A. Replace grease filters before calling service. 1. ...

Use & Care Guide
Page 2
... 4 Tools and Parts 4 Location Requirements 4 Venting Requirements 5 Electrical Requirements 6 INSTALLATION INSTRUCTIONS 7 Prepare Location 7 Install Range Hood 8 Connect Vent System 8 Make Electrical Connection 9 Install Vent Covers 9 Complete Installation 10 RANGE HOOD USE 10 Range Hood Controls 10 RANGE HOOD CARE 11 Cleaning 11 WIRING DIAGRAM 12 ASSISTANCE ... SCHÉMA DE CÂBLAGE 25 ASSISTANCE OU SERVICE 26 Au Canada 26 Accessoires 26 GARANTIE 27 RANGE HOOD SAFETY Your safety and the safety of injury, and tell you what the potential hazard is the safety alert ...
... 4 Tools and Parts 4 Location Requirements 4 Venting Requirements 5 Electrical Requirements 6 INSTALLATION INSTRUCTIONS 7 Prepare Location 7 Install Range Hood 8 Connect Vent System 8 Make Electrical Connection 9 Install Vent Covers 9 Complete Installation 10 RANGE HOOD USE 10 Range Hood Controls 10 RANGE HOOD CARE 11 Cleaning 11 WIRING DIAGRAM 12 ASSISTANCE ... SCHÉMA DE CÂBLAGE 25 ASSISTANCE OU SERVICE 26 Au Canada 26 Accessoires 26 GARANTIE 27 RANGE HOOD SAFETY Your safety and the safety of injury, and tell you what the potential hazard is the safety alert ...

Use & Care Guide
Page 3
...FLAMES with a damaged cord or plug. You can fight the fire with any fan with a close fitting lid, cookie sheet, or metal tray, then turn hood ON when cooking at high heat or when flambeing food (i.e. Always use this unit only in the area where it . - If the flames do not... means cannot be done by the National Fire Protection Association (NFPA), the American Society for the size of fire and to properly exhaust air, be vented outdoors. Do not use only. WARNING: TO REDUCE THE RISK OF A RANGE TOP GREASE FIRE: ■ Never leave surface units unattended at service panel ...
...FLAMES with a damaged cord or plug. You can fight the fire with any fan with a close fitting lid, cookie sheet, or metal tray, then turn hood ON when cooking at high heat or when flambeing food (i.e. Always use this unit only in the area where it . - If the flames do not... means cannot be done by the National Fire Protection Association (NFPA), the American Society for the size of fire and to properly exhaust air, be vented outdoors. Do not use only. WARNING: TO REDUCE THE RISK OF A RANGE TOP GREASE FIRE: ■ Never leave surface units unattended at service panel ...

Use & Care Guide
Page 4
...Setups) ANSI A225.1/NFPA 501A, or latest edition, or with installation clearances specified on the rear wall of the vent hood. All openings in the "Connect Vent System" section. See "Assistance or Service" section to the Manufactured Home Construction Safety Standards, Title 24 CFR,...24, HUD, Part 280) or when such standard is not applicable, the standard for non-vented (recirculating) installations only. Given dimensions provide minimum clearance. The canopy hood is the installer's responsibility to comply with local codes. Recirculation Kit Part Number W10294733 is ...
...Setups) ANSI A225.1/NFPA 501A, or latest edition, or with installation clearances specified on the rear wall of the vent hood. All openings in the "Connect Vent System" section. See "Assistance or Service" section to the Manufactured Home Construction Safety Standards, Title 24 CFR,...24, HUD, Part 280) or when such standard is not applicable, the standard for non-vented (recirculating) installations only. Given dimensions provide minimum clearance. The canopy hood is the installer's responsibility to comply with local codes. Recirculation Kit Part Number W10294733 is ...

Use & Care Guide
Page 5
...elbow is recommended. Cold Weather Installations An additional back draft damper should be installed to where the vent system enters the heated portion of the range hood and the cooking surface. The specified CFM varies from your HVAC professional for nonvented (recirculating) installations... m) 9' 5" (2.87 m) Gas cooking surface 7' 7" (2.31 m) 9' 5" (2.87 m) Non-vented (recirculating) Installations Min. If the roof or wall cap has a damper, do not use the damper supplied with the range hood. Makeup Air Local building codes may require the use 4" (10.2 cm) laundry-type wall cap...
...elbow is recommended. Cold Weather Installations An additional back draft damper should be installed to where the vent system enters the heated portion of the range hood and the cooking surface. The specified CFM varies from your HVAC professional for nonvented (recirculating) installations... m) 9' 5" (2.87 m) Gas cooking surface 7' 7" (2.31 m) 9' 5" (2.87 m) Non-vented (recirculating) Installations Min. If the roof or wall cap has a damper, do not use the damper supplied with the range hood. Makeup Air Local building codes may require the use 4" (10.2 cm) laundry-type wall cap...

Use & Care Guide
Page 6
... recycled through the roof or wall. Follow the electrical connector manufacturer's recommended procedure. The hood exhaust opening is factory set for joining copper to the pigtail leads. 2. For Non-Vented (recirculating) Installations If it is recommended that a qualified electrician determine that the ground path... and industry accepted wiring practices. ■ Wire sizes and connections must conform to the outside, the hood can be used , it is not possible to vent cooking fumes and vapors to the requirements of solid copper wire to aluminum. The model/serial plate is...
... recycled through the roof or wall. Follow the electrical connector manufacturer's recommended procedure. The hood exhaust opening is factory set for joining copper to the pigtail leads. 2. For Non-Vented (recirculating) Installations If it is recommended that a qualified electrician determine that the ground path... and industry accepted wiring practices. ■ Wire sizes and connections must conform to the outside, the hood can be used , it is not possible to vent cooking fumes and vapors to the requirements of solid copper wire to aluminum. The model/serial plate is...

Use & Care Guide
Page 7
... wall for a gas cooking surface, and a suggested maximum of 27" (68.6 cm) for exhaust vent. ■ Check your ceiling height and the hood height maximum before you select your hood. 1. Wall C. Determine which venting method to make all openings. 7 Range Hood Mounting Screws Installation 1. Fastener locations C. There must be installed into wood. ■ Before making...
... wall for a gas cooking surface, and a suggested maximum of 27" (68.6 cm) for exhaust vent. ■ Check your ceiling height and the hood height maximum before you select your hood. 1. Wall C. Determine which venting method to make all openings. 7 Range Hood Mounting Screws Installation 1. Fastener locations C. There must be installed into wood. ■ Before making...

Use & Care Guide
Page 8
... screws and tighten. Check that back draft dampers work properly. A B C A. Measure from the hood. 7. See "Range Hood Care" section. 3. Vent transition B. 3.5 x 9.5 mm screw For vented installations only: 1. Vent duct E. Place the assembled air deflector and duct over the exhaust outlet. 2. Assemble the air deflector...Air deflector B. Reassemble the air deflector to the bottom of hood (if removed for shipping) with 2 - 3.5 x 9.5 mm sheet metal screws. Lower mounting screws 2. Connect Vent System 1. Fit vent system over the exhaust outlet from the bottom of the air ...
... screws and tighten. Check that back draft dampers work properly. A B C A. Measure from the hood. 7. See "Range Hood Care" section. 3. Vent transition B. 3.5 x 9.5 mm screw For vented installations only: 1. Vent duct E. Place the assembled air deflector and duct over the exhaust outlet. 2. Assemble the air deflector...Air deflector B. Reassemble the air deflector to the bottom of hood (if removed for shipping) with 2 - 3.5 x 9.5 mm sheet metal screws. Lower mounting screws 2. Connect Vent System 1. Fit vent system over the exhaust outlet from the bottom of the air ...

Use & Care Guide
Page 9
...Check that all parts and panels before servicing. NOTE: For vented installations, the upper vent cover may be reversed to yellow-green ground wire (F) in terminal box using both upper and lower vent covers, push lower cover down onto hood and lift upper cover to green and yellow ground wire in ...death or electrical shock. 7. UL listed wire connectors E. Failure to do so can result in terminal box. AB C A. Black wires D. Install Vent Covers When using ...
...Check that all parts and panels before servicing. NOTE: For vented installations, the upper vent cover may be reversed to yellow-green ground wire (F) in terminal box using both upper and lower vent covers, push lower cover down onto hood and lift upper cover to green and yellow ground wire in ...death or electrical shock. 7. UL listed wire connectors E. Failure to do so can result in terminal box. AB C A. Black wires D. Install Vent Covers When using ...

Use & Care Guide
Page 10
...cooking and allow it to operate several minutes after the cooking is designed to clear all smoke and odors from your new range hood, read the "Range Hood Use" section. On/Off light button A B B. Blower speed minimum button D. Press once for On D and again for... quiet operation. Duct cover C. The Blower Off button turns the blower Off. 10 For non-vented (recirculating) installations only, install charcoal filters over metal grease filter. See the "Range Hood Care" section. 2. Blower Off button C. Duct cover holes B. Lamp cover G. Check the operation of ...
...cooking and allow it to operate several minutes after the cooking is designed to clear all smoke and odors from your new range hood, read the "Range Hood Use" section. On/Off light button A B B. Blower speed minimum button D. Press once for On D and again for... quiet operation. Duct cover C. The Blower Off button turns the blower Off. 10 For non-vented (recirculating) installations only, install charcoal filters over metal grease filter. See the "Range Hood Care" section. 2. Blower Off button C. Duct cover holes B. Lamp cover G. Check the operation of ...
Use & Care Guide
Page 11
... handle 2. Push in this section. 2. Replace with bare fingers. Bend spring clips away from range hood. Replace metal grease filter. Disconnect power. 2. A. Push up to 6 months with normal use steel wool or soap-filled scouring pads. Non-Vented (recirculating) Installation Filters: The charcoal filter is not washable. See "Metal Grease Filter" in...
... handle 2. Push in this section. 2. Replace with bare fingers. Bend spring clips away from range hood. Replace metal grease filter. Disconnect power. 2. A. Push up to 6 months with normal use steel wool or soap-filled scouring pads. Non-Vented (recirculating) Installation Filters: The charcoal filter is not washable. See "Metal Grease Filter" in...

