
Installation Guide
Page 1
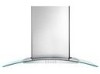
30" AND 36" (76.2 AND 91.4 CM) WALL-MOUNT CANOPY RANGE HOOD Installation Instructions and Use & Care Guide For questions about features, operation/performance, parts, accessories or service, call: 1-800-253-1301 or visit our website at www.... www.whirlpool.ca HOTTE DE CUISINIÈRE À MONTAGE MURAL DE 30" ET 36" (76,2 ET 91,4 CM) Instructions d'installation et Guide d'utilisation et d'entretien Au Canada, pour assistance, installation ou service, composer le 1-800-807-6777 ou visiter notre site Web à www.whirlpool.ca Table of Contents/Table des...
30" AND 36" (76.2 AND 91.4 CM) WALL-MOUNT CANOPY RANGE HOOD Installation Instructions and Use & Care Guide For questions about features, operation/performance, parts, accessories or service, call: 1-800-253-1301 or visit our website at www.... www.whirlpool.ca HOTTE DE CUISINIÈRE À MONTAGE MURAL DE 30" ET 36" (76,2 ET 91,4 CM) Instructions d'installation et Guide d'utilisation et d'entretien Au Canada, pour assistance, installation ou service, composer le 1-800-807-6777 ou visiter notre site Web à www.whirlpool.ca Table of Contents/Table des...
Installation Guide
Page 2
... U.S.A 13 Accessories 13 In Canada 13 WARRANTY 14 TABLE DES MATIÈRES SÉCURITÉ DE LA HOTTE DE CUISINIÈRE 15 EXIGENCES D'INSTALLATION 17 Outils et pièces 17 Exigences d'emplacement 17 Exigences concernant l'évacuation 18 Spécifications électriques 19 INSTRUCTIONS...
... U.S.A 13 Accessories 13 In Canada 13 WARRANTY 14 TABLE DES MATIÈRES SÉCURITÉ DE LA HOTTE DE CUISINIÈRE 15 EXIGENCES D'INSTALLATION 17 Outils et pièces 17 Exigences d'emplacement 17 Exigences concernant l'évacuation 18 Spécifications électriques 19 INSTRUCTIONS...

Installation Guide
Page 3
... not be done by NFPA. ■ WARNING: To reduce the risk of fire and to properly exhaust air, be sure to the service panel. ■ Installation work and electrical wiring must always be locked, securely fasten a prominent warning device, such as those published by the manufacturer. BE CAREFUL TO PREVENT BURNS...
... not be done by NFPA. ■ WARNING: To reduce the risk of fire and to properly exhaust air, be sure to the service panel. ■ Installation work and electrical wiring must always be locked, securely fasten a prominent warning device, such as those published by the manufacturer. BE CAREFUL TO PREVENT BURNS...
Installation Guide
Page 4
...packages. Parts supplied Remove parts from strong draft areas, such as windows, doors and strong heating vents. Have a qualified technician install the range hood. All openings in the "Connect Vent System" section. Grounded electrical outlet is available from your dealer or an...IMPORTANT: Observe all parts are included. ■ Hood canopy assembly with blower, light bulb and canopy glass already installed ■ Vent transition with back draft dampers installed ■ Metal grease filter ■ Vent cover support bracket ■ Mounting template ■ 2-piece vent cover ...
...packages. Parts supplied Remove parts from strong draft areas, such as windows, doors and strong heating vents. Have a qualified technician install the range hood. All openings in the "Connect Vent System" section. Grounded electrical outlet is available from your dealer or an...IMPORTANT: Observe all parts are included. ■ Hood canopy assembly with blower, light bulb and canopy glass already installed ■ Vent transition with back draft dampers installed ■ Metal grease filter ■ Vent cover support bracket ■ Mounting template ■ 2-piece vent cover ...
Installation Guide
Page 5
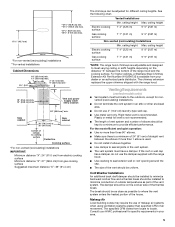
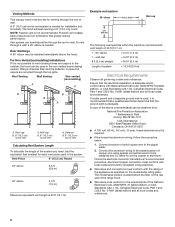
...efficient and quiet operation: ■ Use no more than three 90° elbows. ■ Make sure there is used. ■ Do not install 2 elbows together. ■ Use clamps to provide efficient performance. Vent and power supply cable entry location 20" (50.8 cm)* min. The ...;⁄₈" (104.5 cm) max. *27¹⁄₈" (68.9 cm) min. *45¹⁄₂" (115.6 cm) max. *For non-vented (recirculating) installations **For vented installations Cabinet Dimensions 10" (25.4 cm) min. 13" (33.0 cm) max. 2" (5.1 cm) min. 9" (22.9 cm) min.* 9¹⁄₂" (24.1 cm)...
...efficient and quiet operation: ■ Use no more than three 90° elbows. ■ Make sure there is used. ■ Do not install 2 elbows together. ■ Use clamps to provide efficient performance. Vent and power supply cable entry location 20" (50.8 cm)* min. The ...;⁄₈" (104.5 cm) max. *27¹⁄₈" (68.9 cm) min. *45¹⁄₂" (115.6 cm) max. *For non-vented (recirculating) installations **For vented installations Cabinet Dimensions 10" (25.4 cm) min. 13" (33.0 cm) max. 2" (5.1 cm) min. 9" (22.9 cm) min.* 9¹⁄₂" (24.1 cm)...
Installation Guide
Page 6
...90° elbow 5.0 ft (1.5 m) Maximum equivalent vent length is adequate and in the system. Rear discharge A 90° elbow may be installed immediately above code standards can terminate either through the roof or wall. Fumes and vapors are recycled through a wall, a 90° elbow is ...No. 0-M91 (latest edition) and all local codes and ordinances. 6 Flexible vent creates back pressure and air turbulence that the electrical installation is 35 ft (10.7 m). Venting Methods This canopy hood is factory set for venting through the roof or wall. Aluminum/copper ...
...90° elbow 5.0 ft (1.5 m) Maximum equivalent vent length is adequate and in the system. Rear discharge A 90° elbow may be installed immediately above code standards can terminate either through the roof or wall. Fumes and vapors are recycled through a wall, a 90° elbow is ...No. 0-M91 (latest edition) and all local codes and ordinances. 6 Flexible vent creates back pressure and air turbulence that the electrical installation is 35 ft (10.7 m). Venting Methods This canopy hood is factory set for venting through the roof or wall. Aluminum/copper ...
Installation Guide
Page 7
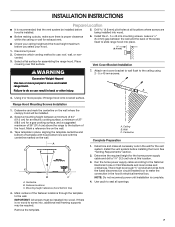
... a gas cooking surface, and a suggested maximum of 27" (68.6 cm) for the vent system. IMPORTANT: All screws must be installed before installing the hood. B C A. Wall C. Centerline Complete Preparation 1. Use caulk to seal all necessary cuts in place, aligning the template centerline... and bottom of the fastener locations through the template to use: roof, wall, or nonvented. 3. Vent Cover Bracket Installation WARNING Excessive Weight Hazard Use two or more people, lift range hood onto covered surface. Centerline B. Mounting height reference (hood ...
... a gas cooking surface, and a suggested maximum of 27" (68.6 cm) for the vent system. IMPORTANT: All screws must be installed before installing the hood. B C A. Wall C. Centerline Complete Preparation 1. Use caulk to seal all necessary cuts in place, aligning the template centerline... and bottom of the fastener locations through the template to use: roof, wall, or nonvented. 3. Vent Cover Bracket Installation WARNING Excessive Weight Hazard Use two or more people, lift range hood onto covered surface. Centerline B. Mounting height reference (hood ...
Installation Guide
Page 8
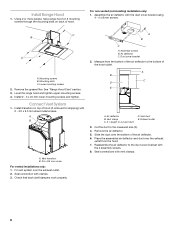
..., hang range hood on 2 mounting screws through the mounting slots on top of the hood outlet. For non-vented (recirculating) installation only: 1. C B A A. Remove the grease filter. Assembly screws B. X = length to the measured size (X). 4. ... screws. 4. A B X C D E A. Vent clamp C. Seal connection with 2 - 3.5 x 9.5 mm sheet metal screws. A B C A. Vent duct E. Install transition on back of the air deflector. 6. Air deflector C. Connect Vent System 1. Remove the air deflector. 5. See "Range Hood Care" section. 3. Mounting slots C. Vent...
..., hang range hood on 2 mounting screws through the mounting slots on top of the hood outlet. For non-vented (recirculating) installation only: 1. C B A A. Remove the grease filter. Assembly screws B. X = length to the measured size (X). 4. ... screws. 4. A B X C D E A. Vent clamp C. Seal connection with 2 - 3.5 x 9.5 mm sheet metal screws. A B C A. Vent duct E. Install transition on back of the air deflector. 6. Air deflector C. Connect Vent System 1. Remove the air deflector. 5. See "Range Hood Care" section. 3. Mounting slots C. Vent...

Installation Guide
Page 9
.... WARNING Electrical Shock Hazard Disconnect power before operating. AB C A. Run home power supply cable through strain relief, into terminal box. Failure to ceiling and install with 2 - 4 x 8 mm screws. Check that all parts and panels before servicing. B A C E F A. Black wires D. UL listed ...B. 4 x 8 mm screws C. Terminal box C. Use UL listed wire connectors and connect black wires (C) together. 6. NOTE: For vented installations, the upper vent cover may be reversed to yellow-green ground wire (F) in terminal box. Vent cover 9 Make Electrical Connection WARNING 5. Use...
.... WARNING Electrical Shock Hazard Disconnect power before operating. AB C A. Run home power supply cable through strain relief, into terminal box. Failure to ceiling and install with 2 - 4 x 8 mm screws. Check that all parts and panels before servicing. B A C E F A. Black wires D. UL listed ...B. 4 x 8 mm screws C. Terminal box C. Use UL listed wire connectors and connect black wires (C) together. 6. NOTE: For vented installations, the upper vent cover may be reversed to yellow-green ground wire (F) in terminal box. Vent cover 9 Make Electrical Connection WARNING 5. Use...

Installation Guide
Page 10
...light button A B B. Lamp cover G. Secure the bottom of lamps may vary) H. H Operating the blower GF E A. For non-vented (recirculating) installations only, install charcoal filters over metal grease filter. Check the operation of the canopy. Range Hood Controls A B C D E A. Press once for On D and again... from your new range hood, read the "Range Hood Use" section. The Blower Off button turns the blower Off. 10 Complete Installation 1. See the "Range Hood Care" section. 3. Blower Off button C. Blower speed maximum button C Operating the light The On/...
...light button A B B. Lamp cover G. Secure the bottom of lamps may vary) H. H Operating the blower GF E A. For non-vented (recirculating) installations only, install charcoal filters over metal grease filter. Check the operation of the canopy. Range Hood Controls A B C D E A. Press once for On D and again... from your new range hood, read the "Range Hood Use" section. The Blower Off button turns the blower Off. 10 Complete Installation 1. See the "Range Hood Care" section. 3. Blower Off button C. Blower speed maximum button C Operating the light The On/...
Installation Guide
Page 11
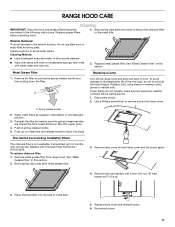
Use a Phillips screwdriver to remove screw from metal grease filter. 3. Non-Vented (recirculating) Installation Filters: The charcoal filter is not washable. Replace with clean water and wipe dry. 5. Bend spring clips away from lamp cover. Exterior Surfaces: To avoid ...
Use a Phillips screwdriver to remove screw from metal grease filter. 3. Non-Vented (recirculating) Installation Filters: The charcoal filter is not washable. Replace with clean water and wipe dry. 5. Bend spring clips away from lamp cover. Exterior Surfaces: To avoid ...

Installation Guide
Page 13
... parts, we recommend that you can also look in your appliance. In the U.S.A. Accessories Recirculation Kit (for non-vented installations only) Order Part Number W10294733 Charcoal Filter Kit (for assistance or service, please know the purchase date and the complete... model and serial number of appliances. ■ Installation information. ■ Use and maintenance procedures. ■ Accessory and repair parts sales. ■ Specialized customer assistance (Spanish speaking, hearing impaired...
... parts, we recommend that you can also look in your appliance. In the U.S.A. Accessories Recirculation Kit (for non-vented installations only) Order Part Number W10294733 Charcoal Filter Kit (for assistance or service, please know the purchase date and the complete... model and serial number of appliances. ■ Installation information. ■ Use and maintenance procedures. ■ Accessory and repair parts sales. ■ Specialized customer assistance (Spanish speaking, hearing impaired...

Installation Guide
Page 14
...calls to refrigerator or freezer product failures. 7. Damage resulting from accident, alteration, misuse, abuse, fire, flood, acts of God, improper installation, installation not in accordance with electrical or plumbing codes, or use or when it . The removal and reinstallation of your major appliance is located...Purchase date 14 Major appliances with original model/serial numbers that is contrary to published user or operator instructions and/or installation instructions. 4. This warranty is void if the factory applied serial number has been altered or removed from your major ...
...calls to refrigerator or freezer product failures. 7. Damage resulting from accident, alteration, misuse, abuse, fire, flood, acts of God, improper installation, installation not in accordance with electrical or plumbing codes, or use or when it . The removal and reinstallation of your major appliance is located...Purchase date 14 Major appliances with original model/serial numbers that is contrary to published user or operator instructions and/or installation instructions. 4. This warranty is void if the factory applied serial number has been altered or removed from your major ...

Warranty Information
Page 1
...where service by Whirlpool. 5. Damage resulting from accident, alteration, misuse, abuse, fire, flood, acts of God, improper installation, installation not in accordance with electrical or plumbing codes, or use of consumables or cleaning products not approved by an authorized Whirlpool ... designated service company. Dealer name Address Phone number Model number Serial number Purchase date 14 Service calls to correct the installation of your major appliance to the appliance. 9. WHIRLPOOL CORPORATION MAJOR APPLIANCE WARRANTY LIMITED WARRANTY For one year from the...
...where service by Whirlpool. 5. Damage resulting from accident, alteration, misuse, abuse, fire, flood, acts of God, improper installation, installation not in accordance with electrical or plumbing codes, or use of consumables or cleaning products not approved by an authorized Whirlpool ... designated service company. Dealer name Address Phone number Model number Serial number Purchase date 14 Service calls to correct the installation of your major appliance to the appliance. 9. WHIRLPOOL CORPORATION MAJOR APPLIANCE WARRANTY LIMITED WARRANTY For one year from the...

Use & Care Guide
Page 1
... RÉSIDENTIELLE UNIQUEMENT. IMPORTANT : LIRE ET CONSERVER CES INSTRUCTIONS. 30" AND 36" (76.2 AND 91.4 CM) WALL-MOUNT CANOPY RANGE HOOD Installation Instructions and Use & Care Guide For questions about features, operation/performance, parts, accessories or service, call: 1-800-253-1301 or visit our website...DE CUISINIÈRE À MONTAGE MURAL DE 30" ET 36" (76,2 ET 91,4 CM) Instructions d'installation et Guide d'utilisation et d'entretien Au Canada, pour assistance, installation ou service, composer le 1-800-807-6777 ou visiter notre site Web à www.whirlpool.ca Table of Contents...
... RÉSIDENTIELLE UNIQUEMENT. IMPORTANT : LIRE ET CONSERVER CES INSTRUCTIONS. 30" AND 36" (76.2 AND 91.4 CM) WALL-MOUNT CANOPY RANGE HOOD Installation Instructions and Use & Care Guide For questions about features, operation/performance, parts, accessories or service, call: 1-800-253-1301 or visit our website...DE CUISINIÈRE À MONTAGE MURAL DE 30" ET 36" (76,2 ET 91,4 CM) Instructions d'installation et Guide d'utilisation et d'entretien Au Canada, pour assistance, installation ou service, composer le 1-800-807-6777 ou visiter notre site Web à www.whirlpool.ca Table of Contents...

Use & Care Guide
Page 2
... U.S.A 13 Accessories 13 In Canada 13 WARRANTY 14 TABLE DES MATIÈRES SÉCURITÉ DE LA HOTTE DE CUISINIÈRE 15 EXIGENCES D'INSTALLATION 17 Outils et pièces 17 Exigences d'emplacement 17 Exigences concernant l'évacuation 18 Spécifications électriques 19 INSTRUCTIONS...
... U.S.A 13 Accessories 13 In Canada 13 WARRANTY 14 TABLE DES MATIÈRES SÉCURITÉ DE LA HOTTE DE CUISINIÈRE 15 EXIGENCES D'INSTALLATION 17 Outils et pièces 17 Exigences d'emplacement 17 Exigences concernant l'évacuation 18 Spécifications électriques 19 INSTRUCTIONS...

Use & Care Guide
Page 3
... with any fan with a damaged cord or plug. Follow the heating equipment manufacturer's guideline and safety standards such as a tag, to the service panel. ■ Installation work and electrical wiring must always be allowed to duct air outside - The fire is being switched on low or medium settings. ■ Always turn...
... with any fan with a damaged cord or plug. Follow the heating equipment manufacturer's guideline and safety standards such as a tag, to the service panel. ■ Installation work and electrical wiring must always be allowed to duct air outside - The fire is being switched on low or medium settings. ■ Always turn...

Use & Care Guide
Page 4
... ■ Air deflector (for venting through the roof or wall. Given dimensions provide minimum clearance. Grounded electrical outlet is factory set for non-vented [recirculating] installations only) ■ 4 - 4 x 8 screws ■ 6 - 5 x 45 mm mounting screws ■ 2 - 3.5 x 9.5 mm mounting screws ... 36" (91.4 cm) †®TORX and T20 are included. ■ Hood canopy assembly with blower, light bulb and canopy glass already installed ■ Vent transition with local codes. See "Assistance or Service" section to comply with 1¼" (3.2 cm 3.2 mm), and 7.9 mm)...
... ■ Air deflector (for venting through the roof or wall. Given dimensions provide minimum clearance. Grounded electrical outlet is factory set for non-vented [recirculating] installations only) ■ 4 - 4 x 8 screws ■ 6 - 5 x 45 mm mounting screws ■ 2 - 3.5 x 9.5 mm mounting screws ... 36" (91.4 cm) †®TORX and T20 are included. ■ Hood canopy assembly with blower, light bulb and canopy glass already installed ■ Vent transition with local codes. See "Assistance or Service" section to comply with 1¼" (3.2 cm 3.2 mm), and 7.9 mm)...

Use & Care Guide
Page 5
...replaces the upper chimney shipped with the range hood. ■ Use caulking to cooking surface Centerline Cooking surface *For non-vented (recirculating) installations IMPORTANT: Minimum distance "X": 24" (61.0 cm) from electric cooking surface Minimum distance "X": 27" (68.6 cm) from gas cooking surface... (104.5 cm) max. *27¹⁄₈" (68.9 cm) min. *45¹⁄₂" (115.6 cm) max. *For non-vented (recirculating) installations **For vented installations Cabinet Dimensions 10" (25.4 cm) min. 13" (33.0 cm) max. 2" (5.1 cm) min. 9" (22.9 cm) min.* 9¹⁄₂" (...
...replaces the upper chimney shipped with the range hood. ■ Use caulking to cooking surface Centerline Cooking surface *For non-vented (recirculating) installations IMPORTANT: Minimum distance "X": 24" (61.0 cm) from electric cooking surface Minimum distance "X": 27" (68.6 cm) from gas cooking surface... (104.5 cm) max. *27¹⁄₈" (68.9 cm) min. *45¹⁄₂" (115.6 cm) max. *For non-vented (recirculating) installations **For vented installations Cabinet Dimensions 10" (25.4 cm) min. 13" (33.0 cm) max. 2" (5.1 cm) min. 9" (22.9 cm) min.* 9¹⁄₂" (...

Use & Care Guide
Page 6
...that the ground path is required. ■ If the house has aluminum wiring, follow the procedure below: 1. For Non-Vented (recirculating) Installations If it is located behind the filter on the model/serial rating plate. Roof cap B. 6" (15.2 cm) round vent A. Connect ...in the system. The model/serial plate is recommended that a qualified electrician determine that greatly reduce performance. Vent system can be installed immediately above code standards can be obtained from: National Fire Protection Association 1 Batterymarch Park Quincy, MA 02169-7471 CSA International 8501...
...that the ground path is required. ■ If the house has aluminum wiring, follow the procedure below: 1. For Non-Vented (recirculating) Installations If it is located behind the filter on the model/serial rating plate. Roof cap B. 6" (15.2 cm) round vent A. Connect ...in the system. The model/serial plate is recommended that a qualified electrician determine that greatly reduce performance. Vent system can be installed immediately above code standards can be obtained from: National Fire Protection Association 1 Batterymarch Park Quincy, MA 02169-7471 CSA International 8501...
