
Installation Guide
Page 3
... appliance. This symbol alerts you to reduce the chance of others . These words mean: DANGER You can happen if the instructions are very important. RANGE HOOD SAFETY Your safety and the safety of injury, and tell you what the potential hazard is the safety alert symbol. Always read and obey all...
... appliance. This symbol alerts you to reduce the chance of others . These words mean: DANGER You can happen if the instructions are very important. RANGE HOOD SAFETY Your safety and the safety of injury, and tell you what the potential hazard is the safety alert symbol. Always read and obey all...
Installation Guide
Page 4
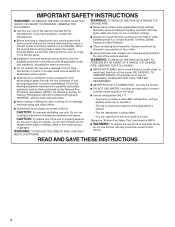
... IN THE EVENT OF A RANGE TOP GREASE FIRE, OBSERVE THE FOLLOWING:a ■ SMOTHER FLAMES with a close fitting lid, cookie sheet, or metal tray, then turn hood ON when cooking at high heat or when flambeing food (i.e. BE CAREFUL TO PREVENT BURNS. The fire is small and contained in accordance with your...
... IN THE EVENT OF A RANGE TOP GREASE FIRE, OBSERVE THE FOLLOWING:a ■ SMOTHER FLAMES with a close fitting lid, cookie sheet, or metal tray, then turn hood ON when cooking at high heat or when flambeing food (i.e. BE CAREFUL TO PREVENT BURNS. The fire is small and contained in accordance with your...

Installation Guide
Page 5
... need: ■ Recirculation Kit Part Number W10349327 for venting through the roof or wall. Check that are included. ■ Hood canopy assembly with ventilator and light bulbs installed ■ Vent transition with back draft dampers installed ■ Metal grease filter(s) ... for Mobile Home Construction and Safety, Title 24, HUD, Part 280) or when such standard is a registered trademark of the vent hood. Given dimensions provide minimum clearance. INSTALLATION REQUIREMENTS Tools and Parts Gather the required tools and parts before starting installation. Have a qualified technician...
... need: ■ Recirculation Kit Part Number W10349327 for venting through the roof or wall. Check that are included. ■ Hood canopy assembly with ventilator and light bulbs installed ■ Vent transition with back draft dampers installed ■ Metal grease filter(s) ... for Mobile Home Construction and Safety, Title 24, HUD, Part 280) or when such standard is a registered trademark of the vent hood. Given dimensions provide minimum clearance. INSTALLATION REQUIREMENTS Tools and Parts Gather the required tools and parts before starting installation. Have a qualified technician...

Installation Guide
Page 6
...61.0 cm) from gas cooking surfaces. NOTE: Flexible vent is 6" (15.2 cm) round. Consult your HVAC professional for installation (not included). The hood exhaust opening around the cap. ■ The size of the vent should be uniform. Minimum distance "X": 27" (68.6 cm) from electric cooking ...depending on the cold air side of the thermal break. ceiling height 7' 5" (2.26 m) 9' 6" (2.9 m) 7' 8" (2.34 m) 9' 6" (2.9 m) *NOTE: The range hood chimneys are adjustable and designed to seal all joints in an attic or other enclosed area. ■ Do not use of makeup air systems when...
...61.0 cm) from gas cooking surfaces. NOTE: Flexible vent is 6" (15.2 cm) round. Consult your HVAC professional for installation (not included). The hood exhaust opening around the cap. ■ The size of the vent should be uniform. Minimum distance "X": 27" (68.6 cm) from electric cooking ...depending on the cold air side of the thermal break. ceiling height 7' 5" (2.26 m) 9' 6" (2.9 m) 7' 8" (2.34 m) 9' 6" (2.9 m) *NOTE: The range hood chimneys are adjustable and designed to seal all joints in an attic or other enclosed area. ■ Do not use of makeup air systems when...

Installation Guide
Page 7
See the "Assistance or Service" section for information on the rear wall of the range hood. ■ Wire sizes must conform with the rating of the system you need, add the equivalent feet (meters) for joining copper to aluminum. Roof Venting ... System Length To calculate the length of the appliance as specified on the model/serial rating plate. Connect the aluminum wiring to the outside, the hood can be used in the non-vented (recirculating) version, by fitting a charcoal filter and the deflector. The model/serial plate is required. ■ If the...
See the "Assistance or Service" section for information on the rear wall of the range hood. ■ Wire sizes must conform with the rating of the system you need, add the equivalent feet (meters) for joining copper to aluminum. Roof Venting ... System Length To calculate the length of the appliance as specified on the model/serial rating plate. Connect the aluminum wiring to the outside, the hood can be used in the non-vented (recirculating) version, by fitting a charcoal filter and the deflector. The model/serial plate is required. ■ If the...

Installation Guide
Page 8
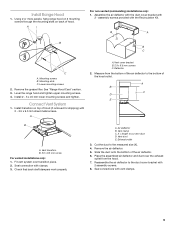
... and insert anchors flush with the centerline marked on the wall. Run the home power supply cable according to wall. Use caulk to slide range hood into , additional wall framing supports may be required. Select a flat surface for the vent system. Install 2 - 5 x 45 mm mounting ... into wood. 10. NOTE: Do not reconnect power until installation is installed. 8. Place covering over that the vent system be installed before installing the hood. Centerline on wall about ¹⁄₈" (3.0 mm) away from the fused disconnect (or circuit breaker) box to use: roof, wall, or...
... and insert anchors flush with the centerline marked on the wall. Run the home power supply cable according to wall. Use caulk to slide range hood into , additional wall framing supports may be required. Select a flat surface for the vent system. Install 2 - 5 x 45 mm mounting ... into wood. 10. NOTE: Do not reconnect power until installation is installed. 8. Place covering over that the vent system be installed before installing the hood. Centerline on wall about ¹⁄₈" (3.0 mm) away from the fused disconnect (or circuit breaker) box to use: roof, wall, or...
Installation Guide
Page 9
...cut vent duct D. Place the assembled air deflector and duct over transition piece. 2. Reassemble the air deflector to the bottom of hood (if removed for shipping) with 2 - Seal connections with 2 assembly screws. 8. Remove the grease filter. Seal connection with ...the Recirculation Kit. Vent duct E. Slide the duct onto the bottom of hood. assembly screws provided with clamps. 3. Connect Vent System 1. Vent cover bracket B. 2.9 x 6.5 mm screws C. Check that back draft dampers work ...
...cut vent duct D. Place the assembled air deflector and duct over transition piece. 2. Reassemble the air deflector to the bottom of hood (if removed for shipping) with 2 - Seal connections with 2 assembly screws. 8. Remove the grease filter. Seal connection with ...the Recirculation Kit. Vent duct E. Slide the duct onto the bottom of hood. assembly screws provided with clamps. 3. Connect Vent System 1. Vent cover bracket B. 2.9 x 6.5 mm screws C. Check that back draft dampers work ...
Installation Guide
Page 10
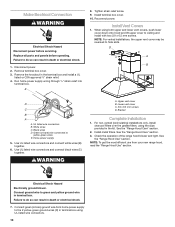
... UL listed or CSA approved ¹⁄₂" strain relief. 4. Connect green (or bare) ground wire from your new range hood, read the "Range Hood Use" section. Disconnect power. 2. When using UL listed wire connectors. 10 Use UL listed wire connectors and connect black wires ...the grease filters, using the clips provided in terminal box. Reconnect power. WARNING A. Bracket Complete Installation 1. Check the operation of the range hood blower and light. Remove the knockout in death or electrical shock. 7. E 8. Green (or bare) wire connected to hide slots. Use...
... UL listed or CSA approved ¹⁄₂" strain relief. 4. Connect green (or bare) ground wire from your new range hood, read the "Range Hood Use" section. Disconnect power. 2. When using UL listed wire connectors. 10 Use UL listed wire connectors and connect black wires ...the grease filters, using the clips provided in terminal box. Reconnect power. WARNING A. Bracket Complete Installation 1. Check the operation of the range hood blower and light. Remove the knockout in death or electrical shock. 7. E 8. Green (or bare) wire connected to hide slots. Use...

Installation Guide
Page 11
...Incandescent lamp housings The BLOWER SPEED buttons turn the blower off and speed minimum button C. Blower speed medium button D. Grease filter B. The hood controls are located on the front panel on and control the blower speed and sound level for Off. Operating the blower D A. Blower and... be changed anytime during fan operation by pressing the desired blower speed button. Grease filter handle C. For best results, start the hood before cooking and allow it to operate several minutes after the cooking is designed to remove smoke, cooking vapors and odors from the kitchen...
...Incandescent lamp housings The BLOWER SPEED buttons turn the blower off and speed minimum button C. Blower speed medium button D. Grease filter B. The hood controls are located on the front panel on and control the blower speed and sound level for Off. Operating the blower D A. Blower and... be changed anytime during fan operation by pressing the desired blower speed button. Grease filter handle C. For best results, start the hood before cooking and allow it to operate several minutes after the cooking is designed to remove smoke, cooking vapors and odors from the kitchen...

Installation Guide
Page 12
.... Remove lens cover and set lens cover and the screw aside. Replace with clean water and wipe dry. Bend spring clips away from range hood. Lens covers B. Reconnect power. 12 Bend spring clips back into place. 6. Cleaning Method: ■ Liquid detergent soap and water, or ...ordering. See "Metal Grease Filter" in this section. 2. Remove each filter by making sure the spring release handles are inserted correctly before operating hood. 3. Place charcoal filter into upper track. 4. Repeat steps 1-5 for information on metal filter and release handle to latch into place to ...
.... Remove lens cover and set lens cover and the screw aside. Replace with clean water and wipe dry. Bend spring clips away from range hood. Lens covers B. Reconnect power. 12 Bend spring clips back into place. 6. Cleaning Method: ■ Liquid detergent soap and water, or ...ordering. See "Metal Grease Filter" in this section. 2. Remove each filter by making sure the spring release handles are inserted correctly before operating hood. 3. Place charcoal filter into upper track. 4. Repeat steps 1-5 for information on metal filter and release handle to latch into place to ...

