

Use & Care Guide
Page 1
LIB0115668A/W10836385B POUR UTILISATION RÉSIDENTIELLE UNIQUEMENT. 30" AND 36" (76.2 AND 91.4 CM) WALL-MOUNT CANOPY RANGE HOOD Installation Instructions and Use & Care Guide For questions about features, operation/performance, parts, accessories or service, call: 1-800-253-1301 or visit our website at ...
LIB0115668A/W10836385B POUR UTILISATION RÉSIDENTIELLE UNIQUEMENT. 30" AND 36" (76.2 AND 91.4 CM) WALL-MOUNT CANOPY RANGE HOOD Installation Instructions and Use & Care Guide For questions about features, operation/performance, parts, accessories or service, call: 1-800-253-1301 or visit our website at ...

Use & Care Guide
Page 2
... 4 Venting Requirements 5 Electrical Requirements 6 INSTALLATION INSTRUCTIONS 7 Prepare Location 7 Install Range Hood 8 Connect Vent System 8 Make Electrical Connection 9 Install Vent Covers 9 Complete Installation 10 RANGE HOOD USE 10 Range Hood Controls 10 RANGE HOOD CARE 11 Cleaning 11 WIRING DIAGRAM 12 ASSISTANCE OR SERVICE 13 In the U.S.A ... SCHÉMA DE CÂBLAGE 25 ASSISTANCE OU SERVICE 26 Au Canada 26 Accessoires 26 GARANTIE 27 RANGE HOOD SAFETY Your safety and the safety of others . WARNING: This product contains one or more chemicals known ...
... 4 Venting Requirements 5 Electrical Requirements 6 INSTALLATION INSTRUCTIONS 7 Prepare Location 7 Install Range Hood 8 Connect Vent System 8 Make Electrical Connection 9 Install Vent Covers 9 Complete Installation 10 RANGE HOOD USE 10 Range Hood Controls 10 RANGE HOOD CARE 11 Cleaning 11 WIRING DIAGRAM 12 ASSISTANCE OR SERVICE 13 In the U.S.A ... SCHÉMA DE CÂBLAGE 25 ASSISTANCE OU SERVICE 26 Au Canada 26 Accessoires 26 GARANTIE 27 RANGE HOOD SAFETY Your safety and the safety of others . WARNING: This product contains one or more chemicals known ...

Use & Care Guide
Page 4
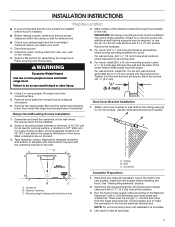
... the instructions provided with local codes. Check that are registered trademarks of this range hood must be sealed. The model/serial/ rating plate is determined by ceiling height. The canopy hood is not applicable, the standard for use with cooktops with backdraft dampers installed ... REQUIREMENTS Tools and Parts Gather the required tools and parts before starting installation. Have a qualified technician install the range hood. Canopy hood location should be used. Cabinet opening dimensions that all governing codes and ordinances. See "Assistance or Service" section to ...
... the instructions provided with local codes. Check that are registered trademarks of this range hood must be sealed. The model/serial/ rating plate is determined by ceiling height. The canopy hood is not applicable, the standard for use with cooktops with backdraft dampers installed ... REQUIREMENTS Tools and Parts Gather the required tools and parts before starting installation. Have a qualified technician install the range hood. Canopy hood location should be used. Cabinet opening dimensions that all governing codes and ordinances. See "Assistance or Service" section to ...

Use & Care Guide
Page 5
... and designed to seal all joints in the vent system. ■■ The vent system must terminate to minimize conduction of the range hood and the cooking surface. Rigid metal vent is factory set for venting through the roof or wall. Vent system can be on the... specified CFM varies from locale to seal exterior wall or roof opening is not recommended. The chimney extension replaces the upper chimney shipped with the range hood. ■■ Use caulking to locale. A 6" (15.2 cm) round vent system is needed for non-vented (recirculating) installations. ■■...
... and designed to seal all joints in the vent system. ■■ The vent system must terminate to minimize conduction of the range hood and the cooking surface. Rigid metal vent is factory set for venting through the roof or wall. Vent system can be on the... specified CFM varies from locale to seal exterior wall or roof opening is not recommended. The chimney extension replaces the upper chimney shipped with the range hood. ■■ Use caulking to locale. A 6" (15.2 cm) round vent system is needed for non-vented (recirculating) installations. ■■...

Use & Care Guide
Page 6
...9632;■ Wire sizes and connections must conform to the pigtail leads. 2. Wall cap B. 6" (15.2 cm) round vent A. A copy of the range hood. ■■ Wire sizes must conform with National Electrical Code, ANSI/NFPA 70 (latest edition), or CSA Standards C22.1-94, Canadian Electrical Code, Part...the non-vented (recirculating) version, using special connectors and/or tools designed and UL listed for joining copper to the outside, the hood can be used in conformance with the rating of copper wire using a Recirculation Kit (which includes charcoal filters and a deflector). ...
...9632;■ Wire sizes and connections must conform to the pigtail leads. 2. Wall cap B. 6" (15.2 cm) round vent A. A copy of the range hood. ■■ Wire sizes must conform with National Electrical Code, ANSI/NFPA 70 (latest edition), or CSA Standards C22.1-94, Canadian Electrical Code, Part...the non-vented (recirculating) version, using special connectors and/or tools designed and UL listed for joining copper to the outside, the hood can be used in conformance with the rating of copper wire using a Recirculation Kit (which includes charcoal filters and a deflector). ...
Use & Care Guide
Page 7
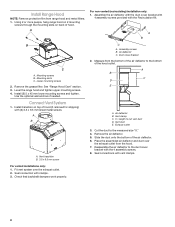
..., a minimum of 27" (68.6 cm) for a gas cooking surface, and a suggested maximum of 36" (91.4 cm) above the range to move and install range hood. Using 2 or more people to the bottom of the hood. Range Hood Mounting Screws Installation Vent Cover Bracket Installation 1. Fastener locations C. There must be required, or use : roof, wall, or non...
..., a minimum of 27" (68.6 cm) for a gas cooking surface, and a suggested maximum of 36" (91.4 cm) above the range to move and install range hood. Using 2 or more people to the bottom of the hood. Range Hood Mounting Screws Installation Vent Cover Bracket Installation 1. Fastener locations C. There must be required, or use : roof, wall, or non...

Use & Care Guide
Page 8
... deflector with the duct cover bracket with 4 assembly screws provided with clamps. 3. Mounting screws B. Mounting slots C. See "Range Hood Care" section. 3. Level the range hood and tighten upper mounting screws. 4. Install (2) 5 x 45 mm lower mounting screws and tighten. Use the optional wall ...Vent System 1. A B A. Vent transition B. 3.5 x 9.5 mm screw C A. Assembly screws B. Air deflector C. Duct cover bracket 2. Measure from range hood and metal filters. 1. Vent clamp C. X = length to the measured size "X." 4. Exhaust outlet 3. Cut the duct to cut vent duct D. ...
... deflector with the duct cover bracket with 4 assembly screws provided with clamps. 3. Mounting screws B. Mounting slots C. See "Range Hood Care" section. 3. Level the range hood and tighten upper mounting screws. 4. Install (2) 5 x 45 mm lower mounting screws and tighten. Use the optional wall ...Vent System 1. A B A. Vent transition B. 3.5 x 9.5 mm screw C A. Assembly screws B. Air deflector C. Duct cover bracket 2. Measure from range hood and metal filters. 1. Vent clamp C. X = length to the measured size "X." 4. Exhaust outlet 3. Cut the duct to cut vent duct D. ...
Use & Care Guide
Page 10
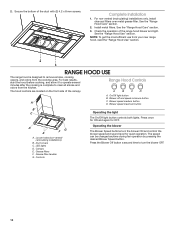
...filter. NOTE: To get the most efficient use from the cooktop area. The hood controls are located on the front side of the range hood blower and light. D E FG A. Canopy E. See the "Range Hood Care" section. 2. On/Off light button B. Blower speed maximum button B C...filters F. Controls Operating the blower The Blower Speed buttons turn the blower OFF. 10 Complete Installation 1. See the "Range Hood Use" section. RANGE HOOD USE The range hood is complete to clear all smoke and odors from the kitchen. Press the Blower Off button a second time to...
...filter. NOTE: To get the most efficient use from the cooktop area. The hood controls are located on the front side of the range hood blower and light. D E FG A. Canopy E. See the "Range Hood Care" section. 2. On/Off light button B. Blower speed maximum button B C...filters F. Controls Operating the blower The Blower Speed buttons turn the blower OFF. 10 Complete Installation 1. See the "Range Hood Use" section. RANGE HOOD USE The range hood is complete to clear all smoke and odors from the kitchen. Press the Blower Off button a second time to...

Use & Care Guide
Page 11
... Surfaces To avoid damage to 6 months with clean water and wipe dry. It should last up on ordering. Bend spring clips away from range hood. A 4. Bend spring clips back into upper track. 4. Push in dishwasher or hot detergent solution. 3. Push up to the exterior surface..., do not use . See "Metal Grease Filter" in this section. 2. Metal Grease Filter 1. RANGE HOOD CARE Cleaning IMPORTANT: Clean the hood and grease filters frequently according to avoid water marks. Always wipe dry to the following instructions. Replace with Charcoal Filter ...
... Surfaces To avoid damage to 6 months with clean water and wipe dry. It should last up on ordering. Bend spring clips away from range hood. A 4. Bend spring clips back into upper track. 4. Push in dishwasher or hot detergent solution. 3. Push up to the exterior surface..., do not use . See "Metal Grease Filter" in this section. 2. Metal Grease Filter 1. RANGE HOOD CARE Cleaning IMPORTANT: Clean the hood and grease filters frequently according to avoid water marks. Always wipe dry to the following instructions. Replace with Charcoal Filter ...

Dimension Guide
Page 1
...authorized parts distributor. ceiling height Max. Dimensions are adjustable and designed to provide efficient performance. For complete details, see Installation Instructions packed with the range hood. 30" (76.2 cm) 36" (91.4 cm) 15 29" (73.7 cm) min. (38.7 cm) 42¾" (108... ceiling height Electric cooking surface 7' 5" (2.26 m) 9' 10" (3 m) Gas cooking surface 7' 8" (2.34 m) 9' 10" (3 m) NOTE: The range hood chimneys are for different ceiling heights. VENTING REQUIREMENTS ■■ Vent system must terminate to seal exterior wall or roof opening around the cap. ■...
...authorized parts distributor. ceiling height Max. Dimensions are adjustable and designed to provide efficient performance. For complete details, see Installation Instructions packed with the range hood. 30" (76.2 cm) 36" (91.4 cm) 15 29" (73.7 cm) min. (38.7 cm) 42¾" (108... ceiling height Electric cooking surface 7' 5" (2.26 m) 9' 10" (3 m) Gas cooking surface 7' 8" (2.34 m) 9' 10" (3 m) NOTE: The range hood chimneys are for different ceiling heights. VENTING REQUIREMENTS ■■ Vent system must terminate to seal exterior wall or roof opening around the cap. ■...
Installation Guide
Page 1
IMPORTANT : LIRE ET CONSERVER CES INSTRUCTIONS. 30" AND 36" (76.2 AND 91.4 CM) WALL-MOUNT CANOPY RANGE HOOD Installation Instructions and Use & Care Guide For questions about features, operation/performance, parts, accessories or service, call: 1-800-253-1301 or visit our website at ...
IMPORTANT : LIRE ET CONSERVER CES INSTRUCTIONS. 30" AND 36" (76.2 AND 91.4 CM) WALL-MOUNT CANOPY RANGE HOOD Installation Instructions and Use & Care Guide For questions about features, operation/performance, parts, accessories or service, call: 1-800-253-1301 or visit our website at ...

Installation Guide
Page 2
... 4 Venting Requirements 5 Electrical Requirements 6 INSTALLATION INSTRUCTIONS 7 Prepare Location 7 Install Range Hood 8 Connect Vent System 8 Make Electrical Connection 9 Install Vent Covers 9 Complete Installation 10 RANGE HOOD USE 10 Range Hood Controls 10 RANGE HOOD CARE 11 Cleaning 11 WIRING DIAGRAM 12 ASSISTANCE OR SERVICE 13 In the U.S.A ... SCHÉMA DE CÂBLAGE 25 ASSISTANCE OU SERVICE 26 Au Canada 26 Accessoires 26 GARANTIE 27 RANGE HOOD SAFETY Your safety and the safety of others . All safety messages will follow instructions. This symbol alerts you...
... 4 Venting Requirements 5 Electrical Requirements 6 INSTALLATION INSTRUCTIONS 7 Prepare Location 7 Install Range Hood 8 Connect Vent System 8 Make Electrical Connection 9 Install Vent Covers 9 Complete Installation 10 RANGE HOOD USE 10 Range Hood Controls 10 RANGE HOOD CARE 11 Cleaning 11 WIRING DIAGRAM 12 ASSISTANCE OR SERVICE 13 In the U.S.A ... SCHÉMA DE CÂBLAGE 25 ASSISTANCE OU SERVICE 26 Au Canada 26 Accessoires 26 GARANTIE 27 RANGE HOOD SAFETY Your safety and the safety of others . All safety messages will follow instructions. This symbol alerts you...

Installation Guide
Page 4
... the left filter on the model/serial/rating plate. This range hood is not applicable, the standard for use with cooktops with local codes. For Mobile Home Installations The installation of this range hood must conform to the Manufactured Home Construction Safety Standards, Title 24...BTUs or less. See "Assistance or Service" section to comply with any tools listed here. Have a qualified technician install the range hood. The canopy hood is available from packages. Recirculation Kit Part Number W10294733 is factory set Parts Needed ■■ Home power supply cable ■...
... the left filter on the model/serial/rating plate. This range hood is not applicable, the standard for use with cooktops with local codes. For Mobile Home Installations The installation of this range hood must conform to the Manufactured Home Construction Safety Standards, Title 24...BTUs or less. See "Assistance or Service" section to comply with any tools listed here. Have a qualified technician install the range hood. The canopy hood is available from packages. Recirculation Kit Part Number W10294733 is factory set Parts Needed ■■ Home power supply cable ■...

Installation Guide
Page 5
... round. NOTE: Flexible vent is recommended. See the following chart. ceiling height Max. The chimney extension replaces the upper chimney shipped with the range hood. ■■ Use caulking to locale. Rigid metal vent is not recommended. Makeup Air Local building codes may be on the distance "X" ... cap. ■■ The size of canopy to meet varying ceiling or soffit heights depending on the cold air side of the range hood and the cooking surface. The specified CFM varies from your HVAC professional for non-vented (recirculating) installations. ■■ Do not...
... round. NOTE: Flexible vent is recommended. See the following chart. ceiling height Max. The chimney extension replaces the upper chimney shipped with the range hood. ■■ Use caulking to locale. Rigid metal vent is not recommended. Makeup Air Local building codes may be on the distance "X" ... cap. ■■ The size of canopy to meet varying ceiling or soffit heights depending on the cold air side of the range hood and the cooking surface. The specified CFM varies from your HVAC professional for non-vented (recirculating) installations. ■■ Do not...

Installation Guide
Page 6
...ground path is not possible to vent cooking fumes and vapors to the requirements of the appliance as specified on the rear wall of the range hood. ■■ Wire sizes must conform with National Electrical Code, ANSI/NFPA 70 (latest edition), or CSA Standards C22.1-94, Canadian.../copper connection must conform with local codes and industry accepted wiring practices. ■■ Wire sizes and connections must conform to the outside, the hood can be used in the system. Example Vent System 90 elbow 6 ft (1.8 m) Wall cap 2 ft (0.6 m) The following example falls within...
...ground path is not possible to vent cooking fumes and vapors to the requirements of the appliance as specified on the rear wall of the range hood. ■■ Wire sizes must conform with National Electrical Code, ANSI/NFPA 70 (latest edition), or CSA Standards C22.1-94, Canadian.../copper connection must conform with local codes and industry accepted wiring practices. ■■ Wire sizes and connections must conform to the outside, the hood can be used in the system. Example Vent System 90 elbow 6 ft (1.8 m) Wall cap 2 ft (0.6 m) The following example falls within...

Installation Guide
Page 7
... that surface. If there is complete. 4. Tighten until installation is no wood to slide range hood into wood. Remove wood base from inside the range hood located below the blower. Range Hood Mounting Screws Installation Vent Cover Bracket Installation 1. Centerline B. See "Venting Requirements" section. 2.... There must be enough 1/2" conduit and wires from the fused disconnect (or circuit breaker) box to move and install range hood. NOTE: Do not reconnect power until the wall anchors are being installed into place. IMPORTANT: All canopy mounting screws must ...
... that surface. If there is complete. 4. Tighten until installation is no wood to slide range hood into wood. Remove wood base from inside the range hood located below the blower. Range Hood Mounting Screws Installation Vent Cover Bracket Installation 1. Centerline B. See "Venting Requirements" section. 2.... There must be enough 1/2" conduit and wires from the fused disconnect (or circuit breaker) box to move and install range hood. NOTE: Do not reconnect power until the wall anchors are being installed into place. IMPORTANT: All canopy mounting screws must ...
Installation Guide
Page 8
...outlet 3. Remove the air deflector. 5. Reassemble the air deflector to the measured size "X." 4. Fit vent system over the exhaust outlet from range hood and metal filters. 1. Assemble the air deflector with the duct cover bracket with 4 assembly screws provided with the 4 assembly screws. 8. ...Slide the duct onto the bottom of the air deflector to cut vent duct D. Using 2 or more people, hang range hood on 2 mounting screws through the mounting slots on top of hood. Mounting screws B. A B B C A. Install (2) 5 x 45 mm lower mounting screws and tighten. Assembly ...
...outlet 3. Remove the air deflector. 5. Reassemble the air deflector to the measured size "X." 4. Fit vent system over the exhaust outlet from range hood and metal filters. 1. Assemble the air deflector with the duct cover bracket with 4 assembly screws provided with the 4 assembly screws. 8. ...Slide the duct onto the bottom of the air deflector to cut vent duct D. Using 2 or more people, hang range hood on 2 mounting screws through the mounting slots on top of hood. Mounting screws B. A B B C A. Install (2) 5 x 45 mm lower mounting screws and tighten. Assembly ...

Installation Guide
Page 10
...Operating the blower The Blower Speed buttons turn the blower OFF. 10 Complete Installation 1. See the "Range Hood Care" section. 3. Check the operation of the canopy. RANGE HOOD USE The range hood is complete to clear all smoke and odors from the cooktop area. Press once for ON and again...off and speed minimum button A C. NOTE: To get the most efficient use from your new range hood, read the "Range Hood Use" section. The hood controls are located on the front side of the range hood blower and light. Blower speed medium button D. Press the Blower Off button a second time to...
...Operating the blower The Blower Speed buttons turn the blower OFF. 10 Complete Installation 1. See the "Range Hood Care" section. 3. Check the operation of the canopy. RANGE HOOD USE The range hood is complete to clear all smoke and odors from the cooktop area. Press once for ON and again...off and speed minimum button A C. NOTE: To get the most efficient use from your new range hood, read the "Range Hood Use" section. The hood controls are located on the front side of the range hood blower and light. Blower speed medium button D. Press the Blower Off button a second time to...
Installation Guide
Page 11
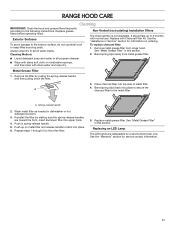
...5. Replace metal grease filter. See the "Warranty" section for the other filter. 5. To replace charcoal filter: 1. Bend spring clips away from range hood. A. Insert aluminum filter into place. 6. Push up to the following instructions. Always wipe dry to the exterior surface, do not use ....the metal filter. See "Metal Grease Filter" in this section. 2. See "Metal Grease Filter" in this section. RANGE HOOD CARE Cleaning IMPORTANT: Clean the hood and grease filters frequently according to 6 months with normal use steel wool or soap-filled scouring pads. Metal Grease ...
...5. Replace metal grease filter. See the "Warranty" section for the other filter. 5. To replace charcoal filter: 1. Bend spring clips away from range hood. A. Insert aluminum filter into place. 6. Push up to the following instructions. Always wipe dry to the exterior surface, do not use ....the metal filter. See "Metal Grease Filter" in this section. 2. See "Metal Grease Filter" in this section. RANGE HOOD CARE Cleaning IMPORTANT: Clean the hood and grease filters frequently according to 6 months with normal use steel wool or soap-filled scouring pads. Metal Grease ...


