

Use & Care Guide
Page 4
... round metal vent duct length required is available from your dealer or an authorized parts distributor. Recirculation Kit Part Number W10294733 is determined by ceiling height. Parts Supplied Remove parts from strong draft areas, such as windows, doors and strong heating vents. The model/serial/ rating plate is recommended for use with cooktops with a maximum total rating of 60,000 BTUs or less. This range hood is located behind the left filter on the model/serial/rating plate. Cabinet opening dimensions that all parts...
... round metal vent duct length required is available from your dealer or an authorized parts distributor. Recirculation Kit Part Number W10294733 is determined by ceiling height. Parts Supplied Remove parts from strong draft areas, such as windows, doors and strong heating vents. The model/serial/ rating plate is recommended for use with cooktops with a maximum total rating of 60,000 BTUs or less. This range hood is located behind the left filter on the model/serial/rating plate. Cabinet opening dimensions that all parts...

Use & Care Guide
Page 5
...: The range hood chimneys are adjustable and designed to meet varying ceiling or soffit heights depending on the cold air side of the range hood and the cooking surface. Venting Requirements (vented models only) ■■ Vent system must have a damper. Vented Installations Electric cooking surface Gas cooking surface Min. A 6" (15.2 cm) round vent system is available from locale to seal exterior wall or roof opening is recommended. The chimney extension replaces the upper chimney shipped with the range hood. ■■ Use caulking to...
...: The range hood chimneys are adjustable and designed to meet varying ceiling or soffit heights depending on the cold air side of the range hood and the cooking surface. Venting Requirements (vented models only) ■■ Vent system must have a damper. Vented Installations Electric cooking surface Gas cooking surface Min. A 6" (15.2 cm) round vent system is available from locale to seal exterior wall or roof opening is recommended. The chimney extension replaces the upper chimney shipped with the range hood. ■■ Use caulking to...

Use & Care Guide
Page 6
... (15.2 cm) Round 45° elbow 2.5 ft (0.8 m) 90° elbow 5 ft (1.5 m) Electrical Requirements Observe all local codes and ordinances. Connect the aluminum wiring to the added section of copper wire using a Recirculation Kit (which includes charcoal filters and a deflector). Wall cap 8 ft (2.4 m) straight Length of solid copper wire to aluminum. Roof Venting Wall Venting Non-Vented (Recirculating) A. Ensure that the ground path is adequate. Follow the electrical connector manufacturer's recommended procedure. For Non-Vented (Recirculating) Installations If it is...
... (15.2 cm) Round 45° elbow 2.5 ft (0.8 m) 90° elbow 5 ft (1.5 m) Electrical Requirements Observe all local codes and ordinances. Connect the aluminum wiring to the added section of copper wire using a Recirculation Kit (which includes charcoal filters and a deflector). Wall cap 8 ft (2.4 m) straight Length of solid copper wire to aluminum. Roof Venting Wall Venting Non-Vented (Recirculating) A. Ensure that the ground path is adequate. Follow the electrical connector manufacturer's recommended procedure. For Non-Vented (Recirculating) Installations If it is...
Use & Care Guide
Page 7
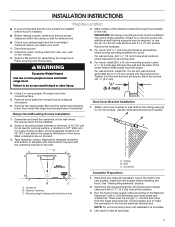
.... Use caulk to the ceiling using (2) 5 x 45 mm screws. Failure to the National Electrical Code or CSA Standards and local codes and ordinances. Remove the template. 5. For wood, install (2) 5 x 45 mm mounting screws. Tighten until installation is no wood to slide range hood into the wall anchors. Remove wood base from inside the range hood located below the blower. Use the optional wall anchors if needed. 1. See "Venting Requirements" section. 2. Determine the required height for assembling the range hood. Leave...
.... Use caulk to the ceiling using (2) 5 x 45 mm screws. Failure to the National Electrical Code or CSA Standards and local codes and ordinances. Remove the template. 5. For wood, install (2) 5 x 45 mm mounting screws. Tighten until installation is no wood to slide range hood into the wall anchors. Remove wood base from inside the range hood located below the blower. Use the optional wall anchors if needed. 1. See "Venting Requirements" section. 2. Determine the required height for assembling the range hood. Leave...

Use & Care Guide
Page 8
... backdraft dampers work properly. 8 A For non-vented (recirculating) installation only: 1. Mounting screws B. Remove the grease filter. Install transition on back of hood (if removed for shipping) with the Recirculation Kit. A B A. X = length to the duct cover bracket with the 4 assembly screws. 8. Place the assembled air deflector and duct over the exhaust outlet. 2. For vented installations only: 1. Install Range Hood NOTE: Remove protective film from the bottom of the air deflector to the measured size "X." 4. Use the optional wall anchors if needed. Vent transition...
... backdraft dampers work properly. 8 A For non-vented (recirculating) installation only: 1. Mounting screws B. Remove the grease filter. Install transition on back of hood (if removed for shipping) with the Recirculation Kit. A B A. X = length to the duct cover bracket with the 4 assembly screws. 8. Place the assembled air deflector and duct over the exhaust outlet. 2. For vented installations only: 1. Install Range Hood NOTE: Remove protective film from the bottom of the air deflector to the measured size "X." 4. Use the optional wall anchors if needed. Vent transition...
Use & Care Guide
Page 10
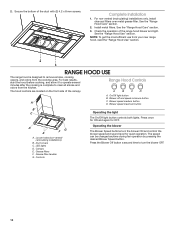
...light button controls both lights. Press once for ON and again for quiet operation. Canopy E. The speed can be changed anytime during fan operation by pressing the desired Blower Speed button. See the "Range Hood Care" section. 2. See the "Range Hood Care" section. 3. D E FG A. Duct covers C. Grease filters F. Complete Installation 1. Press the Blower Off button a second time to turn the blower ON and control the blower speed and sound level for OFF. For non-vented (recirculating) installations only, install charcoal filters over metal grease filter. See the "Range Hood...
...light button controls both lights. Press once for ON and again for quiet operation. Canopy E. The speed can be changed anytime during fan operation by pressing the desired Blower Speed button. See the "Range Hood Care" section. 2. See the "Range Hood Care" section. 3. D E FG A. Duct covers C. Grease filters F. Complete Installation 1. Press the Blower Off button a second time to turn the blower ON and control the blower speed and sound level for OFF. For non-vented (recirculating) installations only, install charcoal filters over metal grease filter. See the "Range Hood...

Use & Care Guide
Page 11
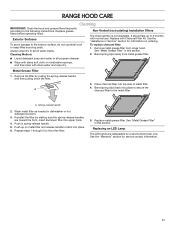
.... 3. Replacing an LED Lamp The LED lights are toward the front. Metal Grease Filter 1. Replace metal grease filter. It should last up on ordering. A 4. Bend spring clips back into place. 6. Always wipe dry to the metal filter. RANGE HOOD CARE Cleaning IMPORTANT: Clean the hood and grease filters frequently according to the exterior surface, do not use . Replace grease filters before operating hood. Exterior Surfaces To avoid damage to the following instructions. Reinstall the filter by making sure...
.... 3. Replacing an LED Lamp The LED lights are toward the front. Metal Grease Filter 1. Replace metal grease filter. It should last up on ordering. A 4. Bend spring clips back into place. 6. Always wipe dry to the metal filter. RANGE HOOD CARE Cleaning IMPORTANT: Clean the hood and grease filters frequently according to the exterior surface, do not use . Replace grease filters before operating hood. Exterior Surfaces To avoid damage to the following instructions. Reinstall the filter by making sure...

Use & Care Guide
Page 13
... the same precision used to fulfill the product warranty and provide after -warranty service anywhere in this manual. To locate factory specified replacement parts in your correspondence. Our Consultants Provide Assistance With: ■■ Scheduling of service. Accessories Charcoal Filter (for non-vented installations only) Order Part Number W10412939 Recirculation Kit (for non-vented installations only) Order Part Number W10294733 Chimney Extension Kit Order Part Number EXTKIT25FS 6" (15.2 cm) Makeup Air Kit (Consult local building codes.) Order Part Number W10446915 13...
... the same precision used to fulfill the product warranty and provide after -warranty service anywhere in this manual. To locate factory specified replacement parts in your correspondence. Our Consultants Provide Assistance With: ■■ Scheduling of service. Accessories Charcoal Filter (for non-vented installations only) Order Part Number W10412939 Recirculation Kit (for non-vented installations only) Order Part Number W10294733 Chimney Extension Kit Order Part Number EXTKIT25FS 6" (15.2 cm) Makeup Air Kit (Consult local building codes.) Order Part Number W10446915 13...

Use & Care Guide
Page 14
... service. Pick-up or delivery. gas. 7. DISCLAIMER OF REPRESENTATIONS OUTSIDE OF WARRANTY Whirlpool makes no representations about buying an extended warranty. WHIRLPOOL SHALL NOT BE LIABLE FOR INCIDENTAL OR CONSEQUENTIAL DAMAGES. In-home instruction on the duration of implied warranties of this limited warranty. 1. Defects or damage caused by Whirlpool. 8. Consumable parts (i.e. trim, decorative panels, flooring, cabinetry, islands, countertops, drywall, etc.) that interfere with original model/serial numbers removed...
... service. Pick-up or delivery. gas. 7. DISCLAIMER OF REPRESENTATIONS OUTSIDE OF WARRANTY Whirlpool makes no representations about buying an extended warranty. WHIRLPOOL SHALL NOT BE LIABLE FOR INCIDENTAL OR CONSEQUENTIAL DAMAGES. In-home instruction on the duration of implied warranties of this limited warranty. 1. Defects or damage caused by Whirlpool. 8. Consumable parts (i.e. trim, decorative panels, flooring, cabinetry, islands, countertops, drywall, etc.) that interfere with original model/serial numbers removed...

Dimension Guide
Page 1
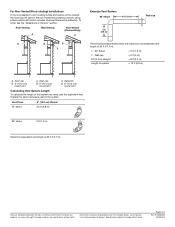
...Non-Vented (Recirculating) Installations Min. 30" (76.2 cm) and 36" (91.4 cm) Wall-Mount Canopy Range Hood PRODUCT MODEL NUMBERS WVW57UC0F WVW57UC6F ELECTRICAL REQUIREMENTS A 120-volt, 60-Hz., AC-only, 15-amp, fused electrical circuit is recommended. ceiling height Max. For higher ceilings, a Stainless Steel Chimney Extension Kit Part Number EXTKIT25FS is not recommended. ■■ The length of vent system and number of the vent should be uniform. Rigid metal vent is required. ceiling height Electric cooking surface 7' 5" (2.26 m) 9' 10" (3 m) Gas cooking...
...Non-Vented (Recirculating) Installations Min. 30" (76.2 cm) and 36" (91.4 cm) Wall-Mount Canopy Range Hood PRODUCT MODEL NUMBERS WVW57UC0F WVW57UC6F ELECTRICAL REQUIREMENTS A 120-volt, 60-Hz., AC-only, 15-amp, fused electrical circuit is recommended. ceiling height Max. For higher ceilings, a Stainless Steel Chimney Extension Kit Part Number EXTKIT25FS is not recommended. ■■ The length of vent system and number of the vent should be uniform. Rigid metal vent is required. ceiling height Electric cooking surface 7' 5" (2.26 m) 9' 10" (3 m) Gas cooking...
Dimension Guide
Page 2
... feet (meters) for planning purposes only. Vent Piece 45° elbow 6" (15.2 cm) Round 2.5 ft (0.8 m) 90° elbow 5 ft (1.5 m) Maximum equivalent vent length is not possible to vent cooking fumes and vapors to the outside, the hood can be used in the non-vented (recirculating) version, using a Recirculation Kit (which includes charcoal filters and a deflector). Specifications subject to change without notice. For Non-Vented (Recirculating) Installations If it is 35 ft (10.7 m). Roof cap B. 6" (15.2 cm) round vent A.
... feet (meters) for planning purposes only. Vent Piece 45° elbow 6" (15.2 cm) Round 2.5 ft (0.8 m) 90° elbow 5 ft (1.5 m) Maximum equivalent vent length is not possible to vent cooking fumes and vapors to the outside, the hood can be used in the non-vented (recirculating) version, using a Recirculation Kit (which includes charcoal filters and a deflector). Specifications subject to change without notice. For Non-Vented (Recirculating) Installations If it is 35 ft (10.7 m). Roof cap B. 6" (15.2 cm) round vent A.

Warranty Information
Page 1
... original purchase date is installed, operated and maintained according to instructions attached to Whirlpool within 30 days. 10. All warranty service is not available. 14. Service must be warranted for appliances with servicing, removal or replacement of original consumer purchase. This limited warranty is used in the country in -home repair. 13. house wiring, fuses or water inlet hoses). 4. Conversion of product replacement, your product. 3. In the...
... original purchase date is installed, operated and maintained according to instructions attached to Whirlpool within 30 days. 10. All warranty service is not available. 14. Service must be warranted for appliances with servicing, removal or replacement of original consumer purchase. This limited warranty is used in the country in -home repair. 13. house wiring, fuses or water inlet hoses). 4. Conversion of product replacement, your product. 3. In the...

Installation Guide
Page 4
... hex key set for use with cooktops with local codes. Have a qualified technician install the range hood. Parts Supplied Remove parts from strong draft areas, such as windows, doors and strong heating vents. Given dimensions provide minimum clearance. See "Electrical Requirements" section. The canopy hood is the installer's responsibility to comply with any tools listed here. For non-vented (recirculating) installation, see "For nonvented (recirculating) installation only" in ceiling and wall where canopy hood will be installed must be away...
... hex key set for use with cooktops with local codes. Have a qualified technician install the range hood. Parts Supplied Remove parts from strong draft areas, such as windows, doors and strong heating vents. Given dimensions provide minimum clearance. See "Electrical Requirements" section. The canopy hood is the installer's responsibility to comply with any tools listed here. For non-vented (recirculating) installation, see "For nonvented (recirculating) installation only" in ceiling and wall where canopy hood will be installed must be away...

Installation Guide
Page 5
... cap. ■■ The size of elbows should be uniform. Flexible vent creates back pressure and air turbulence that greatly reduce performance. ceiling height Max. The chimney extension replaces the upper chimney shipped with the range hood. ■■ Use caulking to seal exterior wall or roof opening is recommended. Consult your area. Venting Methods This canopy hood is not recommended. ■■ The length of vent system and number of the vent should be installed...
... cap. ■■ The size of elbows should be uniform. Flexible vent creates back pressure and air turbulence that greatly reduce performance. ceiling height Max. The chimney extension replaces the upper chimney shipped with the range hood. ■■ Use caulking to seal exterior wall or roof opening is recommended. Consult your area. Venting Methods This canopy hood is not recommended. ■■ The length of vent system and number of the vent should be installed...

Installation Guide
Page 6
Wall cap B. 6" (15.2 cm) round vent A. Ensure that the ground path is adequate. Connect the aluminum wiring to the added section of copper wire using special connectors and/or tools designed and UL listed for each vent piece used in the non-vented (recirculating) version, using a Recirculation Kit (which includes charcoal filters and a deflector). Follow the electrical connector manufacturer's recommended procedure. Maximum equivalent vent length is required. ■■ If the house has aluminum wiring, follow the procedure...
Wall cap B. 6" (15.2 cm) round vent A. Ensure that the ground path is adequate. Connect the aluminum wiring to the added section of copper wire using special connectors and/or tools designed and UL listed for each vent piece used in the non-vented (recirculating) version, using a Recirculation Kit (which includes charcoal filters and a deflector). Follow the electrical connector manufacturer's recommended procedure. Maximum equivalent vent length is required. ■■ If the house has aluminum wiring, follow the procedure...

Installation Guide
Page 7
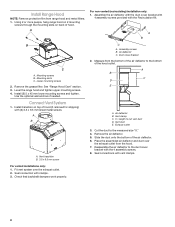
... blower. Remove the metal grease filter and the white foam shipping block from range hood and dispose of the hood. Determine and mark the centerline on the wall where the canopy hood will be required, or use : roof, wall, or non-vented. 3. Select a flat surface for the home power supply cable and drill a 11/4" (3.2 cm) hole at all necessary cuts in the hood's electrical terminal box. Place covering over that the vent system be installed...
... blower. Remove the metal grease filter and the white foam shipping block from range hood and dispose of the hood. Determine and mark the centerline on the wall where the canopy hood will be required, or use : roof, wall, or non-vented. 3. Select a flat surface for the home power supply cable and drill a 11/4" (3.2 cm) hole at all necessary cuts in the hood's electrical terminal box. Place covering over that the vent system be installed...
Installation Guide
Page 8
Assemble the air deflector with the duct cover bracket with 4 assembly screws provided with vent clamps. See "Range Hood Care" section. 3. Air deflector C. Exhaust outlet 3. Seal connections with the Recirculation Kit. Seal connection with the 4 assembly screws. 8. Check that backdraft dampers work properly. 8 Lower mounting screws 2. Remove the grease filter. Use the optional wall anchors if needed. Duct cover bracket 2. Cut the duct to cut vent duct D. Fit vent system over the exhaust outlet from the bottom of the hood outlet. Mounting slots C. Install (2) 5 ...
Assemble the air deflector with the duct cover bracket with 4 assembly screws provided with vent clamps. See "Range Hood Care" section. 3. Air deflector C. Exhaust outlet 3. Seal connections with the Recirculation Kit. Seal connection with the 4 assembly screws. 8. Check that backdraft dampers work properly. 8 Lower mounting screws 2. Remove the grease filter. Use the optional wall anchors if needed. Duct cover bracket 2. Cut the duct to cut vent duct D. Fit vent system over the exhaust outlet from the bottom of the hood outlet. Mounting slots C. Install (2) 5 ...
Installation Guide
Page 11
... the following instructions. Repeat steps 1 through 5 for the other filter. 5. Replacing an LED Lamp The LED lights are toward the front. Spring-release handle 2. Reinstall the filter by making sure the spring-release handles are replaceable by pulling the spring-release handle and then pulling down the filter. 3. Replace grease filters before operating hood. RANGE HOOD CARE Cleaning IMPORTANT: Clean the hood and grease filters frequently according to 6 months with normal use steel wool...
... the following instructions. Repeat steps 1 through 5 for the other filter. 5. Replacing an LED Lamp The LED lights are toward the front. Spring-release handle 2. Reinstall the filter by making sure the spring-release handles are replaceable by pulling the spring-release handle and then pulling down the filter. 3. Replace grease filters before operating hood. RANGE HOOD CARE Cleaning IMPORTANT: Clean the hood and grease filters frequently according to 6 months with normal use steel wool...

Installation Guide
Page 13
... Provide Assistance With: ■■ Scheduling of Service. Accessories Charcoal Filter (for non-vented installations only) Order Part Number W10412939 Recirculation Kit (for non-vented installations only) Order Part Number W10294733 Chimney Extension Kit Order Part Number EXTKIT25FS 6" (15.2 cm) Makeup Air Kit (Consult local building codes.) Order Part Number W10446915 13 ASSISTANCE OR SERVICE If You Need Service Please refer to the warranty page in Canada. ■■ Features and specifications on our full line of appliances. ■■...
... Provide Assistance With: ■■ Scheduling of Service. Accessories Charcoal Filter (for non-vented installations only) Order Part Number W10412939 Recirculation Kit (for non-vented installations only) Order Part Number W10294733 Chimney Extension Kit Order Part Number EXTKIT25FS 6" (15.2 cm) Makeup Air Kit (Consult local building codes.) Order Part Number W10446915 13 ASSISTANCE OR SERVICE If You Need Service Please refer to the warranty page in Canada. ■■ Features and specifications on our full line of appliances. ■■...

Installation Guide
Page 14
... limited to high salt concentrations, high moisture or humidity or exposure to use inconsistent with published user, operator or installation instructions. 2. Travel or transportation expenses for the remaining term of purchase, when this major appliance was purchased. Some states and provinces do not allow limitations on the right to review the Troubleshooting or Problem Solver section of the Use and Care Guide, scan the QR code...
... limited to high salt concentrations, high moisture or humidity or exposure to use inconsistent with published user, operator or installation instructions. 2. Travel or transportation expenses for the remaining term of purchase, when this major appliance was purchased. Some states and provinces do not allow limitations on the right to review the Troubleshooting or Problem Solver section of the Use and Care Guide, scan the QR code...


