
User Manual
Page 5
... first 1 Charging the battery 2 Inserting the battery 2 Important battery information 3 Turning the camera on and off 4 Setting the date and time 5 Checking camera status in capture mode 5 Storing pictures on an SD/MMC card 6 Using optional lenses 6 2 Taking pictures and videos 7 Taking a picture 7 Taking a video 8 Reviewing the picture or video just taken 9 Using optical zoom 9 Using digital zoom 10 Camera modes 10 Using the flash 15 Shooting close-up and landscape pictures 17 Using exposure bracketing 18 Using burst 19 Changing picture-taking settings 20 Using setup to...
... first 1 Charging the battery 2 Inserting the battery 2 Important battery information 3 Turning the camera on and off 4 Setting the date and time 5 Checking camera status in capture mode 5 Storing pictures on an SD/MMC card 6 Using optional lenses 6 2 Taking pictures and videos 7 Taking a picture 7 Taking a video 8 Reviewing the picture or video just taken 9 Using optical zoom 9 Using digital zoom 10 Camera modes 10 Using the flash 15 Shooting close-up and landscape pictures 17 Using exposure bracketing 18 Using burst 19 Changing picture-taking settings 20 Using setup to...

User Manual
Page 6
... 6 Transferring and printing pictures 42 Transferring pictures/videos with the USB cable 42 Printing pictures from your computer 43 Ordering prints online 43 Printing from an optional SD/MMC card 43 Printing without a computer 43 7 Troubleshooting 44 Camera problems 44 Computer/connectivity problems 45 Picture quality problems 46 Camera ready light status 46 8 Getting help 48 Helpful links 48 Telephone customer support 49 9 Appendix 50 Camera specifications 50 Tips, safety, maintenance 52 Storage capacities 53 Power-saving features 54 Upgrading your software and firmware...
... 6 Transferring and printing pictures 42 Transferring pictures/videos with the USB cable 42 Printing pictures from your computer 43 Ordering prints online 43 Printing from an optional SD/MMC card 43 Printing without a computer 43 7 Troubleshooting 44 Camera problems 44 Computer/connectivity problems 45 Picture quality problems 46 Camera ready light status 46 8 Getting help 48 Helpful links 48 Telephone customer support 49 9 Appendix 50 Camera specifications 50 Tips, safety, maintenance 52 Storage capacities 53 Power-saving features 54 Upgrading your software and firmware...

User Manual
Page 11
...Kodak EasyShare software may update the camera clock when you turn on the camera or if the battery is removed for details. Flash Landscape/Close-up Date stamp Album name Zoom: digital telephoto wide Burst Picture size Compression Pictures/time remaining Image storage AF mode Focus zone Exposure metering White balance ISO Battery Camera mode Aperture Shutter speed Flash compensation Exposure compensation www.kodak.com/go/support 5 Setting the date & time, anytime 1 Turn on the camera screen indicate the active camera and picture settings. Press setting. See EasyShare software Help...
...Kodak EasyShare software may update the camera clock when you turn on the camera or if the battery is removed for details. Flash Landscape/Close-up Date stamp Album name Zoom: digital telephoto wide Burst Picture size Compression Pictures/time remaining Image storage AF mode Focus zone Exposure metering White balance ISO Battery Camera mode Aperture Shutter speed Flash compensation Exposure compensation www.kodak.com/go/support 5 Setting the date & time, anytime 1 Turn on the camera screen indicate the active camera and picture settings. Press setting. See EasyShare software Help...
User Manual
Page 13
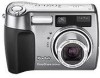
... the Shutter button halfway to set the exposure and focus. 4 When the ready light turns green, continue pressing the Shutter button completely down to turn off when you can adjust the viewfinder sharpness to your preference. 1 Look through the viewfinder. 2 Using your finger, recompose the scene, and return to Auto . (See page 10 for other mode descriptions.) The camera screen displays the mode name and description. When the ready light blinks green, the picture...
... the Shutter button halfway to set the exposure and focus. 4 When the ready light turns green, continue pressing the Shutter button completely down to turn off when you can adjust the viewfinder sharpness to your preference. 1 Look through the viewfinder. 2 Using your finger, recompose the scene, and return to Auto . (See page 10 for other mode descriptions.) The camera screen displays the mode name and description. When the ready light blinks green, the picture...
User Manual
Page 14
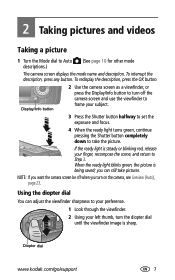
... camera screen as a viewfinder, framing marks indicate where the camera is accomplished. NOTE: Framing marks do not appear in the scene. 1 With the camera screen on, press the Shutter button halfway and hold it for more than 2 seconds to begin recording. When the framing marks turn green, focus is focusing. You can change optical zoom before (but not during) video recording. 8 www.kodak.com/go/support Taking a video 1 Turn the Mode dial to Video . 2 Use...
... camera screen as a viewfinder, framing marks indicate where the camera is accomplished. NOTE: Framing marks do not appear in the scene. 1 With the camera screen on, press the Shutter button halfway and hold it for more than 2 seconds to begin recording. When the framing marks turn green, focus is focusing. You can change optical zoom before (but not during) video recording. 8 www.kodak.com/go/support Taking a video 1 Turn the Mode dial to Video . 2 Use...
User Manual
Page 15
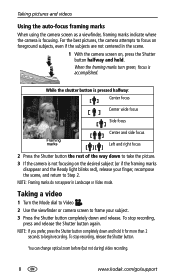
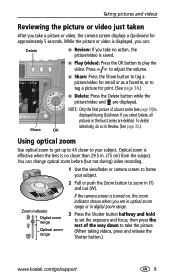
... the picture or video is displayed, you take a picture or video, the camera screen displays a Quickview for print. (See page 38.) Share ■ Delete: Press the Delete button while the picture/video and are in optical zoom range or in digital zoom range. 3 Press the Shutter button halfway and hold to set the exposure and focus, then press the rest of a burst series (see page 19) is no action, the picture/video is saved. ■ Play (video): Press...
... the picture or video is displayed, you take a picture or video, the camera screen displays a Quickview for print. (See page 38.) Share ■ Delete: Press the Delete button while the picture/video and are in optical zoom range or in digital zoom range. 3 Press the Shutter button halfway and hold to set the exposure and focus, then press the rest of a burst series (see page 19) is no action, the picture/video is saved. ■ Play (video): Press...
User Manual
Page 16
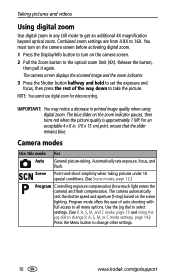
... menu options. The camera screen displays the zoomed image and the zoom indicator. 3 Press the Shutter button halfway and hold to set the exposure and focus, then press the rest of auto shooting with full access to turn on the zoom indicator pauses, then turns red when the picture quality is approximately 1 MP. Camera modes Use this mode For Auto General picture-taking pictures under 16 special conditions. (See Scene modes, page 12.) Program Controlling exposure compensation (how much light enters the camera) and flash...
... menu options. The camera screen displays the zoomed image and the zoom indicator. 3 Press the Shutter button halfway and hold to set the exposure and focus, then press the rest of auto shooting with full access to turn on the zoom indicator pauses, then turns red when the picture quality is approximately 1 MP. Camera modes Use this mode For Auto General picture-taking pictures under 16 special conditions. (See Scene modes, page 12.) Program Controlling exposure compensation (how much light enters the camera) and flash...

User Manual
Page 19
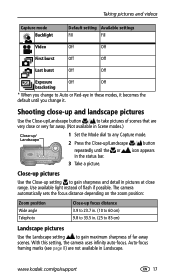
... aperture settings make the foreground sharp and background blurry; less bright: -0.5, -1.0). Higher settings are in bright light. Taking pictures and videos Use this SCN mode For Children Action pictures of children in shadow or "backlit" (when light is behind the subject). Backlight Subjects that are more sensitive to 2 EV in 0.3 EV steps. P, A, S, M, and C mode Aperture Shutter speed Exposure compensation Flash compensation Mode setting Aperture-also known as f-stop, controls the size of the lens opening...
... aperture settings make the foreground sharp and background blurry; less bright: -0.5, -1.0). Higher settings are in bright light. Taking pictures and videos Use this SCN mode For Children Action pictures of children in shadow or "backlit" (when light is behind the subject). Backlight Subjects that are more sensitive to 2 EV in 0.3 EV steps. P, A, S, M, and C mode Aperture Shutter speed Exposure compensation Flash compensation Mode setting Aperture-also known as f-stop, controls the size of the lens opening...
User Manual
Page 23
... camera uses infinity auto-focus. www.kodak.com/go/support 17 icon appears 3 Take a picture. Use available light instead of scenes that are not available in these modes, it . Taking pictures and videos Capture mode Backlight Default setting Available settings Fill Fill Video Off Off First burst Off Off Last burst Off Off Exposure Off Off bracketing * When you change to Auto or Red-eye in Landscape. The camera automatically sets the focus distance depending on the zoom position: Zoom...
... camera uses infinity auto-focus. www.kodak.com/go/support 17 icon appears 3 Take a picture. Use available light instead of scenes that are not available in these modes, it . Taking pictures and videos Capture mode Backlight Default setting Available settings Fill Fill Video Off Off First burst Off Off Last burst Off Off Exposure Off Off bracketing * When you change to Auto or Red-eye in Landscape. The camera automatically sets the focus distance depending on the zoom position: Zoom...

User Manual
Page 28
... icon)- Selectable-zone -move the focus brackets to give an even picture focus. no need an exact exposure of a specific area in Video mode. 22 www.kodak.com/go/support Accessory Lens AF -uses TTL-AF when optional accessory lenses are attached. The setting is pressed halfway down to focus. Ideal for backlit subjects. This setting remains until you change it . Continuous AF (default; AF Control Choose an auto-focus setting. Multi-zone (default...
... icon)- Selectable-zone -move the focus brackets to give an even picture focus. no need an exact exposure of a specific area in Video mode. 22 www.kodak.com/go/support Accessory Lens AF -uses TTL-AF when optional accessory lenses are attached. The setting is pressed halfway down to focus. Ideal for backlit subjects. This setting remains until you change it . Continuous AF (default; AF Control Choose an auto-focus setting. Multi-zone (default...

User Manual
Page 29
..., antique look.) NOTE: EasyShare software also lets you turn the Mode dial or turn the camera screen on . This setting remains until you change it . If not, the camera uses internal memory. Available only in Video mode. Sharpness Control picture sharpness. Set Album (Still) Choose Album names. This setting remains until you change a black-and-white or sepia picture to its default settings. Unavailable in Auto mode. Reset P, A, S, M, or C mode to color. Internal Memory-the camera always uses internal memory, even if a card is on or off...
..., antique look.) NOTE: EasyShare software also lets you turn the Mode dial or turn the camera screen on . This setting remains until you change it . If not, the camera uses internal memory. Available only in Video mode. Sharpness Control picture sharpness. Set Album (Still) Choose Album names. This setting remains until you change a black-and-white or sepia picture to its default settings. Unavailable in Auto mode. Reset P, A, S, M, or C mode to color. Internal Memory-the camera always uses internal memory, even if a card is on or off...
User Manual
Page 32
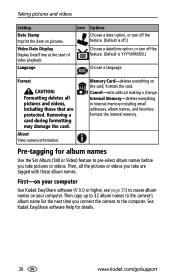
... View camera information. Removing a card during formatting may damage the card. formats the internal memory. Cancel-exits without making a change. Video Date Display Display Date/Time at the start of video playback. Pre-tagging for details. 26 www.kodak.com/go/support See Kodak EasyShare software Help for album names Use the Set Album (Still or Video) feature to pre-select album names before you connect the camera to create album names on pictures. Taking pictures and videos Setting Date Stamp Imprint the date on your computer. Format CAUTION: Formatting deletes all...
... View camera information. Removing a card during formatting may damage the card. formats the internal memory. Cancel-exits without making a change. Video Date Display Display Date/Time at the start of video playback. Pre-tagging for details. 26 www.kodak.com/go/support See Kodak EasyShare software Help for album names Use the Set Album (Still or Video) feature to pre-select album names before you connect the camera to create album names on pictures. Taking pictures and videos Setting Date Stamp Imprint the date on your computer. Format CAUTION: Formatting deletes all...
User Manual
Page 39
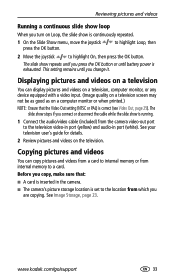
... a card to internal memory or from which you copy, make sure that the Video Out setting (NTSC or PAL) is correct (see Video Out, page 25). This setting remains until you press the OK button or until you change it. Reviewing pictures and videos Running a continuous slide show loop When you connect or disconnect the cable while the slide show is running. 1 Connect the audio/video cable (included) from the camera video...
... a card to internal memory or from which you copy, make sure that the Video Out setting (NTSC or PAL) is correct (see Video Out, page 25). This setting remains until you press the OK button or until you change it. Reviewing pictures and videos Running a continuous slide show loop When you connect or disconnect the cable while the slide show is running. 1 Connect the audio/video cable (included) from the camera video...
User Manual
Page 47
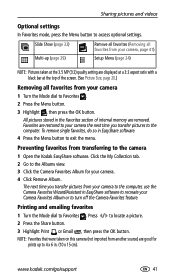
... My Collection tab. 2 Go to the Albums view. 3 Click the Camera Favorites Album for prints up (page 29) Remove all favorites (Removing all favorites from your camera the next time you transfer pictures from transferring to exit the menu. Preventing favorites from your camera to the computer, use the Camera Favorites Wizard/Assistant in EasyShare software. 4 Press the Menu button to the camera 1 Open the Kodak EasyShare software. The next time you transfer pictures to access optional settings.
... My Collection tab. 2 Go to the Albums view. 3 Click the Camera Favorites Album for prints up (page 29) Remove all favorites (Removing all favorites from your camera the next time you transfer pictures from transferring to exit the menu. Preventing favorites from your camera to the computer, use the Camera Favorites Wizard/Assistant in EasyShare software. 4 Press the Menu button to the camera 1 Open the Kodak EasyShare software. The next time you transfer pictures to access optional settings.

User Manual
Page 50
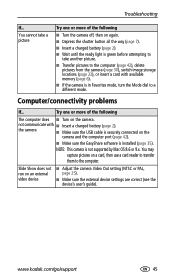
... controls do not function ■ Remove, then reinsert the battery. ■ Insert a charged battery. ■ Place the camera on again. The camera screen does not turn off , then on a Kodak EasyShare camera or printer dock (sold separately), then try again. ■ Connect the camera to Troubleshooting information, see Liveview (Auto), page 23. black screen is ■ Set the Orientation Sensor (page 25). Additional technical information is on the Kodak EasyShare software CD. To change as needed...
... controls do not function ■ Remove, then reinsert the battery. ■ Insert a charged battery. ■ Place the camera on again. The camera screen does not turn off , then on a Kodak EasyShare camera or printer dock (sold separately), then try again. ■ Connect the camera to Troubleshooting information, see Liveview (Auto), page 23. black screen is ■ Set the Orientation Sensor (page 25). Additional technical information is on the Kodak EasyShare software CD. To change as needed...
User Manual
Page 51
... PAL, page 25). ■ Make sure the external device settings are correct (see the device's user's guide). Troubleshooting If... www.kodak.com/go/support 45 not communicate with available memory (page 6). ■ If the camera is in Favorites mode, turn the Mode dial to the computer (page 42), delete pictures from the camera (page 30), switch image storage locations (page 23), or insert a card with ■ Insert a charged battery (page 2).
... PAL, page 25). ■ Make sure the external device settings are correct (see the device's user's guide). Troubleshooting If... www.kodak.com/go/support 45 not communicate with available memory (page 6). ■ If the camera is in Favorites mode, turn the Mode dial to the computer (page 42), delete pictures from the camera (page 30), switch image storage locations (page 23), or insert a card with ■ Insert a charged battery (page 2).

User Manual
Page 54
... help Helpful links Camera links Get support for your product (FAQs, troubleshooting information, etc.) www.kodak.com/go/dx7440support Purchase camera accessories (camera www.kodak.com/go/dx7440accessories docks, printer docks, lenses, cards, etc.) Download the latest camera software and www.kodak.com/go/dx7440downloads firmware Software links Get information on EasyShare software Get help with the Windows operating system and working with digital pictures www.kodak.com/go/easysharesw or click the Help button in the EasyShare software www.kodak...
... help Helpful links Camera links Get support for your product (FAQs, troubleshooting information, etc.) www.kodak.com/go/dx7440support Purchase camera accessories (camera www.kodak.com/go/dx7440accessories docks, printer docks, lenses, cards, etc.) Download the latest camera software and www.kodak.com/go/dx7440downloads firmware Software links Get information on EasyShare software Get help with the Windows operating system and working with digital pictures www.kodak.com/go/easysharesw or click the Help button in the EasyShare software www.kodak...
User Manual
Page 58
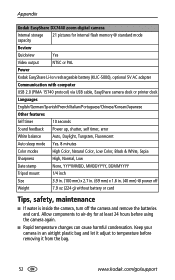
.... Appendix Kodak EasyShare DX7440 zoom digital camera Internal storage capacity 21 pictures for internal flash memory @ standard mode Review Quickview Yes Video output NTSC or PAL Power Kodak EasyShare Li-Ion rechargeable battery (KLIC-5000), optional 5V AC adapter Communication with computer USB 2.0 (PIMA 15740 protocol) via USB cable, EasyShare camera dock or printer dock Languages English/German/Spanish/French/Italian/Portuguese/Chinese/Korean/Japanese Other features Self timer 10 seconds Sound feedback Power up, shutter, self timer, error White balance Auto, Daylight...
.... Appendix Kodak EasyShare DX7440 zoom digital camera Internal storage capacity 21 pictures for internal flash memory @ standard mode Review Quickview Yes Video output NTSC or PAL Power Kodak EasyShare Li-Ion rechargeable battery (KLIC-5000), optional 5V AC adapter Communication with computer USB 2.0 (PIMA 15740 protocol) via USB cable, EasyShare camera dock or printer dock Languages English/German/Spanish/French/Italian/Portuguese/Chinese/Korean/Japanese Other features Self timer 10 seconds Sound feedback Power up, shutter, self timer, error White balance Auto, Daylight...

User Manual
Page 63
... reviewing videos, 28 Canadian compliance, 56 caring for your camera, 52 charging battery via charger, 2 lights, battery charger, 2 children, 13 clock, setting, 5 close-up, 12 scenes, 17 close-up pictures, 17 color mode, 23 compression, 21 computer connecting camera, 42 transfer to, 42 connector for camera dock, ii contents, camera box, 1 copy pictures card to memory, 33 memory to card, 33 to computer via USB cable, 42 custom, 11 custom exposure mode, 20 customer support, 49 D date setting, 5 date stamp, 26 default, reset to, 23 deleting...
... reviewing videos, 28 Canadian compliance, 56 caring for your camera, 52 charging battery via charger, 2 lights, battery charger, 2 children, 13 clock, setting, 5 close-up, 12 scenes, 17 close-up pictures, 17 color mode, 23 compression, 21 computer connecting camera, 42 transfer to, 42 connector for camera dock, ii contents, camera box, 1 copy pictures card to memory, 33 memory to card, 33 to computer via USB cable, 42 custom, 11 custom exposure mode, 20 customer support, 49 D date setting, 5 date stamp, 26 default, reset to, 23 deleting...
User Manual
Page 67
..., 4 U upgrading software, firmware, 55 URLs, Kodak web sites, 48 USB (universal serial bus) connection location, ii transferring pictures, 42 Index V VCCI compliance, 56 video length, 24 out, 25 size, 24 video date display, 26 videos checking settings, 28 copying, 33 deleting, 30 emailing tagged, 39 reviewing, 28 storage capacities, 54 transfer to computer, 42 viewing, 28 viewfinder, i, ii viewing picture after taking, 9, 28 magnified, 30 viewing picture, video information, 34 W white balance, 21 Windows computers installing software, 36 wrist strap post, i Z zoom digital...
..., 4 U upgrading software, firmware, 55 URLs, Kodak web sites, 48 USB (universal serial bus) connection location, ii transferring pictures, 42 Index V VCCI compliance, 56 video length, 24 out, 25 size, 24 video date display, 26 videos checking settings, 28 copying, 33 deleting, 30 emailing tagged, 39 reviewing, 28 storage capacities, 54 transfer to computer, 42 viewing, 28 viewfinder, i, ii viewing picture after taking, 9, 28 magnified, 30 viewing picture, video information, 34 W white balance, 21 Windows computers installing software, 36 wrist strap post, i Z zoom digital...


