User Manual
Page 7
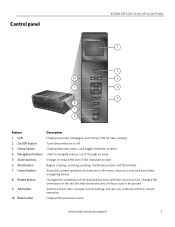
Control panel KODAK ESP 5200 Series All-in-One Printer ESP 5250 1 All-in-One-Printer 2 Back Home 10 3 9 OK 4 Rotate Back Home MS SD/HC MMC 8 Zoom Rotate 5 Cancel 7 Start 6 Feature 1 LCD 2 On/Off button 3 Home button 4 Navigation buttons ... Rotate button 9 OK button 10 Back button Description Displays pictures, messages, and menus; with the current operation Displays the previous screen www.kodak.com/go/aiosupport 2 returns to be printed Selects a menu item, accepts a zoom setting, and lets you continue with the zoom function, changes the orientation of the red box...
Control panel KODAK ESP 5200 Series All-in-One Printer ESP 5250 1 All-in-One-Printer 2 Back Home 10 3 9 OK 4 Rotate Back Home MS SD/HC MMC 8 Zoom Rotate 5 Cancel 7 Start 6 Feature 1 LCD 2 On/Off button 3 Home button 4 Navigation buttons ... Rotate button 9 OK button 10 Back button Description Displays pictures, messages, and menus; with the current operation Displays the previous screen www.kodak.com/go/aiosupport 2 returns to be printed Selects a menu item, accepts a zoom setting, and lets you continue with the zoom function, changes the orientation of the red box...
User Manual
Page 15
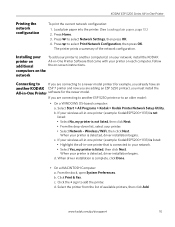
... list of the network configuration. www.kodak.com/go/aiosupport 10 Press Home. 3. The printer prints a summary of available printers, then click Add. If you are adding an ESP 5250 printer), you are connecting to another ESP 5250 printer or to an older model: • On a WINDOWS OS-based computer: a. If your wireless all-in-one printer (example: KodakESP5200+1133) is listed...
... list of the network configuration. www.kodak.com/go/aiosupport 10 Press Home. 3. The printer prints a summary of available printers, then click Add. If you are adding an ESP 5250 printer), you are connecting to another ESP 5250 printer or to an older model: • On a WINDOWS OS-based computer: a. If your wireless all-in-one printer (example: KodakESP5200+1133) is listed...


